📖 B. INTRODUCTION
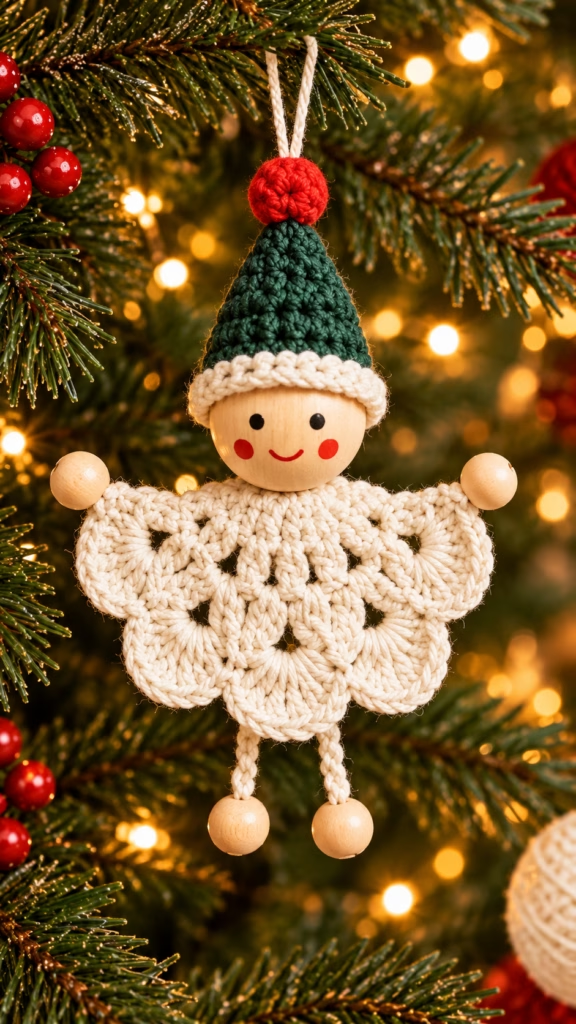
There is something incredibly special about holiday decor that blends soft yarn with natural elements. This Woodland Angel ornament captures that cozy, rustic aesthetic perfectly, featuring a beautifully textured crochet dress that doubles as delicate wings. The use of a smooth wooden bead for the face brings a minimalist, Waldorf-inspired charm that stands out beautifully against the dark green branches of a Christmas tree.
Whether you are looking to create a set of cohesive ornaments for your own home, craft thoughtful handmade gifts for teachers and neighbors, or add a special touch to your holiday wrapping as a gift topper, this project is quick and highly rewarding. The mixed-media approach means you get to enjoy a bit of crochet, a bit of knot-tying, and some fun, simple assembly.
You can easily personalize these little guardians by changing the yarn colors to match your seasonal palette—swap the traditional green and red hat for icy blues, metallic golds, or even neutral earthy tones. Because it uses very little yarn, it is also a fantastic stash-buster for those partial skeins of cotton you have left over from larger projects.
🔍 C. MAIN PATTERN OVERVIEW
This pattern is designed in several quick, modular components that are assembled at the end to create the final figure:
- The Body/Wings: Crocheted flat in rows radiating from a central point, utilizing expanding double crochet rows finished with a scalloped shell border to mimic a beautiful angelic dress and wings.
- The Winter Hat: A cone-shaped cap crocheted in continuous rounds from the top down, finished with a contrasting textured brim and topped with a tiny, brightly colored pom-pom.
- The Limbs: Created using simple cotton cord or twine, knotted through small wooden beads for a floppy, rustic look.
- The Head: A pre-painted (or hand-painted) large wooden bead that anchors the entire design.
🎯 D. SKILL LEVEL
Easy to Intermediate
This project is very approachable for confident beginners who are comfortable with basic stitch combinations.
Specific techniques utilized include:
- Working in the round (magic ring, continuous rounds)
- Working flat in rows
- Basic increases and decreases
- Shell stitches (working multiple stitches into a single space)
- Mixed-media assembly and basic knot tying
📏 E. FINISHED SIZE
When made with the recommended DK or light worsted weight cotton yarn and a 3.5mm hook, the finished angel measures approximately 5 inches (12.5 cm) tall from the top of the pom-pom to the bottom of the wooden bead feet, with a wingspan of about 4.5 inches (11.5 cm).
Note: The size will vary depending on your yarn weight, hook size, tension, and the size of the wooden beads you select. Using worsted weight yarn and a larger bead will yield a slightly larger ornament.
🧮 F. GAUGE
Gauge is not strictly critical for this ornament. However, it is important that your stitches for the hat are tight enough so that the cone shape holds its structure, and the stitches for the body should be neat to showcase the shell definition.
Suggested Gauge: 5 sc x 5 rows = 1 inch (2.5 cm) using a 3.5mm hook.
🧶 G. REQUIRED YARN AMOUNTS
This is a fantastic scrap-busting project. Exact yardage will vary, but estimates for a single ornament are:
- Main Color (Cream/White): Approximately 15-20 yards for the body and hat brim.
- Contrast Color 1 (Forest Green): Approximately 10-15 yards for the hat.
- Contrast Color 2 (Cherry Red): Approximately 3-5 yards for the pom-pom.
🧰 H. MATERIALS
- Hook: 3.5mm (US E/4) crochet hook
- Yarn: DK or Light Worsted weight cotton yarn (e.g., Paintbox Yarns Cotton DK or Ricorumi DK) in Cream, Green, and Red.
- Large Wooden Bead: One 25mm round wooden bead for the head (pre-painted with a face, or plain to paint yourself).
- Small Wooden Beads: Four 10mm round wooden beads for the hands and feet.
- Cord/Twine: A length of 2mm macrame cord, strong twine, or braided cotton string for the limbs.
- Hanger: A 6-inch piece of thin metallic string or white twine for hanging.
- Tools: Yarn needle, sharp scissors, stitch marker.
- Adhesive: Hot glue gun or strong craft glue (for securing the hat and string).
- ⚠️ Safety Note: This item contains small beads and long cords. It is intended as a decorative ornament, not a toy for young children or pets.
🔤 I. ABBREVIATIONS – US TERMS
- MR: Magic Ring
- ch: chain
- st(s): stitch(es)
- sl st: slip stitch
- sc: single crochet
- dc: double crochet
- tr: treble crochet
- inc: increase (2 sc in the same stitch)
- dec: invisible decrease (sc 2 stitches together)
- BLO: back loop only
- FO: fasten off
📝 J. NOTES BEFORE YOU BEGIN
- Continuous Rounds vs. Rows: The Hat and Pom-Pom are worked in continuous, unjoined rounds. Use a stitch marker to mark the first stitch of each round. The Body/Wings are worked flat in turned rows.
- Shell Stitch: The final row of the body creates a scalloped edge. A shell in this pattern consists of 5 double crochets worked into a single stitch.
- Assembly Logic: Because the head is a wooden bead, we do not crochet a neck. Instead, we use the limb cords threaded through the center of the crochet body to secure everything together underneath the head.
🪡 K. COMPLETE PATTERN
🎓 Hat
Use Green yarn.
R1: MR, 4 sc in ring. (4)
R2: (1 sc, inc) x 2. (6)
R3: (2 sc, inc) x 2. (8)
R4: (3 sc, inc) x 2. (10)
R5: (4 sc, inc) x 2. (12)
R6: (5 sc, inc) x 2. (14)
R7: (6 sc, inc) x 2. (16)
R8: (7 sc, inc) x 2. (18)
R9: (8 sc, inc) x 2. (20)
R10: 1 sc in each st around. (20)
Change to Cream yarn. Fasten off the Green yarn.
R11: Working in BLO for this round only: (sc in next st, ch 1) in every st around. (20 sc, 20 ch-1 spaces) FO Cream yarn, weave in all ends. The ch-1 spaces create a lightly textured, rolled brim.
🔴 Hat Pom-Pom
Use Red yarn.
R1: MR, 5 sc in ring. (5)
R2: inc in each st around. (10)
R3: 1 sc in each st around. (10)
R4: dec x 5. (5)
FO, leaving a long tail for sewing. You do not need to stuff this piece; gently flatten it into a ball shape and use the tail to sew it securely to the very tip of the Green Hat.
👗 Angel Body & Wings
Use Cream yarn. This piece is worked flat in rows.
Row 1: MR. ch 3 (counts as first dc here and throughout), 6 dc in ring. Pull ring tight, but do not join. Turn. (7 dc) Row 2: ch 3, 1 dc in the very first st (base of ch-3). 2 dc in each remaining st across, placing the final 2 dc in the top of the turning chain from the previous row. Turn. (14 dc) Row 3: ch 3, 1 dc in the first st. 1 dc in the next st. (2 dc in next st, 1 dc in next st) repeat across to the end. Turn. (21 dc) Row 4 (Shell Border): ch 1, 1 sc in the first st. Skip 1 st, 5 dc in the next st, skip 1 st, 1 sc in the next st. Repeat the sequence between the * * 4 more times across the row. Note on Row 4: You will create exactly 5 shell scallops. The outer two scallops serve as the wings, while the middle three create the drape of the dress. FO and weave in ends.
🦵 Limbs (Arms & Legs)
Use Cord/Twine.
Legs: Cut a 7-inch (18 cm) piece of cord. Thread a small 10mm wooden bead onto each end. Tie a secure double knot at the very tips of the cord to keep the beads from sliding off. Trim any fraying edges below the knot. Arms: Cut a 6-inch (15 cm) piece of cord. Repeat the same process with the remaining two 10mm wooden beads, tying knots at the ends.
🎨 L. STYLING / ASSEMBLY / STABILITY / FINAL SHAPING
The magic of this pattern happens during the mixed-media assembly. Follow these steps sequentially for the cleanest finish.
- Prepare the Head: If your 25mm bead is not pre-painted, use acrylic paint or fine-tip markers to draw two small black eyes, a gentle curved smile, and two round red cheeks. Let it dry completely.
- Attach the Legs to the Body: Take your 7-inch Leg cord (with beads already attached). Fold it in half to find the center loop. Push this center loop through the Magic Ring hole at the top (Row 1) of your Cream Body piece from the front to the back.
- Attach the Arms: Take your 6-inch Arm cord. Pass it straight through the loop of the leg cord protruding from the back of the Body’s Magic Ring. Pull the leg cord tight from the front—this will trap the arm cord firmly against the back of the crochet body, instantly creating hanging legs and horizontal arms! Add a tiny drop of hot glue inside the magic ring to lock the cords in place permanently.
- Mount the Head: Apply a dab of hot glue to the top center of the Cream Body (right over the magic ring) and firmly press the large wooden bead head onto it, ensuring the face is pointing directly forward.
- Attach the Hat: Apply a thin ring of hot glue along the inside bottom edge of the Green Hat. Press it firmly onto the top of the wooden bead head. The textured white brim should sit just above the painted eyes.
- Add the Hanger: Thread a tapestry needle with your hanging string. Pass it carefully through the top of the Red pom-pom (or just below it through the green tip). Tie the ends in a secure knot to create a hanging loop.
✅ Final Finishing Checklist:
- ✅ Face is centered and pointing in the same direction as the curve of the body shells.
- ✅ Arm cord is sitting horizontally and evenly distributed on both sides.
- ✅ Leg cords hang straight down behind the center shell.
- ✅ Hat is completely secure and the glue is hidden.
- ✅ Hanging loop is perfectly centered so the angel hangs upright without tilting.
💡 M. HELPFUL CROCHET TIPS
- 💡 Yarn Choice Matters: A mercerized cotton or firm macrame cord works best for the body because it gives the shells beautiful, crisp stitch definition and helps the wings hold their flat shape.
- 💡 Hide the Knots: When tying off your hanging loop, spin the string so the knot is hidden directly inside the pom-pom.
- 💡 Perfect Beads: Check the hole size of your wooden beads before purchasing your cord; make sure the cord is thick enough to look proportionate but thin enough to pass through the bead holes.
- 💡 Blocking the Wings: If your angel’s body is curling slightly, give it a quick blast of steam from an iron and press it flat with your hands before assembly.
- 💡 Invisible Glue: When applying hot glue to yarn, use a low-temp glue gun to avoid melting acrylic fibers (if you substituted yarn) and apply it sparingly to prevent it from oozing through the stitches.
- 💡 Customizing the Face: If you are painting the face yourself, practice on a scrap piece of paper first. A toothpick dipped in black paint makes perfectly round, consistent dots for eyes.
🧼 N. CARE INSTRUCTIONS
Because this ornament utilizes natural, unfinished wooden elements and adhesive, do not submerge it in water or put it in a washing machine.
- To clean: Use a dry, soft-bristled brush (like a clean makeup brush) to dust the yarn and beads before packing them away after the holidays.
- Spot cleaning: If the yarn gets stained, use a slightly damp cloth with a tiny amount of mild soap and gently dab the affected area. Avoid getting the wooden beads wet, as water can cause the wood to swell or the painted face to bleed.
- Storage: Store in a dry box, preferably wrapped in tissue paper to keep the white/cream yarn pristine year after year.
❓ R. FAQ
❓ Can I use acrylic yarn instead of cotton?
Yes, you can absolutely use acrylic yarn! Just keep in mind that acrylic tends to be softer and fuzzier. The wings might not lay quite as stiffly, but it will still look adorable and festive.
❓ What if I can’t find wooden beads with faces already on them? Plain wooden beads are widely available at craft stores. You can easily draw the face yourself using ultra-fine point permanent markers or a small paintbrush and acrylic paint.
❓ My angel’s hat keeps leaning to one side, how do I fix this?
This usually happens if the hat isn’t glued flush to the round bead. Before gluing, make sure the bottom round of the hat is completely flat. Hold the hat firmly in place for at least 30 seconds while the glue sets completely.
❓ Can I make this larger to use as a tree topper?
Yes! To scale this up, use bulky weight yarn (or hold two strands of worsted yarn together) with a larger hook (like a 5.5mm or 6.0mm). You will also need to source a significantly larger wooden bead for the head and thicker macrame rope for the limbs to maintain the proportions.
❓ How do I stop the wooden beads from falling off the arms and legs? Make sure the knot you tie at the end of the cord is larger than the hole in the bead. If your cord is thin, you may need to tie a double or triple knot. Alternatively, a tiny drop of super glue inside the bead hole before sliding it down to the knot will keep it permanently secured.