📖 INTRODUCTION
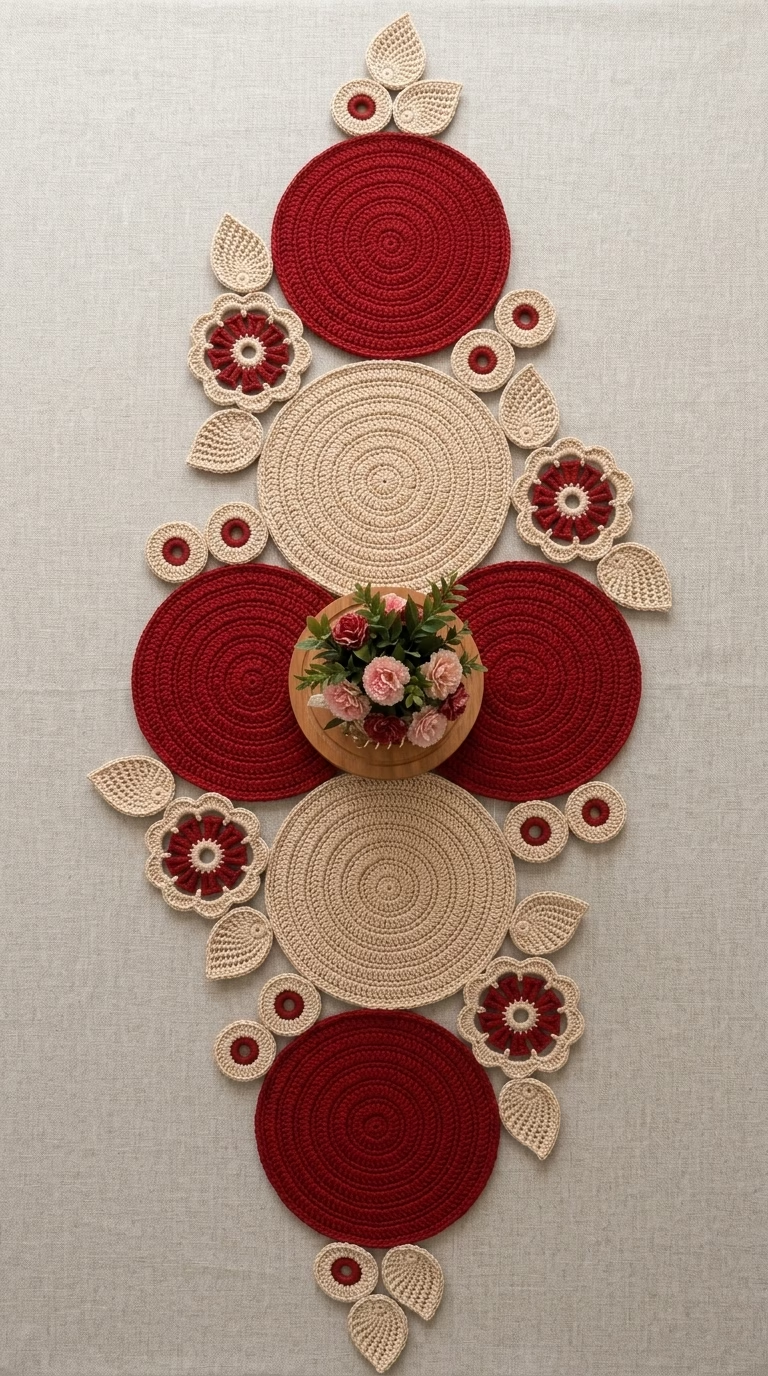
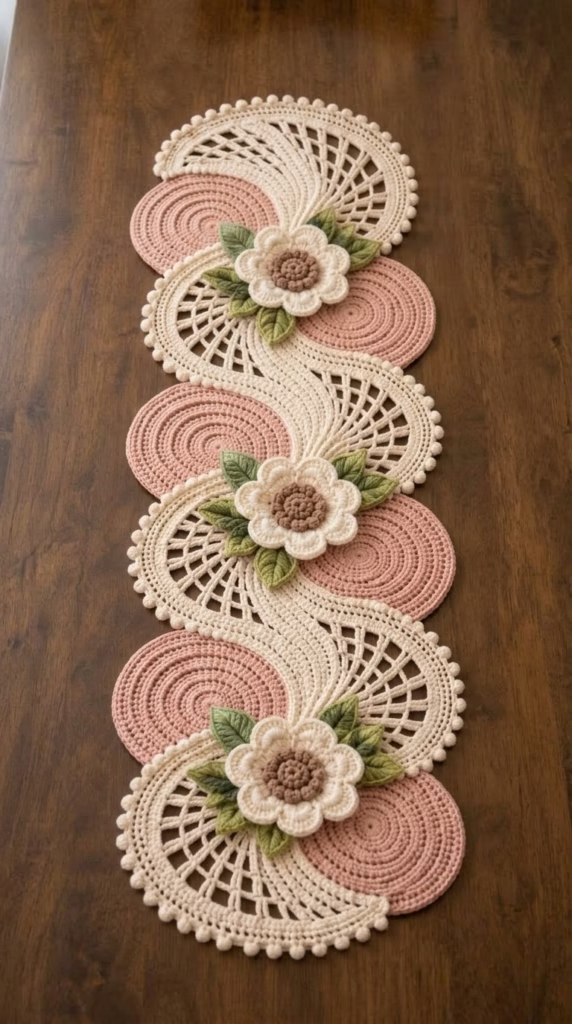
Transform your dining space with the Blushing Bloom Serpentine Table Runner, a striking geometric and floral design that brings incredible texture and movement to any surface. Unlike traditional linear runners, this pattern uses a clever modular approach—joining perfectly calculated semi-circles back-to-back—to create a natural, undulating wave that sweeps down the center of your table.
This project is a spectacular way to showcase advanced crochet techniques without feeling overwhelmed. By breaking the design down into repeating solid pink and lacy cream motifs, the construction remains approachable while delivering a highly sophisticated result. The alternating dense and openwork textures create a beautiful visual balance, reminiscent of vintage filet crochet but updated with modern, crisp blocking.
Nestled in the natural curves of the runner are dimensional, rustic blossoms. With their textured brown centers and plush cream petals framed by olive green leaves, these flowers anchor the wave and give the piece a romantic, finished look. It makes a breathtaking seasonal centerpiece, a memorable handmade wedding gift, or a stunning permanent addition to a farmhouse-style dining room. You can easily adapt the colors to match your home decor or extend the length by simply crocheting more semi-circles.
🔍 MAIN PATTERN OVERVIEW
The runner is constructed using a modular join-as-you-go styling. You will crochet two distinct types of large semi-circles: Solid Dusty Pink motifs and Lace Cream motifs. The straight edges of these semi-circles are then sewn together with a 50% offset, creating a continuous, stable wave. Once the main serpentine body is assembled, you will crochet the 3D flowers and ribbed leaves separately, sewing them directly into the “valleys” (the inner curves) where the motifs meet to complete the visual flow.
🎯 SKILL LEVEL
Intermediate
This pattern requires comfort with working flat semi-circles while maintaining perfect stitch counts to ensure the pieces lay perfectly flat.
- Techniques include: Magic Ring, working in rows, double crochet increases, chain-space mesh (filet crochet), bobble/cluster stitches for borders and floral centers, and modular sewing assembly.
📏 FINISHED SIZE
- Length: 48 inches (122 cm)
- Width: 14 inches (35 cm) at the widest point of the wave.
- Size Alterations: The length is fully customizable. Each pair of joined semi-circles adds approximately 7 inches (18 cm) to the total length. Changing your yarn weight or hook size will directly impact the final dimensions. Using a heavier worsted weight yarn will yield a significantly larger and wider runner.
🧮 GAUGE
- Solid Motif Gauge: After Row 4 of the Solid Semi-Circle, the straight edge should measure 4.5 inches (11.5 cm) across.
- While exact gauge is not strictly critical for this project, your tension must remain consistent between the pink solid motifs and the cream lace motifs. If one motif type is crocheted much tighter than the other, the runner will buckle and warp when assembled.
🧶 REQUIRED YARN AMOUNTS
This pattern is designed for DK weight (Category 3) mercerized cotton yarn, which provides the crisp stitch definition and durability needed for a table runner.
- Main Color 1 (Cream/Off-White): Approximately 450 yards (410 m) for the lace motifs and flower petals.
- Main Color 2 (Dusty Pink): Approximately 300 yards (275 m) for the solid motifs.
- Accent Color 1 (Olive Green): Approximately 50 yards (45 m) for the leaves.
- Accent Color 2 (Warm Brown): Approximately 25 yards (23 m) for the flower centers.
🧰 MATERIALS
- Hook: 4.0 mm (US G-6) crochet hook
- Yarn: DK weight mercerized cotton in the four required colors
- Needle: Large-eye tapestry needle for weaving ends and assembly
- Scissors: Sharp craft scissors
- Markers: 6-8 locking stitch markers for pinning the motifs together before sewing
- Blocking Tools: Rust-proof T-pins, blocking mats, and a garment steamer or spray bottle (crucial for flat lace).
🔤 ABBREVIATIONS – US TERMS
- MR: Magic Ring
- ch: chain
- ch-sp: chain space
- sc: single crochet
- hdc: half double crochet
- dc: double crochet
- tr: treble crochet
- sl st: slip stitch
- st(s): stitch(es)
- inc: double crochet increase (2 dc in the same stitch)
- Bobble: 4-dc bobble stitch (Yarn over, insert hook into st, pull up a loop, yarn over, pull through 2 loops. Repeat 3 more times in the same st. Yarn over, pull through all 5 loops on hook.)
- FO: Fasten off
📝 NOTES BEFORE YOU BEGIN
- Turning Chains: The starting chain-3 at the beginning of rows always counts as 1 double crochet.
- Semi-Circle Geometry: We are making exactly half-circles. To ensure they lay flat, each double crochet row increases by exactly 6 stitches. Count your stitches at the end of every row.
- Symmetry: When joining the motifs, the “right side” of every motif should face up. Mark the front of your work with a stitch marker if you have trouble identifying the right side.
- Blocking: The cream lace motifs will naturally curl slightly during construction. Do not panic. Wet blocking or aggressive steam blocking before assembly is required to open up the mesh and flatten the piece.
🪡 COMPLETE PATTERN
🌸 Solid Pink Semi-Circle
Make 4 using Dusty Pink yarn.
Row 1: MR, ch 3, 5 dc in ring. Tighten ring but leave it open in a half-moon shape. Turn. (6 sts)
Row 2: Ch 3, dc in same st (counts as an inc), 2 dc in each of the next 5 sts. Turn. (12 sts)
Row 3: Ch 3, dc in same st, 1 dc in next st. 2 dc in next st, 1 dc in next st across. Turn. (18 sts)
Row 4: Ch 3, dc in same st, 2 dc in next sts. 2 dc in next st, 1 dc in next 2 sts across. Turn. (24 sts)
Row 5: Ch 3, dc in same st, 3 dc in next sts. 2 dc in next st, 1 dc in next 3 sts across. Turn. (30 sts)
Row 6: Ch 3, dc in same st, 4 dc in next sts. 2 dc in next st, 1 dc in next 4 sts across. Turn. (36 sts)
Row 7: Ch 3, dc in same st, 5 dc in next sts. 2 dc in next st, 1 dc in next 5 sts across. Turn. (42 sts)
Row 8: Ch 3, dc in same st, 6 dc in next sts. 2 dc in next st, 1 dc in next 6 sts across. Turn. (48 sts)
Row 9: Ch 3, dc in same st, 7 dc in next sts. 2 dc in next st, 1 dc in next 7 sts across. Turn. (54 sts)
Row 10: Ch 3, dc in same st, 8 dc in next sts. 2 dc in next st, 1 dc in next 8 sts across. Turn. (60 sts)
Row 11: Ch 3, dc in same st, 9 dc in next sts. 2 dc in next st, 1 dc in next 9 sts across. Turn. (66 sts)
Row 12: Ch 3, dc in same st, 10 dc in next sts. 2 dc in next st, 1 dc in next 10 sts across. Turn. (72 sts)
Row 13 (Finishing Edge): Ch 1, sc in each st across the curve. (72 sc).
FO, leaving a long 24-inch tail for assembly sewing.
🕸️ Lace Cream Semi-Circle
Make 5 using Cream/Off-White yarn.
Rows 1-6: Follow Rows 1-6 of the Solid Pink Semi-Circle. (36 sts at end of Row 6) Row 7 (Eyelet Setup): Ch 4 (counts as dc + ch 1), sk first st, dc in next st. Ch 1, sk 1, dc in next st across to the end. Turn. (18 dc, 17 ch-1 sps) Row 8: Ch 3 (counts as dc), 2 dc in next ch-1 sp, dc in next dc across. Turn. (53 sts) Row 9: Ch 3, dc in same st, 1 dc in next 8 sts. 2 dc in next st, 1 dc in next 8 sts across. Turn. (59 sts) Row 10 (Large Mesh): Ch 5 (counts as dc + ch 2), sk 1 st, dc in next st. Ch 2, sk 1 st, dc in next st across. Turn. Row 11: Ch 3, 3 dc in next ch-2 sp, dc in next dc across. Turn. (89 sts) Row 12 (Bobble Border): Ch 1, sc in first st. Ch 3, Bobble st in the first ch made, sk 2 sts on the main row, sc in next st. Repeat from * to end of curve. FO, leaving a long 24-inch tail for assembly sewing.
🌻 3D Dimensional Flowers
Make 3.
🧵 Color Note: Begin with Warm Brown.
Rnd 1: MR, ch 1, 6 sc in ring. Sl st to first sc to join. (6) Rnd 2: Ch 1, 2 sc in each st around. Sl st to join. (12) Rnd 3: Ch 1, 1 sc in next st, 2 sc in next around. Sl st to join. (18) Rnd 4: Ch 2, Bobble st in next st, ch 1, sl st in next st around. (9 Bobbles created for textured center). FO Brown. 🧵 Color Note: Join Cream yarn to the back loops only of Rnd 3. Rnd 5 (Petals): Ch 3, 2 tr in same st, 2 tr in next st, ch 3, sl st in next st. Repeat from * 5 more times to create 6 large, overlapping petals. FO, leaving a long tail for attaching to the runner.
🍃 Ribbed Leaves
Make 6 using Olive Green yarn.
Row 1: Ch 12.
Row 2: Working into the back bumps of the chain: sl st in 2nd ch from hook, sc in next ch, hdc in next ch, dc in next 2 chs, tr in next 2 chs, dc in next 2 chs, hdc in next ch, 3 sc in last ch.
Rotate to work down the opposite side of the foundation chain.
Row 3: Hdc in next ch, dc in next 2 chs, tr in next 2 chs, dc in next 2 chs, hdc in next ch, sc in next ch, sl st in last ch.
FO, leaving a 10-inch tail.
🎨 STYLING / ASSEMBLY / STABILITY / FINAL SHAPING
Correct assembly is what transforms these individual pieces into a structural wave. Work on a large, flat surface.
Step 1: Joining the Motifs Lay out your semi-circles in an alternating pattern: Cream, Pink, Cream, Pink, Cream. Place a Cream motif right-side up. Take a Pink motif and align its straight flat edge against the straight flat edge of the Cream motif. ⚠️ Crucial Alignment: Do not line them up perfectly edge-to-edge. Slide the Pink motif so it is offset by exactly 50%. The center magic ring of the Pink motif should touch the outer straight edge of the Cream motif. Pin them firmly in place. Using the long tails and a tapestry needle, neatly whip stitch the intersecting flat edges together. Repeat this down the line until all 9 motifs form a continuous wavy strip.
Step 2: Attaching the Florals Locate the three “valleys” on the top of the runner (the inner curves where a Pink and Cream motif meet on one side of the wave). ✅ Pin one 3D flower over the intersection point in each of these three valleys. ✅ Tuck two green leaves underneath each flower, angling them outward along the curve of the motifs. Sew the leaves securely to the runner first, then sew the flowers directly on top, catching the back loops of the flower to maintain its 3D popping effect.
Step 3: Final Blocking
Pin the entire runner face-down on blocking mats. Pull the bobble edging taut so the lace mesh opens beautifully. Steam thoroughly and let it dry completely in place.
💡 HELPFUL CROCHET TIPS
- 💡 Count Every Row: Because the flat geometry relies on precise increases, missing just one stitch can cause the motifs to cup or ruffle. Count after every row.
- 💡 Pin Before You Sew: Never try to freehand the motif assembly. Always use locking stitch markers or safety pins to hold the straight edges together at the 50% offset mark before you begin seaming.
- 💡 Seamless Color Transitions: When changing from brown to cream on the flower, make your final slip stitch of the brown round with the cream yarn to ensure the join is practically invisible.
- 💡 Starch for Crispness: If you prefer a stiffer table runner, use a light spray starch during the final blocking phase. It helps the bobbles on the border stand out beautifully.
- 💡 Weave Ends As You Go: This modular pattern generates several tails. Take the time to weave them into the matching colored sections immediately after finishing a piece to save yourself a headache at the end.
- 💡 Invisible Seaming: When whip stitching the flat edges together, pick up only the back loops of the stitches along the straight edge to create a seamless, flat hinge between the motifs.
🧼 CARE INSTRUCTIONS
Because this table runner is made of cotton and features dimensional 3D accents, hand washing is strongly recommended. Soak in cool water with a mild, bleach-free detergent. Do not wring or twist the runner, as this will distort the lace mesh and the overall serpentine wave. Roll the runner in a clean, dry towel and press down gently to remove excess moisture. Reshape the runner on a flat surface, gently fluff the 3D flower petals with your fingers, and lay flat to dry completely. If the lace edges curl after washing, gently press them flat with an iron on a low steam setting, using a pressing cloth to protect the yarn.
❓ FAQ
❓ Can I make this runner longer for a large dining table?
Absolutely. The pattern is completely modular. Simply continue making Pink and Cream semi-circles and joining them at a 50% offset until you reach your desired length. Add more flowers into the resulting valleys as needed.
❓ Can I use acrylic yarn instead of cotton?
While you can, it is not recommended for table runners. Acrylic yarn cannot be wet-blocked as effectively as cotton, meaning the lace sections may not lay as perfectly flat. Acrylic is also susceptible to melting if a hot serving dish is placed on top of it.
❓ Why are my semi-circles rippling like a potato chip?
Rippling occurs when there are too many stitches in a row, or if your tension is noticeably looser than the previous rows. Ensure you are following the stitch counts precisely (increasing by exactly 6 stitches per row) and consider dropping down half a hook size if your gauge remains loose.
❓ How do I hide the seam where the motifs connect?
By offsetting the motifs precisely at the 50% mark and whip stitching only the inner loops of the straight edges, the seam naturally blends into the foundation lines of the motifs. The 3D flowers also purposefully hide the most prominent central intersections.
❓ Can I make this pattern in a single color?
Yes. A single-color version looks incredibly elegant and emphasizes the textural differences between the solid motifs and the lace motifs, though the serpentine wave effect will be more subtle without the color contrast.