📖 B. INTRODUCTION
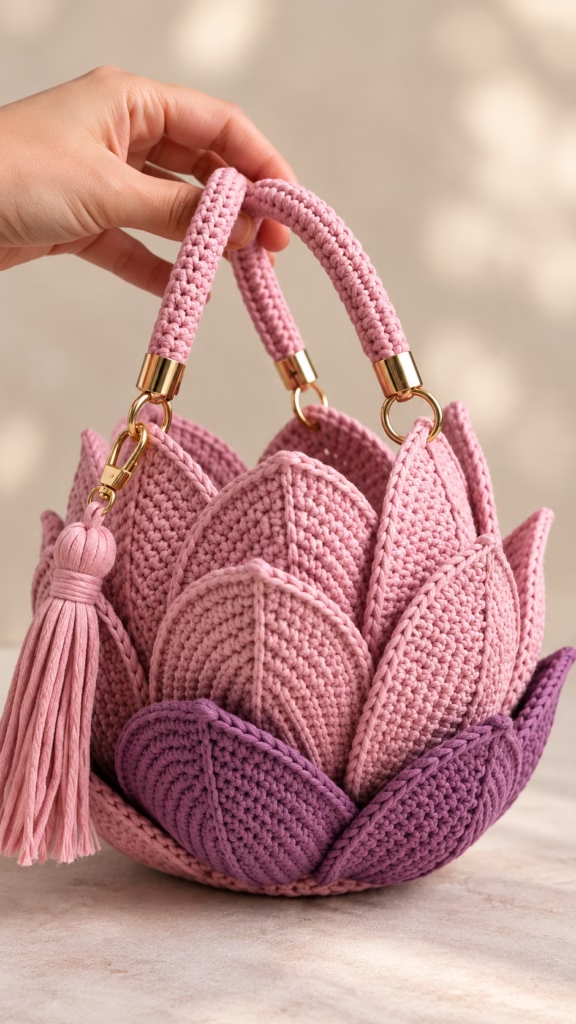
Step into a world of botanical elegance with the Blooming Lotus Blossom Handbag, an original structured handbag designed to capture the breathtaking beauty of a water lily in full bloom. Featuring layered, sculpted petals in rich shades of dusty rose, soft pink, and deep plum, this handbag transforms sturdy cotton yarn into a wearable piece of art. The distinct tiered petals flare outward naturally from a solid circular base, creating a voluminous, sculptural silhouette that holds its shape gracefully whether carried by hand or set down as a decorative accent.
PNG+ 2
Whether you are looking for a showstopping statement piece for a wedding, spring garden party, or formal evening out, this lotus bag delivers both functional storage and head-turning style. It makes a deeply memorable gift for flower lovers, vintage fashion enthusiasts, or anyone who appreciates handcrafted couture. Beyond everyday wear, it doubles as a stunning decorative bowl or centerpiece when placed on a vanity or coffee table.
PNG
What makes this project so rewarding is its clever modular construction. Working with heavy cotton cord or t-shirt yarn, you will stitch a sturdy main bucket body and accent it with structured, ribbed petal appliqués layered in three distinct tiers. Finished with gold-toned O-rings, sturdy handles, and a sweeping statement tassel, this project offers endless possibilities for personalization. Swap out the pink tones for vibrant tropical hues, serene whites, or dark gothic tones to make a piece that is uniquely your own.
PNG+ 2
🔍 C. MAIN PATTERN OVERVIEW
The Blooming Lotus Blossom Handbag consists of a central structural body layered with three dimensional tiers of textured, pointed petals:
PNG
- 🌸 Inner Main Body (Bucket Liner): A firm, dense circular base that transitions into a cylindrical vessel, providing the interior structure, wall stability, and attachment points for hardware and inner petals. PNG
- 🌺 Tier 1: Inner Petals (Upper Layer): 6 large light-rose petals attached to the upper rim of the bag body, forming the soft interior blossom framing. PNG
- 🌸 Tier 2: Middle Petals (Mid Layer): 6 large dusty-pink petals staggered between the inner petals, fanning outward to add volume and realistic petal depth. PNG
- 🪻 Tier 3: Outer Base Petals (Lower Layer): 6 deep-plum base petals attached near the bottom round, cupping the lower half of the handbag in rich contrast. PNG
- 👜 Tubular Wrapped Handles (Make 2): Sturdy corded handles trimmed with polished gold metallic end caps and metal clip-on O-rings attached to the top rim. PNG
- 🪢 Decorative Statement Tassel: A long, thick fringed tassel with a wrapped neck attached via a gold lobster clasp to one handle ring. PNG
🎯 D. SKILL LEVEL
Intermediate
This pattern requires a firm tension and familiarity with working in specialized stitch loops (Back Loop Only / Front Loop Only) to build structure and texture.
PNG
- 🧶 Techniques Included:
- 🔄 Magic Ring (MR) and continuous/joined spiral rounds. PNG
- 🔀 Single crochet (sc), half double crochet (hdc), and double crochet (dc) shaping. PNG
- ➰ Working into chain spaces and chain sps for sharp petal points. PNG
- ⭕ Working in Front Loops Only (FLO) and Back Loops Only (BLO) to create ridged seams and attachment ridges. PNG
- 🪡 Surface slip stitching / central seam embroidery on petals. PNG
- 🔩 Hardware attachment (attaching O-rings, end caps, and clasp). PNG
📏 E. FINISHED SIZE
- 📐 Height (excluding handles): Approximately 8.5 inches (21.5 cm). PNG
- 📐 Total Height (including handles): Approximately 14.5 inches (37 cm). PNG
- 📐 Base Diameter: 7.5 inches (19 cm) across the bottom.
- 📐 Max Width (fanned petals): Approximately 11 inches (28 cm) at the widest petal span. PNG
Note: Finished dimensions may vary slightly depending on your yarn thickness, hook size, and stitch tension. Using a firmer yarn or smaller hook creates a stiffer, slightly more compact bag.
🧮 F. GAUGE
- 🧶 Main Body Gauge (Single Crochet in the Round): 14 sts x 16 rnds = 4″ x 4″ (10 cm x 10 cm) using a 4.0 mm crochet hook and bulky/macramé cotton cord. PNG
- 💡 Gauge Note: Precise gauge is not strictly critical for this accessory, but keeping your tension very firm is essential so that the lotus petals stand upright without flopping. PNG
🧶 G. REQUIRED YARN AMOUNTS
All estimates are based on Category 4 / Worsted Weight (held double) OR Category 5 / Bulky Macramé Cotton Yarn (approx. 3mm cord):
PNG
- 🌸 Color A (Light Dusty Rose – Inner Petals & Body Rim): Approx. 280 yards (256 meters) / 200g. PNG
- 🌺 Color B (Medium Dusty Pink – Middle Petals & Handles): Approx. 310 yards (283 meters) / 220g. PNG
- 🪻 Color C (Deep Plum / Purple – Outer Base Petals): Approx. 210 yards (192 meters) / 150g. PNG
- 🧶 Total Project Yarn Requirement: Approx. 800 yards (731 meters) / 570g.
🧰 H. MATERIALS
- 🪡 Crochet Hook: 4.0 mm (US Size G/6) or 3.5 mm (for extra firm tension). PNG
- 🧶 Yarn: Sturdy macramé cotton cord (3mm), t-shirt yarn, or heavy mercerized cotton yarn in Light Pink, Dusty Rose, and Deep Plum. PNG
- ⭕ Metal Hardware:
- 4 Gold Metal O-Rings (approx. 1.25″ / 32mm outer diameter). PNG
- 4 Gold Metal Cord End Caps / Barrel Connectors. PNG
- 1 Gold Swivel Lobster Clasp (for tassel attachment). PNG
- 🛡️ Plastic Base Shaper (Optional): 7.5″ flexible acrylic or plastic mesh circle for bottom reinforcement.
- 📌 Notions: Stitch markers, large-eye tapestry needle, heavy-duty craft glue (for end caps), sharp scissors, tape measure, sewing pins. PNG
🔤 I. ABBREVIATIONS – US TERMS
- 🧵 ch: chain
- 🧵 sl st: slip stitch
- 🧵 sc: single crochet
- 🧵 hdc: half double crochet
- 🧵 dc: double crochet
- 🧵 tr: treble crochet
- 🧵 inc: increase (2 sc in same st)
- 🧵 dec: decrease (sc2tog)
- 🧵 BLO: back loop only
- 🧵 FLO: front loop only
- 🧵 MR: magic ring
- 🧵 st(s): stitch(es)
- 🧵 rnd(s): round(s)
- 🧵 [ ]: work steps inside brackets into same stitch/space
- 🧵 ( ): total stitch count at the end of the round/row
📝 J. NOTES BEFORE YOU BEGIN
- 🔄 Continuous vs. Joined Rounds: The base and inner body are worked in continuous spiral rounds to avoid visible seam lines. Use a stitch marker to track the start of each round. PNG
- 🧶 Yarn Firmness: For the best structural silhouette, use a non-stretchy cotton yarn or braided cotton cord. If using standard acrylic yarn, hold two strands together with a smaller hook. PNG
- 🪡 Petal Ribbing & Seams: The lotus petals feature a raised central rib down the middle. This is achieved by crocheting around a central chain foundation and executing raised surface slip stitches upon completion. PNG+ 1
- ⚠️ Assembly & Tension: Work petal attachment rounds with tight stitches to ensure the petals hug the main body securely without drooping. PNG
🪡 K. COMPLETE PATTERN
👜 1. Main Structural Bucket Body
Worked from the bottom up in Light Pink / Color A. Creates the internal bucket structure with designated BLO/FLO ridges for attaching external petals.
PNG
- ⭕ Rnd 1: MR 6 sc. (6) PNG
- ⭕ Rnd 2: inc in each st around. (12) PNG
- ⭕ Rnd 3: (1 sc, inc) x6. (18) PNG
- ⭕ Rnd 4: (2 sc, inc) x6. (24) PNG
- ⭕ Rnd 5: (3 sc, inc) x6. (30) PNG
- ⭕ Rnd 6: (4 sc, inc) x6. (36) PNG
- ⭕ Rnd 7: (5 sc, inc) x6. (42) PNG
- ⭕ Rnd 8: (6 sc, inc) x6. (48) PNG
- ⭕ Rnd 9: (7 sc, inc) x6. (54) PNG
- ⭕ Rnd 10: (8 sc, inc) x6. (60) PNG
- ⭕ Rnd 11: (9 sc, inc) x6. (66) PNG
- ⭕ Rnd 12: (10 sc, inc) x6. (72) PNG
- ⭕ Rnd 13: Working in BLO, sc in each st around. (72) (This forms the sharp base edge for attaching outer petals). PNG
- ⭕ Rnds 14-18: sc in each st around. (72) PNG
- ⭕ Rnd 19: Working in BLO, sc in each st around. (72) (Ridge for Middle Petal Layer). PNG
- ⭕ Rnds 20-25: sc in each st around. (72) PNG
- ⭕ Rnd 26: Working in BLO, sc in each st around. (72) (Ridge for Upper Inner Petal Layer). PNG
- ⭕ Rnds 27-30: sc in each st around. (72) PNG
- ⭕ Rnd 31: sl st in each st around. Fasten off and weave in ends. (72) PNG
🌸 2. Upper Inner Petals (Tier 1 – Make 6)
Worked in Color A (Light Pink). These large pointed petals surround the upper rim.
PNG
- 🧵 Foundation: Ch 16. PNG
- 🧵 Row 1: Starting in 2nd ch from hook, sc in next 14 ch, [sc 2, ch 2, sc 2] in last ch st. Working down opposite side of chain: sc in next 14 ch, ch 1, turn. (32 sts + ch-2 sp) PNG
- 🧵 Row 2: sc in next 15 sts, [sc 1, ch 2, sc 1] in ch-2 sp at tip, sc in next 15 sts, ch 1, turn. (34 sts) PNG
- 🧵 Row 3: hdc in next 16 sts, [hdc 1, ch 2, hdc 1] in ch-2 sp, hdc in next 16 sts, ch 1, turn. (36 sts) PNG
- 🧵 Row 4: dc in next 17 sts, [dc 2, ch 2, dc 2] in ch-2 sp, dc in next 17 sts, ch 1, turn. (40 sts) PNG
- 🧵 Row 5 (Edging & Central Rib): sc in each st up to tip, [sc 1, ch 1, sc 1] in ch-2 sp, sc in each st down side. Do not fasten off. PNG
- 🪡 Central Spine Detail: Surface sl st directly down the middle seam line of the petal from tip to base to create the realistic leaf vein texture seen in the photo. Fasten off, leaving a 12″ tail for sewing. PNG+ 1
🌺 3. Middle Layer Petals (Tier 2 – Make 6)
Worked in Color B (Medium Dusty Pink). Slightly wider petals that flare outward from the mid-section.
PNG
- 🧵 Foundation: Ch 18. PNG
- 🧵 Row 1: Starting in 2nd ch from hook, sc in next 16 ch, [sc 2, ch 2, sc 2] in last ch st. Working along opposite side: sc in next 16 ch, ch 1, turn. (36 sts) PNG
- 🧵 Row 2: sc in next 17 sts, [sc 1, ch 2, sc 1] in ch-2 sp, sc in next 17 sts, ch 1, turn. (38 sts) PNG
- 🧵 Row 3: hdc in next 18 sts, [hdc 2, ch 2, hdc 2] in ch-2 sp, hdc in next 18 sts, ch 1, turn. (42 sts) PNG
- 🧵 Row 4: dc in next 19 sts, [dc 2, ch 2, dc 2] in ch-2 sp, dc in next 19 sts, ch 1, turn. (46 sts) PNG
- 🧵 Row 5 (Edging): sc around entire outer edge with [sc 1, ch 2, sc 1] at the pointed tip. PNG
- 🪡 Work surface sl st down center spine. Fasten off with a long sewing tail. PNG
🪻 4. Outer Base Petals (Tier 3 – Make 6)
Worked in Color C (Deep Plum / Purple). Deeply cupped base petals that form the floral foundation.
PNG
- 🧵 Foundation: Ch 16. PNG
- 🧵 Row 1: Starting in 2nd ch from hook, sc in next 14 ch, [sc 2, ch 2, sc 2] in last ch st. Working along opposite side: sc in next 14 ch, ch 1, turn. (32 sts) PNG
- 🧵 Row 2: sc in next 15 sts, [sc 1, ch 2, sc 1] in ch-2 sp, sc in next 15 sts, ch 1, turn. (34 sts) PNG
- 🧵 Row 3: hdc in next 16 sts, [hdc 2, ch 2, hdc 2] in ch-2 sp, hdc in next 16 sts, ch 1, turn. (38 sts) PNG
- 🧵 Row 4: sc in next 18 sts, [sc 1, ch 2, sc 1] in ch-2 sp, sc in next 18 sts. (38 sts) PNG
- 🪡 Complete surface sl st down center spine. Fasten off with long tail. PNG+ 1
👜 5. Tubular Handles (Make 2)
Worked in Color B (Medium Pink) to form smooth, round handles.
PNG
- 🧵 Foundation: Ch 7. Join with sl st to form a small ring. PNG
- 🔄 Rnds 1-45: sc in each st in a continuous spiral until cord measures approx. 12 inches (30 cm) in length. PNG
- 🧵 Finishing: Fasten off. Slide gold barrel connectors / end caps over each end. Attach gold O-rings through the end loops/caps. PNG+ 1
🪢 6. Statement Hanging Tassel
Worked in Color B (Medium Pink) with gold hardware.
PNG
- ✂️ Cut 30 strands of yarn, each 14 inches long. PNG
- 🪢 Fold strands in half through the loop of a gold swivel lobster clasp. PNG
- 🧵 Wrap a 20-inch strand tightly around the top neck of the tassel (approx. 1 inch below clasp) to form a neat wrapped collar. Secure with a hidden knot and trim fringe evenly to approx. 6 inches. PNG+ 1
🎨 L. STYLING / ASSEMBLY / STABILITY / FINAL SHAPING
  [ Tier 1: Inner Petals ]  ---> Attached to Rnd 26 FLO Ridge
  [ Tier 2: Middle Petals ] ---> Staggered on Rnd 19 FLO Ridge
  [ Tier 3: Base Petals ]   ---> Cupped around Rnd 13 Base Ridge
📌 Assembly Steps:
- Tier 1 (Inner Light Pink Petals): Pin 6 inner petals evenly spaced around the exposed Front Loops of Rnd 26 on the main body. Stitch securely across the bottom edge of each petal using tapestry needle. PNG+ 1
- Tier 2 (Middle Dusty Pink Petals): Pin 6 middle petals around the Front Loops of Rnd 19, positioning each petal so its center aligns directly between the gaps of two upper petals for an authentic staggered blossom look. PNG
- Tier 3 (Outer Plum Petals): Pin 6 plum petals around the bottom base ridge (Rnd 13). Stagger them relative to Tier 2 so they cup the bottom nicely. PNG+ 1
- Hardware Attachment: Sew four sturdy reinforcement tabs (ch 6, 3 rows of sc) evenly spaced around the top interior rim. Loop each tab through a gold O-ring attached to the handles and stitch tightly. PNG+ 1
- Tassel Clip: Clip the statement tassel onto the front-left O-ring connector. PNG
💡 M. HELPFUL CROCHET TIPS
- 💡 Tip 1: Use a smaller hook than recommended on yarn labels to ensure stiff, self-supporting petal structures. PNG
- 💡 Tip 2: For ultimate bag stability, insert a circular plastic canvas disc inside the bottom base before stitching the lower wall.
- 💡 Tip 3: Block your individual petals with steam or spray before assembling to ensure sharp points and smooth flat edges. PNG
- 💡 Tip 4: When stitching surface sl sts down the petal centers, keep tension relaxed so the petals do not pucker up. PNG
- 💡 Tip 5: Secure metal hardware end caps with a drop of fabric or jewel glue inside the cap before clamping or sewing down.
- 💡 Tip 6: Staggering petals evenly is key to achieving a realistic lotus flower silhouette. Use locking stitch markers to plan placement prior to sewing. PNG
🧼 N. CARE INSTRUCTIONS
- 🧼 Spot Cleaning: Gently dab soiled areas with a soft cloth dampened with mild soapy water. Do not submerge metal hardware in water. PNG
- 🧼 Drying: Air dry flat in a shaded area. Reshape petals by hand while damp. PNG
- 🧼 Storage: Stuff the interior vessel with tissue paper when storing to maintain its round cylindrical shape and keep petals crisp. PNG
❓ R. FAQ
- ❓ Q: Can I use acrylic yarn instead of cotton cord?
- A: Yes, but you should hold two strands of worsted weight acrylic yarn together with a 3.5mm hook to achieve the necessary structure and firmness. PNG
- ❓ Q: How do I make the bag larger?
- A: Continue expanding the base (Rnds 1-12) by adding additional increase rounds before working upward, and increase petal foundation chains proportionally. PNG
- ❓ Q: Are the handles strong enough for everyday items?
- A: Absolutely! The tubular sc handles reinforced with metal hardware connectors provide excellent durability for carrying everyday essentials like keys, phone, and wallet. PNG
- ❓ Q: Can I add a fabric lining to this bag?
- A: Yes, sewing a simple cylindrical fabric lining with a drawstring top into the inner main body adds extra security for small personal items. PNG
- ❓ Q: How long does this project take to complete?
- A: Most intermediate crocheters complete this multi-piece structured bag in approximately 10 to 14 hours.