📖 B. INTRODUCTION
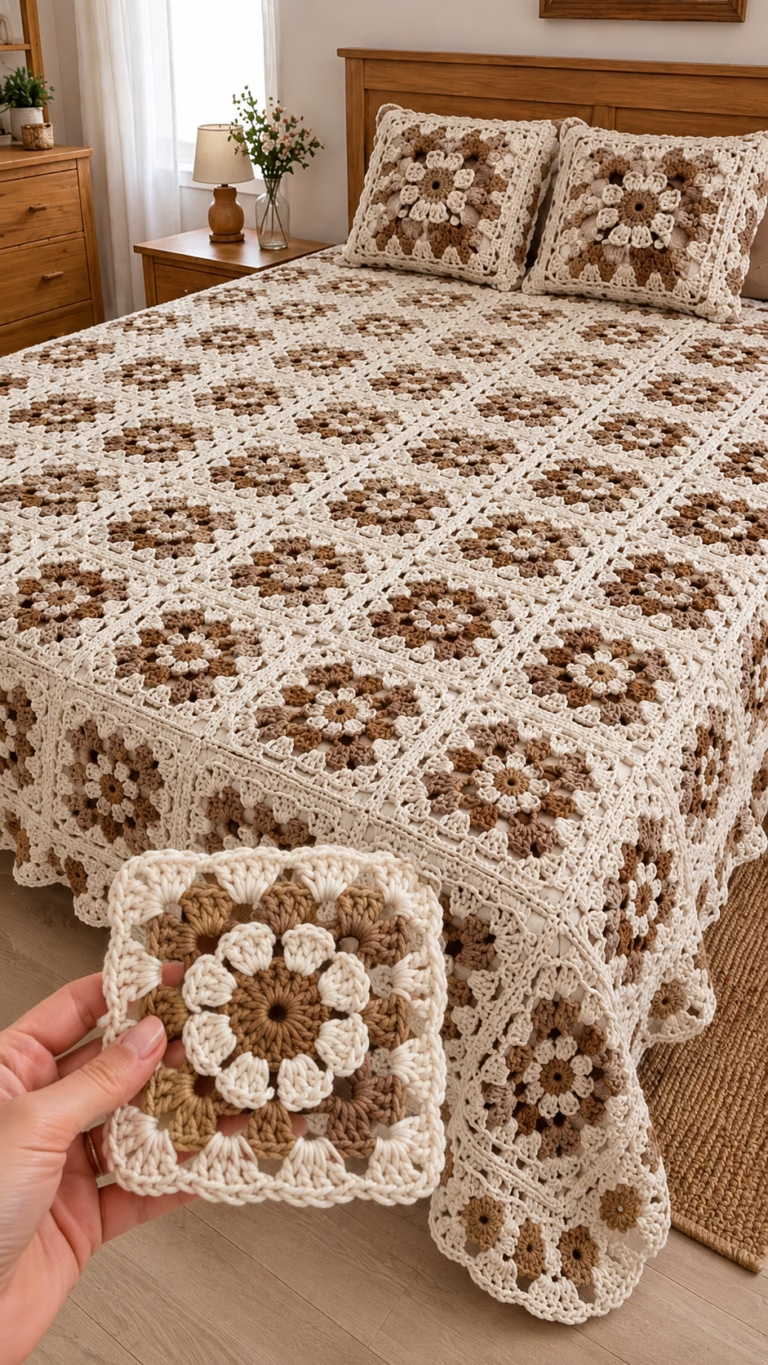
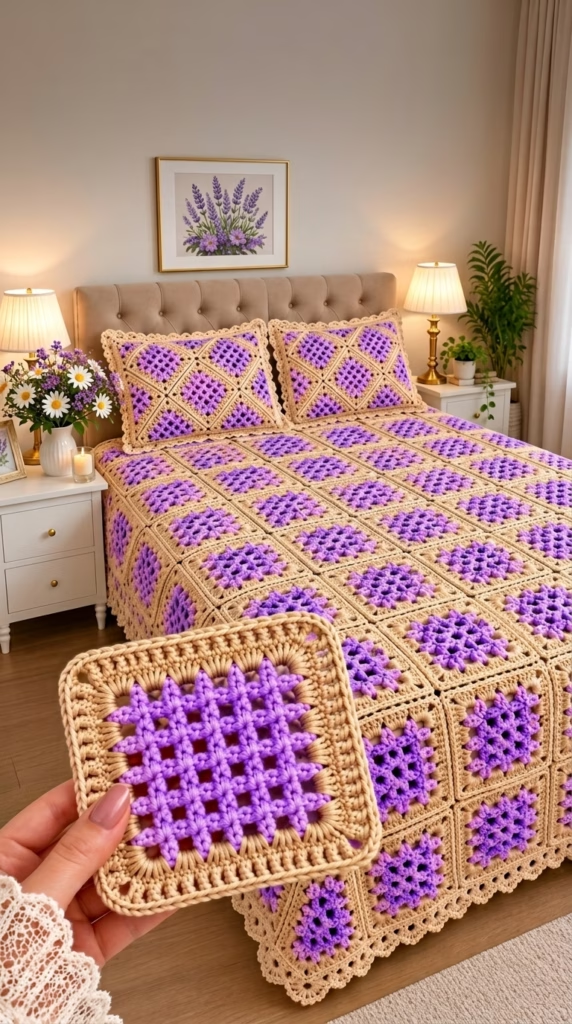
Transform your bedroom into a serene sanctuary with the Lavender Lattice Dream Blanket & Pillow Set. This heirloom-quality design features a captivating two-tone geometric motif, blending deep violet and soft lavender lattice centers with warm beige framing. Inspired by the soothing aesthetic of French lavender fields, the raised criss-cross lattice texture creates a luxurious, tactile surface that elevates any room’s decor.
Whether you are crafting a full-sized bed coverlet, a cozy couch throw, or matching accent pillow shams, this modular pattern allows for effortless customization. The individual squares are crocheted separately, making it an ideal portable project that you can work on anywhere before joining them into a seamless, majestic blanket finished with a delicate scalloped border.
This project makes an incredible wedding gift, housewarming present, or cherished family heirloom. The structured geometric pattern paired with soft neutral framing adds a timeless touch to modern, farmhouse, or classic interior styles.
🔍 C. MAIN PATTERN OVERVIEW
The Lavender Lattice Dream Set consists of modular square motifs worked from the center outward, then framed with textured border stitches.
- 🟪 The Lattice Motif Square: The core of each motif is a square lattice worked in rich purple/lavender yarn. Raised front-post treble clusters cross over a open mesh grid, creating a 3D woven lattice effect.
- 🌾 The Beige Textured Frame: Each purple center is framed by 3 rounds of beige/tan solid stitches (hdc/dc and back-loop detailing) that square off the motif cleanly, providing structured edges for joining.
- 🛏️ The Bedspread Construction: Squares are joined in a continuous grid using a flat slip-stitch or invisible join method, finished with a multi-tiered scalloped and picot edging along the outer perimeter.
- 🛋️ Matching Pillow Shams: Matching accent pillows feature 4 diagonal or 4 straight-joined motifs on the front, backed with a solid fabric or crocheted panel, and edged with the same decorative scallops.
🎯 D. SKILL LEVEL
Intermediate
While the construction of individual squares is straightforward, this project utilizes post stitches, color switching, precise joining, and multi-round edging.
- 🟣 Magic Ring & Working in the Round
- 🟣 Front Post Treble Crochet ($fptr$) for lattice crossovers
- 🟣 Working in Back Loops Only ($BLO$) for textured framing
- 🟣 Seamless Color Changing
- 🟣 Flat Slip Stitch Joining / Whipstitch Assembly
- 🟣 Scalloped / Shell Border Stitches
📏 E. FINISHED SIZE
- 🟩 Single Square Motif: $8.5 \times 8.5\text{ inches}$ ($21.5 \times 21.5\text{ cm}$)
- 🛋️ Standard Pillow Sham (Front 2×2 motifs): $18 \times 18\text{ inches}$ ($46 \times 46\text{ cm}$)
- 🛏️ Full/Queen Bedspread ($7 \times 8$ Grid = 56 Squares + Border): Approximately $66 \times 74\text{ inches}$ ($168 \times 188\text{ cm}$)
- 💡 Note: You can easily adjust the size of the blanket by adding or removing rows/columns of motifs!
🧮 F. GAUGE
- 📐 Individual Motif Gauge: 1 completed 8-round square motif = $8.5 \times 8.5\text{ inches}$ ($21.5 \times 21.5\text{ cm}$) using a $4.5\text{ mm}$ (US G+/7) hook.
- 📐 Mesh Core Gauge: Rounds 1–5 (Purple Lattice Core) = $5.5 \times 5.5\text{ inches}$ ($14 \times 14\text{ cm}$).
🧶 G. REQUIRED YARN AMOUNTS
Amounts based on Worsted Weight / Aran (#4 Medium) Acrylic or Cotton Blend Yarn (approx. 200 yds / 183 m per 100g skein):
- 💜 Color A (Lavender/Purple – Core Lattice): 12 Skeins / approx. 2,400 yds ($2,195\text{ m}$)
- 🌾 Color B (Warm Beige/Sand – Frame & Edging): 14 Skeins / approx. 2,800 yds ($2,560\text{ m}$)
- 🛋️ For 2 Pillow Shams: Add 3 Skeins Color A + 4 Skeins Color B
🧰 H. MATERIALS
- 🪡 Hook Size: $4.5\text{ mm}$ (US G+/7) crochet hook (or size needed to obtain gauge)
- 🧶 Yarn: Medium Worsted (#4 Weight) soft acrylic, wool, or cotton blend in Violet/Lavender and Warm Beige
- ✂️ Tools: Tapestry needle, sharp scissors, locking stitch markers
- 🛋️ Extras (Optional): $18 \times 18\text{ in}$ pillow inserts for shams, blocking board and rust-proof pins
🔤 I. ABBREVIATIONS – US TERMS
- $ch$ = chain
- $sl\ st$ = slip stitch
- $sc$ = single crochet
- $hdc$ = half double crochet
- $dc$ = double crochet
- $tr$ = treble crochet
- $fptr$ = front post treble crochet
- $BLO$ = back loop only
- $ch\text{-}sp$ = chain space
- $st(s)$ = stitch(es)
- $MR$ = magic ring
- $inc$ = increase (2 sts in same st)
📝 J. NOTES BEFORE YOU BEGIN
- 📌 Construction: Motifs are worked in continuous joined rounds without turning unless specified.
- 📌 Color Changes: Change yarn colors at the final yarn-over of the last stitch of the round.
- 📌 Post Stitches: $fptr$ stitches are worked around the posts of stitches from previous rounds to form the raised front lattice overlay.
- 📌 Blocking: Wet or steam blocking each square to $8.5\text{ in}$ before assembly guarantees straight lines and smooth edge joins.
🪡 K. COMPLETE PATTERN
🟪 Square Motif (Make 56 for Blanket, 4 per Pillow)
💜 Section 1: Purple Lattice Core (Color A)
- R1: With Color A, MR. $ch\ 3$ (counts as $1\ dc$), $2\ dc$ into ring, $ch\ 2$, [$3\ dc$, $ch\ 2$] 3 times into ring. Join with $sl\ st$ to top of $ch\text{-}3$. (12 $dc$, 4 $ch\text{-}2\ sp$)
- R2: $ch\ 3$, $1\ dc$ in next 2 sts. In corner $ch\text{-}2\ sp$ work ($2\ dc, ch\ 2, 2\ dc$). $1\ dc$ in next 3 sts, corner ($2\ dc, ch\ 2, 2\ dc$). Repeat from * to * twice more. Join with $sl\ st$ to top of $ch\text{-}3$. (28 $dc$, 4 $ch\text{-}2\ sp$)
- R3: $ch\ 1$, $sc$ in same st, $ch\ 2$, skip 1 st, $sc$ in next st, $ch\ 2$, skip 1 st, $sc$ in next st. In corner work ($1\ sc, ch\ 2, 1\ sc$). Work ($sc, ch\ 2$, skip 1) across side, corner ($1\ sc, ch\ 2, 1\ sc$). Repeat around. Join with $sl\ st$.
- R4 (Lattice Overlay Round): $ch\ 3$, $fptr$ around post of $dc$ 2 rounds below, $1\ dc$ in $ch\text{-}2\ sp$, $fptr$ around next post 2 rounds below. Repeat around sides, placing ($2\ dc, ch\ 2, 2\ dc$) in each corner $ch\text{-}2\ sp$. Join with $sl\ st$.
- R5: $ch\ 1$, $sc$ in each st around, placing ($2\ sc, ch\ 2, 2\ sc$) in each corner space. Fasten off Color A.
🌾 Section 2: Beige Frame (Color B)
- R6: Join Color B in any corner $ch\text{-}2\ sp$. $ch\ 3$ (counts as $dc$), ($1\ dc, ch\ 2, 2\ dc$) in corner space. $1\ dc$ in $BLO$ of each st across to next corner, corner ($2\ dc, ch\ 2, 2\ dc$) in $ch\text{-}2\ sp$. Repeat from * around. Join with $sl\ st$ to top of $ch\text{-}3$.
- R7: $ch\ 2$ (counts as $hdc$), $1\ hdc$ in each st across, working ($2\ hdc, ch\ 2, 2\ hdc$) in each corner space. Join with $sl\ st$.
- R8: $ch\ 1$, $sc$ in $BLO$ of each st around, working ($1\ sc, ch\ 2, 1\ sc$) in each corner space. Fasten off leaving a tail for joining if using whipstitch, or weave in ends if using slip-stitch join.
👑 Decorative Blanket & Pillow Edging (Color B)
Once all motifs are joined together into the full grid, work the edging around the outer perimeter:
- Border R1: Join Color B in any corner. $ch\ 1$, [$1\ sc, ch\ 2, 1\ sc$] in corner, $sc$ in each st across side (placing $1\ sc$ in each seam). Repeat around all 4 sides. Join.
- Border R2: $ch\ 3$, skip 2 sts, $1\ sc$ in next st. Repeat around, adjusting spacing slightly at corners to fit evenly.
- Border R3 (Scallop Round): In each $ch\text{-}3$ loop work: [$1\ sc, 1\ hdc, 3\ dc, 1\ hdc, 1\ sc$]. Join with $sl\ st$, fasten off, weave in ends.
🎨 L. STYLING / ASSEMBLY / STABILITY / FINAL SHAPING
🧩 Assembly Instructions
- Lay out all 56 squares in a $7 \times 8$ grid on a flat surface, ensuring all lattice motifs face the same direction.
- Right sides facing together, join squares into rows using a flat slip stitch through the back loops only of Color B outer edges.
- Join the horizontal rows together to complete the blanket top.
- Attach Color B to any corner and complete the 3-round Scalloped Border.
🛋️ Pillow Sham Assembly
- Join 4 motifs into a $2 \times 2$ square grid.
- Create a back panel (either a solid $18 \times 18\text{ in}$ $hdc$ square or two overlapping envelope flaps).
- Join front and back panels with wrong sides together using Border R1–R3 around all four edges.
💡 M. HELPFUL CROCHET TIPS
- 💡 Maintain Post Tension: Keep your yarn tension relaxed when working the $fptr$ lattice stitches to prevent the square from puckering inward.
- 💡 Block Early: Steam block your individual squares before assembly; joining pre-blocked squares is 50% faster and much cleaner.
- 💡 Stitch Count Vigilance: Always double-check your st count on Round 8 of each square so joining stays aligned.
- 💡 Color Continuity: Ensure you use the exact same dye lot for Color B beige yarn across all squares and the outer border.
- 💡 Weave as You Go: Weave in purple ends before adding the beige frame to save hours of finishing work at the end!
🧼 N. CARE INSTRUCTIONS
- 🧼 Washing: Hand wash or machine wash on gentle cycle in cold water using a mild wool/delicates detergent.
- 🧼 Drying: Lay flat on dry towels to air dry. Do not tumble dry to prevent fuzzing of the raised post stitches.
- 🧼 Maintenance: Gently reshape edges while damp. Do not iron synthetic fibers directly.
❓ R. FAQ
❓ Can I make this blanket larger or smaller?
Yes! Simply adjust the total number of square motifs. A $5 \times 6$ grid makes a great throw, while a $8 \times 9$ grid fits a King size bed.
❓ What yarn fiber works best for this pattern?
A high-quality 100% acrylic or cotton-acrylic blend in worsted weight offers excellent stitch definition for the lattice while remaining durable and easy to wash.
❓ Do I have to use post stitches for the lattice?
The $fptr$ post stitches give the center its iconic raised 3D criss-cross texture. Replacing them with standard $dc$ will flatten the visual effect.
❓ How long does it take to finish the set?
An individual square takes approximately 25–35 minutes. A complete full-sized blanket and pillow set takes roughly 35–45 hours total.