Tropical Sugar Cookies
Stunning Tropical Luau Decorated Sugar Cookies: A Comprehensive Guide
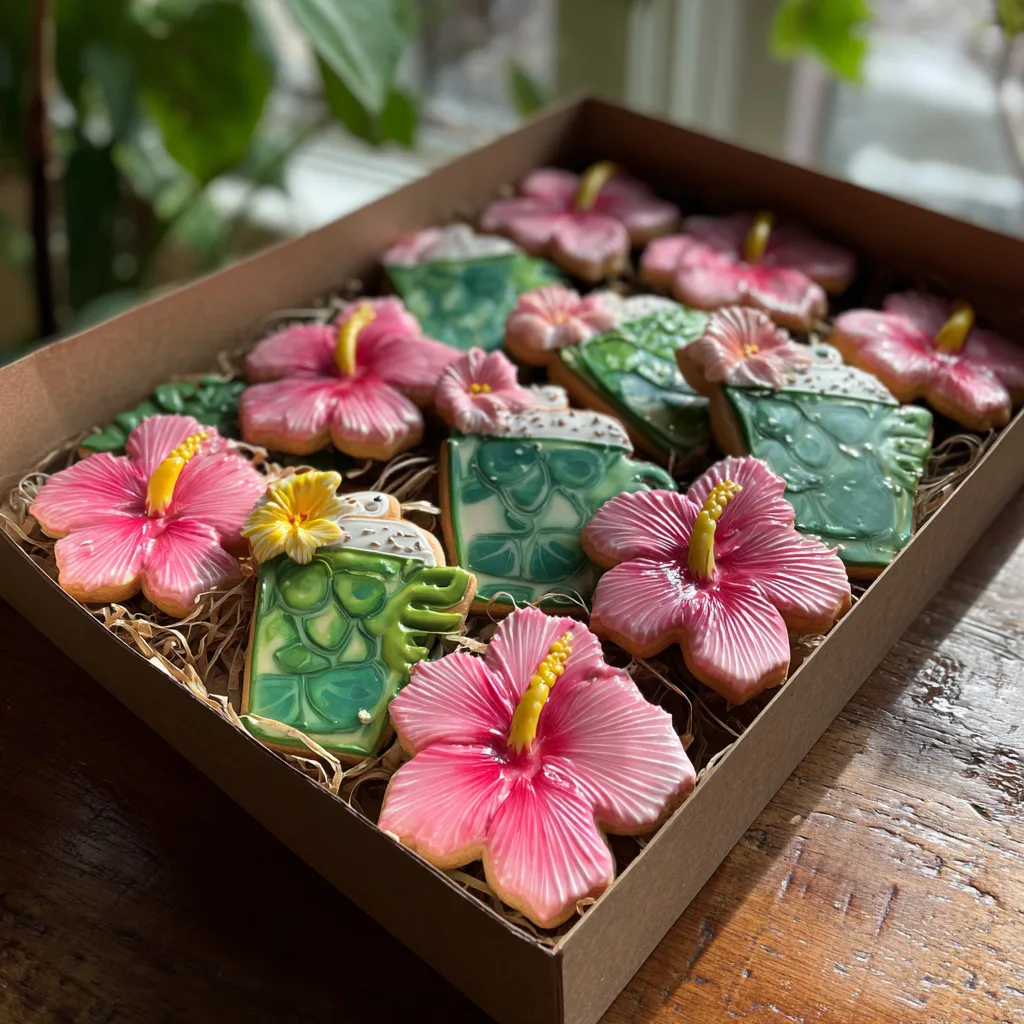
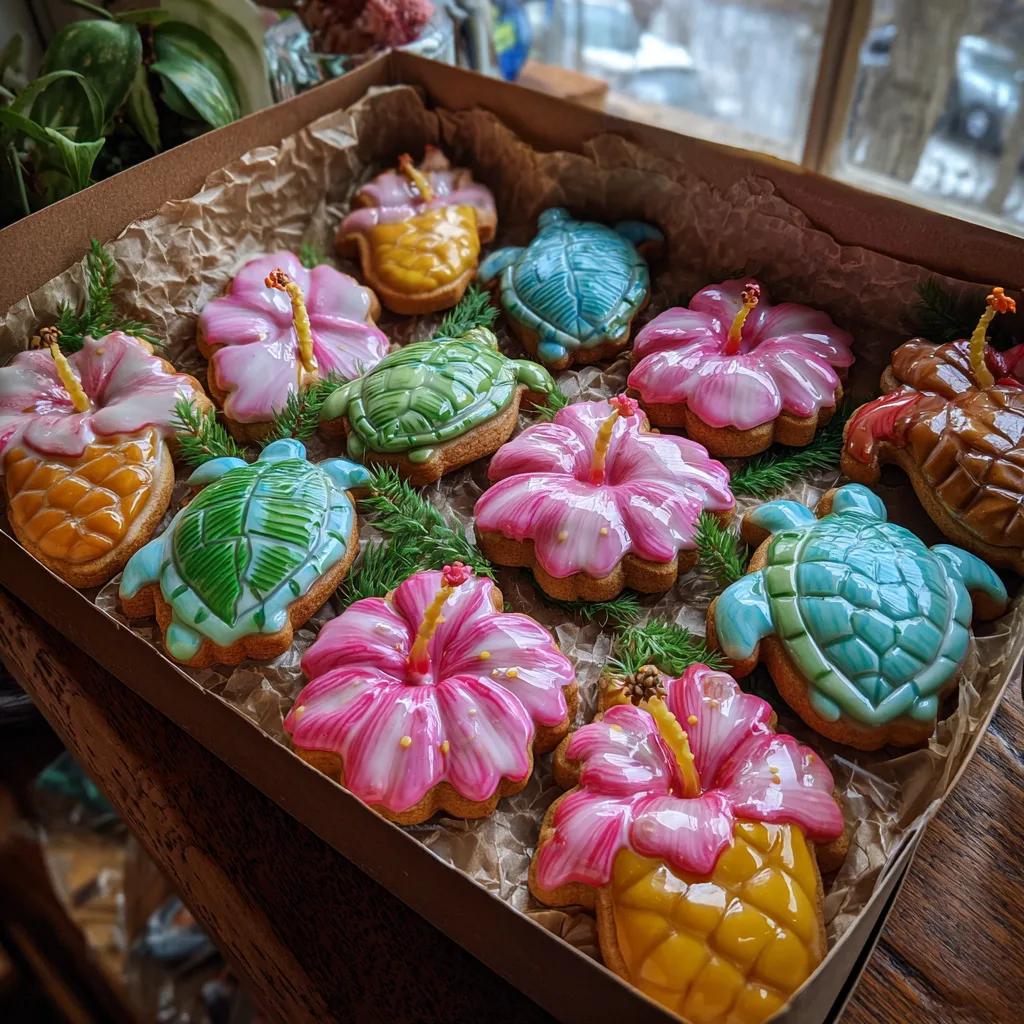
Welcome to the ultimate guide on creating the most breathtaking, vibrant, and delicious Tropical Luau Decorated Sugar Cookies. Whether you are hosting a summer pool party, a Hawaiian-themed birthday bash, or simply want to bring a touch of the islands into your kitchen, these cookies are guaranteed to steal the show. Featuring intricate designs like lush pink hibiscus flowers, adorable green sea turtles, and refreshing coconut drinks complete with tiny umbrellas, these treats are miniature edible works of art. In this extensive guide, we will cover everything from the perfect no-spread sugar cookie dough to the secrets of flawless royal icing, ensuring your creations look like they came straight from a boutique bakery.
Why You Will Fall in Love With This Recipe
Decorated sugar cookies hold a special place in the world of baking. They are a blank canvas for creativity, allowing home bakers to express themselves through color, texture, and design. You will absolutely love this recipe because it combines an incredibly flavorful, tender, yet sturdy vanilla sugar cookie base with a royal icing that dries to a beautiful, smooth finish. Unlike some sugar cookies that taste like sweet cardboard, this recipe incorporates high-quality butter, pure vanilla extract, and a hint of almond to provide a rich, bakery-quality flavor profile. Furthermore, the dough is specifically formulated to hold its shape in the oven, meaning your sea turtles won’t expand into unrecognizable green blobs. It is the perfect marriage of structural integrity and mouth-watering flavor.
The Magic Behind No-Spread Sugar Cookies
The biggest challenge when making shaped cookies is the dreaded “spread.” You spend hours cutting out intricate shapes, only to have them lose their definition in the oven. To achieve the sharp, precise edges seen in our tropical hibiscus and coconut shapes, we use a few critical techniques. First, omitting baking powder or baking soda minimizes the rise and spread of the dough. Second, temperature control is paramount. Working with chilled dough and freezing the cut-out shapes for 15 minutes right before baking solidifies the butter, ensuring the cookie sets before the fat has a chance to melt and spread. Finally, using a silicone baking mat or high-quality parchment paper provides the right amount of grip for the dough as it bakes.
Mastering Royal Icing: The Key to Professional Decorating
Royal icing is the magical medium that transforms a plain cookie into a masterpiece. It is made from powdered sugar, meringue powder, and water. The secret to professional-looking cookies lies entirely in understanding icing consistencies. For these tropical cookies, you will need three distinct consistencies:
Stiff Consistency: This resembles thick toothpaste. It holds its shape perfectly and is used for details that need dimension, such as the textured shell of the coconut drinks, the stems of the hibiscus flowers, and the personalized name plaques.
Piping Consistency: Slightly thinner than stiff, like soft-serve ice cream. It is used to outline the cookies, creating a dam that holds the flood icing in place.
Flood Consistency: This is the thinnest icing, resembling honey or shampoo. It flows easily to fill the outlined areas, settling into a perfectly smooth, flat surface. The 15-second rule is standard here: if you drag a knife through the icing, it should seamlessly heal and flatten out in exactly 15 seconds.
Essential Tools for Cookie Decorating
Before diving into the recipe, gathering the right tools will make your decorating journey significantly smoother. You don’t need a professional bakery setup, but a few key items are essential. First, invest in quality cookie cutters: a hibiscus flower, a sea turtle, a coconut or round shape, and a square plaque cutter. You will also need piping bags (tipless bags are highly recommended for ease of use), a scribe tool or a simple toothpick for popping air bubbles and guiding the icing, and gel food coloring. Gel coloring is crucial because it provides vibrant, intense colors without adding excess moisture to your icing, which would ruin the carefully calibrated consistency.
Ingredients
For the Vanilla Sugar Cookies:
- – 1 cup (2 sticks) unsalted butter, slightly softened but still cool
- – 1 cup granulated sugar
- – 1 large egg, room temperature
- – 1 teaspoon pure vanilla extract
- – 1/2 teaspoon almond extract (optional, but highly recommended)
- – 3 cups all-purpose flour, spooned and leveled
- – 1/2 teaspoon salt
For the Royal Icing:
- – 4 cups powdered sugar, sifted
- – 3 tablespoons meringue powder
- – 1/3 cup to 1/2 cup warm water (adjust as needed for consistency)
- – 1 teaspoon clear vanilla extract (to keep icing white)
- – Gel food coloring (Pink, Leaf Green, Lemon Yellow, Brown, Orange, White)
Instructions
Step 1: Preparing the Cookie Dough
1. In the bowl of a stand mixer fitted with the paddle attachment, or using a hand mixer, beat the cold, slightly softened butter and granulated sugar together on medium speed until creamy and well combined, about 2 minutes. Do not overmix, as incorporating too much air can lead to cookie spreading.
2. Add the room temperature egg, pure vanilla extract, and almond extract. Beat on medium-low speed until the wet ingredients are fully incorporated into the butter mixture. Scrape down the sides and bottom of the bowl with a rubber spatula as needed.
3. In a separate medium bowl, whisk together the all-purpose flour and salt. Gradually add the dry ingredients to the wet ingredients in three additions, mixing on low speed until the dough just begins to clump together and pull away from the sides of the bowl.
4. Turn the dough out onto a piece of parchment paper. Knead it briefly with your hands until it forms a cohesive, smooth ball.
Step 2: Rolling and Cutting
5. Divide the dough into two equal portions. Place one portion between two sheets of parchment paper and roll it out to a uniform thickness of 1/4 inch. Rolling guides or a rolling pin with thickness rings are excellent tools for this step.
6. Slide the rolled dough (still between the parchment paper) onto a baking sheet and refrigerate for at least 1 hour, or until firm.
7. Remove the chilled dough from the refrigerator and peel off the top layer of parchment. Use your tropical cookie cutters (hibiscus, turtle, coconut, plaques) to cut out shapes. Press firmly and lift the cutter straight up to ensure clean edges.
8. Carefully transfer the cut-out shapes to a baking sheet lined with a silicone baking mat or fresh parchment paper, leaving about 1 inch of space between each cookie.
Step 3: Baking to Perfection
9. Place the baking sheet of cut-out cookies into the freezer for 15 minutes. This crucial step solidifies the butter and completely prevents spreading in the oven.
10. While the cookies are chilling, preheat your oven to 350°F (175°C).
11. Bake the chilled cookies for 10 to 14 minutes, depending on the size of the cutters. The cookies are done when the edges are just barely beginning to turn a light golden brown, and the centers no longer look glossy or wet.
12. Allow the cookies to cool on the baking sheet for 5 minutes before carefully transferring them to a wire cooling rack to cool completely. Cookies must be 100% cool before decorating.
Step 4: Making the Royal Icing
13. In the clean, grease-free bowl of a stand mixer fitted with the whisk attachment, combine the sifted powdered sugar and meringue powder.
14. Add 1/3 cup of warm water and the clear vanilla extract. Beat on medium-high speed for 5 to 7 minutes until stiff peaks form. The icing should be bright white, glossy, and hold its shape perfectly when you pull the whisk straight up.
15. This is your base stiff consistency icing. From here, you will divide the icing into separate bowls to create your different colors and consistencies.
Step 5: Coloring and Consistency Adjustments
16. Divide the icing into multiple bowls based on the colors you need. You will need a large amount of pink (for flowers), green (for turtles and borders), and smaller amounts of yellow, brown, orange, and white.
17. Tint each bowl using your gel food coloring. Remember that colors deepen as the icing dries, so mix them a shade lighter than your desired final result.
18. To create piping consistency, add a few drops of water at a time to your stiff icing until it resembles soft-serve ice cream.
19. To create flood consistency, continue adding water slowly until the icing levels out in 15 seconds when you run a knife through it. Transfer all consistencies into piping bags.
Step 6: Decorating the Tropical Masterpieces
20. The Sea Turtles: Outline the turtle body with green piping icing. Fill with green flood icing. While the flood icing is still wet, pipe small dots of yellow flood icing onto the shell area to create a wet-on-wet gradient pattern. Allow to dry completely before piping the shell grid details with stiff green icing.
21. The Hibiscus Flowers: Working one petal at a time, outline and flood the petals with pink icing. Let adjacent petals dry slightly before flooding the next to create dimension and prevent them from bleeding together into a single blob. Once dry, use stiff yellow icing to pipe the distinct stamen in the center.
22. The Coconut Drinks: Outline and flood the bottom half of the circle with brown icing. While wet, use a stiff brush to gently stipple the icing to create a hairy, textured coconut shell look. Flood the top with white for the drink, and use stiff colored icing to pipe a small umbrella, a green straw, and a tiny tropical flower.
23. The Name Plaques: Flood a square cookie with tan or light brown icing. Let it dry completely (at least 8 hours). Use stiff green icing to pipe a textured border around the edge, and use stiff gold or brown icing to carefully pipe names or tropical greetings in the center.
Troubleshooting Common Cookie Decorating Issues
Decorating cookies is a learned skill, and it’s common to encounter a few bumps along the road. If your icing is drying dull instead of glossy, it might be due to excessive humidity or overmixing the icing. To encourage a beautiful shine, place your freshly flooded cookies in front of a standard oscillating fan for the first hour of drying. The moving air helps set the top crust of the icing quickly, locking in the gloss and preventing color bleed. If you notice cratering (small dips or holes in small flooded areas), your flood icing might be slightly too thin, or you may be piping into too small of a space without a thick enough outline.
Storage and Freezing Guidelines
One of the best things about decorated sugar cookies is their impressive shelf life. Once the royal icing is completely dry (which takes 12 to 24 hours at room temperature), the icing acts as a seal, keeping the cookie beneath soft and fresh. Store fully dried cookies in an airtight container at room temperature, layered between sheets of parchment or wax paper, for up to two weeks. Do not refrigerate decorated cookies, as the condensation upon bringing them back to room temperature will melt and ruin the royal icing.
If you wish to make these ahead of time, they freeze beautifully! To freeze decorated cookies, place the completely dried cookies in an airtight container with parchment paper between layers. Freeze for up to three months. To thaw, take the container out of the freezer and let it sit on the counter at room temperature for at least several hours before opening the lid. This prevents any condensation from forming on the cookies themselves.
Serving Suggestions and Luau Party Ideas
These magnificent tropical sugar cookies deserve a beautiful presentation. Serve them arranged on a large wooden platter lined with fresh (food-safe) monstera or banana leaves to instantly elevate the luau vibe. They make incredible party favors as well; simply slip each fully dried cookie into a clear cellophane bag, tie it with a piece of natural raffia or a bright tropical ribbon, and attach a customized thank-you tag. Pair these sweet treats with fresh fruit platters featuring pineapple and mango, coconut shrimp, and colorful mocktails with paper umbrellas to complete your ultimate Hawaiian-themed feast. The vibrant colors and incredible details of the hibiscus, sea turtles, and coconut drinks will have your guests marveling at your baking skills before they even take their first delicious bite.
Tropical Decorated Sugar Cookies
Ingredients
Equipment
Method
- In a stand mixer, cream the butter and sugar until smooth. Add egg and extracts, mixing until combined.
- Whisk flour and salt together. Gradually add to the wet ingredients and mix until a dough forms.
- Roll dough between two sheets of parchment paper to 1/4-inch thickness. Chill in the refrigerator for 1 hour.
- Cut out tropical shapes using cutters. Place on a lined baking sheet and freeze for 15 minutes to prevent spreading.
- Preheat oven to 350°F (175°C). Bake cookies for 10-14 minutes until edges are barely golden. Cool completely.
- For the icing, whip powdered sugar, meringue powder, warm water, and clear vanilla until stiff peaks form.
- Divide the icing into bowls, tint with gel colors, and thin with water to create stiff, piping, and flood consistencies.
- Decorate the completely cooled cookies with the prepared royal icing. Allow to dry at room temperature for 12-24 hours.