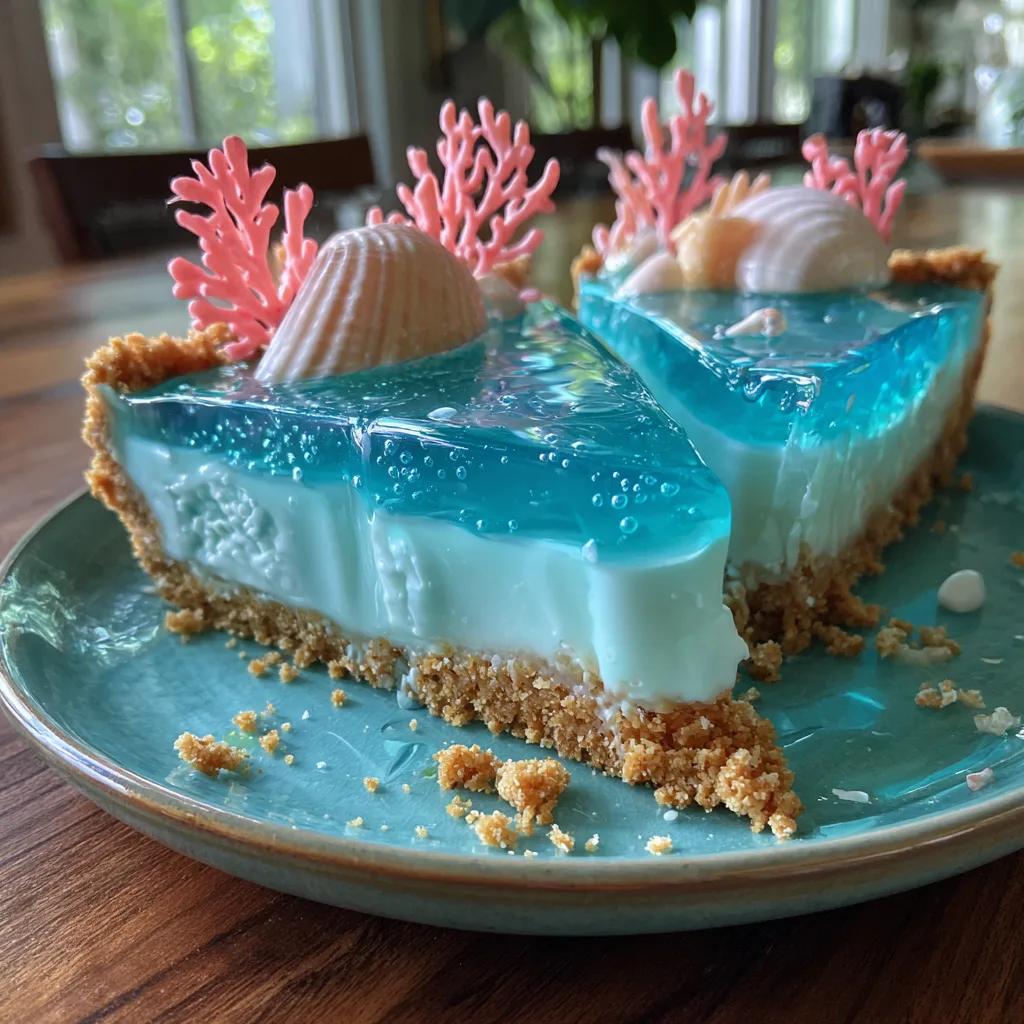
Ocean Jelly Cheesecake
The Ultimate Ocean Water Jelly Cheesecake Recipe: A Slice of Summer
Welcome to the most mesmerizing, show-stopping dessert you will ever create! If you have been searching for a culinary masterpiece that captures the pure, refreshing essence of a tropical summer day, look no further. This Ocean Water Jelly Cheesecake is a breathtaking layered dessert that combines the rich, comforting textures of a classic cheesecake with the whimsical, visual magic of a clear blue gelatin ocean. Complete with edible white chocolate seashells and pink coral, this tart is not just a sweet treat; it is a work of edible art that will transport your guests straight to the beach.
Baking and dessert-making are often about creating an experience, and this recipe delivers on every sensory level. The visual impact is undeniable—the striking contrast between the sandy graham cracker crust, the foamy pale blue cheesecake layer, and the crystal-clear teal jelly is truly a sight to behold. But this cake is not just about looks. It offers a sophisticated flavor profile that balances the buttery crunch of the crust, the tangy sweetness of the cream cheese, and the light, refreshing fruity flavor of the gelatin. In this comprehensive, SEO-optimized guide, we will dive deep into every single step required to achieve this stunning layered effect, ensuring your ocean tart turns out flawlessly.
Why You Will Fall in Love with this Beach Themed Tart
There are countless reasons why this Ocean Water Jelly Cheesecake will become your go-to recipe for summer gatherings, pool parties, and tropical-themed events. First and foremost is the “wow” factor. When you slice into this tart and reveal the perfectly distinct layers—especially the suspended seashells in the clear jelly—it looks like a slice of the actual sea. It is an instant conversation starter and a guaranteed way to impress your friends and family.
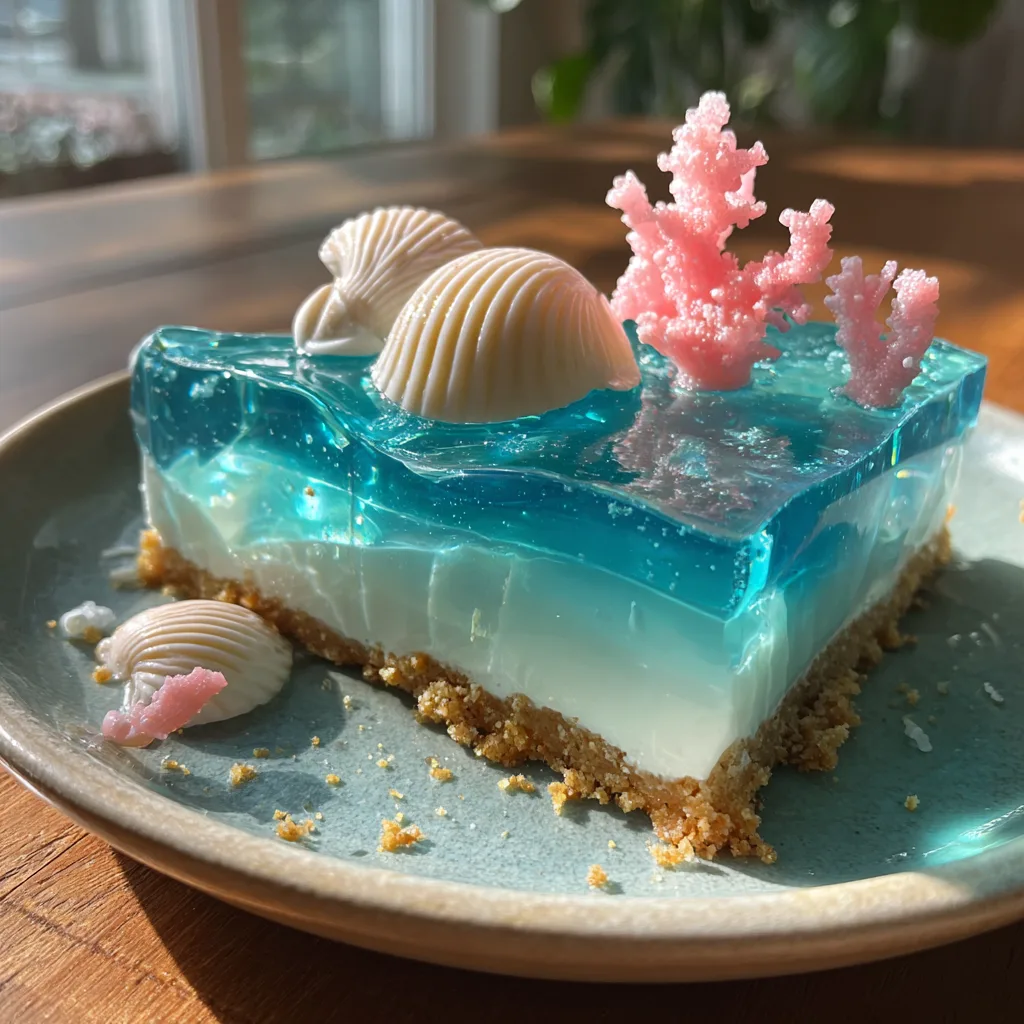
Beyond its stunning appearance, the textural contrast is an absolute dream. The foundation is a classic, sturdy graham cracker crust that provides a satisfying, buttery bite. This mimics the sandy floor of the ocean. Above that lies a velvety, smooth, no-bake cheesecake layer. We tint it a very pale, milky blue to represent the shallow, foamy waters near the shore. Finally, the top layer is a firm but melt-in-your-mouth clear gelatin, flavored lightly (often with clear coconut, lemon, or subtle berry flavors) and tinted a vibrant teal. The combination of crumbly, creamy, and jiggly textures in one bite is incredibly satisfying.
Furthermore, despite its complex appearance, this dessert is surprisingly approachable. Because the cheesecake layer is no-bake, you avoid the common pitfalls of traditional cheesecakes, such as water baths, cracking, and sinking centers. The most challenging aspect is simply exercising patience while waiting for each layer to set properly in the refrigerator. If you can follow instructions and wait, you can execute this masterpiece with professional-level results.
The Anatomy of a Masterpiece: Understanding the Layers
To truly master this dessert, it is helpful to understand the purpose and science behind each layer. Creating distinct, sharp lines between the layers requires careful temperature management and proper setting times.
The “Sand” Crust: The base of our tart is a reinforced graham cracker crust. Unlike a loose crumb crust, this one needs to be packed tightly and baked briefly. Baking the crust melts the sugars in the butter and graham crackers, fusing them together. This creates a solid foundation that will not become soggy when the moist cheesecake and liquid gelatin layers are added on top. It also ensures clean slices.
The “Shallow Water” Cheesecake: This no-bake layer relies on heavy whipping cream and cream cheese for its structure. The key here is to whip the heavy cream to stiff peaks before gently folding it into the cream cheese mixture. This incorporates air, making the layer light and mousse-like rather than heavy and dense. A tiny drop of blue food coloring gives it that opaque, milky ocean-foam look. This layer must be completely cold and firm before the jelly is added, or the layers will bleed into one another.
The “Deep Ocean” Jelly: This is where the magic happens. We use unflavored gelatin powder bloomed in water, then mixed with a clear, flavored liquid (such as white grape juice, clear soda, or a simple syrup flavored with extracts) and a drop of teal food coloring. The trick to a crystal-clear layer is to avoid boiling the gelatin, which can make it cloudy, and to skim off any foam before pouring. You must also let the jelly mixture cool to room temperature before pouring it over the cheesecake; if it is too hot, it will melt the cream cheese and ruin the distinct line between the layers.
Ingredients You Will Need
Gathering high-quality ingredients is the first step to creating this beautiful dessert. Here is exactly what you need for each component.
– For the Graham Cracker Crust:
- 1 1/2 cups graham cracker crumbs (about 10-12 full sheets)
- 1/3 cup granulated sugar
- 6 tablespoons unsalted butter, melted
- A pinch of sea salt
– For the Pale Blue Cheesecake Layer:
- 16 oz (2 blocks) full-fat cream cheese, softened to room temperature
- 1/2 cup powdered sugar
- 1 teaspoon pure vanilla extract
- 1 cup heavy whipping cream, cold
- 1 small drop of sky blue gel food coloring
– For the Clear Ocean Jelly Layer:
- 2 envelopes (about 2 tablespoons) unflavored gelatin powder
- 1/2 cup cold water (for blooming)
- 2 cups clear liquid (white cranberry juice, white grape juice, or clear lemon-lime soda work best)
- 1/4 cup granulated sugar (adjust based on the sweetness of your chosen liquid)
- 1 tiny drop of teal or sky blue gel food coloring
– For the Edible Decorations:
- 1/2 cup white chocolate chips or white candy melts
- 1/4 cup pink candy melts (for the coral)
- Seashell and coral silicone molds
Step-by-Step Instructions
Follow these instructions meticulously, paying special attention to the chilling times, to ensure your ocean tart is a resounding success.
- Prepare the Crust: Preheat your oven to 350°F (175°C). In a medium bowl, combine the graham cracker crumbs, granulated sugar, melted butter, and a pinch of salt. Stir until the mixture resembles wet sand.
- Press and Bake: Transfer the crumb mixture into a 9-inch springform pan or a deep tart pan with a removable bottom. Use the back of a measuring cup or a glass to press the mixture firmly and evenly into the bottom and slightly up the sides. Bake for 10 minutes until golden and fragrant. Allow the crust to cool completely on a wire rack.
- Make the Decor: While the crust cools, melt the white chocolate and pink candy melts in separate bowls. Pour the melted white chocolate into your seashell molds, and the pink melts into the coral molds. Tap the molds gently on the counter to remove air bubbles. Place them in the refrigerator to set completely (about 20 minutes), then pop them out of the molds and set aside.
- Whip the Cream: In a large mixing bowl, beat the cold heavy whipping cream until stiff peaks form. Set aside in the refrigerator.
- Prepare the Cheesecake Base: In another large bowl, beat the softened cream cheese, powdered sugar, and vanilla extract until completely smooth and creamy, with no lumps remaining. Add one tiny drop of sky blue gel food coloring and mix until you achieve a very pale, pastel blue color.
- Fold and Chill: Gently fold the whipped cream into the blue cream cheese mixture until just combined. Be careful not to deflate the cream. Pour this mixture over the cooled graham cracker crust. Smooth the top with an offset spatula so it is as level as possible. Place the pan in the refrigerator to chill for at least 3 to 4 hours, or until very firm.
- Bloom the Gelatin: Once the cheesecake layer is firm, prepare the jelly. In a small bowl, sprinkle the unflavored gelatin powder over the 1/2 cup of cold water. Let it sit for 5-10 minutes to “bloom” (it will become thick and rubbery).
- Heat the Liquid: In a saucepan, bring your chosen clear liquid (e.g., white grape juice) and sugar to a gentle simmer, stirring until the sugar is dissolved. Remove from heat.
- Combine and Color: Add the bloomed gelatin to the hot liquid and whisk gently until the gelatin is completely dissolved. Add a tiny drop of teal or blue gel food coloring to achieve an ocean water color. Let this mixture sit at room temperature until it is completely cool to the touch but has not yet started to set (about 30-45 minutes). Do not skip this cooling step!
- Assemble the Ocean: Take your chilled cheesecake out of the fridge. Arrange half of your white chocolate seashells directly onto the cheesecake surface. Very carefully, pour the cooled liquid gelatin over the back of a spoon onto the cheesecake layer (pouring over a spoon prevents the liquid from digging a hole into the cheesecake).
- Final Chill: Carefully transfer the pan back to the refrigerator. Let it chill for at least 4 hours, or preferably overnight, until the gelatin is completely firm.
- Decorate and Serve: Once set, carefully remove the sides of the springform or tart pan. Decorate the top of the jelly with the remaining white chocolate seashells and the pink coral pieces. Serve chilled and enjoy the gasps of amazement!
Pro Tips for the Perfect Ocean Effect
To take your tart from amateur to artisan, keep these professional tips in mind:
Achieving Crystal Clear Jelly: The biggest enemy of a clear jelly layer is air bubbles and undissolved gelatin. When whisking your gelatin into the hot liquid, do so gently. Vigorous whisking creates foam. If you see foam on top of your liquid mixture after adding the color, use a fine-mesh sieve or a spoon to skim it off before pouring it over the cheesecake. Additionally, ensure the liquid is hot enough to fully dissolve the bloomed gelatin, otherwise, you will have cloudy, rubbery bits in your ocean.
Temperature Control is Crucial: The most common mistake in making layered desserts is pouring a warm layer over a cold layer too soon. If your teal gelatin mixture is even slightly warm, it will melt the top of the cream cheese layer, causing white, cloudy swirls to bleed into your pristine ocean water. Have patience and wait for the liquid to reach room temperature.
Unmolding with Clean Edges: Removing a springform pan can sometimes tear the edges of your beautiful layers. To prevent this, run a thin, hot knife around the very edge of the pan before releasing the clasp. Alternatively, you can use an acetate collar inside the pan before building your layers; peeling the acetate away yields flawlessly smooth sides.
Creative Variations to Try
Once you understand the basic technique, you can customize this dessert in a multitude of ways!
Tropical Flavor Profile: Instead of vanilla in the cheesecake layer, try using coconut extract. For the clear jelly layer, use a clear pineapple-flavored sparkling water or coconut water sweetened with a little simple syrup. This gives the entire cake a Pina Colada vibe.
Edible Sand: For an even more realistic beach look, you can leave a portion of the cheesecake layer uncovered by the jelly. Sprinkle crushed graham crackers or vanilla wafers over this exposed section to look like a sandy beach leading up to the water.
Under the Sea Creatures: Don’t limit yourself to just seashells! Use small silicone molds to create edible starfish, turtles, or even little fish using different colored candy melts to bury in your gelatin ocean.
Serving Suggestions for a Summer Party
This Ocean Water Jelly Cheesecake is the ultimate centerpiece for a summer event. If you are hosting a pool party, a mermaid-themed birthday, or a luau, here is how to serve it in style.
Place the tart on a large, flat wooden board or a slate platter to give it a natural, rustic beach feel. Scatter extra graham cracker crumbs around the base of the cake to look like sand, and place a few extra white chocolate shells around the board. Serve with tropical drinks, such as blue curacao mocktails or fresh coconut water, to complete the theme. Because the cake contains gelatin, it should be kept refrigerated until the very last moment before serving, especially on a hot summer day.
Frequently Asked Questions
Can I use regular flavored Jell-O instead of unflavored gelatin?
Yes, you can use a box of blue raspberry or berry blue store-bought gelatin mix to save time. However, be aware that commercial gelatin mixes are heavily dyed and strongly flavored. They are often less transparent than using unflavored gelatin with a clear liquid, so your embedded seashells might not be as visible.
Why didn’t my jelly layer set?
There are a few reasons this could happen. First, ensure you used the correct amount of gelatin powder (two packets is standard for two cups of liquid). Second, certain fresh fruits and juices (like fresh pineapple, kiwi, or papaya) contain enzymes that destroy the protein structures in gelatin, preventing it from setting. Always use pasteurized juices or heat your fresh juices to boiling before using them with gelatin.
Can I make this dessert ahead of time?
Absolutely! In fact, this dessert requires making it ahead of time. It is best made the day before you plan to serve it, allowing all the layers to set perfectly in the refrigerator overnight. Just hold off on adding the final chocolate decorations on top until right before serving, as condensation in the fridge can cause the chocolate to “sweat.”
Storing Your Ocean Masterpiece
If you happen to have leftovers, proper storage is essential. Because it contains dairy and gelatin, the tart must be kept refrigerated. Store it in an airtight container or cover it loosely with a large bowl to prevent it from absorbing odors from the fridge. It will keep well for up to 4 days.
Unfortunately, this dessert does not freeze well. Freezing and thawing will completely ruin the texture of the gelatin layer, turning it into a weeping, rubbery mess, and the cream cheese layer may separate. It is best enjoyed fresh from the refrigerator!
Creating this Ocean Water Jelly Cheesecake is a delightful culinary project that yields breathtaking results. With a little patience and attention to detail, you can serve up a slice of the ocean at your next summer gathering. Happy baking!
Ocean Water Jelly Cheesecake
Ingredients
Equipment
Method
- Preheat oven to 350°F (175°C). Mix graham cracker crumbs, sugar, melted butter, and salt. Press into a 9-inch springform pan and bake for 10 minutes. Cool completely.
- Melt white and pink chocolates and pour into silicone molds to create seashells and coral. Chill until set.
- Whip heavy cream to stiff peaks. In a separate bowl, beat cream cheese, powdered sugar, and vanilla until smooth. Add blue food coloring for a pale blue tint.
- Fold whipped cream into the cream cheese mixture. Pour over cooled crust, smooth the top, and chill for 3-4 hours until firm.
- Bloom gelatin in cold water for 5 minutes. Heat clear liquid and sugar until simmering, then whisk in the bloomed gelatin until dissolved. Add a drop of teal food coloring.
- Let the liquid gelatin cool to room temperature. Arrange some white chocolate seashells on the firm cheesecake layer.
- Carefully pour the cooled liquid gelatin over the back of a spoon onto the cheesecake. Chill for at least 4 hours or overnight until set.
- Remove from pan, decorate the top with remaining chocolate shells and coral, and serve.