📖 B. INTRODUCTION
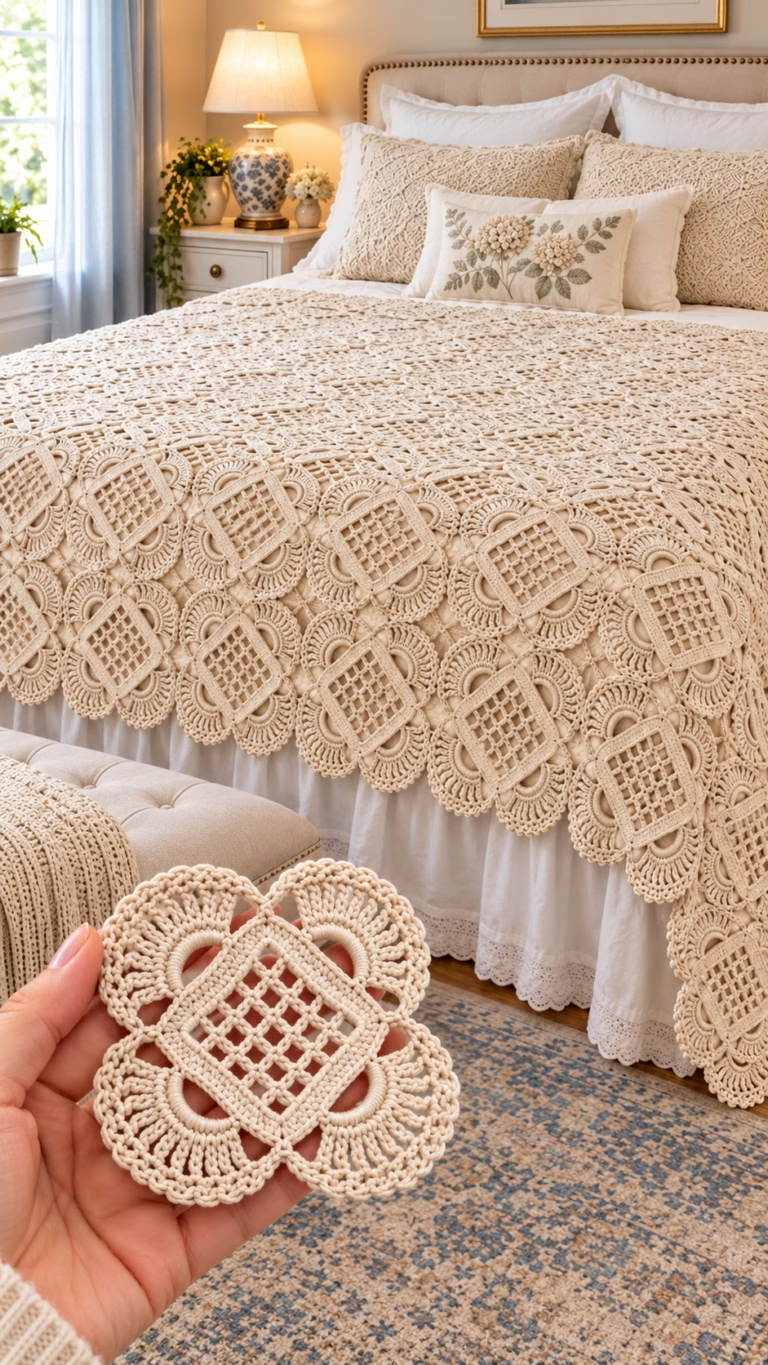
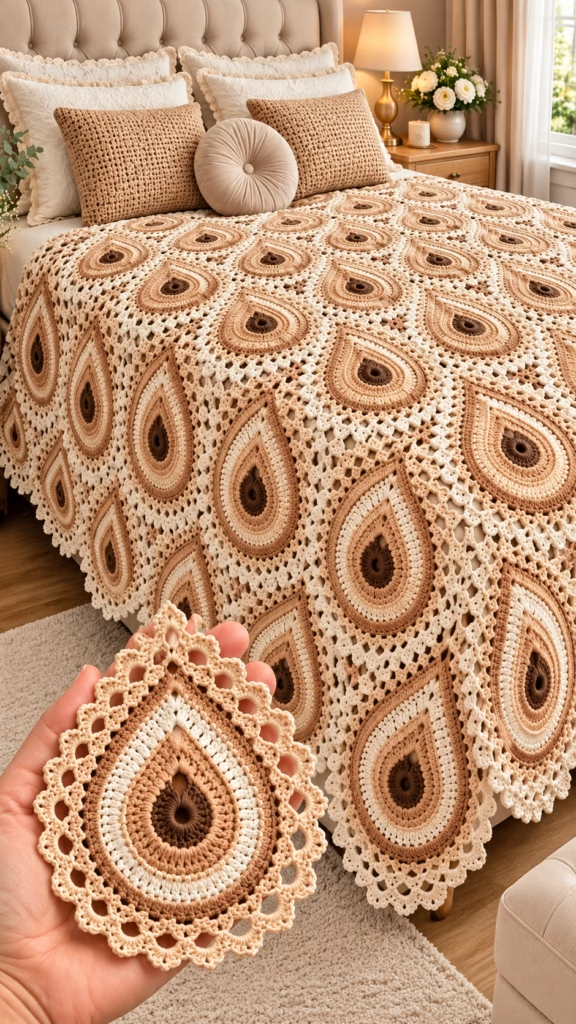
Bring warmth, elegance, and artisanal charm into your home with this stunning Neutral Teardrop Motif Crochet Bedspread. Featuring a striking teardrop or peacock-feather silhouette composed of concentric gradient rings in espresso, camel, warm tan, cream, and beige, this heirloom-quality project transforms simple crochet stitches into a breathtaking piece of textured functional art. The motifs feature an almond-shaped central medallion surrounded by delicate openwork picot arches that join seamlessly into a cohesive, draped coverlet.
Whether styled over a queen bed, draped across a cozy living room sofa, or crafted as an unforgettable heirloom wedding or housewarming gift, this throw project is equal parts engaging to work and beautiful to display. The modular motif design makes this an ideal project for crocheting on the go—you can make individual teardrop medallions anywhere, then join them in rows using an intuitive join-as-you-go method or traditional sewing assembly.
With endless possibilities for customization, you can stick with this rich, bohemian neutral palette—featuring deep chocolate browns, warm caramel tones, and soft ecru—or tailor the color scheme to match your bedroom decor using muted jewel tones, ocean gradients, or pastel shades.
In this comprehensive, step-by-step crochet guide, you will find complete, fully tested round-by-round instructions for the teardrop motif, edge-filling half-motifs, seamless joining techniques, and the scalloped lace outer border.
🔍 C. MAIN PATTERN OVERVIEW
The Teardrop Motif Bedspread is constructed by joining modular teardrop-shaped medallions arranged in offsetting rows to form a continuous grid. The pointed tips of one row nest snugly into the rounded bases of the adjacent row, creating a fluid, organic texture reminiscent of peacock feathers or bohemian mandala tilework.
💧 The Teardrop Motif Structure
- Central Core: A rich dark brown ring worked into a ring.
- Gradient Rings: Progressive expansion of double crochet ($dc$) and treble crochet ($tr$) stitches to transform a circular center into an elongated teardrop point.
- Color Transitions: 5 distinct shades (Espresso, Chocolate Brown, Warm Tan, Off-White/Cream, and Natural Beige).
- Lace Border Frame: An outer edging of chain loops and picot arches that forms the structural points for interlocking motifs together.
🧩 Layout & Fillers
- Full Motifs: Main building blocks arranged in interlocking vertical/horizontal columns.
- Half/Edge Motifs: Worked along the edges and corners to square off the perimeter before applying the outer lace border.
- Border: A luxurious multi-round picot and shell lace border running around the complete bedspread.
🎯 D. SKILL LEVEL
Skill Level: Intermediate 🎚️
This pattern uses standard crochet stitches combined with shaping techniques and continuous color changes. It is well suited for an adventurous beginner ready to tackle post stitches and gradient color work, or an intermediate crocheter looking for an engaging motif-based project.
Required Techniques:
- 🧶 Magic Ring (MR) or Chain Ring startup
- 🧶 Basic stitches: Single Crochet ($sc$), Half Double Crochet ($hdc$), Double Crochet ($dc$), Treble Crochet ($tr$)
- 🧶 Stitch height manipulation for teardrop shaping (working taller stitches at the apex)
- 🧶 Working in Back Loops Only ($BLO$) for textured ridges
- 🧶 Seamless color changing in the round
- 🧶 Join-As-You-Go ($JAYG$) chain-space joining or slip-stitch assembly
📏 E. FINISHED SIZE
Measurements are provided for both a Throw Blanket size and a Queen Bedspread size (as shown in the reference image).
| Bed / Throw Size | Grid Dimensions (Motifs) | Finished Dimensions (Inches) | Finished Dimensions (CM) |
| Throw / Lapghan | 6 motifs wide $\times$ 8 motifs long | 48″ $\times$ 64″ | 122 cm $\times$ 162 cm |
| Full / Queen Coverlet | 10 motifs wide $\times$ 12 motifs long | 82″ $\times$ 96″ | 208 cm $\times$ 244 cm |
📏 Individual Motif Size: Each blocked teardrop motif measures approximately 8″ wide $\times$ 11″ long ($20.5\text{ cm} \times 28\text{ cm}$) at its widest and longest points including the picot edging.
Note: Yarn weight, hook size, yarn fiber content, and individual tension will impact final measurements.
🧮 F. GAUGE
- Single Motif Size: 1 complete Motif (Rounds 1–8) = 8″ wide $\times$ 11″ long ($20.5\text{ cm} \times 28\text{ cm}$) after light steam blocking.
- Gauge Swatch (Rounds 1–4): Rounds 1–4 of Motif = 4″ wide $\times$ 5.25″ long ($10\text{ cm} \times 13.5\text{ cm}$).
💡 Tension Note: Exact gauge is not critical for a blanket, but consistency across all motifs is essential so that edges match up perfectly during assembly!
🧶 G. REQUIRED YARN AMOUNTS
The pattern is designed using Category 3 (Light / DK Weight) or Category 4 (Medium / Worsted Weight) cotton or cotton-blend yarn for crisp stitch definition. Estimates below are based on Category 3 / Light Worsted Cotton Yarn (approx. 230 yards / 210 meters per 100g skein).
Color Palette Key:
- 🟤 Color A (Espresso / Dark Brown): Inner core center.
- 🟤 Color B (Milk Chocolate / Brown): Ring 2 & accents.
- 🐪 Color C (Warm Tan / Caramel): Mid-gradient ring.
- 🥛 Color D (Cream / Off-White): Outer highlight ring.
- 🌾 Color E (Natural Beige / Sand): Outer picot frame & join color.
                     [COLOR GRADIENT PALETTE]
  (Center) Color A ➔ Color B ➔ Color C ➔ Color D ➔ Color E (Outer Border)
Yarn Quantities per Size:
1. Throw Blanket Size (48″ x 64″ — 48 Motifs)
- 🟤 Color A (Espresso): ~250 yards / 230 m (2 skeins)
- 🟤 Color B (Chocolate): ~410 yards / 375 m (2 skeins)
- 🐪 Color C (Warm Tan): ~650 yards / 595 m (3 skeins)
- 🥛 Color D (Cream): ~780 yards / 713 m (4 skeins)
- 🌾 Color E (Natural Beige): ~1,150 yards / 1,050 m (5 skeins)
- Total Yardage: ~3,240 yards / 2,963 m
2. Queen Bedspread Size (82″ x 96″ — 120 Motifs)
- 🟤 Color A (Espresso): ~600 yards / 550 m (3 skeins)
- 🟤 Color B (Chocolate): ~1,000 yards / 915 m (5 skeins)
- 🐪 Color C (Warm Tan): ~1,600 yards / 1,460 m (7 skeins)
- 🥛 Color D (Cream): ~1,950 yards / 1,780 m (9 skeins)
- 🌾 Color E (Natural Beige): ~2,850 yards / 2,600 m (13 skeins)
- Total Yardage: ~8,000 yards / 7,305 m
🧰 H. MATERIALS
- 🧶 Yarn: DK / Light Worsted Weight Cotton or Cotton-Acrylic Blend Yarn in 5 colors (as detailed above).
- 🪡 Crochet Hook: US size G/6 (4.0 mm) or H/8 (5.0 mm) — choose the hook that gives you good drape without loose stitches.
- ✂️ Tapestry Needle: Large eye yarn needle for weaving in multiple ends.
- 📍 Stitch Markers: 4–6 locking stitch markers (useful for marking the apex point of each teardrop).
- 📏 Measuring Tape: For checking motif dimensions.
- 💨 Blocking Supplies: Blocking board, stainless steel T-pins, and a steam iron or garment steamer (crucial for setting the almond shape before joining).
🔤 I. ABBREVIATIONS – US TERMS
- ch: chain
- sl st: slip stitch
- sc: single crochet
- hdc: half double crochet
- dc: double crochet
- tr: treble (triple) crochet
- dtr: double treble crochet (yarn over 3 times)
- st(s): stitch(es)
- sp(s): space(s)
- ch-sp: chain space
- MR: Magic Ring
- inc: increase (2 stitches worked in the same stitch)
- BLO: back loop only
- FLO: front loop only
- picot: ch 3, sl st in 3rd ch from hook
- [ ]: repeat instructions within brackets specified number of times
- ( ): total stitch count at the end of the round/row
📝 J. NOTES BEFORE YOU BEGIN
- 📌 Continuous vs. Joined Rounds: Each round of the motif is joined with a slip stitch into the starting stitch, followed by a color change where indicated.
- 📌 Teardrop Shaping Mechanics: The teardrop shape is achieved by varying stitch heights within the same round. Short stitches ($sc$, $hdc$) are worked at the rounded bottom, medium stitches ($dc$) along the sides, and tall stitches ($tr$, $dtr$) clustered together at the top apex to extend the point.
- 📌 Seamless Color Changes: Fasten off the old color with a invisible join or sl st, then join the new color in any stitch (or specifically at the apex point as indicated) with a standing st or sl st.
- 📌 Weaving in Ends: Because this project uses multiple color transitions per motif, weave in your yarn ends as you complete each round or block of motifs. Working over ends where possible will save significant finishing time.
- 📌 Right Side / Wrong Side: Motifs have a distinct Right Side (RS) facing forward with crisp stitch ridges. Ensure all motifs face RS up during assembly.
🪡 K. COMPLETE PATTERN
💧 1. Full Teardrop Motif (Make 120 for Queen / 48 for Throw)
                    [TEARDROP MOTIF DIAGRAM SKETCH]

                                /\  <-- Apex Point (dtr / tr cluster)
                               /  \
                              /    \
                             |  *   | <-- Concentric Color Rings (R1-R6)
                             | ( )  | <-- Ring Center (Color A)
                              \    /
                               \__/  <-- Base Curve (sc / hdc)
🟤 Core Center (Color A – Espresso)
- Round 1: Start with a MR (or ch 4, sl st to 1st ch to form ring). Ch 3 (counts as 1st $dc$), work 15 $dc$ into the ring. Sl st to top of starting ch-3 to join. Fasten off Color A. (16 $dc$)
🟤 Ring 2: Oval Expansion (Color B – Chocolate Brown)
- Round 2: Join Color B with a sl st in any st from R1. Ch 1, $sc$ in same st, $hdc$ in next st, $dc$ in next st, 2 $dc$ in next st, 2 $tr$ in next st, (1 $tr$, 1 $dtr$, 1 $tr$) in next st (Apex Point), 2 $tr$ in next st, 2 $dc$ in next st, $dc$ in next st, $hdc$ in next st, $sc$ in next st, 2 $sc$ in next st, 2 $sc$ in next st, 2 $sc$ in next st. Sl st to 1st $sc$ to join. Fasten off Color B. (24 sts)
🐪 Ring 3: Ridge Expansion (Color C – Warm Tan)
- Round 3: Join Color C in $BLO$ of the central $dtr$ stitch at the apex from R2. Working in $BLO$ for this entire round:
- Ch 3 (counts as $dc$), (1 $dc$, 1 $tr$, 1 $dc$) in same apex st.
- $dc$ in next 3 sts, $hdc$ in next 3 sts, $sc$ in next 9 sts (around the bottom curve), $hdc$ in next 3 sts, $dc$ in next 3 sts.
- Sl st to top of starting ch-3. Fasten off Color C. (28 sts)
🥛 Ring 4: Highlight Gradient (Color D – Cream)
- Round 4: Join Color D in both loops of the apex $tr$ st from R3.
- Ch 4 (counts as $tr$), (2 $tr$, ch 2, 2 $tr$) in same apex st.
- $dc$ in next 4 sts, $hdc$ in next 4 sts, $sc$ in next 10 sts, $hdc$ in next 4 sts, $dc$ in next 4 sts.
- Sl st to top of starting ch-4. Fasten off Color D. (32 sts + 1 ch-2 sp at apex)
🐪 Ring 5: Outer Body Gradient (Color C – Warm Tan)
- Round 5: Join Color C in the ch-2 apex space from R4.
- In ch-2 sp work: (2 $dc$, ch 2, 2 $dc$).
- $dc$ in next 6 sts, $hdc$ in next 5 sts, $sc$ in next 10 sts, $hdc$ in next 5 sts, $dc$ in next 6 sts.
- Sl st to 1st $dc$. Fasten off Color C. (36 sts + 1 ch-2 sp)
🌾 Ring 6: Solid Frame Base (Color E – Natural Beige)
- Round 6: Join Color E in the ch-2 apex space from R5.
- In ch-2 sp work: (1 $dc$, 1 $tr$, ch 2, 1 $tr$, 1 $dc$).
- $dc$ in next 8 sts, $hdc$ in next 5 sts, $sc$ in next 10 sts, $hdc$ in next 5 sts, $dc$ in next 8 sts.
- Sl st to 1st $dc$. Do not fasten off. (40 sts + 1 ch-2 sp)
🌾 Round 7: Inner Mesh Loop Base (Color E – Natural Beige)
- Round 7:
- In apex ch-2 sp work: (1 $sc$, ch 3, 1 $sc$).
- [Ch 3, skip 1 st, $sc$ in next st] repeat 19 times around the teardrop perimeter until returning to apex.
- Sl st to 1st $sc$. (21 ch-3 loops created around motif)
🌾 Round 8: Outer Lace Picot Frame (Color E – Natural Beige)
- Round 8:
- Sl st into 1st ch-3 apex loop. (Ch 3, $dc$, picot [ch 3, sl st into 3rd ch from hook], 2 $dc$) into apex loop.
- Work around the outer edge: Into each remaining ch-3 loop, work: (2 $sc$, picot, 1 $sc$).
- Sl st to top of starting ch-3 to complete motif. Fasten off and weave in ends. (21 picot arches per motif)
🧩 2. Half-Teardrop Edge Fillers (Make as needed for straight borders)
To square off the sides and top/bottom edges of the bedspread, half-motifs are inserted into the gaps between rounded teardrops.
                [HALF-TEARDROP FILLER DIAGRAM SKETCH]

                                 /\
                                /  |  <-- Worked in Flat Rows
                               /   |  <-- Flat Straight Edge
                              /____|
- Row 1 (Color A): MR, ch 3, 8 $dc$ into ring. Turn. (9 $dc$)
- Row 2 (Color B): Ch 3, 1 $dc$ in same st, 1 $dc$ in next 2 sts, 1 $hdc$ in next 2 sts, 1 $sc$ in next 2 sts, 2 $sc$ in last st. Turn. Fasten off B. (11 sts)
- Row 3 (Color C – BLO): Join Color C in $BLO$. Ch 3, 2 $dc$ in 1st st, $dc$ in next 3 sts, $hdc$ in next 3 sts, $sc$ in next 3 sts, 2 $sc$ in last st. Turn. Fasten off C. (14 sts)
- Row 4 (Color D): Join Color D. Ch 3, $dc$ in same st, $dc$ in next 4 sts, $hdc$ in next 4 sts, $sc$ in next 4 sts, 2 $sc$ in last st. Turn. Fasten off D. (16 sts)
- Row 5 (Color E): Join Color E. Work mesh ch-3 loops along the curved edge and flat single crochets along the straight bottom edge to match full motif count. Fasten off.
🎨 L. STYLING / ASSEMBLY / STABILITY / FINAL SHAPING
📌 1. Blocking Before Assembly
Before joining, steam block every individual teardrop motif. Pin each motif to a blocking board, pinning out the top apex point and rounding the bottom edge neatly. Steam lightly with an iron (do not touch iron directly to yarn) and allow to dry completely. This step ensures all motifs are uniform, making alignment effortless!
🧱 2. Motif Layout & Arrangement
Lay out all finished teardrops on a large flat surface (a clean floor or large bed).
- Alignment: Arrange motifs in alternating rows. The top apex of a Motif in Row 2 fits directly between the bottom curves of two Motifs in Row 1.
- Color Orientation: Ensure all right sides ($RS$) face upward and color gradients align uniformly throughout.
                        [ASSEMBLY GRID LAYOUT]

            Row 1:      (  /\  )      (  /\  )      (  /\  )
                       (  /  \  )    (  /  \  )    (  /  \  )
                        ( ____ )      ( ____ )      ( ____ )
            Row 2:          (  /\  )      (  /\  )
                           (  /  \  )    (  /  \  )
                            ( ____ )      ( ____ )
🪡 3. Joining Method Options
Option A: Join-As-You-Go (JAYG) — Recommended for Best Flow
When crocheting Round 8 (Outer Lace Picot Frame) of subsequent motifs, replace the center chain of each picot (ch 2) with a $sl\ st$ into the corresponding picot of the adjacent completed motif. This creates a flexible, invisible lace join between motifs.
Option B: Needle Sewing / Mattress Stitch — Best for Precision
- Complete Round 8 on all individual motifs.
- Place two motifs right sides together, matching picot loops along adjacent edges.
- Using Color E and a tapestry needle, whipstitch or mattress stitch adjacent picot loops together along the contact points.
- Fasten off and weave in ends securely.
👑 4. Multi-Round Scalloped Lace Border (Color E – Beige)
Once all motifs and half-fillers are joined into a solid rectangular blanket, work this grand border around the entire outer edge of the bedspread.
                 [OUTER LACE BORDER PROFILE SKETCH]

          ~~~ Picot Shell Arch ~~~  <-- Border Round 3
          ||| Double Crochet Mesh ||| <-- Border Round 2
          *** Single Crochet Base *** <-- Border Round 1
- Border Round 1 (Foundation): Join Color E in any corner picot loop. Ch 1, work [3 $sc$ in each corner picot loop, 2 $sc$ in each side picot loop, and 1 $sc$ in motif valley junctions] around the entire perimeter. Sl st to join.
- Border Round 2 (Mesh Bridge): Ch 4 (counts as $dc$ + ch 1), *skip 1 st, $dc$ in next st, ch 1; repeat from * around, working ($dc$, ch 3, $dc$) into each corner point. Sl st to join.
- Border Round 3 (Grand Scallop & Picot Edge): *Skip 2 sts, 5 $dc$ in next st, picot, 4 $dc$ in same st (Shell made), skip 2 sts, $sc$ in next st; repeat from * around to create a deep, luxurious scalloped edge. Sl st to start st. Fasten off.
🏁 5. Final Shaping Checklist
- ✅ All yarn tails are woven in securely on the wrong side.
- ✅ All motifs are facing Right Side ($RS$) up.
- ✅ Teardrop points are crisp and aligned in straight vertical columns.
- ✅ Border scallops lay completely flat without puckering or waving.
- ✅ Steam press edges lightly for maximum drape and polished presentation.
💡 M. HELPFUL CROCHET TIPS
- 💡 Tip 1: Work in Batches. To maintain momentum, crochet all Round 1 cores first, then Round 2, and so forth. Batching color rounds speeds up production dramatically!
- 💡 Tip 2: Manage Your Yarn Tails. Weave in yarn ends as you transition between colors on each motif. Leaving hundreds of tails until the end can be overwhelming.
- 💡 Tip 3: Check Motif Gauge Periodically. Measure your motifs every 10–15 pieces to ensure your tension hasn’t loosened or tightened over time.
- 💡 Tip 4: Mark Your Apex. Place a stitch marker in the apex ch-space of Round 4 on your first few motifs to easily spot where stitch height transitions ($dtr / tr$) belong.
- 💡 Tip 5: Use Cotton or Cotton Blends. Cotton yarns provide crisp stitch definition for lace picots and give the bedspread a pleasant, luxurious weight.
- 💡 Tip 6: Steam Blocking is Magic. Acrylic and cotton both benefit enormously from steam blocking; it opens up the lace loops and gives the teardrops their signature almond outline.
- 💡 Tip 7: Dye Lot Consistency. When buying yarn in bulk for large coverlets, make sure your primary join color (Color E) comes from the same dye lot to avoid subtle shading differences.
🧼 N. CARE INSTRUCTIONS
- 🧼 Washing: Hand wash or machine wash on delicate cycle in cold water using a mild, gentle detergent. Place the bedspread inside a large mesh laundry bag to protect picot loops from snagging.
- 🧼 Drying: Do not tumble dry high! Lay flat on clean towels to dry, reshaping the outer scalloped border while damp.
- 🧼 Storage: Store folded neatly in a breathable cotton storage bag with cedar blocks. Avoid hanging, as the weight of the blanket may stretch the lace motifs over time.
❓ R. FAQ
❓ Can I make this blanket using standard Worsted Weight (Category 4) yarn?
Yes! Using Medium Worsted yarn with a 5.0 mm or 5.5 mm hook will make each motif slightly larger (approx. 9.5″ $\times$ 12.5″). You will need fewer total motifs to achieve the same blanket dimensions, and the finished bedspread will be heavier and extra cozy!
❓ How do I join motifs without using Join-As-You-Go?
You can complete all individual teardrop motifs through Round 8, steam block them, and then sew them together using a tapestry needle with Color E yarn. Use a mattress stitch through the back loops of adjacent picots for an invisible finish.
❓ Can I make this bedspread in a single solid color instead of gradients?
Absolutely! A solid cream, linen, or white bedspread highlights the rich texture of the post stitches and lace arches while giving the finished piece a vintage, heirloom bedspread aesthetic.
❓ How do I stop my teardrop points from curling forward?
Curling usually occurs if stitch height transitions are worked too tightly. Make sure your treble ($tr$) and double treble ($dtr$) stitches at the apex are drawn up to full height. Steam blocking will also instantly flatten any minor curling.
❓ Is this project suitable for a beginner?
While intermediate crocheters will find this pattern straightforward, an ambitious beginner can complete it by taking it one round at a time! The step-by-step round instructions clearly break down stitch placements.
🎉 CELEBRATE YOUR CREATION!
Congratulations on creating your very own Neutral Teardrop Motif Crochet Bedspread! This masterwork of gradient color and intricate lace construction is sure to be a showstopping center point in your home or a treasured gift for someone special. Customize your next version with wild vibrant colorways, deep jewel tones, or subtle monochromatic hues—and don’t forget to share photos of your completed blanket with the crochet community! Happy Crocheting! 🧶