📖 INTRODUCTION
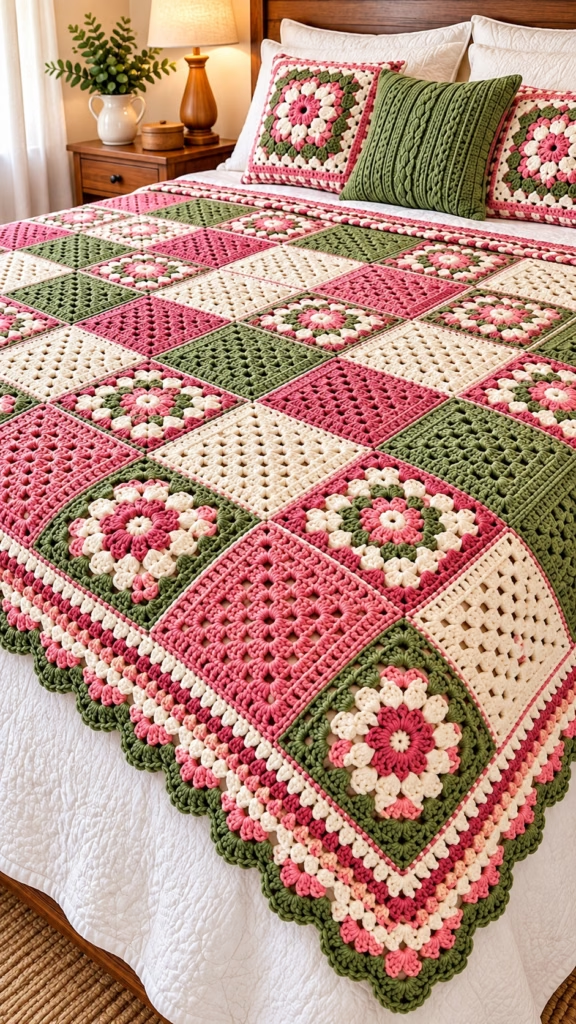
Inspired by cottage garden rosebushes and trailing moss, the Rosewater & Moss Botanical Granny Square Blanket is a sumptuous, heirloom-quality afghan that turns any bedroom or living space into a warm botanical retreat. Constructed on the diagonal (point-to-point) from two distinct square motifs—a dimensional floral medallion square and a classic textured solid-color granny square—this blanket combines rhythmic, relaxing stitch work with rich visual movement.
9cf04cc8-ec1b-4a6c-890c-c36d546fa584.png+ 1
Whether you are crafting an unforgettable wedding keepsake, a housewarming centerpiece, or a cozy seasonal throw for your own bed, this project offers the deeply satisfying rhythm of motif crochet. Each square works up independently, making it an ideal portable project for evening relaxation before joining the blocks into a dramatic diamond layout framed by a multi-stripe granny border and lush moss-green scalloped edging.
9cf04cc8-ec1b-4a6c-890c-c36d546fa584.png+ 1
The signature palette pairs warm cream, dusty rose, deep berry pink, soft peach, and earthy olive-moss green. Every floral square blooms outward from a puff-and-cluster center into crisp botanical framing, while alternating solid squares in cream, rose, and moss provide visual breathing room that lets the floral medallions shine. Prefer a coastal blue, autumn spice, or monochrome neutral aesthetic? Because the pattern is modular, you can easily swap out the five-color botanical palette to match any room in your home.
9cf04cc8-ec1b-4a6c-890c-c36d546fa584.png+ 1
🔍 MAIN PATTERN OVERVIEW
The Rosewater & Moss Botanical Granny Square Blanket is built using a diagonal point-to-point (on-point) square layout. Instead of orienting the squares with horizontal and vertical edges parallel to the bed, every square is rotated 45 degrees so its corners point north, south, east, and west, creating a striking zigzag edge that is filled in with matching half-square triangles along all four outer sides.
9cf04cc8-ec1b-4a6c-890c-c36d546fa584.png+ 1
The blanket consists of four main structural elements:
- 🌸 Motif A — Botanical Bloom Granny Square: A 7-round dimensional flower motif worked in Berry Rose, Warm Cream, Soft Peach, and Moss Green, finished with a clean solid single-crochet border round. 9cf04cc8-ec1b-4a6c-890c-c36d546fa584.png
- 🟩 Motif B — Classic Framed Granny Square: A 6-round solid-color traditional granny cluster square finished with a clean solid single-crochet border round, worked in three separate colorways (Warm Cream, Dusty Rose, and Moss Green). 9cf04cc8-ec1b-4a6c-890c-c36d546fa584.png
- 📐 Setting Triangles (Half-Square Motifs): Classic granny half-squares worked flat in rows to fill the diagonal perimeter gaps along the four edges of the blanket so the finished throw forms a crisp, straight-edged rectangle. 9cf04cc8-ec1b-4a6c-890c-c36d546fa584.png
- 🌊 Multi-Color Granny & Scalloped Border: A 6-round continuous border worked around the squared-off blanket perimeter in alternating stripes of Warm Cream, Berry Rose, Soft Peach, Dusty Rose, and a final plush Moss Green shell scallop edging. 9cf04cc8-ec1b-4a6c-890c-c36d546fa584.png
🎯 SKILL LEVEL
Intermediate
While the individual stitches rely on approachable granny square fundamentals, achieving crisp corners, flat dimensional petals, and clean diagonal joining requires attentive stitch placement and tension control.
- 🧶 Techniques Used: Magic ring, double crochet clusters (3-dc groups), puff stitches, popcorn/petal clusters, working in chain spaces, standing stitches or invisible joins, flat row-based triangles, whip-stitch or mattress-stitch seaming, and multi-round scalloped edging.
📏 FINISHED SIZE
- Finished Throw / Queen Bed Topper Size: Approximately 64 in × 80 in (163 cm × 203 cm) including the outer scalloped border. 9cf04cc8-ec1b-4a6c-890c-c36d546fa584.png
- Individual Full Square Size (Blocked): 9 in × 9 in (23 cm × 23 cm). 9cf04cc8-ec1b-4a6c-890c-c36d546fa584.png
- Diagonal Corner-to-Corner Width of One Square: Approximately 12.75 in (32.4 cm). 9cf04cc8-ec1b-4a6c-890c-c36d546fa584.png
- Border Width: Approximately 3.5 in (9 cm) all around. 9cf04cc8-ec1b-4a6c-890c-c36d546fa584.png
Factors That Affect Finished Size:
- 🧵 Yarn Weight & Fiber: Using a heavier worsted yarn or a lofty wool blend will yield larger squares (up to 10 in / 25.5 cm) and a wider blanket, whereas a thinner acrylic or cotton-blend worsted will yield slightly smaller motifs.
- 🪝 Hook Size & Tension: Loose tension on chain spaces increases square dimensions noticeably; blocking every square to an identical 9 in × 9 in measurement ensures flat seams and accurate final dimensions.
🧮 GAUGE
- Standard Motif Gauge: One completed 7-round Motif A or Motif B square measures 9 in × 9 in (23 cm × 23 cm) after light steam or wet blocking.
- Cluster Gauge: 4 granny clusters (3-dc groups) and 3 intervening ch-1 spaces = 4 in (10 cm) using a 5.0 mm (US H-8) hook.
- ⚠️ Important Note: Matching the exact 9 in × 9 in square dimension between Motif A (the floral square) and Motif B (the solid square) is essential so all seams align smoothly without puckering.
🧶 REQUIRED YARN AMOUNTS
This pattern is designed for Category #4 Worsted / Aran Weight Yarn (100% soft anti-pilling acrylic, superwash wool, or cotton-acrylic blend; approximately 200–220 yds / 183–201 m per 100 g skein).
- 🤍 Color A — Warm Cream: Approximately 1,650 yds (1,510 m) / ~8 skeins (used for floral petals, solid cream squares, setting triangles, and border rounds) 9cf04cc8-ec1b-4a6c-890c-c36d546fa584.png
- 🌿 Color B — Moss Green: Approximately 1,550 yds (1,420 m) / ~8 skeins (used for floral leaves/frames, solid moss squares, setting triangles, and final scalloped border) 9cf04cc8-ec1b-4a6c-890c-c36d546fa584.png
- 🌸 Color C — Dusty Rose: Approximately 1,250 yds (1,145 m) / ~6.5 skeins (used for floral accents, solid rose squares, setting triangles, and border rounds) 9cf04cc8-ec1b-4a6c-890c-c36d546fa584.png
- 🌺 Color D — Berry Rose (Deep Pink): Approximately 620 yds (567 m) / ~3.5 skeins (used for floral centers, outer flower tips, and border accent rounds) 9cf04cc8-ec1b-4a6c-890c-c36d546fa584.png
- 🍑 Color E — Soft Peach: Approximately 480 yds (440 m) / ~2.5 skeins (used for floral inner petal highlights and border accent rounds) 9cf04cc8-ec1b-4a6c-890c-c36d546fa584.png
- 📊 Total Estimated Yarn: Approximately 5,550 yds (5,080 m) across all five colors.
(Note: Estimates include a 10% buffer for color-change tails, seaming, and tension variations.)
🧰 MATERIALS
- 🪝 Crochet Hook: 5.0 mm (US H-8) ergonomic crochet hook (plus a 4.5 mm / US 7 hook if your floral motif tends to grow larger than your solid squares).
- 🧶 Yarn: Category #4 Worsted Weight yarn in Colors A, B, C, D, and E as listed above.
- 🪡 Tapestry / Yarn Needle: Blunt-tip metal tapestry needle with a large eye for weaving in ends and seaming squares.
- ✂️ Scissors: Sharp embroidery or craft scissors.
- 📍 Stitch Markers: 10–15 locking stitch markers for holding square corners together during assembly.
- 📏 Blocking Mats & Rust-Proof Pins: Foam blocking boards and T-pins (or a wooden granny square blocking board with pegs) to block all motifs to a uniform 9 in × 9 in size.
🔤 ABBREVIATIONS – US TERMS
- beg: beginning
- ch: chain
- ch-sp: chain space
- cl: cluster (see Special Stitches below)
- dc: double crochet
- dc2tog: double crochet 2 together
- dc3tog: double crochet 3 together (petal cluster)
- FO: fasten off
- hdc: half double crochet
- MR: magic ring
- puff: puff stitch (see Special Stitches below)
- rep: repeat
- rnd(s): round(s)
- RS: right side
- sc: single crochet
- sk: skip
- sl st: slip stitch
- sp(s): space(s)
- st(s): stitch(es)
- tr: treble crochet
- WS: wrong side
- [ … ]: work instructions inside brackets into the same stitch or space
- ( … ) xN: repeat instructions inside parentheses N times
📝 NOTES BEFORE YOU BEGIN
- 🔄 Right Side Always Facing: All full squares (Motif A and Motif B) and the outer border are worked in joined rounds with the Right Side (RS) facing you at all times. Do not turn between rounds unless specifically instructed (such as in the flat Setting Triangles).
- 🌸 Special Stitch — Puff Stitch (puff): Yarn over, insert hook into indicated stitch/space, yarn over and pull up a loop to the height of a double crochet (3 loops on hook); [yarn over, insert hook into same stitch/space, yarn over and pull up a loop] 2 more times (7 loops on hook); yarn over and pull through all 7 loops on hook, ch 1 to close the puff. (Note: The closing ch-1 is part of the puff stitch and is not counted as an extra chain space unless noted.)
- 🌷 Special Stitch — 3-dc Petal Cluster (dc3tog): [Yarn over, insert hook into indicated space, yarn over and pull up a loop, yarn over and pull through 2 loops] 3 times in the same space (4 loops on hook); yarn over and pull through all 4 loops on hook.
- 🎨 Clean Color Changes: When ending a round to switch colors, fasten off with a 4-inch tail and join the new color with a standing stitch (or slip stitch + starting chains) in any corner or indicated space. Working over your tails as you crochet the next round dramatically reduces end-weaving later.
- 📐 Square Count & Layout Math: Because this afghan is arranged on the diagonal (point-to-point), the layout uses a 5 × 6 diagonal grid of full squares plus perimeter setting triangles: 9cf04cc8-ec1b-4a6c-890c-c36d546fa584.png
- Motif A (Botanical Bloom Square): Make 25
- Motif B — Warm Cream: Make 13
- Motif B — Dusty Rose: Make 12
- Motif B — Moss Green: Make 11
- Total Full Squares: 61 squares (arranged in 11 alternating diagonal rows of 5 and 6 squares: 6 + 5 + 6 + 5 + 6 + 5 + 6 + 5 + 6 + 5 + 6 = 61 squares)
- Half-Square Setting Triangles: Make 18 (6 Warm Cream, 6 Dusty Rose, 6 Moss Green) to square off all four sides. 9cf04cc8-ec1b-4a6c-890c-c36d546fa584.png
- Quarter-Square Corner Triangles: Make 4 (2 Warm Cream, 2 Moss Green) for the four outer corners of the blanket. 9cf04cc8-ec1b-4a6c-890c-c36d546fa584.png
🪡 COMPLETE PATTERN
🌸 Motif A: Botanical Bloom Granny Square (Make 25)
Purpose: Dimensional floral medallion square featuring a berry-pink center, layered cream and peach petals, and a mossy green botanical frame.
9cf04cc8-ec1b-4a6c-890c-c36d546fa584.png
Yarn Colors: Color D (Berry Rose), Color A (Warm Cream), Color E (Soft Peach), Color C (Dusty Rose), Color B (Moss Green).
Starting Point: Center Magic Ring with Color D.
- R1 (Color D — Berry Rose): Make a MR. Ch 3 (counts as first dc), 11 dc into MR. Pull ring tight and join with sl st to top of beg ch-3. FO Color D. (12 dc) 9cf04cc8-ec1b-4a6c-890c-c36d546fa584.png
- R2 (Color D — Berry Rose): Join Color D in any st. Ch 2 (does not count as a st), work 1 puff in the same st and in each st around. Join with sl st to top of first puff. FO Color D. (12 puffs) 9cf04cc8-ec1b-4a6c-890c-c36d546fa584.png
- R3 (Color A — Warm Cream): Join Color A in any sp between two puffs. Ch 2, work [1 dc3tog, ch 2, 1 dc3tog, ch 1] in the same sp. In each of the remaining 11 sps between puffs, work [1 dc3tog, ch 2, 1 dc3tog, ch 1]. Join with sl st to top of first dc3tog. FO Color A. (24 dc3tog petal clusters, 12 ch-2 sps, 12 ch-1 sps) 9cf04cc8-ec1b-4a6c-890c-c36d546fa584.png
- R4 (Color E — Soft Peach & Color C — Dusty Rose): In this round, you will transform the 12-petal circle into a 4-cornered square. Join Color E in any ch-2 sp (between a pair of cream petal clusters). 9cf04cc8-ec1b-4a6c-890c-c36d546fa584.png
- Corner 1: [Ch 3 (counts as dc), 2 dc, ch 2, 3 dc] all in the same ch-2 sp.
- Side 1: Ch 1, 3 hdc in next ch-2 sp, ch 1, 3 hdc in next ch-2 sp, ch 1.
- Corner 2: [3 dc, ch 2, 3 dc] in next ch-2 sp.
- Side 2: Ch 1, 3 hdc in next ch-2 sp, ch 1, 3 hdc in next ch-2 sp, ch 1.
- Corner 3: [3 dc, ch 2, 3 dc] in next ch-2 sp.
- Side 3: Ch 1, 3 hdc in next ch-2 sp, ch 1, 3 hdc in next ch-2 sp, ch 1.
- Corner 4: [3 dc, ch 2, 3 dc] in next ch-2 sp.
- Side 4: Ch 1, 3 hdc in next ch-2 sp, ch 1, 3 hdc in next ch-2 sp, ch 1.
- Join with sl st to top of beg ch-3. FO Color E. (16 three-stitch clusters: 8 corner dc clusters and 8 side hdc clusters, plus 4 corner ch-2 sps and 12 side ch-1 sps) 9cf04cc8-ec1b-4a6c-890c-c36d546fa584.png
- Optional Two-Tone Accent: To mirror the subtle rose-tipped petals seen in the reference design, work the 4 corners in Color C (Dusty Rose) and the 8 side clusters in Color E (Soft Peach), carrying the unused yarn loosely along the back of the work. 9cf04cc8-ec1b-4a6c-890c-c36d546fa584.png
- R5 (Color A — Warm Cream): Join Color A in any corner ch-2 sp.
- [Ch 3 (counts as dc), 2 dc, ch 2, 3 dc] in corner ch-2 sp, (ch 1, 3 dc in next ch-1 sp) 3 times, ch 1.
- Repeat from * to * 3 more times, omitting the first ch-3 on repeats 2–4 (work 3 dc instead). Join with sl st to top of beg ch-3. FO Color A. (20 three-dc clusters, 4 corner ch-2 sps, 16 side ch-1 sps) 9cf04cc8-ec1b-4a6c-890c-c36d546fa584.png
- R6 (Color B — Moss Green): Join Color B in any corner ch-2 sp.
- [Ch 3 (counts as dc), 2 dc, ch 2, 3 dc] in corner ch-2 sp, (ch 1, 3 dc in next ch-1 sp) 4 times, ch 1.
- Repeat from * to * 3 more times, replacing beg ch-3 with 1 dc. Join with sl st to top of beg ch-3. Do not FO. (24 three-dc clusters, 4 corner ch-2 sps, 20 side ch-1 sps) 9cf04cc8-ec1b-4a6c-890c-c36d546fa584.png
- R7 (Color B — Moss Green — Solid Framing Round): Sl st across the next 2 dc into the corner ch-2 sp.
- Ch 1, [2 sc, ch 2, 2 sc] in corner ch-2 sp, work 1 sc in every dc and 1 sc in every ch-1 sp across the side (22 sc along the side).
- Repeat from * to * 3 more times (omitting the initial ch-1 on sides 2–4). Join with sl st to first sc. FO leaving a 12-inch tail on half of your squares for seaming. (26 sc per side / 104 sc total, plus 4 corner ch-2 sps) 9cf04cc8-ec1b-4a6c-890c-c36d546fa584.png
🟩 Motif B: Classic Solid Granny Square (Make 36 Total)
Purpose: Alternating solid-colored textured squares that balance the intricate floral medallions.
9cf04cc8-ec1b-4a6c-890c-c36d546fa584.png
Quantities by Color:
- 🤍 Color A (Warm Cream): Make 13 9cf04cc8-ec1b-4a6c-890c-c36d546fa584.png
- 🌸 Color C (Dusty Rose): Make 12 9cf04cc8-ec1b-4a6c-890c-c36d546fa584.png
- 🌿 Color B (Moss Green): Make 11 9cf04cc8-ec1b-4a6c-890c-c36d546fa584.png
Starting Point: Center Magic Ring in the chosen solid color.
- R1: Make a MR. Ch 3 (counts as dc), 2 dc into MR, ch 2, (3 dc into MR, ch 2) 3 times. Pull ring tight and join with sl st to top of beg ch-3. (4 three-dc clusters, 4 corner ch-2 sps) 9cf04cc8-ec1b-4a6c-890c-c36d546fa584.png
- R2: Sl st across next 2 dc into the first corner ch-2 sp. [Ch 3 (counts as dc), 2 dc, ch 2, 3 dc] in same corner sp, ch 1, [3 dc, ch 2, 3 dc] in next corner ch-2 sp. Repeat from * to * 2 more times, ch 1. Join with sl st to top of beg ch-3. (8 three-dc clusters, 4 corner ch-2 sps, 4 side ch-1 sps) 9cf04cc8-ec1b-4a6c-890c-c36d546fa584.png
- R3: Sl st across next 2 dc into corner ch-2 sp. [Ch 3 (counts as dc), 2 dc, ch 2, 3 dc] in corner sp, ch 1, 3 dc in next ch-1 sp, ch 1, [3 dc, ch 2, 3 dc] in next corner ch-2 sp. Repeat from * to * 2 more times, ch 1, 3 dc in last ch-1 sp, ch 1. Join with sl st to top of beg ch-3. (12 three-dc clusters, 4 corner ch-2 sps, 8 side ch-1 sps) 9cf04cc8-ec1b-4a6c-890c-c36d546fa584.png
- R4: Sl st across next 2 dc into corner ch-2 sp. [Ch 3 (counts as dc), 2 dc, ch 2, 3 dc] in corner sp, (ch 1, 3 dc in next ch-1 sp) 2 times, ch 1, [3 dc, ch 2, 3 dc] in next corner ch-2 sp. Repeat from * to * 2 more times, (ch 1, 3 dc in next ch-1 sp) 2 times, ch 1. Join with sl st to top of beg ch-3. (16 three-dc clusters, 4 corner ch-2 sps, 12 side ch-1 sps) 9cf04cc8-ec1b-4a6c-890c-c36d546fa584.png
- R5: Sl st across next 2 dc into corner ch-2 sp. [Ch 3 (counts as dc), 2 dc, ch 2, 3 dc] in corner sp, (ch 1, 3 dc in next ch-1 sp) 3 times, ch 1, [3 dc, ch 2, 3 dc] in next corner ch-2 sp. Repeat from * to * 2 more times, (ch 1, 3 dc in next ch-1 sp) 3 times, ch 1. Join with sl st to top of beg ch-3. (20 three-dc clusters, 4 corner ch-2 sps, 16 side ch-1 sps) 9cf04cc8-ec1b-4a6c-890c-c36d546fa584.png
- R6: Sl st across next 2 dc into corner ch-2 sp. [Ch 3 (counts as dc), 2 dc, ch 2, 3 dc] in corner sp, (ch 1, 3 dc in next ch-1 sp) 4 times, ch 1, [3 dc, ch 2, 3 dc] in next corner ch-2 sp. Repeat from * to * 2 more times, (ch 1, 3 dc in next ch-1 sp) 4 times, ch 1. Join with sl st to top of beg ch-3. (24 three-dc clusters, 4 corner ch-2 sps, 20 side ch-1 sps) 9cf04cc8-ec1b-4a6c-890c-c36d546fa584.png
- R7 (Solid Framing Round — Matches Motif A R7): Sl st across next 2 dc into corner ch-2 sp.
- Ch 1, [2 sc, ch 2, 2 sc] in corner ch-2 sp, work 1 sc in every dc and 1 sc in every ch-1 sp across the side (22 sc along the side).
- Repeat from * to * 3 more times (omitting beg ch-1). Join with sl st to first sc. FO leaving a 12-inch tail on half of your squares for seaming. (26 sc per side / 104 sc total, plus 4 corner ch-2 sps) 9cf04cc8-ec1b-4a6c-890c-c36d546fa584.png
📐 Motif C: Half-Square Setting Triangles (Make 18 Total)
Purpose: Fills the V-shaped gaps along the four straight outer edges of the diagonal blanket layout so the blanket has straight edges prior to adding the border.
9cf04cc8-ec1b-4a6c-890c-c36d546fa584.png
Quantities by Color:
- 🤍 Color A (Warm Cream): Make 6
- 🌸 Color C (Dusty Rose): Make 6
- 🌿 Color B (Moss Green): Make 6
Starting Point: Center Magic Ring worked flat in turned rows.
- Row 1 (RS): Make a MR. Ch 4 (counts as 1 dc + ch 1), [3 dc, ch 2, 3 dc] into MR, ch 1, 1 dc into MR. Pull ring tight. Turn. (2 three-dc clusters, 2 edge dc, 1 center ch-2 sp, 2 side ch-1 sps)
- Row 2: Ch 4 (counts as 1 dc + ch 1), 3 dc in first ch-1 sp, ch 1, [3 dc, ch 2, 3 dc] in center ch-2 sp, ch 1, 3 dc in last ch-1 sp, ch 1, 1 dc in 3rd ch of turning ch-4. Turn. (4 three-dc clusters, 2 edge dc)
- Row 3: Ch 4, (3 dc in next ch-1 sp, ch 1) 2 times, [3 dc, ch 2, 3 dc] in center ch-2 sp, (ch 1, 3 dc in next ch-1 sp) 2 times, ch 1, 1 dc in 3rd ch of turning ch-4. Turn. (6 three-dc clusters, 2 edge dc)
- Row 4: Ch 4, (3 dc in next ch-1 sp, ch 1) 3 times, [3 dc, ch 2, 3 dc] in center ch-2 sp, (ch 1, 3 dc in next ch-1 sp) 3 times, ch 1, 1 dc in 3rd ch of turning ch-4. Turn. (8 three-dc clusters, 2 edge dc)
- Row 5: Ch 4, (3 dc in next ch-1 sp, ch 1) 4 times, [3 dc, ch 2, 3 dc] in center ch-2 sp, (ch 1, 3 dc in next ch-1 sp) 4 times, ch 1, 1 dc in 3rd ch of turning ch-4. Turn. (10 three-dc clusters, 2 edge dc)
- Row 6: Ch 4, (3 dc in next ch-1 sp, ch 1) 5 times, [3 dc, ch 2, 3 dc] in center ch-2 sp, (ch 1, 3 dc in next ch-1 sp) 5 times, ch 1, 1 dc in 3rd ch of turning ch-4. Turn. (12 three-dc clusters, 2 edge dc)
- Row 7 (Solid Framing Row — Short Sides Only): Ch 1, 1 sc in first dc, 1 sc in first ch-1 sp, 1 sc in each of next 3 dc, 1 sc in next ch-1 sp; repeat from * to * 5 more times across the first short side (26 sc), [2 sc, ch 2, 2 sc] in center ch-2 sp, work 26 sc evenly across the second short side ending with 1 sc in the 3rd ch of turning ch-4. (Do not work along the long hypotenuse base yet—it will be finished during the main blanket border.) FO leaving a 12-inch tail. (28 sc on each short side)
📐 Motif D: Quarter-Square Corner Triangles (Make 4 Total)
Purpose: Fills the four outer 90-degree corners of the diagonal grid.
9cf04cc8-ec1b-4a6c-890c-c36d546fa584.png
Quantities by Color:
- 🤍 Color A (Warm Cream): Make 2
- 🌿 Color B (Moss Green): Make 2
Starting Point: Center Magic Ring worked flat in turned rows.
- Row 1 (RS): Make a MR. Ch 4 (counts as 1 dc + ch 1), 3 dc into MR, ch 1, 1 dc into MR. Pull ring tight. Turn. (1 three-dc cluster, 2 edge dc)
- Row 2: Ch 4, 3 dc in first ch-1 sp, ch 1, 3 dc in last ch-1 sp, ch 1, 1 dc in 3rd ch of turning ch-4. Turn. (2 three-dc clusters, 2 edge dc)
- Row 3: Ch 4, (3 dc in next ch-1 sp, ch 1) 3 times, 1 dc in 3rd ch of turning ch-4. Turn. (3 three-dc clusters, 2 edge dc)
- Row 4: Ch 4, (3 dc in next ch-1 sp, ch 1) 4 times, 1 dc in 3rd ch of turning ch-4. Turn. (4 three-dc clusters, 2 edge dc)
- Row 5: Ch 4, (3 dc in next ch-1 sp, ch 1) 5 times, 1 dc in 3rd ch of turning ch-4. Turn. (5 three-dc clusters, 2 edge dc)
- Row 6: Ch 4, (3 dc in next ch-1 sp, ch 1) 6 times, 1 dc in 3rd ch of turning ch-4. Turn. (6 three-dc clusters, 2 edge dc)
- Row 7 (Solid Framing Row — Top Edge Only): Ch 1, 1 sc in first dc, 1 sc in first ch-1 sp, (1 sc in each of next 3 dc, 1 sc in next ch-1 sp) 6 times, ending with 1 sc in 3rd ch of turning ch-4. (28 sc across the single square-joining edge). FO leaving a 12-inch tail.
🌊 Multi-Color Granny & Scalloped Border
Purpose: Frames the entire assembled rectangular blanket with crisp striped granny rounds and a plush moss-green scalloped edge.
9cf04cc8-ec1b-4a6c-890c-c36d546fa584.png
Yarn Colors: Color A (Warm Cream), Color D (Berry Rose), Color E (Soft Peach), Color C (Dusty Rose), Color B (Moss Green).
- Border R1 (Color A — Warm Cream — Foundation Round): With RS facing, join Color A in any of the 4 outer corner stitches of the assembled blanket.
- Work [1 sc, ch 2, 1 sc] in the corner.
- Along each side, work 1 sc into the side of every row-end along the triangle hypotenuses, spacing stitches evenly so the fabric lies completely flat (aim for approximately 18 sc per triangle edge, plus 1 sc at each seam junction).
- Work [1 sc, ch 2, 1 sc] in each of the remaining 3 corners. Join with sl st to first sc. Do not FO.
- ⚠️ Stitch Count Check: Ensure your stitch count along every side is a multiple of 4 + 2 so the granny clusters in Border R2 land cleanly in the corners! Adjust by adding or skipping 1–2 sc evenly along a side if needed.
- Border R2 (Color A — Warm Cream): Sl st into the corner ch-2 sp.
- [Ch 3 (counts as dc), 2 dc, ch 2, 3 dc] in corner ch-2 sp, (ch 1, sk 3 sc, 3 dc in next sc) across the side to the last 3 sc before the next corner, ch 1, sk last 3 sc.
- Repeat from * to * 3 more times (replacing beg ch-3 with 1 dc). Join with sl st to top of beg ch-3. FO Color A. 9cf04cc8-ec1b-4a6c-890c-c36d546fa584.png
- Border R3 (Color D — Berry Rose): Join Color D in any corner ch-2 sp.
- [Ch 3 (counts as dc), 2 dc, ch 2, 3 dc] in corner ch-2 sp, (ch 1, 3 dc in next ch-1 sp) across the side, ch 1.
- Repeat from * to * 3 more times (replacing beg ch-3 with 1 dc). Join with sl st to top of beg ch-3. FO Color D. 9cf04cc8-ec1b-4a6c-890c-c36d546fa584.png
- Border R4 (Color E — Soft Peach): Join Color E in any corner ch-2 sp. Work identically to Border R3. Join with sl st to top of beg ch-3. FO Color E. 9cf04cc8-ec1b-4a6c-890c-c36d546fa584.png
- Border R5 (Color C — Dusty Rose): Join Color C in any corner ch-2 sp. Work identically to Border R3. Join with sl st to top of beg ch-3. FO Color C. 9cf04cc8-ec1b-4a6c-890c-c36d546fa584.png
- Border R6 (Color A — Warm Cream): Join Color A in any corner ch-2 sp. Work identically to Border R3. Join with sl st to top of beg ch-3. FO Color A. 9cf04cc8-ec1b-4a6c-890c-c36d546fa584.png
- Border R7 (Color B — Moss Green — Plush Scalloped Shell Edging): Join Color B in any corner ch-2 sp.
- Corner Shell: [Ch 3 (counts as dc), 6 dc] in the corner ch-2 sp (7 dc fan).
- Side Scallops: 1 sc in the center (2nd) dc of the next 3-dc cluster, ch 1, 5 dc in the next ch-1 sp, ch 1; repeat from * to * across the side until you reach the last 3-dc cluster before the corner, work 1 sc in the center dc of that last cluster.
- Repeat the Corner Shell (7 dc in corner ch-2 sp) and Side Scallops along the remaining 3 sides.
- Join with sl st to top of beg ch-3. FO Color B and weave in all ends securely. 9cf04cc8-ec1b-4a6c-890c-c36d546fa584.png
🎨 STYLING / ASSEMBLY / STABILITY / FINAL SHAPING
🧩 Diagonal Layout Plan
Lay all 61 full squares out on a bed or large floor space in a diagonal checkerboard grid so no two identical motifs touch edge-to-edge:
9cf04cc8-ec1b-4a6c-890c-c36d546fa584.png
- Alternate Motif A (Botanical Bloom) with Motif B (Solid Squares) in every diagonal row. 9cf04cc8-ec1b-4a6c-890c-c36d546fa584.png
- Rotate the solid Motif B colors (Warm Cream, Dusty Rose, and Moss Green) in a balanced diagonal rhythm so each color appears evenly across the blanket. 9cf04cc8-ec1b-4a6c-890c-c36d546fa584.png
- Place the 18 Half-Square Setting Triangles along the four outer edges (4 along each short top/bottom edge and 5 along each long left/right edge) and the 4 Quarter-Square Corner Triangles in the four corners. 9cf04cc8-ec1b-4a6c-890c-c36d546fa584.png
🧵 Flat Mattress-Stitch Joining Method
- Place two adjacent squares edge-to-edge with Right Sides facing up (or hold WS together for an invisible whip-stitch seam).
- Thread your tapestry needle with matching Color B (Moss Green) or Color A (Warm Cream) yarn—note how the crisp green framing rounds on Motif A create a subtle tailored grid line when joined with an invisible mattress stitch through the back loops only. 9cf04cc8-ec1b-4a6c-890c-c36d546fa584.png
- Work stitch-for-stitch across all 26 single crochets of each side, keeping tension relaxed so the seam stretches naturally with the crochet fabric.
- At four-way intersections where four square corners meet, pass your yarn needle once through all four corner chain spaces and snug gently to prevent holes.
📋 Recommended Assembly Order
- Block All Motifs First: Steam-block or wet-block all 61 full squares to 9 in × 9 in and all setting/corner triangles to matching edge lengths (9 in along each seaming edge).
- Join Into Diagonal Strips: Pin and seam the squares into 11 diagonal strips first, attaching the appropriate edge/corner triangles to the ends of each strip.
- Join Diagonal Strips Together: Pin the 11 strips together at every corner intersection using locking stitch markers, then seam the long diagonal lines from end to end.
- Weave In Motif Tails: Weave in all interior seaming ends securely on the wrong side before starting the border.
- Crochet the 7-Round Border: Work Border Rounds 1–7 continuously around the squared-off blanket, steam-blocking the final Moss Green scallops so each shell lies flat and plump. 9cf04cc8-ec1b-4a6c-890c-c36d546fa584.png
✅ Final Shaping & Finishing Checklist
- ✅ Every Motif A and Motif B square measures an identical 9 in × 9 in (23 cm × 23 cm) before joining.
- ✅ Floral puff centers in Motif A pop forward cleanly on the Right Side of the blanket. 9cf04cc8-ec1b-4a6c-890c-c36d546fa584.png
- ✅ All four outer edges of the assembled blanket lie straight without flaring or rippling before Border R1.
- ✅ Border R1 stitch count is a multiple of 4 + 2 on every side so corner fans align symmetrically.
- ✅ Final Moss Green scallops are lightly steamed flat so the edges do not curl inward. 9cf04cc8-ec1b-4a6c-890c-c36d546fa584.png
- ✅ Every yarn tail is woven back and forth in at least three directions so ends stay hidden through washing.
💡 HELPFUL CROCHET TIPS
- 💡 Keep Floral & Solid Squares the Same Size: Because Motif A uses puff stitches and dc3tog clusters, your gauge may differ slightly from Motif B. Measure your first completed Motif A and first Motif B—if Motif A is 0.25–0.5 in larger, drop down a half hook size (to 4.5 mm / US 7) for Motif A only.
- 💡 Block in Batches: Don’t wait until all 61 squares are finished to block! Block stacks of 8–10 squares at a time on a wooden peg blocking board so assembly feels effortless at the end.
- 💡 Use Standing Double Crochets for Color Changes: Instead of joining a new color with a slip stitch and ch-3 (which can leave a visible seam line), start each new color round with a standing double crochet directly in the corner space for seamless, invisible joins.
- 💡 Control Puff Stitch Height: Pull your puff loops in Motif A Round 2 up to a consistent double-crochet height (about 0.5 in / 1.2 cm). If pulled too tight, the flower center will cup; if pulled too loose, the petals will look floppy.
- 💡 Pin Every Intersection Before Seaming: Place a locking stitch marker through the corner ch-2 spaces of adjoining squares before sewing long diagonal seams—this prevents the fabric from shifting and keeps corners razor-sharp.
- 💡 Adjusting Blanket Dimensions: Want a baby blanket or lap throw instead? Build a 3 × 4 diagonal grid (25 full squares + 10 setting triangles + 4 corner triangles) for a cozy 42 in × 52 in (107 cm × 132 cm) throw.
- 💡 Matching Accent Pillow: To make the matching floral granny square throw pillow shown in the inspiration photo, make 2 Motif A squares enlarged by adding 3 extra granny rounds (alternating Warm Cream, Moss Green, and Dusty Rose) to reach 16 in × 16 in (40.5 cm × 40.5 cm), then seam around a 16-inch pillow insert. 9cf04cc8-ec1b-4a6c-890c-c36d546fa584.png
🧼 CARE INSTRUCTIONS
- 🧺 Washing: Machine wash cold on a gentle/delicate cycle inside a large mesh laundry bag (or hand wash in cool water with mild wool/delicate detergent).
- 🌬️ Drying: Reshape the blanket gently while damp—smoothing out the Moss Green scalloped edge—and lay flat to air dry on clean towels. Avoid hanging wet blankets, as the weight of water can stretch diagonal seams.
- 💨 Refreshing: Lightly hover a garment steamer 1–2 inches above the surface (without pressing the iron directly onto acrylic fibers) to refresh the plushness of the floral petals and scallops between washes.
The Rosewater & Moss Botanical Granny Square Blanket is a timeless heirloom piece designed to bring warmth, texture, and garden-inspired charm into your home for years to come. Whether you follow the classic dusty rose and moss green palette or customize the colors to suit a loved one’s bedroom, each square carries the unmistakable care of handmade craft. Share your finished blanket progress and color variations with fellow makers—every version of this botanical throw tells its own story!
9cf04cc8-ec1b-4a6c-890c-c36d546fa584.png
❓ FAQ
❓ How can I make this blanket larger for a King-size bed?
To upsize the afghan to approximately 86 in × 102 in (218 cm × 259 cm), expand the diagonal layout from a 5 × 6 grid to a 7 × 8 diagonal grid (requiring 105 full squares, 26 half-square setting triangles, and 4 quarter-square corner triangles) and increase your yarn quantities by roughly 65%.
❓ Can I join the squares as I go (JAYGO) instead of sewing them together?
Yes! To use a Join-As-You-Go method, work Round 7 of each square using single crochet and replace the regular single crochets along adjoining edges with slip stitches into the corresponding stitches of the neighboring square. Keep in mind that mattress-stitch seaming yields slightly flatter, more structured grid lines.
9cf04cc8-ec1b-4a6c-890c-c36d546fa584.png
❓ What is the best yarn fiber for this pattern?
A soft, anti-pilling worsted-weight acrylic or superwash merino wool blend works best because both hold crisp stitch definition for the puff-stitch flowers while remaining durable enough for everyday bed use. Cotton-acrylic blends (like 60% cotton / 40% acrylic) also give gorgeous drape and breathable weight.
❓ Why is my floral square ruffling or cupping in the center?
Cupping in Rounds 1–3 means your puff stitches or closing chains are pulled too tightly—try relaxing your tension or going up 0.5 mm in hook size for Rounds 1–3. Ruffling in Round 4 means your corner or side chains are too loose; tightening your chain tension or wet-blocking the square will flatten it completely.
❓ How do I keep the scalloped border from curling upward?
Make sure your Border Round 1 foundation single crochets are not spaced too far apart, and work the 5-dc shells in Border Round 7 with relaxed, full-height double crochets. A quick pass with a handheld garment steamer after fastening off will lock the scallops into flat, rounded waves.
❓ Can I simplify the pattern by using only one type of square?
Absolutely. If you love the floral motif, you can make all 61 squares using Motif A for an all-over garden bloom quilt, or make all 61 squares using Motif B in rotating colors for a faster, beginner-friendly diagonal patchwork throw.