📖 INTRODUCTION
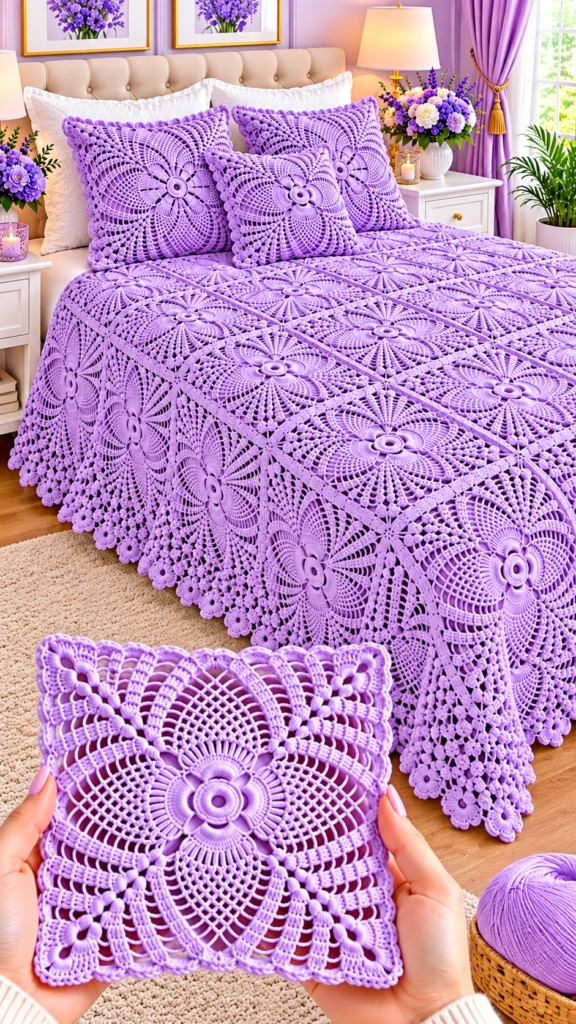
Few handmade pieces transform a bedroom quite like an heirloom lace bedspread paired with matching decorative pillow covers. Inspired by vintage European threadwork and cathedral rose windows, this Lavender Lace Cathedral Window Bedspread & Pillow Set brings delicate, light-catching geometry to modern crochet yarn. Each square motif begins with a raised, sculptural four-petal rosette medallion at the center, radiating outward into sweeping pineapple-lace arches, crisp diamond latticework, and sturdy corner fans before locking together into an architectural tapestry. Finished along the bed’s hem with a lush, floral-scalloped border and accompanied by three coordinating accent cushions, the set creates a serene, cohesive sanctuary in soft monochromatic wisteria lavender.
Whether you are crocheting a centerpiece heirloom for your own master bedroom, crafting an unforgettable wedding or housewarming gift, or working on a meditative motif-by-motif project over several months, this modular design rewards every stitch. Because the entire suite is built from one versatile square motif, you can easily scale the project to fit any mattress size—from a cozy twin throw to a dramatic king bedspread—or make just a pair of accent pillows to refresh a sofa or reading nook. While monochromatic lavender highlights every raised post stitch and picot edge with crisp shadow play, the pattern is equally breathtaking in warm ivory, sage green, dusty rose, or subtle ombré transitions.
🔍 MAIN PATTERN OVERVIEW
This comprehensive home decor pattern provides complete instructions for an original modular lace square motif along with full assembly, edging, and finishing instructions to create both a full-sized Queen/Full Bedspread and a three-piece Accent Pillow Suite.
- 🌸 The Cathedral Rosette Lace Square (Core Motif): Worked from the center outward in joined rounds, this intricate 12-inch (30.5 cm) square features a dimensional padded ring center surrounded by four curved ribbed petals, delicate chain-mesh pineapple arches, structural triple-treble lattice ribs, and corner cluster fans framed by a neat single-crochet and picot-style scalloped edge.
- 🛏️ The Heirloom Lace Bedspread: Constructed from 42 individual squares arranged in a 6-motif by 7-motif grid (including a generous overhang along the sides and foot of the bed), joined cleanly with a flat slip-stitch or whipstitch seam and finished along the three hanging edges with a multi-round Clover-Flower & Picot Lace Border.
- 🛋️ The Matching Accent Pillow Covers (2 Large Square + 1 Center Accent): The two larger pillows showcase a single motif centered on the front panel with a solid, supportive mesh-and-double-crochet envelope back and a scalloped ruffled edge. The smaller front accent pillow uses a slightly tighter hook size and trimmer border for a tailored, layered look.
🎯 SKILL LEVEL
Intermediate to Advanced
This pattern uses foundational crochet stitches combined in architectural, textured, and lacy ways. While there are no complicated color changes, working around post stitches, maintaining even chain-space tension, and blocking openwork motifs to exact dimensions require focus and steady tension.
- 🧶 Magic Ring & Post Stitches: Working front-post and back-post stitches to create the raised central medallion and ribbed petals.
- 🕸️ Openwork Lace & Chain Arches: Maintaining uniform chain-3 and chain-5 loops to form crisp diamond latticework and pineapple-inspired fan arches.
- 🫧 Puff & Cluster Stitches: Creating dimensional texture along the diagonal corner ribs and floral border scallops.
- 📐 Wet/Steam Blocking & Motif Joining: Pinning lace squares to consistent measurements and joining edges cleanly without puckering.
📏 FINISHED SIZE
All measurements below reflect finished, blocked dimensions using Light Worsted / DK (#3) mercerized cotton yarn and a 3.5 mm (E-4) crochet hook (3.0 mm for the small accent pillow).
- 🟦 Single Blocked Motif: 12″ × 12″ (30.5 cm × 30.5 cm)
- 🛏️ Queen/Full Bedspread (6 × 7 motifs + 3-sided floral lace border): Approximately 76″ wide × 86″ long (193 cm × 218.5 cm), providing an elegant drape over the sides and foot of a standard Queen mattress. (See FAQ for Twin and King motif counts.)
- 🟨 Large Square Accent Pillows (Make 2): 16″ × 16″ (40.5 cm × 40.5 cm) including the 2″ (5 cm) scalloped lace border flange.
- 🟪 Small Center Accent Pillow (Make 1): 13″ × 13″ (33 cm × 33 cm) worked with a 3.0 mm hook and a compact 1″ (2.5 cm) scalloped border.
Factors That Affect Finished Size: Cotton vs. acrylic fiber elasticity, hook size variations, chain-space tension, and aggressive vs. gentle blocking can alter each square by 0.5″ to 1.5″ (1.25 to 3.8 cm). Always block one test square before committing to your final grid layout.
🧮 GAUGE
- Motif Gauge: Rounds 1–6 (through the completion of the four ribbed petals) = 4.25″ (10.8 cm) across from petal tip to opposite petal tip, blocked.
- Complete Square Gauge: 1 complete 17-round motif = 12″ × 12″ (30.5 cm × 30.5 cm) after wet blocking.
For bedspreads and pillow covers, consistency across squares is far more important than hitting an exact millimeter measurement. If your squares measure 11.5″ instead of 12″, simply adjust your pillow insert size or add one extra row of motifs to your bedspread grid.
🧶 REQUIRED YARN AMOUNTS
This design shines in Light Worsted / DK (#3) 100% Mercerized Cotton (approx. 125–140 yards / 115–128 meters per 50 g skein), which provides crisp stitch definition, high sheen, and structural stability for lace arches.
- 💜 Single Motif (1 Square): Approximately 135 yards (123 meters) / 50 g of Wisteria Lavender
- 🛏️ Complete Queen Bedspread (42 Squares + Border):
- 42 Squares: Approximately 5,670 yards (5,185 meters) / 2,100 g
- Joining & 3-Sided Floral Lace Border: Approximately 830 yards (759 meters) / 310 g
- Bedspread Total: Approximately 6,500 yards (5,944 meters) / 2,410 g (about 49 × 50 g skeins)
- 🛋️ Three-Piece Pillow Set (2 Large Pillows + 1 Small Pillow):
- Front Motifs (3 Squares): Approximately 405 yards (370 meters) / 150 g
- Solid Envelope Backs & Scalloped Borders: Approximately 845 yards (773 meters) / 315 g
- Pillow Set Total: Approximately 1,250 yards (1,143 meters) / 465 g (about 10 × 50 g skeins)
- ✨ Grand Total (Bedspread + All 3 Pillows): Approximately 7,750 yards (7,087 meters) / 2,875 g (58–60 × 50 g skeins, including a 5% buffer for swatching and tails).
🧰 MATERIALS
- 🪝 Crochet Hooks: 3.5 mm (US E-4) for bedspread motifs, border, and large pillows; 3.0 mm (US D-3) for the smaller center accent pillow.
- 🧶 Yarn: Light Worsted / DK (#3) 100% Mercerized Cotton in Wisteria Lavender (see exact yardage breakdown above).
- 🧷 Stitch Markers: At least 8 locking stitch markers (4 to mark corner chain spaces on your active square, plus extras for pinning seams).
- 🪡 Tapestry / Yarn Needle: Blunt-tipped steel yarn needle for weaving in ends and sewing flat seams.
- ✂️ Scissors: Sharp embroidery or craft scissors.
- 📌 Blocking Supplies: Interlocking foam blocking mats, rust-proof T-pins, blocking wires (optional but highly helpful for crisp square edges), and a spray bottle or basin for wet blocking.
- 🛌 Pillow Inserts: Two 14″ × 14″ (35.5 cm × 35.5 cm) square cushion inserts (for the 16″ flanged covers) and one 12″ × 12″ (30.5 cm × 30.5 cm) square cushion insert (for the 13″ cover).
- 🔘 Buttons (Optional): Six 0.5″ (12 mm) lavender or mother-of-pearl buttons if you prefer buttoned envelope backs on the pillows instead of overlapping flaps.
🔤 ABBREVIATIONS – US TERMS
- beg – beginning
- BLO – back loop only
- ch – chain
- ch-sp – chain space
- dc – double crochet
- dtr – double treble crochet (yarn over 3 times)
- FLO – front loop only
- FPdc – front post double crochet
- FPtr – front post treble crochet
- hdc – half double crochet
- MR – magic ring (adjustable ring)
- picot – ch 3, sl st in the top of the stitch just made (or in the first ch of the ch-3, as specified)
- puff – puff stitch: [yo, insert hook into indicated st/sp, yo and pull up a loop to height of a dc] 4 times in same st/sp (9 loops on hook), yo and pull through all 9 loops, ch 1 to close
- rep – repeat
- rnd(s) – round(s)
- RS – right side
- sc – single crochet
- sk – skip
- sl st – slip stitch
- sp(s) – space(s)
- st(s) – stitch(es)
- tr – treble crochet (yarn over twice)
- WS – wrong side
- yo – yarn over
- […] – work all instructions inside brackets into the same stitch or space
- (…) xN – repeat instructions inside parentheses N times
📝 NOTES BEFORE YOU BEGIN
- 🔄 Joined Rounds, Right Side Facing: Every round of the Cathedral Rosette Lace Square is worked in joined rounds with the Right Side (RS) facing at all times unless a specific round instructs you to turn. Do not turn at the end of rounds.
- 💍 Center Ring Stability: Because the center of each motif features a dense, raised ring, weave in your starting magic ring tail securely in two directions before blocking so the center hole never loosens over years of bedmaking.
- 🌬️ Consistent Chain Tension: The beauty of the radiating pineapple arches and diamond mesh relies on uniform chain loops. Avoid pulling chains overly tight; let your hook shaft determine the loop size so the motif lies completely flat without cupping.
- 🫧 Puff Stitch Height: Draw up your yarn-over loops in every puff stitch to the full height of a standard double crochet so the diagonal corner ribs sit plump and proud on the surface of the fabric.
- 🧵 Leaving Sewing Tails: When fastening off individual bedspread squares, leave a 24″ (60 cm) tail on half of your motifs—you can use these attached tails directly to whipstitch or mattress-stitch adjacent squares together, dramatically reducing the number of ends to weave in later.
🪡 COMPLETE PATTERN
🌸 PART 1: Cathedral Rosette Lace Square (Core Motif)
Purpose: Main building block for both the bedspread (make 42) and the front panels of the three accent pillows (make 3; use a 3.0 mm hook for the small pillow square).
Yarn: Wisteria Lavender (#3 DK Mercerized Cotton)
Quantity: Make 45 total (42 for bedspread + 3 for pillows)
Starting Point: Center Magic Ring (MR)
🏵️ Center Medallion & Four Ribbed Petals (Rounds 1–6)
- R1: Make a MR, ch 1 (does not count as a st), work 16 sc into the MR. Join with a sl st to the first sc. Pull ring closed so a small, neat eyelet remains in the exact center. (16 sc)
- R2 (Raised Center Ring): Ch 1, working over the sc posts of R1 and into the center MR opening (padded cord effect), work 24 sc evenly around the entire ring. Join with a sl st to the first sc. (Tip: Pack these 24 sc snugly together so they form the smooth, raised donut ring visible at the center of the motif.) (24 sc)
- R3 (Petal Foundation): Ch 1, sc in first st, *ch 6, sk 5 sts, sc in next st; rep from * 2 more times, ch 6, sk last 5 sts, join with a sl st to first sc. (4 sc, 4 ch-6 sps)
- R4 (First Petal Arch): Sl st into the first ch-6 sp, ch 3 (counts as first dc), work 11 dc in the same ch-6 sp (12 dc total in arch), *ch 1, work 12 dc in the next ch-6 sp; rep from * 2 more times, ch 1, join with a sl st to top of beg ch-3. (48 dc, 4 ch-1 sps)
- R5 (Ribbed Petal Expansion): Ch 3 (counts as first FPdc around beg ch-3), [FPdc, ch 1] around each of the next 10 dc, FPdc around the 12th dc of the petal (12 FPdc + 10 ch-1 sps per petal), *ch 2, sk the R4 ch-1 sp, [FPdc, ch 1] around each of the first 11 dc of next petal, FPdc around 12th dc; rep from * 2 more times, ch 2, join with a sl st to top of beg ch-3. (48 FPdc, 40 ch-1 sps, 4 ch-2 sps)
- R6 (Sculpted Petal Rim): Ch 1, *sc in first FPdc, [sc in next ch-1 sp, sc in next FPdc] 10 times, sc in 12th FPdc (23 sc across petal rim), ch 3, sc in the R4 ch-1 sp below (catching the R5 ch-2 sp behind it to anchor the valley between petals), ch 3; rep from * 3 more times, join with a sl st to first sc. (92 sc, 8 ch-3 sps)
🕸️ Radiating Pineapple & Diamond Lace Arches (Rounds 7–13)
- R7 (Lace Base Loops): Sl st into the 2nd sc of the first petal, ch 1, sc in same st, *(ch 3, sk 1 sc, sc in next sc) 9 times across the petal rim (creating 9 ch-3 loops over the petal), ch 4, dc in the valley sc between petals, ch 4, sk first sc of next petal, sc in 2nd sc; rep from * 3 more times, omitting final sc and joining with a sl st to first sc. (36 ch-3 loops, 8 ch-4 sps, 4 valley dc)
- R8 (Mesh Tier 1 & Diagonal Rib Start): Sl st into first ch-3 loop, ch 1, sc in same loop, *(ch 3, sc in next ch-3 loop) 8 times (8 loops over petal), ch 3, [puff, ch 3, puff] in the valley dc (forms the diagonal corner rib), ch 3, sc in first ch-3 loop of next petal; rep from * 3 more times, omitting final sc and joining with a sl st to first sc. (32 petal ch-3 loops, 8 rib ch-3 sps, 8 puffs)
- R9 (Mesh Tier 2): Sl st into first petal ch-3 loop, ch 1, sc in same loop, *(ch 3, sc in next ch-3 loop) 7 times (7 loops over petal), ch 3, puff in next ch-3 sp before the rib, ch 3, [puff, ch 4, puff] in the ch-3 sp between the two corner rib puffs, ch 3, puff in next ch-3 sp after the rib, ch 3, sc in first petal ch-3 loop; rep from * 3 more times, omitting final sc and joining with a sl st to first sc. (28 petal ch-3 loops, 16 puffs, 16 ch-3 sps, 4 corner ch-4 sps)
- R10 (Mesh Tier 3 & Side Spoke Setup): Sl st into first petal ch-3 loop, ch 1, sc in same loop, *(ch 3, sc in next ch-3 loop) 6 times (6 loops over petal), ch 4, puff in ch-3 sp before corner pair, ch 3, [puff, ch 5, puff] in corner ch-4 sp (place a stitch marker in each of these 4 corner ch-5 sps), ch 3, puff in ch-3 sp after corner pair, ch 4, sc in first petal ch-3 loop; rep from * 3 more times, omitting final sc and joining with a sl st to first sc. (24 petal ch-3 loops, 16 puffs, 8 ch-4 sps, 8 ch-3 sps, 4 corner ch-5 sps)
- R11 (Mesh Tier 4 & Radiating Spokes): Sl st into first petal ch-3 loop, ch 1, sc in same loop, *(ch 3, sc in next ch-3 loop) 5 times (5 loops over petal), ch 4, [dc, ch 2, dc] in the ch-4 sp, ch 3, puff in ch-3 sp before corner, ch 3, [puff, ch 2, tr, ch 3, tr, ch 2, puff] in marked corner ch-5 sp, ch 3, puff in ch-3 sp after corner, ch 3, [dc, ch 2, dc] in the ch-4 sp, ch 4, sc in first petal ch-3 loop; rep from * 3 more times, omitting final sc and joining with a sl st to first sc.
- R12 (Mesh Tier 5 & Corner Fan Foundation): Sl st into first petal ch-3 loop, ch 1, sc in same loop, *(ch 3, sc in next ch-3 loop) 4 times (4 loops over petal), ch 4, [2 dc, ch 2, 2 dc] in the [dc, ch 2, dc] sp, ch 3, puff in ch-3 sp before corner, ch 3, puff in ch-2 sp before corner tr, ch 3, 9 tr in the central corner ch-3 sp (forming the corner fan), ch 3, puff in ch-2 sp after corner tr, ch 3, puff in next ch-3 sp, ch 3, [2 dc, ch 2, 2 dc] in the [dc, ch 2, dc] sp, ch 4, sc in first petal ch-3 loop; rep from * 3 more times, omitting final sc and joining with a sl st to first sc.
- R13 (Mesh Tier 6 & Ribbed Corner Fan): Sl st into first petal ch-3 loop, ch 1, sc in same loop, *(ch 3, sc in next ch-3 loop) 3 times (3 loops over petal), ch 4, [2 dc, ch 3, 2 dc] in side ch-2 sp, ch 3, puff in ch-3 sp before corner fan, ch 3, [FPtr around next tr of corner fan, ch 1] 8 times, FPtr around 9th tr of corner fan (9 FPtr + 8 ch-1 sps), ch 3, puff in ch-3 sp after corner fan, ch 3, [2 dc, ch 3, 2 dc] in side ch-2 sp, ch 4, sc in first petal ch-3 loop; rep from * 3 more times, omitting final sc and joining with a sl st to first sc.
🖼️ Structural Square Framing & Scalloped Edge (Rounds 14–17)
- R14 (Squaring the Sides): Sl st into first petal ch-3 loop, ch 1, sc in same loop, *(ch 3, sc in next ch-3 loop) 2 times (2 loops remaining over petal tip), ch 4, [3 dc, ch 2, 3 dc] in side ch-3 sp, ch 4, puff in ch-3 sp before fan, ch 3, [sc in ch-1 sp between FPtrs, ch 2] 3 times, sc in 4th ch-1 sp, ch 3, [puff, ch 4, puff] in the center (5th) FPtr post (creating the sharp square corner point), ch 3, sc in 5th ch-1 sp, [ch 2, sc in next ch-1 sp] 3 times, ch 3, puff in ch-3 sp after fan, ch 4, [3 dc, ch 2, 3 dc] in side ch-3 sp, ch 4, sc in first petal ch-3 loop; rep from * 3 more times, omitting final sc and joining with a sl st to first sc.
- R15 (Solid Frame Alignment): Sl st into first petal ch-3 loop, ch 1, sc in same loop, *ch 3, sc in last petal ch-3 loop (1 loop over petal tip), ch 3, 3 dc in ch-4 sp, dc in each of next 3 dc, [2 dc, ch 1, 2 dc] in side ch-2 sp, dc in each of next 3 dc, 3 dc in ch-4 sp, ch 3, puff in ch-3 sp before corner, ch 3, [3 dc, ch 3, 3 dc] in corner ch-4 sp between corner puffs, ch 3, puff in ch-3 sp after corner, ch 3, 3 dc in ch-4 sp, dc in each of next 3 dc, [2 dc, ch 1, 2 dc] in side ch-2 sp, dc in each of next 3 dc, 3 dc in ch-4 sp, ch 3, sc in first petal ch-3 loop; rep from * 3 more times, omitting final sc and joining with a sl st to first sc.
- R16 (Continuous Solid Perimeter Frame): Ch 1, *sc in the single petal-tip ch-3 loop, 3 sc in next ch-3 sp, sc in each of the next 8 dc, sc in ch-1 sp, sc in each of the next 8 dc, 3 sc in ch-3 sp, sc in top of puff, 3 sc in ch-3 sp, sc in each of the next 3 dc, [2 sc, ch 2, 2 sc] in the corner ch-3 sp (place stitch marker in each corner ch-2 sp), sc in each of the next 3 dc, 3 sc in ch-3 sp, sc in top of puff, 3 sc in ch-3 sp, sc in each of the next 8 dc, sc in ch-1 sp, sc in each of the next 8 dc, 3 sc in ch-3 sp; rep from * 3 more times, join with a sl st to first sc. (Each of the 4 sides now has 57 sc between the corner ch-2 spaces, providing a crisp, uniform border for joining and edging.) (228 sc, 4 corner ch-2 sps)
- R17 (Signature Picot-Scallop Motif Border): Ch 1, *(sc in next st, ch 2, 2 dc in same st, sk 2 sts) 19 times across the 57 side sc, working [sc, ch 3, 3 dc, ch 3, sc] inside the marked corner ch-2 sp; rep from * 3 more times, join with a sl st to first sc. Fasten off, leaving a 24″ (60 cm) tail on half of your squares for seaming.
🛏️ PART 2: Bedspread Assembly & Three-Sided Floral Lace Border
Purpose: Joins the 42 blocked motifs into a seamless bedspread and adds the lush, scalloped clover-flower lace edging along the left side, bottom foot, and right side.
Yarn: Wisteria Lavender (#3 DK Mercerized Cotton)
Hook: 3.5 mm (US E-4)
🔗 Step 1: Joining the 42 Motifs (6 Wide × 7 Long)
- Lay out all 42 wet-blocked motifs in a grid of 6 columns wide by 7 rows long, ensuring all Right Sides (RS) face up and every central rosette is oriented uniformly.
- Joining Method (Invisible Flat Back-Loop Join): Hold two adjacent squares with Right Sides facing up side-by-side (or Wrong Sides together). Thread a tapestry needle with your 24″ yarn tail and whipstitch through the back loops only (BLO) of the R16 structural sc stitches (tucking the R17 scallops slightly forward to the RS so they create subtle raised decorative ridges along every seam line, just like the tiled grid in the finished bedspread).
- Join all 7 horizontal strips of 6 squares first, then join the 6 long vertical seams from top to bottom. Keep tension relaxed so the seams stretch evenly with the lace.
🌺 Step 2: Three-Sided Floral & Clover Lace Bedspread Border
(Worked around the Left Side, Bottom Foot, and Right Side of the bedspread only; leave the top headboard edge plain so it tucks neatly beneath your pillows.)
- Border R1 (Foundation Anchor Row): With RS facing, join yarn with a sl st at the top-left corner of the bedspread (just below the top edge). Ch 1, sc evenly down the left side (working 1 sc in every sc and 2 sc in every seam junction), work [sc, ch 3, sc] in the bottom-left corner, sc evenly across the bottom edge, work [sc, ch 3, sc] in the bottom-right corner, and sc evenly up the right side to the top-right corner. Ensure your stitch count along each side is a multiple of 6 + 1 (adjust by adding or skipping 1–2 sc near a seam if needed). Turn.
- Border R2 (Trellis Loop Tier 1): With WS facing, ch 1, sc in first sc, *ch 5, sk 2 sc, sc in next sc; rep from * across to the bottom-left corner ch-3 sp, [sc, ch 5, sc] in corner sp, continue ch 5, sk 2 sc, sc in next sc across the bottom edge to bottom-right corner sp, [sc, ch 5, sc] in corner sp, and continue ch 5, sk 2 sc, sc in next sc up the right side to the end. Turn.
- Border R3 (Trellis Loop Tier 2): With RS facing, sl st into the first ch-5 loop, ch 1, sc in same loop, *ch 5, sc in next ch-5 loop; rep from * along all three edges, working [sc, ch 5, sc] in each of the two bottom corner loops. Turn.
- Border R4 (Clover-Bud Cluster Round): With WS facing, sl st into first ch-5 loop, ch 1, sc in same loop, *ch 3, [puff, ch 2, puff, ch 2, puff] in next ch-5 loop (forms a 3-petal clover bud), ch 3, sc in next ch-5 loop; rep from * along all three edges, working an extra [puff, ch 2, puff, ch 2, puff] at each bottom corner so the border flares gracefully without pulling. Turn.
- Border R5 (Scalloped Blossoms & Picot Fringe): With RS facing, ch 1, sc in first sc, *ch 2, in the first ch-2 sp of the clover bud work [3 dc, picot, 2 dc], sl st in the center puff, in the second ch-2 sp of the clover bud work [2 dc, picot, 3 dc], ch 2, sc in next sc; rep from * across all three hanging edges of the bedspread. Fasten off and weave in all ends securely.
🛋️ PART 3: Matching Accent Pillow Covers (Make 3)
Purpose: Creates two 16″ × 16″ (40.5 cm × 40.5 cm) large square pillow covers and one 13″ × 13″ (33 cm × 33 cm) smaller front accent pillow cover.
Yarn: Wisteria Lavender (#3 DK Mercerized Cotton)
Hooks: 3.5 mm (US E-4) for the 2 Large Pillows; 3.0 mm (US D-3) for the 1 Small Pillow.
⬛ Solid Envelope Back Panels (Make 2 Panels per Pillow — 6 Panels Total)
(Each pillow uses two overlapping rectangular back panels so you can easily insert and remove the cushion form for washing.)
- Large Pillow Back Panels (Make 4 panels total — 2 per large pillow, 3.5 mm hook):
- Row 1: Ch 59. Starting in the 4th ch from hook (counts as first dc), work 1 dc in each ch across. Turn. (57 dc)
- Row 2: Ch 3 (counts as first dc), dc in each dc across. Turn. (57 dc)
- Rows 3–22: Rep Row 2 until the panel measures 9.5″ (24 cm) tall. Fasten off. (When two 9.5″ panels overlap by 3″ in the center, they match the exact 16″ height of the blocked front motif.)
- Small Pillow Back Panels (Make 2 panels — for 1 small pillow, 3.0 mm hook):
- Row 1: Ch 59. Starting in the 4th ch from hook, work 1 dc in each ch across. Turn. (57 dc)
- Rows 2–19: Rep Row 2 of Large Pillow Back Panel until the panel measures 8″ (20.5 cm) tall. Fasten off. (When overlapped by 3″, the two panels form a 13″ square matching the 3.0 mm front motif.)
🎀 Joining & Scalloped Pillow Flange Border
- Place your blocked Front Motif face-down (WS up). Lay the Upper Back Panel on top with RS facing up, aligning its top and side edges with the motif. Lay the Lower Back Panel on top with RS facing up, aligning its bottom and side edges so the two back panels overlap by approximately 3″ (7.5 cm) across the middle. Pin all layers together through the R16 structural sc round (leaving the R17 scallops free on the front).
- Pillow Joining Round: With the Front Motif facing you (RS up), join yarn with a sl st in any corner, ch 1, and work sc evenly through both the front motif (R16) and the back panel(s) all the way around all 4 sides (57 sc per side), working [sc, ch 2, sc] in each of the 4 corners. Join with a sl st to first sc.
- Pillow Scallop Flange (Large Pillows — 2 Rounds):
- Flange R1: Ch 1, *sc in next st, ch 2, sk 2 sts, [puff, ch 2, puff] in next st, ch 2, sk 2 sts; rep from * around all 4 sides, working [puff, ch 3, puff, ch 3, puff] in each corner ch-2 sp. Join with a sl st to first sc.
- Flange R2: Sl st into first ch-2 sp, ch 1, *sc in ch-2 sp, in the space between the two puffs work [3 dc, picot, 3 dc], sc in next ch-2 sp; rep from * around all 4 sides, working [4 dc, picot, 4 dc] in each corner space. Fasten off, weave in ends, and insert your cushion form through the back envelope opening.
- Pillow Scallop Flange (Small Center Pillow — 1 Round, 3.0 mm hook):
- Flange R1: Ch 1, *(sc in next st, sk 1 st, [2 dc, picot, 2 dc] in next st, sk 1 st) across each side, working [3 dc, picot, 3 dc] in each corner ch-2 sp. Join with a sl st to first sc, fasten off, and insert the 12″ cushion form.
🎨 STYLING / ASSEMBLY / STABILITY / FINAL SHAPING
📐 Wet Blocking for Architectural Lace Crispness
Because this motif relies on contrasting dense central petals and airy chain-mesh arches, blocking is essential—it transforms slightly rippled lace into flat, geometric stained-glass tiles:
- Submerge finished squares in lukewarm water with a drop of mild wool/cotton wash for 15 minutes. Gently squeeze out excess water in a clean towel (never wring or twist).
- Pin each square onto foam blocking mats to an exact 12″ × 12″ (30.5 cm × 30.5 cm) square using rust-proof T-pins at every corner and every 1.5″ (3.8 cm) along the sides.
- Use four T-pins around the R2 center ring and four T-pins at the tips of the R6 ribbed petals to ensure every motif’s centerpiece dries symmetrically. Allow to air-dry completely before unpinning.
🛌 Bedspread Drape & Pillow Styling
- Bed Placement: Align the plain, unbordered top edge of the bedspread flush with the headboard and pillows, letting the floral-bordered sides and foot drape smoothly toward the floor.
- Layered Pillow Arrangement: Prop two crisp white Euro shams against the headboard first, lean the two 16″ Large Lavender Lace Pillows slightly angled in front of them, and center the 13″ Small Lavender Lace Pillow in front to echo the layered hotel-style arrangement.
🔢 Recommended Assembly Order
- Crochet and wet-block all 42 bedspread squares first.
- Seam the 42 squares into 7 horizontal rows of 6, then join the 6 vertical seams.
- Work the 5-round Three-Sided Floral Lace Border along the left, bottom, and right edges of the bedspread, then steam-block the border flat.
- Crochet and wet-block the 3 pillow front motifs (two with 3.5 mm hook, one with 3.0 mm hook).
- Crochet the 6 solid envelope back panels, pin them to the front motifs, join around all four edges, and complete the scalloped flanges.
✅ Final Shaping & Finishing Checklist
- ✅ All 42 bedspread squares and 3 pillow squares blocked to uniform dimensions before joining.
- ✅ Central four-petal rosettes oriented in the same direction across every row and column of the bedspread.
- ✅ Back-loop join seams lie flat with R17 scallops visible on the right side without buckling.
- ✅ Three-sided bedspread border flares smoothly at both bottom corners without curling upward.
- ✅ Pillow envelope backs overlap by at least 3″ (7.5 cm) so inserts stay completely hidden inside.
- ✅ All magic ring centers reinforced and yarn tails woven invisibly through dense stitch bases.
💡 HELPFUL CROCHET TIPS
- 💡 Batch-Work by Rounds: If making all 42 bedspread squares feels daunting, crochet Rounds 1–6 (the centers and petals) on 10 squares at a time, then add the outer lace rounds—your muscle memory will speed up dramatically.
- 💡 Color-Code Your Corner Markers: Keep four locking stitch markers clipped into the four corner spaces of your active motif from Round 10 onward so you never accidentally work a side repeat into a corner fan.
- 💡 Steam-Block Seams Gently: After joining all 42 bedspread squares, hover a handheld garment steamer 1–2 inches above the join lines and pat them flat with your palms to settle the seams permanently.
- 💡 Choose Slightly Oversized Pillow Forms: Stuffing a 14″ insert into the 12″ inner pocket of the large pillow cover (before the 2″ flange) creates plump, luxurious corners that hold the lace pattern taut.
- 💡 Check Dye Lots Up Front: Because this project uses approximately 58–60 skeins of a single solid shade, purchase all yarn at once from the same dye lot—or alternate skeins every few motifs if combining two dye lots.
- 💡 Keep Puff Loops Loose: When working the diagonal rib puff stitches in Rounds 8–15, relax your tension slightly as you pull up loops so the puffs stay rounded rather than pinched.
- 💡 Protect the Lace While Working: Store completed blocked squares stacked flat inside a clean pillowcase rather than a crowded project bag so the delicate picots stay crisp until assembly day.
🧼 CARE INSTRUCTIONS
- Washing: Hand wash the bedspread and pillow covers (with inserts removed) in cool or lukewarm water using a gentle, dye-free detergent. For large bedspreads, soak in a clean bathtub, gently press suds through the cotton, and rinse thoroughly until the water runs clear.
- Drying: Press excess water out by rolling sections in dry bath towels. Lay flat on clean towels or blocking mats to air-dry, gently smoothing the floral border scallops into shape while damp. Do not machine tumble-dry, as high heat can shrink cotton fibers and distort the lace geometry.
- Storage: When not on the bed, fold the bedspread with acid-free tissue paper between layers or roll it around a padded tube to prevent deep creases along the lace arches.
May this luminous lavender bedspread and pillow suite become a treasured heirloom in your home—whether you keep it in tranquil monochromatic wisteria or customize it to match your own bedroom palette, we would love to see your finished squares come to life!
❓ FAQ
❓ Can I adjust the bedspread size for a Twin, King, or Throw blanket?
Yes! Because each blocked motif measures 12″ × 12″ (30.5 cm × 30.5 cm) and the border adds roughly 4″ (10 cm) to the width and 2″ (5 cm) to the length, you can easily customize the grid:
- Sofa Throw (4 × 5 motifs = 20 squares): ~52″ × 62″ (132 cm × 157.5 cm)
- Twin Bedspread (5 × 7 motifs = 35 squares): ~64″ × 86″ (162.5 cm × 218.5 cm)
- Queen/Full Bedspread (6 × 7 motifs = 42 squares): ~76″ × 86″ (193 cm × 218.5 cm)
- King Bedspread (8 × 7 motifs = 56 squares): ~100″ × 86″ (254 cm × 218.5 cm)
❓ What is the best yarn fiber for this lace bedspread?
100% Mercerized Cotton in a Light Worsted / DK (#3) weight is ideal because mercerization gives the yarn a subtle luster, prevents fuzzing, and holds crisp lace stitch definition after blocking. Bamboo-cotton blends also offer gorgeous drape, while standard acrylic can be used if you steam-block each square carefully (avoid touching the iron directly to acrylic yarn).
❓ Why are my squares ruffling or cupping before blocking?
Slight ruffling in the outer chain arches (Rounds 10–14) is completely normal in openwork lace crochet and will flatten out cleanly during wet blocking. However, if a square cups inward like a bowl, go up one hook size (to a 3.75 mm or 4.0 mm hook) or loosen your chain-3 and chain-5 loops.
❓ Can I line the bedspread with fabric so the bedsheets underneath don’t show through?
Absolutely. While unlined lace looks stunning layered over a crisp white or cream duvet cover, you can hand-sew a lightweight cotton sateen or voile backing sheet to the underside of the R16 outer border (leaving the 3-sided floral lace border unlined so it drapes freely).
❓ How can I make the pillow covers faster if I don’t want to crochet solid backs?
You can sew simple envelope pillow backs out of matching lavender cotton or linen fabric, then blanket-stitch around the fabric edges and crochet the front motif directly onto the fabric backing during the Pillow Joining Round.
❓ How long does it take to crochet the entire set?
An experienced crocheter typically completes one 17-round motif in 60 to 90 minutes. Working at a relaxed pace of one or two squares per evening, you can finish the entire 42-square bedspread and three-pillow suite in roughly 6 to 8 weeks.