📖 INTRODUCTION
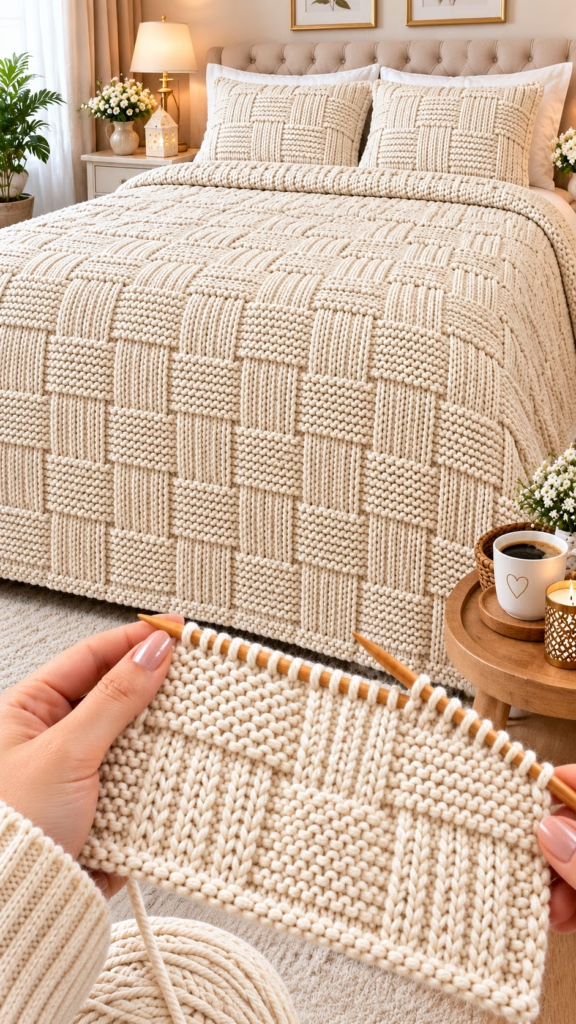
Transform your bedroom into a serene, boutique-hotel sanctuary with this Chunky Basketweave Blanket and Matching Pillow Sham Set. Featuring deep, sculptural rectangular blocks that alternate between smooth vertical ridges and tactile, pebbled horizontal bars, this heirloom-weight bedding ensemble brings effortless warmth and architectural texture to any space. In the reference design, the rich, creamy ivory yarn catches the light across every raised ridge and recessed purl-look bump, creating a rhythmic woven checkerboard that drapes generously over the bed.
Whether you are looking to refresh a master bedroom, craft an unforgettable wedding or housewarming gift, or cozy up your living room for the colder months, this project delivers high-impact luxury without complicated colorwork. Because the entire set is worked in a single, luminous neutral shade, your stitches become the undisputed star of the show. While the visual inspiration showcases a classic knit-look basketweave swatch on wooden needles, this original pattern translates that exact aesthetic into pure, accessible crochet using post stitches and alternating textured blocks—so you can achieve that plush, woven-loft look with a single crochet hook.
Best of all, the modular block repeat makes this design endlessly customizable. You can easily adjust the width and length to create anything from a cozy lap throw to a full king-sized bedspread, and the matching envelope-back pillow shams tie the entire room together with cohesive, designer-level polish.
🔍 MAIN PATTERN OVERVIEW
This complete bedroom bedding pattern includes full, step-by-step instructions for two coordinating pieces:
- The Chunky Basketweave Bed Blanket: A generously proportioned, reversible-friendly throw/bedspread worked flat in rows. The fabric is built from alternating rectangular blocks—each measuring 6 stitches wide by 6 rows tall—that pair smooth, vertical knit-look ribs (created with Front Post Double Crochet) against dense, bumpy horizontal ridges (created with Back Post Double Crochet and alternating texture rows). A neat, ribbed border frames the entire perimeter to prevent curling and mirror the folded top cuff seen on the bed.
- Matching Basketweave Pillow Shams (Set of 2): Coordinating rectangular pillow covers worked in the exact same 6×6 basketweave grid, finished with an overlapping envelope closure on the back and a tidy ribbed edge so you can easily insert or remove standard or queen-sized bed pillows for washing.
Design Note on Construction: While the foreground of the visual reference depicts a swatch on knitting needles, this pattern is 100% crochet. By combining Front Post Double Crochet (FPdc) and Back Post Double Crochet (BPdc) around a sturdy foundation of double crochet stitches, we replicate the deep, 3D vertical columns and raised horizontal bumpy bars in thick, squishy crochet fabric.
🎯 SKILL LEVEL
Easy to Intermediate
This pattern uses a straightforward, repeating stitch grid that quickly becomes meditative once you establish the first block sequence. If you are comfortable working basic double crochet stitches and turning your work cleanly at the end of rows, you can master post stitches within the first few rows.
Techniques Involved:
- 🧶 Foundation chain and basic Double Crochet (dc)
- 🧶 Front Post Double Crochet (FPdc) for smooth, vertical knit-look columns
- 🧶 Back Post Double Crochet (BPdc) for raised, bumpy horizontal ridges
- 🧶 Single Crochet (sc) and Half Double Crochet (hdc) for clean borders and structural edges
- 🧶 Counting rows and reading your stitches to align alternating texture blocks
- 🧶 Seaming and blocking large, heavy crochet panels
📏 FINISHED SIZE
The main instructions are written for a Queen/Full Bedspread and two Standard/Queen Pillow Shams, with built-in stitch multiples so you can resize effortlessly.
- 🛏️ Queen/Full Bed Blanket: Approximately 80 inches wide x 88 inches long (203 cm x 224 cm), allowing for a generous drape over the sides and foot of a standard Queen mattress.
- 🛋️ Alternative Throw Blanket Size (Included in Notes): Approximately 50 inches wide x 60 inches long (127 cm x 152 cm).
- 🛌 Matching Pillow Shams (Make 2): Approximately 20 inches tall x 26 inches wide (51 cm x 66 cm) each, designed to fit standard/queen bed pillows with a snug, tailored fit.
Factors That Affect Finished Size:
- Yarn Weight & Fiber: Bulky (#5) acrylic or wool-blend yarns vary in loft; a dense cotton-blend bulky yarn will have more drape and stretch slightly heavier than a lofty roving-style acrylic.
- Hook Size & Tension: Post stitches naturally draw the fabric inward horizontally. If you crochet tightly, go up to a 9.0 mm (M/N-13) hook to maintain soft drape and prevent stiff board-like fabric.
- Blocking & Gravity: Because a full-sized chunky blanket has significant weight, gentle steam blocking and natural gravity on the bed will relax the vertical columns and add 2–3 inches (5–7.5 cm) in length over time.
🧮 GAUGE
Because post-stitch basketweave is a dense, sculptural fabric, checking gauge on a small swatch before committing to a full bedspread is essential so you do not run short on yarn.
- Pattern Gauge (Unblocked): 10 stitches x 8 rows = 4 inches x 4 inches (10 cm x 10 cm) in established Basketweave Pattern using an 8.0 mm (L-11) hook.
- Block Reference: Each individual 6-stitch x 6-row basketweave block should measure approximately 2.4 inches wide x 3 inches tall (6 cm x 7.5 cm).
Tip: If your swatch is narrower than 4 inches across 10 stitches, switch to a larger hook. If it is wider and loose/gappy between posts, size down to a 7.0 mm hook.
🧶 REQUIRED YARN AMOUNTS
All yarn estimates are calculated for Category #5 Bulky Weight Yarn in a single cohesive color (Creamy Ivory / Warm Alabaster) as shown in the reference imagery.
- 🧵 Queen/Full Bed Blanket (80″ x 88″): Approximately 3,600 – 3,900 yards (3,290 – 3,565 meters) — roughly 26 to 28 skeins (based on 137 yds / 100g per skein).
- 🧵 Optional Throw Size Blanket (50″ x 60″): Approximately 1,650 – 1,800 yards (1,510 – 1,645 meters) — roughly 12 to 13 skeins.
- 🧵 Matching Pillow Shams (Set of 2, 20″ x 26″ each): Approximately 1,100 – 1,250 yards total (1,005 – 1,140 meters) — roughly 8 to 9 skeins (about 4 to 4.5 skeins per sham).
- 📦 Complete Bedroom Set Total (Queen Blanket + 2 Shams): Approximately 4,700 – 5,150 yards (4,300 – 4,710 meters) — 35 to 38 skeins total.
Dye Lot Advisory: Purchase all skeins for the blanket and shams at the same time from the same dye lot so there are no subtle shade shifts across the large monochromatic surface.
🧰 MATERIALS
- 🪝 Crochet Hook: 8.0 mm (US L-11) ergonomic crochet hook (an ergonomic handle is strongly recommended for bulky post-stitch projects).
- 🧶 Yarn: Category #5 Bulky Weight soft acrylic, superwash wool, or wool-acrylic blend in Creamy Ivory (see Required Yarn Amounts above).
- 📌 Stitch Markers: 10 to 15 locking stitch markers (helpful for marking every 24 stitches on your foundation chain and tracking block transitions).
- 🪡 Tapestry Needle: Large-eye blunt yarn needle suitable for bulky yarn weaving and seaming.
- ✂️ Scissors: Sharp crafting scissors.
- 📏 Measuring Tape: Flexible tape measure for checking gauge and panel dimensions.
- 🛌 Pillow Inserts (For Shams): Two (2) 20″ x 26″ (51 cm x 66 cm) standard/queen bed pillow inserts.
- 💨 Blocking Supplies (Optional): Foam blocking mats, rust-proof T-pins, and a garment steamer (or spray bottle) for relaxing the finished borders.
🔤 ABBREVIATIONS – US TERMS
- ch – chain
- st(s) – stitch(es)
- sl st – slip stitch
- sc – single crochet
- hdc – half double crochet
- dc – double crochet
- FPdc – front post double crochet (yo, insert hook from front to back to front around the post of the indicated stitch, yo, pull up a loop, [yo, pull through 2 loops] twice)
- BPdc – back post double crochet (yo, insert hook from back to front to back around the post of the indicated stitch, yo, pull up a loop, [yo, pull through 2 loops] twice)
- BLO – back loop only
- yo – yarn over
- sk – skip
- rep – repeat
- RS – right side
- WS – wrong side
- PM – place marker
📝 NOTES BEFORE YOU BEGIN
- 📝 Understanding the Basketweave Texture: To create the bold, architectural checkerboard seen in the reference bedding, we alternate blocks of 6 FPdc and 6 BPdc across each row for 6 consecutive rows, then swap their positions for the next 6 rows. When you turn your work at the end of a row, remember that a stitch worked as an FPdc on the Right Side must be worked as a BPdc on the Wrong Side so that the smooth vertical ribs stay continuously on the front, while the bumpy horizontal ridges stay grouped together!
- 📝 Turning Chain Rule: At the start of every basketweave row, ch 2 (counts as a standard edge dc). Always work a standard dc into the very last stitch (top of the turning ch-2) of every row. These two edge stitches create clean, straight selvedges that make adding the border effortless.
- 📝 Customizing Blanket Width & Length: The basketweave stitch pattern requires a foundation chain in a multiple of 12 + 4 (for the Queen size: 16 repeats of 12 = 192 + 4 = 196 chains, giving 194 stitches per row).
- For a 50″ Throw Blanket: Chain 124 (10 repeats of 12 + 4 = 122 stitches per row).
- To adjust length: Simply work additional 12-row pattern repeats (6 rows of Block Set A + 6 rows of Block Set B) until your blanket reaches your desired length.
- 📝 Joining New Skeins: Because a large blanket uses nearly 30 skeins, avoid knotting yarn in the middle of a row. Join new yarn at the end of a row right before the turning chain, leaving a 6-inch (15 cm) tail to weave securely through the dense post stitches later.
🪡 COMPLETE PATTERN
🛏️ PART 1: CHUNKY BASKETWEAVE BED BLANKET
Purpose: Main oversized bed blanket with a deeply textured 6×6 basketweave body and a structured ribbed perimeter border.
Yarn: Creamy Ivory (#5 Bulky)
Quantity to Make: 1
Starting Point: Foundation chain worked across the bottom width (80″ / 203 cm).
🧱 Main Blanket Body
Foundation Chain: Ch 196 loosely (or use a foundation double crochet row of 194 sts if preferred; place a stitch marker every 24 chains to keep track of your count).
- Row 1 (Setup Row – WS): Dc in 4th ch from hook (skipped 3 chs count as first dc) and in each ch across. Turn. (194 dc)
Block Set A (Rows 2–7 – Vertical Ribs First):
- Row 2 (RS): Ch 2 (counts as first dc here and throughout), *FPdc around each of next 6 sts, BPdc around each of next 6 sts; rep from * across until 1 st remains, dc in top of turning ch. Turn. (194 sts: 2 edge dc + 16 alternating 6-st blocks)
- Row 3 (WS): Ch 2, *BPdc around each of next 6 sts, FPdc around each of next 6 sts; rep from * across until 1 st remains, dc in top of turning ch. Turn. (194 sts)
- Row 4 (RS): Rep Row 2. (194 sts)
- Row 5 (WS): Rep Row 3. (194 sts)
- Row 6 (RS): Rep Row 2. (194 sts)
- Row 7 (WS): Rep Row 3. (194 sts)
Block Set B (Rows 8–13 – Horizontal Bumps First):
- Row 8 (RS): Ch 2, *BPdc around each of next 6 sts, FPdc around each of next 6 sts; rep from * across until 1 st remains, dc in top of turning ch. Turn. (194 sts)
- Row 9 (WS): Ch 2, *FPdc around each of next 6 sts, BPdc around each of next 6 sts; rep from * across until 1 st remains, dc in top of turning ch. Turn. (194 sts)
- Row 10 (RS): Rep Row 8. (194 sts)
- Row 11 (WS): Rep Row 9. (194 sts)
- Row 12 (RS): Rep Row 8. (194 sts)
- Row 13 (WS): Rep Row 9. (194 sts)
Body Continuation:
- Rows 14–169: Repeat Rows 2–13 thirteen (13) more times, ending after completing a full 6-row Block Set B so the top and bottom edges mirror each other symmetrically. (169 rows total; body measures approximately 77″ wide x 85″ long before border).
- Do not fasten off; proceed directly to the Blanket Ribbed Border.
🖼️ Blanket Ribbed Perimeter Border
Purpose: Frames all four edges of the blanket with a crisp, flat ribbed trim that prevents edge curling and echoes the folded cuff styling seen in the bedroom presentation.
Yarn: Creamy Ivory (#5 Bulky)
Starting Point: Top right corner (RS facing) after Row 169.
- Border Round 1 (RS – Foundation Setup): Ch 1, work 1 sc evenly in each st across the top edge (194 sc), work (sc, ch 2, sc) in the corner st; rotate to work down the left side edge, placing approximately 3 sc for every 2 row-ends evenly down the side (about 252 sc), work (sc, ch 2, sc) in the bottom-left corner; work 1 sc in each foundation ch across the bottom edge (194 sc), work (sc, ch 2, sc) in the bottom-right corner; work evenly up the right side edge matching the left side count (about 252 sc), work (sc, ch 2, sc) in the top-right corner. Join with a sl st to the first sc. (Ensure your stitch count on each of the four sides is an even number).
- Border Round 2 (RS): Ch 2 (counts as first hdc), hdc in each st around, working (hdc, ch 2, hdc) into every corner ch-2 space. Join with a sl st to top of turning ch-2.
- Border Round 3 (RS): Ch 2, *FPdc around next st, BPdc around next st; rep from * to corner ch-2 space, work (hdc, ch 2, hdc) in corner space; continue alternating FPdc/BPdc along each side and working (hdc, ch 2, hdc) in each corner. Join with a sl st to top of turning ch-2.
- Border Round 4 (RS): Ch 2, match the post stitches as they appear (FPdc around FPdc, BPdc around BPdc) along each side, working (hdc, ch 2, hdc) in each corner ch-2 space. Join with a sl st to top of turning ch-2.
- Border Round 5 (RS – Neat Bind-Off): Ch 1, sc in each st around, working 3 sc in each corner ch-2 space. Join with a sl st to first sc.
- Fasten Off: Cut yarn leaving an 8-inch (20 cm) tail and weave securely into the wrong side of the border.
🛌 PART 2: MATCHING BASKETWEAVE PILLOW SHAMS (MAKE 2)
Purpose: Coordinating textured pillow covers with an overlapping envelope back so standard/queen pillows slip in easily without buttons or zippers.
Yarn: Creamy Ivory (#5 Bulky)
Quantity to Make: 2 complete shams (each consisting of 1 Textured Front Panel + 2 Plain Back Envelope Panels).
🔲 Sham Front Panel (Make 2 — 1 per sham)
Starting Point: Foundation chain worked across the 26-inch pillow width.
- Foundation Chain: Ch 64 loosely.
- Row 1 (WS): Dc in 4th ch from hook and in each ch across. Turn. (62 dc: 2 edge dc + five 12-st repeats)
- Rows 2–7 (Block Set A): Work Rows 2–7 of the Blanket Body pattern across your 62 stitches (2 edge dc + alternating blocks of 6 FPdc and 6 BPdc). Turn at the end of each row. (62 sts)
- Rows 8–13 (Block Set B): Work Rows 8–13 of the Blanket Body pattern across your 62 stitches. Turn at the end of each row. (62 sts)
- Rows 14–37: Repeat Rows 2–13 two (2) more times. (37 rows total; panel measures approximately 19.5″ tall x 25.5″ wide).
- Fasten Off: Cut yarn leaving a 6-inch tail and weave in ends. Set aside while you crochet the back envelope panels.
✉️ Sham Back Envelope Panels (Make 4 Total — 2 per sham)
Purpose: Smooth, flat half-double crochet back panels that overlap by 5 inches (12.5 cm) inside the back of the pillow sham so the pillow insert stays neatly hidden without bulk against the headboard.
Starting Point: Foundation chain worked across the 26-inch width.
- Foundation Chain: Ch 64 loosely.
- Row 1 (RS): Hdc in 3rd ch from hook (skipped 2 chs count as first hdc) and in each ch across. Turn. (62 hdc)
- Rows 2–26: Ch 2 (counts as first hdc), hdc in each st across to end of row (placing final hdc in top of turning ch-2). Turn. (62 hdc per row; panel measures approximately 12.25″ tall x 25.5″ wide).
- Fasten Off: Cut yarn leaving a 6-inch tail and weave in ends. Repeat until you have 4 Back Panels total (2 for each sham).
🎨 STYLING / ASSEMBLY / STABILITY / FINAL SHAPING
🧩 Recommended Assembly Order
Follow this exact sequence to assemble your bedding set cleanly and minimize heavy handling:
- Weave in all interior tails on the large blanket before wet or steam blocking.
- Block the blanket flat so the 6×6 blocks relax into crisp squares and rectangles.
- Assemble Pillow Sham #1: Layer the Front Panel and two Back Envelope Panels together, seam the outer edges, and work the ribbed sham border.
- Assemble Pillow Sham #2 using the exact same method.
- Insert pillow forms and arrange the blanket and shams on the bed.
🪡 Assembling the Pillow Shams (Seaming & Ribbed Border)
- Layering for Envelope Overlap: Lay one Sham Front Panel face down (WS facing up). Place the first Back Panel on top, aligning its top edge and side edges with the top and sides of the Front Panel (RS facing up).
- Overlap the Second Back Panel: Place the second Back Panel on top, aligning its bottom edge and side edges with the bottom and sides of the Front Panel (RS facing up). The two back panels will overlap across the center by approximately 5 inches (12.5 cm). Pin all four corners and along the overlapped side edges with locking stitch markers.
- Joining Round (RS Facing): Attach Creamy Ivory yarn with a sl st in the top-right corner through both layers (Front + Back). Ch 1, and work 1 sc evenly around the entire perimeter, catching both layers (and all 3 layers where the back panels overlap on the left and right sides). Work (sc, ch 2, sc) in each of the four corners. Join with a sl st to the first sc. (Ensure an even stitch count on each of the 4 sides).
- Ribbed Sham Edging: Work Border Rounds 2, 3, and 5 from the Blanket Border instructions around the sham perimeter to create a tailored, cushioned flange edge that matches the blanket trim. Fasten off and weave in ends securely.
🛏️ Styling & Bed Presentation
- Creating the Folded Top Cuff: Drape the finished blanket evenly across the bed so both sides hang symmetrically. Fold the top 12 to 15 inches (30–38 cm) of the blanket back over itself toward the foot of the bed. Because the basketweave pattern is reversible in texture, this fold creates a plush, double-thick bolster across the chest of the bed.
- Arranging the Shams: Prop your sleeping pillows upright against the headboard, then place the two Basketweave Pillow Shams directly in front of them with the textured basketweave panels facing forward. Gently tug the four corners of each sham outward so the ribbed trim frames the pillow cleanly.
✅ Final Shaping & Finishing Checklist
- ✅ All 6×6 basketweave blocks align cleanly in crisp vertical columns and alternating checkerboard rows without accidental stitch shifts.
- ✅ Both side edges of the blanket lie flat without flaring or pulling inward.
- ✅ All yarn joins and ends are woven at least 3 inches (7.5 cm) through dense post stitches and trimmed flush.
- ✅ The pillow sham envelope flaps overlap smoothly with no gaping when the pillow insert is inside.
- ✅ The blanket and shams have been lightly steamed or air-dried flat so the creamy ivory stitches look plump, uniform, and relaxed.
💡 HELPFUL CROCHET TIPS
- 💡 Read Your Stitches, Not Just Your Row Count: Once you pass Row 3, you never need to lose track of whether to work an FPdc or BPdc. Look at the vertical column below your hook: if the smooth vertical “V” ribs are facing you on the side you are currently working, work FPdc; if the horizontal bumpy ridges are facing you, work BPdc.
- 💡 Keep Your Post Stitches Tall: Post stitches naturally sit slightly shorter than regular double crochets because you insert your hook around the body of the stitch rather than the top loops. Pull up your first loop generously (about 1/2 inch / 1.25 cm high) on every FPdc and BPdc so the fabric stays plush and flexible rather than stiff.
- 💡 Use an Inline or Ergonomic Hook: Bulky yarn worked around post stitches puts extra friction on your wrist. An ergonomic hook with a smooth throat lets you glide around stitch posts effortlessly without splitting plies.
- 💡 Manage Blanket Weight While Working: Once your blanket passes 30 inches in length, keep the finished portion resting in your lap or in a wide basket beside your chair rather than letting it hang off your hook. Supporting the weight prevents your tension from tightening up halfway through the project.
- 💡 Mark Your 6-Row Block Transitions: Clip a removable stitch marker into the edge stitch of every 6th basketweave row (Rows 7, 13, 19, etc.). A quick glance at your row of side markers confirms immediately when it is time to swap your FPdc and BPdc blocks.
- 💡 Don’t Skip the Corner Chains on the Border: Working
(hdc, ch 2, hdc)in every corner during the border rounds gives the thick post-stitch trim enough room to turn 90 degrees cleanly without curling upward. - 💡 Steam Block Acrylic Gently: If you use a bulky acrylic yarn, hover a handheld garment steamer 1–2 inches above the fabric (never press a hot iron directly onto acrylic!) and pat the blocks into shape with your hands. This instantly softens post-stitch stiffness and gives the blanket a boutique drape.
🧼 CARE INSTRUCTIONS
Because a Queen-sized chunky blanket becomes very heavy when saturated with water, gentle care will protect both your stitches and your washing machine:
- Washing: Machine wash on a gentle/delicate cold cycle using a mild liquid detergent, or hand-wash in a bathtub with cool water and gentle wool/delicate wash. Avoid bleach or harsh fabric softeners, which can coat fibers and dull the crisp stitch definition.
- Pillow Shams: Remove the pillow inserts before washing the crochet covers. Turn the shams inside out so the raised basketweave posts are protected from snagging.
- Drying: Never hang a wet chunky crochet blanket on a clothesline, as the weight of the water will stretch the vertical columns out of shape. Gently press excess water out with clean towels, then lay the blanket and shams flat on a drying rack or clean bedsheet until completely dry. You may also tumble dry on air-fluff (no heat) for 15 minutes once mostly dry to restore yarn loft.
- Storage: Fold neatly and store in a breathable cotton storage bag or cedar chest during warmer months rather than hanging on a hanger.
❓ FAQ
❓ Why does the reference image show knitting needles if this is a crochet pattern?
The reference photo displays a classic knit-look basketweave design. This pattern is an original crochet adaptation designed to capture that exact visual geometry—alternating smooth vertical columns and bumpy horizontal blocks in chunky ivory yarn—using Front Post and Back Post Double Crochet stitches so crocheters can achieve the same cozy, sculptural bedroom aesthetic without needing to knit.
❓ Can I make this blanket in Super Bulky (#6) yarn instead of Bulky (#5)?
Yes! If you use a Super Bulky (#6) yarn with a 10.0 mm (N/P-15) or 11.5 mm (P-16) hook, your stitches will be noticeably larger. Reduce your starting chain to 148 chains (12 repeats of 12 + 4 = 146 stitches) for a Queen-sized blanket, and work 4×4 blocks (4 stitches wide by 4 rows tall) instead of 6×6 blocks so the checkerboard squares stay proportional.
❓ Is this basketweave blanket reversible?
Yes! Because every FPdc on the front creates a raised BPdc bump on the back (and vice versa), both sides of the blanket feature the exact same 6×6 alternating checkerboard texture. There is no “wrong” side when the blanket is folded back over the bed.
❓ How can I stop my post-stitch blanket from feeling too stiff?
Stiffness usually comes from pulling post stitches too tightly or using too small a hook. Switch to a 9.0 mm (M/N-13) hook, consciously pull your loops up slightly taller when working FPdc and BPdc, and lightly steam block the finished blanket to relax the fibers.
❓ Can I add buttons or a zipper to the pillow shams instead of an envelope back?
Absolutely. If you prefer a buttoned back, simply stop the second Back Panel at Row 18, work a 2-row single crochet buttonhole band along the inner edge (spacing 4 buttonholes evenly across the 26-inch width), and sew four 1-inch (25 mm) wooden or ivory buttons onto the overlapping panel underneath.
❓ What yarn fiber works best for a bedroom blanket like this?
A soft anti-pilling bulky acrylic or a superwash merino/acrylic blend is ideal. Anti-pilling acrylic holds crisp stitch definition, stays lightweight enough for comfortable sleeping, and stands up well to washing, while a wool blend adds extra warmth and natural elasticity.