📖 B. INTRODUCTION
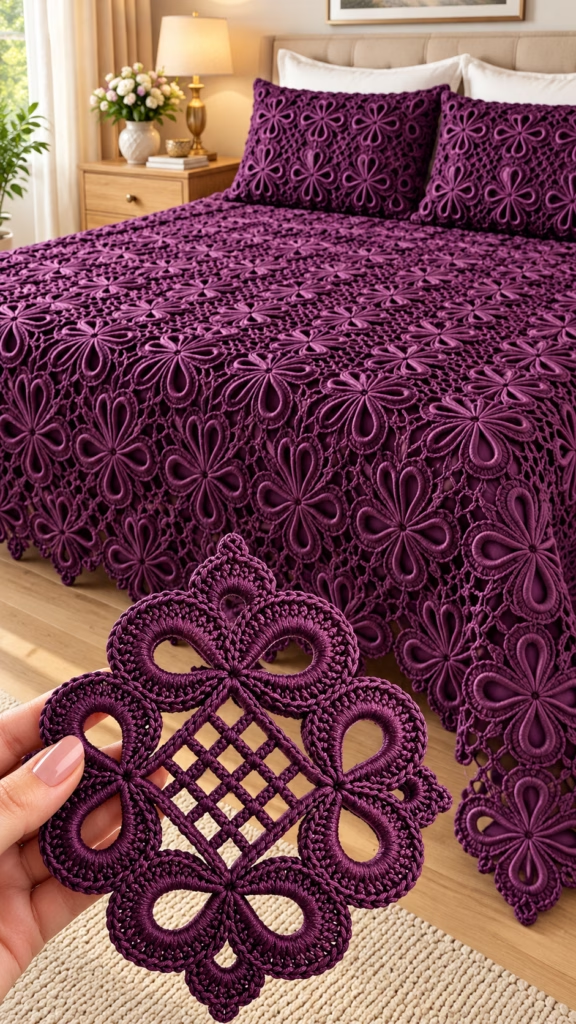
Transform your bedroom into a luxurious sanctuary with the Royal Plum Floral Lattice Bedspread & Pillow Sham. Inspired by vintage lacework and dramatic modern color palettes, this breathtaking crochet project features intricate, raised 4-petal floral motifs set against a geometric diamond-mesh lattice center. The deep rich plum shade lends an unmistakable sense of regal sophistication, creating a statement centerpiece that elevate any bedroom décor scheme.
Whether you are crafting a full queen- or king-sized bedspread heirloom, a dramatic throw blanket for your living space, or matching accent pillow shams, this project promises a deeply satisfying crochet journey. Each motif combines structured relief stitches with airy lacework mesh, creating a lush tactile texture that drapes gracefully over bedding. The modular motif-based construction means you can take your work on the go, completing individual motifs at your own pace before joining them together into a seamless masterwork.
This project makes a magnificent wedding gift, anniversary keepsake, or housewarming present that will be cherished for generations. Customize the aesthetic by choosing muted jewel tones like emerald or sapphire, soft neutrals like cream or linen, or stick with the bold regal plum showcased in our featured design. Dive into this detailed pattern and bring a touch of handcrafted luxury into your home!
🔍 C. MAIN PATTERN OVERVIEW
The Royal Plum Floral Lattice ensemble is built around a signature square motif. Each individual motif consists of three distinct geometric elements:
- 💠 Central Lattice Grid: A firm diagonal filet mesh diamond pattern formed by chains and double crochet stitches, giving the motif structural grounding and classic vintage appeal.
- 🌸 Raised Petal Loops: Four large, smooth 3D looped petals radiating outward from the central grid corners, framed by dense single crochet border edging for distinct dimensional contrast.
- 👑 Picot Crown Edging: Ornamental crowning points at the outer tip of each petal loop and scalloped lace joins between adjacent motifs, locking the bedspread into a continuous tapestry of blooms.
+-------------------------------------------------------+
|                 MOTIF STRUCTURE LAYOUT                |
|                                                       |
|                     👑 Picot Tip                      |
|                   /              \                    |
|                 🌸  Petal  Loop   🌸                  |
|                   \              /                    |
|       👑 Tip -- 🌸 [ Central Grid ] 🌸 -- 👑 Tip      |
|                   /    Lattice   \                    |
|                 🌸  Petal  Loop   🌸                  |
|                   \              /                    |
|                     👑 Picot Tip                      |
+-------------------------------------------------------+
The matching pillow shams utilize the exact same motifs joined into rectangular grids (e.g., 3×4 motifs) with a simplified envelope backing or decorative lace border.
🎯 D. SKILL LEVEL
Skill Level: Intermediate to Advanced
While the individual stitches are straightforward (chains, single crochet, double crochet, treble crochet, and picots), this design requires precise tension control, accurate stitch counting along looped borders, and seamless join-as-you-go (JAYGO) assembly.
- 🌀 Magic Ring foundation & chain mesh lattice grid work
- ➰ Working into extended chain loops to build 3D petals
- 📐 Dense single crochet & half double crochet edging over yarn loops
- 👑 Decorative picots (ch 3, sl st)
- 🔗 Join-as-you-go (JAYGO) slip stitch assembly along outer lace edges
📏 E. FINISHED SIZE
- 🏵️ Single Motif: Approx. 7.5 inches × 7.5 inches (19 cm × 19 cm) after blocking.
- 🛏️ Queen Bedspread (pictured background): Approx. 90 inches wide × 98 inches long (228 cm × 249 cm) — requires a 12 × 13 grid (156 total motifs).
- 🛋️ Standard Pillow Sham (pictured on bed): Approx. 20 inches × 28 inches (51 cm × 71 cm) — requires a 3 × 4 grid per sham front (12 motifs per side).
Note: Finished dimensions are heavily influenced by yarn weight, hook size, blocking tension, and whether you add a wide scalloped lace border.
🧮 F. GAUGE
- Motif Gauge: 1 individual unblocked motif = 7.0 inches × 7.0 inches (17.8 cm × 17.8 cm).
- Blocked Motif Gauge: 1 blocked motif = 7.5 inches × 7.5 inches (19 cm × 19 cm).
- Lattice Grid Center (Rounds 1–4): Measures approx. 2.75 inches (7 cm) across diagonal.
💡 Gauge Note: For bedspreads and home textiles, exact gauge is not strictly critical for fit, but maintaining consistent stitch tension across all motifs ensures your final blanket blocks evenly without buckling or sagging.
🧶 G. REQUIRED YARN AMOUNTS
All yardage estimates are based on Size 3 / DK Weight mercerized cotton yarn or smooth acrylic blend in Royal Plum.
- 🍆 Main Color (Royal Plum):
- 🏵️ Per Motif: Approx. 42 yards (38 meters).
- 🛏️ Queen Size Bedspread (156 Motifs + Outer Border): Approx. 7,000 yards / 6,400 meters (~20-22 skeins of 100g/320yd yarn).
- 🛋️ Pair of Pillow Shams (24 Motifs + Backing/Edging): Approx. 1,250 yards / 1,140 meters (~4 skeins of 100g/320yd yarn).
- 🧵 Embroidery / Sewing Thread: Matching plum thread for sewing seams (if not using JAYGO).
🧰 H. MATERIALS
- 🪡 Crochet Hook: US Size E-4 (3.5 mm) or G-6 (4.0 mm) depending on tension.
- 🧶 Yarn: DK / Light Worsted (Weight 3) Mercerized Cotton (recommended for high stitch definition and elegant drape).
- ✂️ Tapestry Needle / Yarn Needle: Steel yarn needle for weaving in ends.
- 📍 Blocking Supplies: Foam blocking boards, stainless steel T-pins, steam iron or spray bottle.
- 📏 Measuring Tape: For checking motif uniformity.
- 🏷️ Stitch Markers: 4 per motif (optional, for marking petal corner peaks).
🔤 I. ABBREVIATIONS – US TERMS
- ch: chain
- sl st: slip stitch
- sc: single crochet
- hdc: half double crochet
- dc: double crochet
- tr: treble crochet
- dtr: double treble crochet
- MR: magic ring
- st(s): stitch(es)
- sp(s): space(s)
- ch-sp: chain space
- inc: increase
- yo: yarn over
- picot: ch 3, sl st in 1st ch (or top of previous st)
- BPsc: back post single crochet
- JAYGO: join-as-you-go
📝 J. NOTES BEFORE YOU BEGIN
- 🧵 Construction Direction: The motif is worked from the center outward. Rounds 1–4 construct the central lattice diamond mesh. Round 5 forms four long foundational loops that outline the major petals. Rounds 6–8 densely pack stitches over these loops to create the thick, sculptured 3D petals and decorative picot tips.
- 🔄 Continuous vs. Joined: Work in joined rounds unless otherwise instructed. End each round with a sl st to the initial chain or first stitch.
- 🧼 Blocking is Essential: The petal loops will naturally twist or curl during stitching. Pinning and steam blocking each motif flatten the lattice and pop the raised petal borders into crisp alignment.
- 🔗 Joining Method: Motifs can either be sewn together using the back loops after blocking or joined on the final round using the Join-As-You-Go (JAYGO) technique at the picot points and outer arches.
🪡 K. COMPLETE PATTERN
🏵️ Main Floral Lattice Motif (Make Desired Quantity)
Yarn Color: Royal Plum
                       [R6-8: Dense Petal Edging & Picots]
                                     |
                       [R5: 4 Outer Foundational Loops]
                                     |
                       [R1-4: Central Lattice Diamond Grid]
                                     |
                                 [Magic Ring]
💠 Central Lattice Grid (Rounds 1–4)
Creates the open geometric mesh center.
- R1: Form a MR. Ch 4 (counts as 1 dc + ch 1), [1 dc into MR, ch 1] 7 times. Join with sl st to 3rd ch of initial ch-4. (8 dc, 8 ch-1 sps).
- R2: Sl st into first ch-1 sp. Ch 3 (counts as dc), (1 dc, ch 2, 2 dc) in same sp. *Ch 2, skip next dc, (2 dc, ch 2, 2 dc) in next ch-1 sp; repeat from * 2 more times, ch 2. Join with sl st to top of starting ch-3. (4 corner shells formed).
- R3: Sl st across to ch-2 corner sp. Ch 3 (counts as dc), (1 dc, ch 2, 2 dc) in same corner sp. *Ch 3, 1 sc in ch-2 sp between shells, ch 3, (2 dc, ch 2, 2 dc) in corner sp; repeat from * 2 more times, ch 3, 1 sc in last ch-2 sp, ch 3. Join with sl st to top of starting ch-3.
- R4: Sl st to corner sp. Ch 3 (counts as dc), (1 dc, ch 3, 2 dc) in corner sp. *Ch 3, 1 dc in next ch-3 sp, ch 3, 1 dc in next ch-3 sp, ch 3, (2 dc, ch 3, 2 dc) in corner sp; repeat from * 2 more times, ch 3, 1 dc in next ch-3 sp, ch 3, 1 dc in next ch-3 sp, ch 3. Join with sl st to top of starting ch-3. (Central square grid completed).
🌸 Petal Loop Foundations (Round 5)
Creates the four large arching loops that frame the motif.
- R5: Sl st into corner sp. Ch 1, 1 sc in same corner sp.
- *Ch 22 (for petal loop foundation), 1 sc back into same corner sp.
- Ch 5, 1 sc in next ch-3 sp, ch 5, 1 sc in next ch-3 sp, ch 5, 1 sc in corner sp;
- Repeat from * 3 more times, ending final repeat by joining with sl st to first sc. (4 large 22-chain petal loops and 12 connecting ch-5 mesh arches).
🌺 Sculptured Petal Fill & Edging (Rounds 6–8)
Densely covers the long chain loops to build raised 3D petal borders.
- R6:
- *Working into the first ch-22 loop: 14 sc, ch 2 (petal peak), 14 sc all over the ch-22 strand.
- 1 sc in sc at base of loop.
- 3 sc in next ch-5 sp, 3 sc in next ch-5 sp, 3 sc in next ch-5 sp;
- Repeat from * 3 more times. Join with sl st to first sc. (28 sc + ch-2 peak per petal).
- R7:
- *Sl st in first 2 sts of petal. Ch 2 (does not count as st), 1 hdc in each st up the side of the petal (12 hdc).
- In ch-2 peak sp work: (2 hdc, ch 3, 2 hdc).
- 1 hdc in next 12 sts down other side of petal. Skip last 2 sts of petal.
- 1 sc in each of the 9 sc along the mesh edge;
- Repeat from * 3 more times. Join with sl st to first hdc.
- R8 (Crown Tip & Outline Round):
- *1 sc in next 14 hdc up side of petal.
- In peak ch-3 sp work: (2 sc, ch 3-picot [ch 3, sl st in 1st ch], ch 5-picot [ch 5, sl st in 1st ch], ch 3-picot, 2 sc) -> creates the ornate 3-part crown peak.
- 1 sc in next 14 hdc down side of petal.
- Sl st in center of 9-sc mesh edge;
- Repeat from * 3 more times. Join with sl st to first sc.
- Fasten off, leaving a 12-inch tail for assembly (or prepare for JAYGO).
                👑 Central Peak (ch-5 picot)
               / \
    ch-3 picot    ch-3 picot
            \     /
           2 sc | 2 sc
          /         \
    14 sc             14 sc
    (down)           (up)
        \           /
         [ Petal Loop ]
🎨 L. STYLING / ASSEMBLY / STABILITY / FINAL SHAPING
🔗 Recommended Assembly Methods
Option A: Join-As-You-Go (JAYGO) (Recommended)
As you complete Round 8 of Motif #2 and onwards, replace the center ch-5 of the top crown picot with: ch 2, sl st into corresponding picot of adjacent motif, ch 2, sl st to complete picot. Connect adjacent motifs at the 4 major corner points and side mesh midpoints.
Option B: Invisible Whipstitch Assembly
- Pin and steam-block all individual motifs to exactly 7.5″ × 7.5″.
- Lay motifs face down on a flat surface in desired grid layout (e.g., 12 × 13 for bedspread).
- Using matching yarn and yarn needle, whipstitch adjacent motifs together through back loops only, working across picot points and petal edges.
👑 Bedspread Outer Lace Border
Once all motifs are joined into a single blanket top, attach yarn at any outer corner picot.
- Round 1 (Foundation Mesh): *Ch 5, 1 sc in next petal arch / picot tip; repeat from * all the way around blanket perimeter. Join with sl st.
- Round 2 (Shell Scallops): *(1 sc in ch-5 sp, ch 1, 7 dc in next ch-5 sp, ch 1, 1 sc in next ch-5 sp); repeat from * around.
- Round 3 (Picot Edge): *1 sc in each dc of shell with a ch-3 picot worked in the center 4th dc of each shell; repeat from * around. Fasten off and weave in all ends.
🛋️ Pillow Sham Assembly (Make 2)
- Front Panel: Join 12 motifs in a 3 × 4 grid (22.5″ × 30″ unblocked / ~20″ × 28″ blocked).
- Back Panels (Envelope Closure):
- Panel 1 (Upper Half): Ch 65, work in standard dc mesh rows for 16 inches.
- Panel 2 (Lower Half): Ch 65, work in dc mesh rows for 16 inches.
- Joining Front to Back: Place front motif panel face-to-face with overlapping back panels. Sc around outer border through both layers. Turn right-side out and insert pillow form.
💡 M. HELPFUL CROCHET TIPS
💡 Tip 1: Use mercerized cotton yarn. Mercerized cotton has a slight sheen and high twist, which holds the 3D structure of the petal loops sharp without slouching over time.
💡 Tip 2: Maintain firm tension on Round 6 when filling the 22-chain loops. Dense single crochet coverage prevents the underlying chain core from showing through.
💡 Tip 3: Mark your 4 petal peaks with locking stitch markers during Round 5 so you never miscount the center point of the 3D arches.
💡 Tip 4: Steam block motifs individually before joining if using whipstitch, or steam block the entire assembled bedspread if using JAYGO.
💡 Tip 5: Weave in yarn tails as you complete each motif! Attempting to weave in 300+ tails at the end of a full bedspread project can feel overwhelming.
💡 Tip 6: Keep a digital row counter or stitch tally sheet when crafting multi-motif blankets to track progress easily.
🧼 N. CARE INSTRUCTIONS
- 🧼 Washing: Hand wash or machine wash on delicate cycle using cool water and mild wool/cotton detergent.
- 🌀 Drying: Do not tumble dry! Gently press excess water out with a clean dry towel (do not wring). Lay flat to dry on blocking boards or clean dry sheets.
- 💨 Refreshing: Steam lightly with a garment steamer to restore crispness to the petal picots and lattice mesh.
❓ R. FAQ
❓ Can I use a lighter yarn weight like Fingering or Crochet Thread #10?
Yes! Using thread or fingering weight yarn with a smaller hook (1.75 mm–2.25 mm) will produce delicate 3-inch or 4-inch lace coasters, doilies, or table runners while preserving the floral motif design.
❓ How do I adjust this pattern for a King or Twin size bed?
- 🛏️ Twin Size (68″ × 90″): 9 × 12 motifs (108 total).
- 🛏️ Queen Size (90″ × 98″): 12 × 13 motifs (156 total).
- 🛏️ King Size (108″ × 100″): 14 × 13 motifs (182 total).
❓ Why are my petal loops twisting or curling up?
Round 6 puts many single crochets over a chain foundation. It is completely normal for the loops to bow slightly while in progress. Steam blocking flattens the lattice mesh and sets the outer petal loops straight.
❓ Can I make this in multiple colors?
Absolutely! Try working Rounds 1–4 (lattice) in Cream/White, Rounds 5–7 (petals) in Royal Plum, and Round 8 (picot outline) in Soft Pink or Gold for a striking multi-tone heirloom piece.
🎉 Congratulations!
You have completed the Royal Plum Floral Lattice Bedspread & Pillow Sham pattern. Enjoy the timeless beauty and warmth of your new handcrafted masterpiece!