📖 B. INTRODUCTION
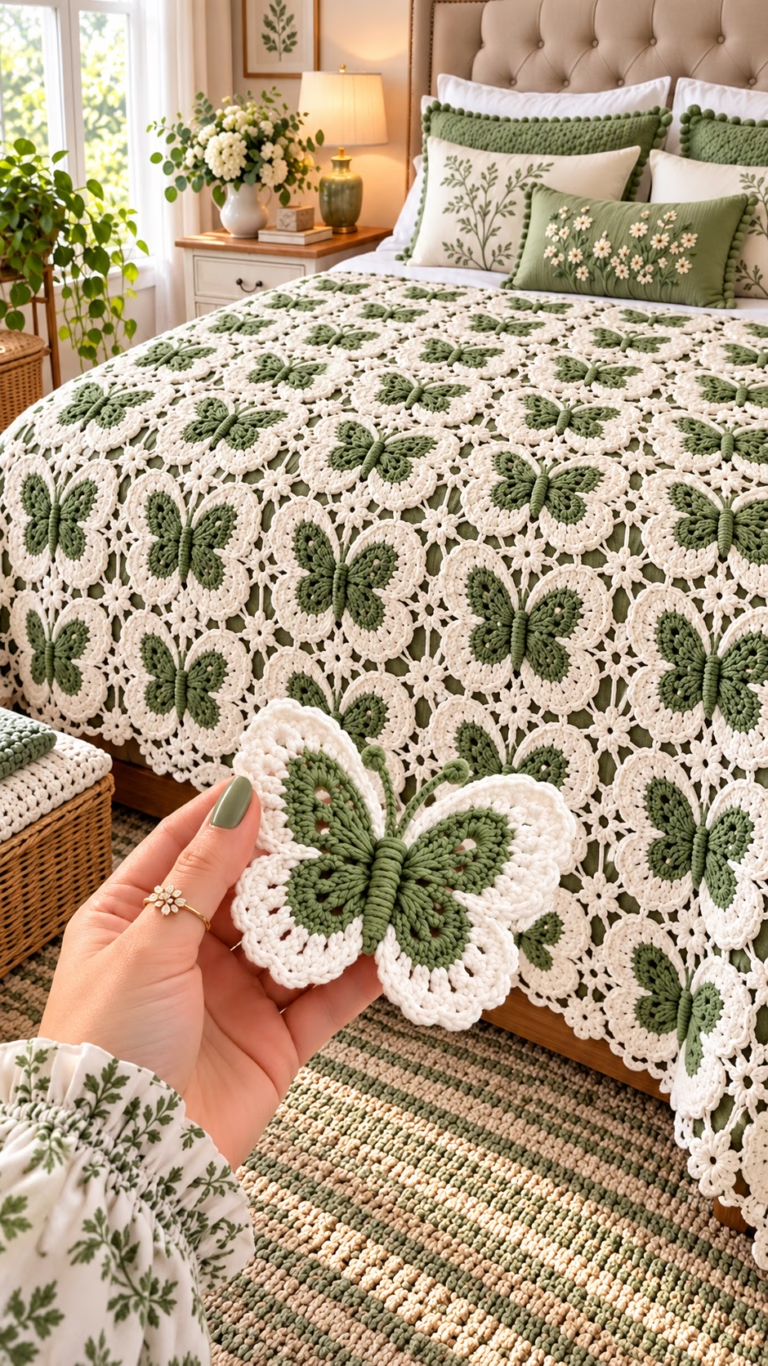
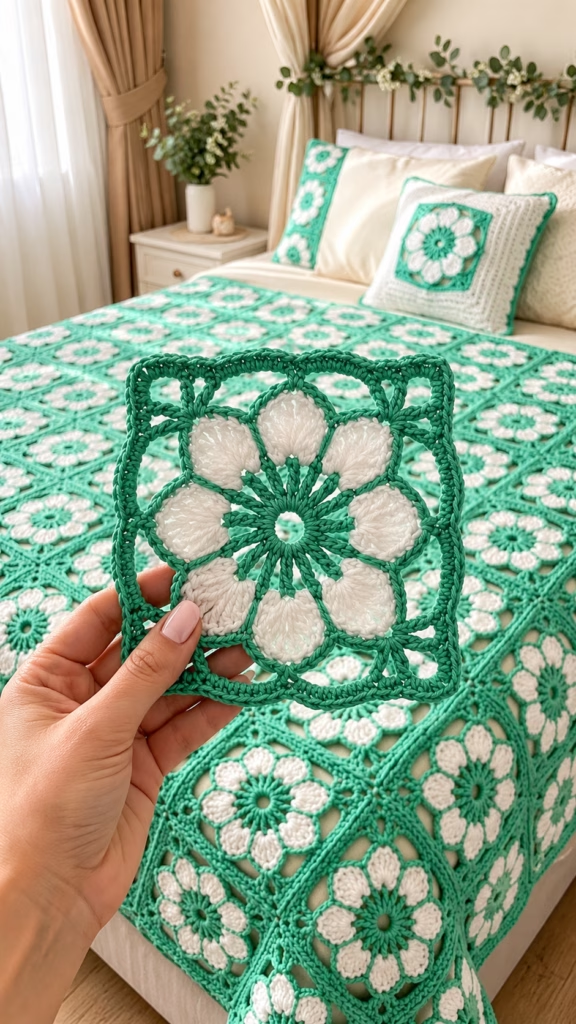
Welcome to your next favorite heirloom crochet project! The Blooming Daisy Granny Square Blanket brings timeless vintage elegance right into your home with its striking, textured floral motif. Featuring a dramatic 12-petaled daisy flower blooming from the center of each square, this design combines crisp structural lines with soft relief stitches to create a statement piece that instantly elevates any bedroom or living space.
Whether you are crafting a full-sized bed coverlet, a cozy lap throw, or matching accent pillows, this floral granny square offers an engaging balance of rhythmic stitch combinations and visual beauty. The fresh color palette—pairing vibrant emerald mint green with bright cream white—gives this retro motif a clean, modern aesthetic that fits effortlessly into bohemian, farmhouse, or classic decor.
Crocheting a motif-based blanket is one of the most practical and satisfying ways to tackle a large project. Each individual square is lightweight and portable, making it easy to work on during cozy evenings or on the go. Once your collection of daisy motifs is complete, joining them together transforms your individual blocks into a cohesive, breathtaking masterpiece.
This complete guide will walk you through crafting the single motif block step-by-step, joining your squares into a finished throw blanket or bedspread, constructing matching envelope-style decorative pillows, and completing the design with an elegant scalloped border. Grab your hook and yarn, and let’s start stitching this beautiful floral motif!
🔍 C. MAIN PATTERN OVERVIEW
The Blooming Daisy project is built around an intricate, openwork 12-petaled floral granny square. The motif begins at the center with a spoke-like ring created by elongated treble/double-treble stitches in rich green. Surrounding this spoke ring is a layer of 12 puffed tulip-shaped flower petals worked in stark white puff/popcorn stitches, giving the square rich tactile contrast and dimensional texture.
+-----------------------------------------------------------+
|                      SQUARE STRUCTURE                     |
|                                                           |
|       [ Outer Green Border Frame: hdc & sc edging ]       |
|    [ Green Arch Framing & Corners: ch-loops & tr/dtr ]    |
|   [ 12 White Textured Petals: 5-dc popcorn stitches ]     |
|  [ Green Center Spoke Ring: 12 long post sts + ch-1 ]     |
|                     ( Center Ring )                       |
+-----------------------------------------------------------+
To turn the circular 12-petaled flower into a flat square, a surrounding frame of green chain arches and corner trebles grounds the motif. A final round of tight half-double crochet stitches squares off the edges, providing clean, sturdy loops for seamless flat-slip-stitch assembly.
Design Variants Included in This Article:
- 🌼 The Blooming Daisy Motif Block: The individual 6.5″ x 6.5″ motif.
- 🛌 The Full Bedspread / Throw Blanket: A 7 x 9 layout (63 motifs total) framed with an ornate lace border.
- 🛋️ The Daisy Accent Pillow: A 16″ x 16″ cushion made from a 2×2 motif front panel paired with a solid cream back panel.
🎯 D. SKILL LEVEL
Intermediate
While the individual stitches are familiar to most crocheters, this pattern uses intermediate techniques including working elongated stitches into an adjustable ring, shaping textured popcorn stitches, working chain-space framing arches, and joining motifs cleanly.
Key Techniques Used:
- 🌀 Magic Ring (MR) / Adjustable loop
- 🌸 Popcorn Stitch (5 double crochet popcorn)
- 📐 Elongated stitches (Treble Crochet
tr& Double Treble Crochetdtr) - ⛓️ Chain-space framing (
ch-sparches) - 🪡 Flat Slip Stitch Join (or invisible seam joining)
- 🧼 Blocking motif blocks to exact square dimensions
📏 E. FINISHED SIZE
Measurements are based on light worsted/DK weight yarn (#3) worked with a 4.0 mm (US G/6) crochet hook.
- 🟩 Single Granny Square Motif: 6.5 inches x 6.5 inches (16.5 cm x 16.5 cm) when blocked.
- 🛋️ Decorative Accent Pillow: 16 inches x 16 inches (40.5 cm x 40.5 cm).
- 🛌 Full Bed Throw Blanket (7 x 9 grid): 52 inches x 65 inches (132 cm x 165 cm) including edging.
💡 Note on Sizing: Switching to Medium Worsted Weight (#4) yarn with a 5.0 mm hook will yield a larger square (approx. 7.5″ to 8″), increasing the overall blanket dimensions accordingly.
🧮 F. GAUGE
- 📏 Single Motif (Rounds 1–6): 6.5 inches x 6.5 inches (16.5 cm x 16.5 cm) after steam or wet blocking.
- ⏱️ Gauge Swatch Check: Work Rounds 1 through 3 of the main motif. Round 3 (the finished petal ring) should measure approximately 4.25 inches (10.8 cm) across.
⚠️ Tension Note: Maintain firm, even tension on the green framing arches (Rounds 4–5) so the square stays flat without bowing in the center or ruffling along the edges.
🧶 G. REQUIRED YARN AMOUNTS
Amounts listed below assume DK / Light Worsted Weight (#3) cotton or acrylic blend yarn (approx. 240 yards / 220 meters per 100g skein).
+-------------------------------------------------------------------------------+
|                           YARN QUANTITY BREAKDOWN                             |
+---------------------+-------------------+-------------------+-----------------+
| Project Type        | Emerald Green (A) | Cream White (B)   | Total Yardage   |
+---------------------+-------------------+-------------------+-----------------+
| Single Square Motif | ~22 yds (20 m)    | ~16 yds (15 m)    | ~38 yds (35 m)  |
| 16" Accent Pillow   | ~180 yds (165 m)  | ~320 yds (290 m)  | ~500 yds (455 m)|
| Full Throw Blanket  | ~1,650 yds (1500m)| ~1,150 yds (1050m)| ~2,800 yds      |
+---------------------+-------------------+-------------------+-----------------+
Color Palette Notes:
- 🧶 Color A (Main Frame/Spokes): Emerald Mint Green — deep mid-tone green with cool blue undertones.
- 🧶 Color B (Flower Petals): Soft Cream White — warm off-white or natural ivory.
🧰 H. MATERIALS
- 🪡 Crochet Hook: Size 4.0 mm (US G/6) or size needed to obtain gauge.
- 🧶 Yarn: DK / Light Worsted Weight (#3) in Emerald Green and Cream White.
- ✂️ Tapestry Needle: Blunt yarn needle for weaving in ends and seaming.
- 📍 Blocking Accessories: Blocking board, stainless steel T-pins, and steam iron/spray bottle.
- 📏 Measuring Tape: For measuring gauge and blanket dimensions.
- 🛋️ Pillow Insert (Optional): 16″ x 16″ (40 x 40 cm) polyfill cushion pad.
- ✂️ Scissors: Sharp craft scissors.
🔤 I. ABBREVIATIONS – US TERMS
- ch: chain
- sl st: slip stitch
- sc: single crochet
- hdc: half double crochet
- dc: double crochet
- tr: treble crochet
- dtr: double treble crochet (yarn over 3 times)
- popcorn: 5-dc popcorn stitch (explained below)
- MR: Magic Ring (adjustable loop)
- st(s): stitch(es)
- sp(s): space(s)
- ch-sp: chain space
- YO: yarn over
- FO: fasten off
- BLO: back loop only
📝 J. NOTES BEFORE YOU BEGIN
- 🧵 Working in the Round: Every round is worked with the right side (RS) facing you. Do not turn your work at the end of rounds unless specified.
- 🎨 Color Changes: To create smooth transitions, complete the final yarn-over of the last stitch in a round using the new color, or join the new yarn color with a standing stitch into the indicated space.
- 🍿 Popcorn Stitch Definition: Work 5 dc into the designated chain space or stitch. Drop the loop from your hook, insert your hook from front to back through the top of the first dc made, grab the dropped loop, and pull it through. Chain 1 to lock the popcorn stitch (this locking chain does not count as a separate chain space).
- 📏 Blocking is Essential: Because the openwork outer arches relax after off-hook assembly, steam blocking each motif to 6.5″ x 6.5″ before joining ensures clean alignment and even edges.
🪡 K. COMPLETE PATTERN
🌼 Blooming Daisy Motif Square (Make 63 for Blanket, or 4 for Pillow)
🟩 Center Spoke Ring
Using Color A (Emerald Green):
- 🟢 Round 1: Start with a MR. Ch 4 (counts as first tr), work 11 tr into the ring. Join with a sl st to the 4th ch of starting ch-4. Pull ring tight. (12 tr)
- 🟢 Round 2: Ch 5 (counts as 1 tr + ch 1). *Work 1 tr in next st, ch 1; repeat from * around 10 more times. Join with a sl st to the 4th ch of starting ch-5. Fasten off Color A. (12 tr, 12 ch-1 sps)
             ROUND 2 SPOKE DETAIL
                 (ch-1 sp)
               - - - - - - -
              |             |
           1 tr           1 tr
              |             |
               - - - - - - -
                 (ch-1 sp)
🤍 Textured Flower Petal Ring
Join Color B (Cream White) in any ch-1 space from Round 2:
- ⚪ Round 3: Standing sl st in any ch-1 sp, ch 3 (counts as first dc of popcorn). Work 4 dc into the same ch-1 sp, complete as first Popcorn stitch. *Ch 3, work 1 Popcorn in the next ch-1 sp; repeat from * around 10 more times. Ch 3, join with a sl st to the top of the first popcorn st. Fasten off Color B. (12 Popcorn stitches, 12 ch-3 spaces)
🟩 Outer Framing & Arching
Join Color A (Emerald Green) in any ch-3 space between popcorns:
- 🟢 Round 4: Standing sc in any ch-3 sp, ch 4. *Sc in next ch-3 sp, ch 4; repeat from * around to start. Join with sl st to first sc. (12 sc, 12 ch-4 arches)
- 🟢 Round 5 (Squaring Round): Sl st into the first ch-4 sp.
- Corner Construction: Ch 5 (counts as 1 dtr), (2 dtr, ch 3, 3 dtr) into the same ch-4 sp (first corner made).
- Side 1: *Ch 2, work 3 tr in next ch-4 sp, ch 2, work 3 dc in next ch-4 sp, ch 2.
- Corner 2: Work (3 dtr, ch 3, 3 dtr) in next ch-4 sp.
- Side 2: Repeat side sequence [ch 2, 3 tr in next sp, ch 2, 3 dc in next sp, ch 2].
- Corner 3: Work (3 dtr, ch 3, 3 dtr) in next ch-4 sp.
- Side 3: Repeat side sequence [ch 2, 3 tr in next sp, ch 2, 3 dc in next sp, ch 2].
- Corner 4: Work (3 dtr, ch 3, 3 dtr) in next ch-4 sp.
- Side 4: Repeat side sequence [ch 2, 3 tr in next sp, ch 2, 3 dc in next sp, ch 2].
- Join with sl st to top of starting ch-5.
🟩 Final Motif Edging
- 🟢 Round 6: Ch 2 (counts as hdc). Hdc in each st and work 2 hdc into each ch-2 sp along the sides. In each of the 4 corner ch-3 spaces, work (2 hdc, ch 2, 2 hdc). Join with sl st to top of starting ch-2. Fasten off leaving an 8-inch tail for weaving. (Each side has 21 hdc between corner ch-2 spaces).
🛋️ Accent Pillow Back Panel (Make 1)
Using Color B (Cream White) or Color A (Emerald Green):
To create an envelope-style opening for the matching 16″ pillow:
- ⚪ Row 1: Ch 56. Hdc in 3rd ch from hook and in each ch across, turn. (54 hdc)
- ⚪ Rows 2–38: Ch 2 (does not count as st), hdc in each st across, turn. (54 hdc per row)
- ⚪ Fasten off and weave in ends.
🎨 L. STYLING / ASSEMBLY / STABILITY / FINAL SHAPING
📌 1. Blocking the Motifs
Before joining your squares, steam block each individual square. Pin the four corners of each motif to a blocking board, stretching gently until it forms a crisp 6.5″ x 6.5″ square. Lightly apply steam, keeping the iron 1 inch away from the yarn, and allow to dry completely.
+-----------------------------------------------------------+
|                     BLANKET LAYOUT GRID                   |
|                        ( 7 x 9 Motifs )                   |
|                                                           |
|     [M1]  [M2]  [M3]  [M4]  [M5]  [M6]  [M7]             |
|     [M8]  [M9]  [M10] [M11] [M12] [M13] [M14]            |
|     ...    ...   ...   ...   ...   ...   ...              |
|     [M57] [M58] [M59] [M60] [M61] [M62] [M63]            |
+-----------------------------------------------------------+
🪡 2. Blanket Seaming (Flat Slip Stitch Join)
- Arrange 63 blocked squares into a 7-square wide by 9-square long grid.
- Place two adjacent squares Right Sides up.
- Join Color A at the corner ch-sp using a sl st worked through the outer back loops only (BLO) of both matching edge stitches.
- Continue sl st joining across the entire row, then repeat for all vertical and horizontal seams.
🌸 3. Grand Scalloped Outer Border
Work around the entire outer edge of the assembled blanket:
- 🟢 Border Round 1 (Foundation): Join Color A in any corner ch-sp. Ch 1, work (1 sc, ch 2, 1 sc) in corner. Work 1 sc in each hdc st across the sides, working 1 sc into each seam junction. Join with sl st to first sc.
- ⚪ Border Round 2 (Lace Shells): Switch to Color B. *Skip 2 sts, work 5 dc in next st (shell made), skip 2 sts, sc in next st; repeat from * along all sides. Work 7 dc into each corner st to turn smoothly.
- 🟢 Border Round 3 (Picot Finish): Switch to Color A. Work 1 sc in each dc of every shell, adding a (ch 3, sl st in 1st ch) picot over the central (3rd) dc of each shell. Join with sl st, FO, and weave in all ends.
💡 M. HELPFUL CROCHET TIPS
- 💡 Prevent Center Gaps: When making Round 1 in the magic ring, leave a 4-inch yarn tail. After completing Round 2, pull the tail taut and weave it back and forth in a zigzag pattern through Round 1 post bases to secure the center ring permanently.
- 💡 Maintain Popcorn Stitch Volume: When pushing the 5 double crochets forward to complete the popcorn stitch, use your thumb behind the motif to push the center of the petals forward for maximum 3D relief.
- 💡 Count Corner Chains Carefully: Accurate corner chain spaces (ch-3 in R5 and ch-2 in R6) ensure your joined blanket lays perfectly flat without puckering at the seam intersections.
- 💡 Steam, Don’t Press: When blocking acrylic or cotton-blend yarns, never touch the iron directly to the fibers, as this can flatten the textured popcorn petals.
- 💡 Batch Work for Speed: Complete all Round 1 & 2 centers first, followed by all Round 3 white petals, before working the outer green framing rounds.
🧼 N. CARE INSTRUCTIONS
- 🧼 Washing: Hand wash or machine wash on a gentle/delicate cycle in cool water using a mild wool/delicate detergent. Place blanket inside a mesh laundry bag to protect open lace arches from snagging.
- 🧼 Drying: Reshape and lay flat to dry on clean towels. Do not tumble dry, drop dry, or hang on a clothesline, as wet fabric can stretch out the floral motifs.
- 🧼 Storage: Store folded in a breathable cotton bag with lavender sachets. Avoid hanging on coat racks or hangers.
❓ R. FAQ
❓ Can I use medium worsted weight (#4) yarn instead of DK weight?
Yes! Using worsted weight yarn with a 5.0 mm (US H/8) hook will result in a larger square (approx. 7.5 to 8 inches). If making a blanket with the same 7×9 layout, your finished throw will expand to approximately 60″ x 76″.
❓ How do I join the squares if I don’t like slip stitch joining?
You can substitute the flat slip stitch join with a traditional tapestry needle mattress stitch seam, a single crochet join for a raised ridge effect, or a join-as-you-go (JAYGO) method on Round 6.
❓ My square is curling after Round 3. Is that normal?
Yes! The dense 5-dc popcorn petals naturally draw the circle inward. Once you add the longer dtr and tr stitches on Round 5 and apply steam blocking, the square will lie flat.
❓ How many squares do I need for a lap-sized throw?
A 5 x 6 grid (30 squares total) makes a cozy 35″ x 42″ lap blanket, ideal for couch reading or gift-giving.
❓ Is this pattern suitable for complete beginners?
While a beginner can tackle this project, familiarity with working into chain spaces, treble crochets, and making popcorn stitches will make the experience much smoother.