📖 B. INTRODUCTION
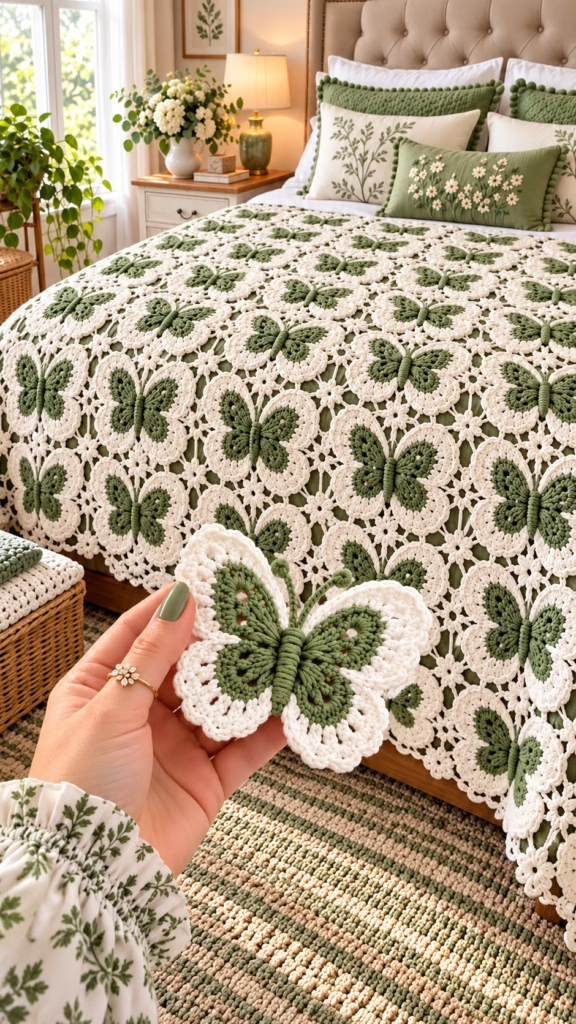
Bring the serene beauty of a springtime meadow into your bedroom or living room with the Botanical Garden Butterfly Motif Blanket. Inspired by nature and vintage lace heirlooms, this breathtaking project features modular, two-tone butterfly motifs in sage green and crisp off-white. Each butterfly boasts delicate scalloped wings and a textured ribbed body, connected by openwork floral joiners to form a luxurious, flowing bedspread or throw blanket.
Whether you choose to craft the full-sized garden throw pictured on the bed or focus on single motifs to use as appliques, wall decor, or cushion embellishments, this pattern offers a rewarding creative escape. The two-color design highlights the dramatic silhouette of upper and lower butterfly wings, creating a mesmerizing textured tile effect across your bed spread or sofa.
This project makes a thoughtful heirloom gift for weddings, housewarmings, or spring anniversaries. Because the blanket is built motif by motif, it is an exceptionally portable project—you can stitch individual butterflies on the go and join them together in cozy assembly sessions at home.
🔍 C. MAIN PATTERN OVERVIEW
This project centers around a modular, two-color butterfly motif consisting of four distinct structural layers:
- 🦋 Inner Sage Wing Core: The central solid lace centers worked in sage green forming the primary structure of both upper and lower wing pairs.
- 🤍 Off-White Scalloped Wing Border: An outer shell of textured arches and fan stitches that frames each butterfly in cream/off-white cotton yarn.
- 🌿 Textured Center Body & Antennae: A ribbed central bar worked in sage green wrapped around the motif center, finished with two slender knotted antennae.
- 🌸 Floral Openwork Corner Joiners: Small 4-point star/flower motifs worked at the intersection corners to connect adjacent butterflies seamlessly into a continuous, flexible bedspread.
🎯 D. SKILL LEVEL
Skill Level: Intermediate
This pattern requires familiarity with basic stitches as well as working in continuous loops, chain spaces, cluster stitches, and joining motifs as you go.
- 🟢 Magic ring and working in rounds
- 🟢 Working chain spaces (ch-sp), picots, and fan shells
- 🟢 Front Post Double Crochet (FPdc) or wrapping stitches for the central body
- 🟢 Seamless motif joining techniques (Join-As-You-Go or needle join)
📏 E. FINISHED SIZE
- 🦋 Single Butterfly Motif: Approx. 6.5 in wide x 5.5 in tall (16.5 cm x 14 cm) across the widest wing tips.
- 🛌 Full Bedspread Blanket (as shown): Approx. 78 in x 88 in (198 cm x 223 cm) using 12 x 16 motifs (192 butterfly motifs total plus corner floral joiners).
- 🛋️ Lap Throw Size Variant: Approx. 52 in x 65 in (132 cm x 165 cm) using 8 x 12 motifs (96 butterfly motifs total).
Note: Yarn weight, hook size, and personal tension will influence final motif size. Blocking each motif ensures uniform measurements across the entire blanket.
🧮 F. GAUGE
- 📐 Individual Motif Gauge: 1 completed Butterfly Motif = 6.5 in (16.5 cm) wide from upper wing tip to upper wing tip after steam/wet blocking.
- 📐 Square Gauge (2×2 Motifs Joined): 12.5 in x 11 in (31.7 cm x 28 cm).
While amigurumi requires extremely tight stitches to hold stuffing, this motif blanket requires soft, flexible tension so the bedspread drapes naturally over bedding. Keep stitch tension consistent across all motifs.
🧶 G. REQUIRED YARN AMOUNTS
Yarn recommendations are based on Medium/Worsted Weight (#4) Cotton or Acrylic-Cotton Blend Yarn (e.g., 50g / 100m per skein).
- 🌿 Color A (Sage Green / Olive):
- Single Motif: Approx. 18 yards (16.5 m)
- Full Bedspread (192 motifs): Approx. 3,456 yards / 35 skeins (100m each)
- 🤍 Color B (Off-White / Cream):
- Single Motif: Approx. 26 yards (23.8 m)
- Full Bedspread (192 motifs + joining/border): Approx. 5,200 yards / 52 skeins (100m each)
- 📦 Total Project Estimate: Approx. 8,656 yards (7,915 m) for full bedspread size.
🧰 H. MATERIALS
- 🪡 Crochet Hook: Size 3.75 mm (US F/5) or 4.0 mm (US G/6) depending on your tension.
- 🧶 Yarn: Worsted/DK weight soft cotton yarn in Sage Green (Color A) and Off-White (Color B).
- ✂️ Tapestry Needle & Scissors: For weaving in ends and securing motif bodies.
- 📌 Blocking Kit: Foam blocking mats and rust-proof stainless steel T-pins (essential for shaping wing scallops prior to joining).
- 🏷️ Stitch Markers: Locking stitch markers for marking attachment points.
🔤 I. ABBREVIATIONS – US TERMS
- 📌 ch: chain
- 📌 sl st: slip stitch
- 📌 sc: single crochet
- 📌 hdc: half double crochet
- 📌 dc: double crochet
- 📌 tr: treble crochet
- 📌 dtr: double treble crochet (yarn over 3 times)
- 📌 inc: increase
- 📌 st(s): stitch(es)
- 📌 ch-sp: chain space
- 📌 MR: magic ring
- 📌 FO: fasten off
- 📌 YO: yarn over
📝 J. NOTES BEFORE YOU BEGIN
- 🧵 Two-Tone Construction: Each butterfly motif is constructed starting from the inner sage green core (Color A), changing to off-white (Color B) for the outer wing lace, and finishing with a sage green wrapped body/antennae piece.
- 🧵 Continuous Symmetry: Work the upper right, lower right, lower left, and upper left wing structures around a central ring to keep the motif balanced.
- 🧵 Blocking is Essential: To achieve the sharp scalloped wings and flat motif tiles seen in the photos, pinning and steam-blocking each completed motif before final joining is highly recommended.
- 🧵 Weaving Ends: Fasten off Color A and Color B cleanly with a 6-inch tail to weave securely through the dense base stitches.
🪡 K. COMPLETE PATTERN
🧠 Component 1: Upper Wing Pair Base (Color A – Sage Green)
The central inner core for the large upper wings.
- 🌿 Start: With Color A (Sage Green), form a MR (or ch 5, sl st to first ch to form a ring).
- 🌿 R1: Ch 3 (counts as 1 dc), work 15 dc into MR. Join with sl st to top of ch-3. (16 dc)
- 🌿 R2 (Creating Wing Arches):
- Upper Right Wing Base: Ch 4, skip 1 st, tr in next st, (ch 1, tr) 5 times in same st, ch 4, sl st in next st.
- Lower Right Wing Base: Ch 3, skip 1 st, (dc, ch 1, dc, ch 1, dc) in next st, ch 3, sl st in next st.
- Lower Left Wing Base: Ch 3, skip 1 st, (dc, ch 1, dc, ch 1, dc) in next st, ch 3, sl st in next st.
- Upper Left Wing Base: Ch 4, skip 1 st, (tr, ch 1) 5 times in next st, tr in same st, ch 4, sl st to base of initial ch-4.
- 🌿 R3: Sl st into first ch-4 sp. (Ch 2, 2 dc) in sp. Work 2 dc in each ch-1 sp across upper wing (6 spaces total = 12 dc). Sl st in ch-4 sp.
- Transition to lower wing: Sl st into ch-3 sp, 2 hdc in each ch-1 sp (4 hdc). Sl st in ch-3 sp.
- Mirror for left side lower wing (4 hdc) and upper wing (12 dc).
- 🌿 FO Color A. Cut yarn leaving a 4-inch tail to weave in.
🪶 Component 2: Outer Lace Wing Border (Color B – Off-White)
Attaches to Color A to create the signature open lace scallops framing the motif.
- 🤍 R4: Join Color B (Off-White) with a sl st in the outer corner of the upper right wing.
- (Upper Right Wing): (Ch 3, skip 1 st, sc in next st) 6 times across the top wing curve. (Ch 4, sc in base of lower wing junction).
- (Lower Right Wing): (Ch 3, skip 1 st, sc in next st) 3 times along the lower rounded edge.
- (Center Bottom): Ch 2, sl st in lower ring center.
- (Lower Left Wing): (Ch 3, skip 1 st, sc in next st) 3 times. Ch 4, sc in junction.
- (Upper Left Wing): (Ch 3, skip 1 st, sc in next st) 6 times. Join with sl st to starting stitch.
- 🤍 R5 (Scallop Shell Finish):
- In each upper wing ch-3 sp: Work (1 sc, 1 hdc, 3 dc, 1 hdc, 1 sc) to form prominent scalloped lobes (6 scallops total per upper wing).
- In lower wing ch-3 sp: Work (1 sc, 3 hdc, 1 sc) in each space (3 scallops total per lower wing).
- 🤍 R6 (Picot Accents): Sl st along outer edge, inserting a ch-3 picot at the central apex of the two top-most scallops for corner attachment points later.
- 🤍 FO Color B. Weave in all white yarn tails securely.
🐛 Component 3: Butterfly Body & Antennae (Color A – Sage Green)
Creates the thick center body and antennae that cinch the center of the butterfly.
- 🌿 Body Strip:
- Ch 15 with Color A.
- Row 1: Sc in 2nd ch from hook and each ch across (14 sc). Turn.
- Row 2: Sl st across to create a thick ribbed strand.
- 🌿 Antennae:
- At top of body strip: Ch 8, sl st in 2nd ch from hook to form a small knot tip, sl st back down 6 ch to body base.
- Repeat for 2nd antenna: Ch 8, sl st in 2nd ch from hook, sl st back down 6 ch to body base.
- 🌿 Assembly of Body: Wrap the main body strip vertically around the narrow middle junction between the left and right wings. Secure the ends together at the back with a tapestry needle, pulling tight to pinch the wing center.
🌸 Component 4: Corner Openwork Joiners (Color B – Off-White)
Small 4-point star motifs worked between 4 adjacent butterfly wings.
- 🤍 Start: MR with Color B.
- 🤍 R1: (Ch 4, sl st into picot edge of adjacent butterfly upper wing, ch 4, sl st in MR) 4 times (connecting to 4 surrounding motifs in a grid).
- 🤍 R2: Fasten off tightly to form a neat, centered floral joiner.
🎨 L. STYLING / ASSEMBLY / STABILITY / FINAL SHAPING
📌 Assembly & Layout Sequence
- 📐 Motif Blocking: Steam or wet block all butterfly motifs prior to assembly so each wing scallop is symmetrical and lies flat.
- 🔲 Grid Arrangement: Lay out butterflies on a flat surface in rows (e.g., 12 columns x 16 rows).
- 🧵 Joining Method: Connect wing tips using the Join-As-You-Go (JAYG) method or needle-sew adjacent wing picots together. Fill all 4-way intersections with the Corner Openwork Floral Joiner (Component 4).
- 🎀 Outer Edging: Work 2 rounds of simple double crochet and picot edging in Off-White (Color B) around the entire outer border of the bedspread for a clean finish.
💡 M. HELPFUL CROCHET TIPS
- 💡 Tip 1 (Tension Control): Keep your yarn tension relaxed when working the white scalloped wing edges so the wings don’t curl upward.
- 💡 Tip 2 (Yarn Choice): Cotton yarn blends (such as 50% cotton / 50% acrylic) provide ideal stitch definition for lace while keeping the full blanket lightweight.
- 💡 Tip 3 (Color Continuity): Dye lots matter for large-scale projects! Purchase all Sage Green and Off-White skeins together to avoid subtle color variations across rows.
- 💡 Tip 4 (Cinching the Center): Pull the Sage Green body wrap snugly around the motif center to give the wings an upward, lifelike contour.
- 💡 Tip 5 (Blocking Board): Make a custom cardboard or foam template with drawn outlines to ensure every butterfly is blocked to the exact same size.
- 💡 Tip 6 (Batch Production): Complete all Sage Green cores first, then perform all Off-White lace borders for faster, assembly-line efficiency.
🧼 N. CARE INSTRUCTIONS
- 🧼 Washing: Hand wash or machine wash on delicate cycle in cold water using a gentle, wool-safe detergent.
- 🧼 Drying: Lay flat to dry on clean towels to prevent heavy wet cotton from stretching the lace openwork out of shape.
- 🧼 Ironing: Steam lightly from the reverse side using a press cloth; never touch hot iron metal directly to synthetic fibers.
❓ R. FAQ
❓ Q1: Can I use a single yarn color for this blanket?
A: Yes! While two colors emphasize the contrast between the butterfly body and wings, a monochrome off-white or solid sage green version produces a beautiful, subtle vintage lace texture.
❓ Q2: How long does it take to complete a full bedspread size?
A: Each motif takes approximately 20–30 minutes to complete. A full bedspread (192 motifs) takes roughly 70–90 hours total, making it an enjoyable long-term project.
❓ Q3: Can I make a smaller baby blanket or throw instead?
A: Absolutely! You can arrange 6 x 8 motifs (48 butterflies) for a charming baby blanket or 8 x 12 motifs for a cozy lap throw.
❓ Q4: What yarn weight works best if I don’t have worsted weight?
A: Sport weight (#2) or DK weight (#3) with a 3.0 mm or 3.5 mm hook creates a lighter, delicate lace throw, though individual motif sizes will be smaller.
❓ Q5: How do I ensure the wings don’t flop over when using the blanket?
A: Blocking with a light starch spray during final shaping helps the wing scallops maintain crisp structural definition over time.