📖 B. INTRODUCTION
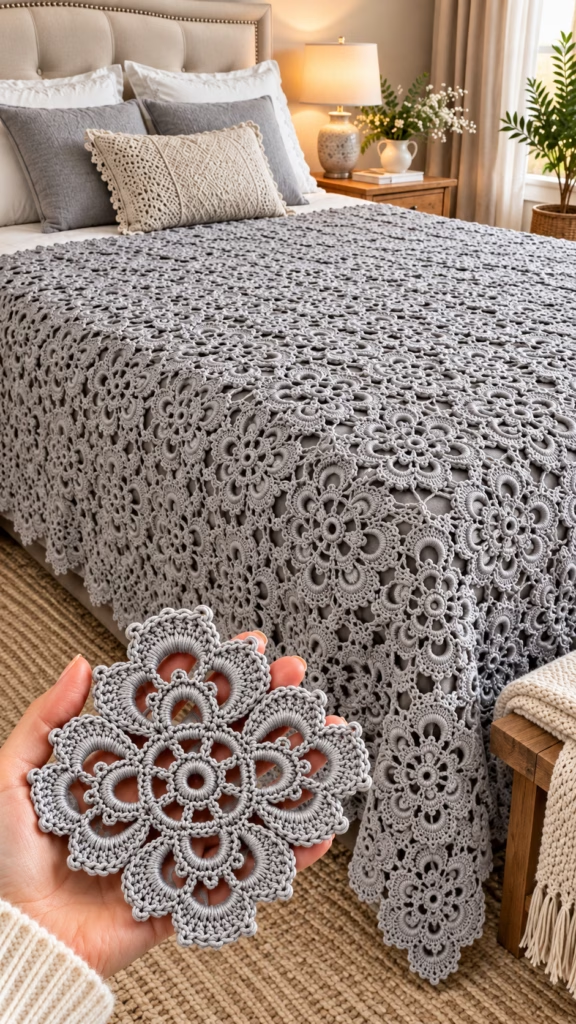
Transform your bedroom into a sanctuary of vintage elegance with the Victorian Lace Heirloom Bedspread. Inspired by classic 19th-century thread lace and intricate floral medallions, this modern heirloom project brings timeless sophistication into today’s home. The design features textured floral motifs joined together to create a dramatic, fluid bed cover that drapes gracefully over any standard mattress, finished with a scalloped lace border that echoes classic European craftsmanship.
Whether you are crafting a breathtaking focal piece for a master bedroom, creating a treasured wedding gift for a loved one, or simply immersing yourself in a deeply satisfying lace motif project, this pattern delivers an unforgettable crocheting experience. The relief stitching, openwork picot arches, and layered petal structure create a rich, tactile surface that catches natural light beautifully, showcasing every carefully worked stitch.
While a full-sized bedspread is a major accomplishment, this pattern is designed with modular motif construction. You can work on individual floral medallions during quiet evenings or travel, assembling them seamlessly as you go using a join-as-you-go (JAYG) technique. The versatile gray-silver tone shown in the reference piece highlights both modern minimalist aesthetics and warm rustic wooden decor, making it infinitely customizable to match your interior palette.
🔍 C. MAIN PATTERN OVERVIEW
The Victorian Lace Heirloom Bedspread is constructed from repeating eight-pointed floral motifs. Each medallion begins with a central ring surrounding a raised post-stitch inner flower, expanding outward through rounds of open chain arches, picot shell clusters, and layered petal arches.
- Central Motif Structure: An 8-petal dimensional floral core enclosed by an intricate picot-edged outer ring.
- Layout & Assembly: Motifs are arranged in a grid array (e.g., $12 \times 14$ motifs for a Queen coverlet) and joined at key outer picot tips during the final round.
- Fill-in Motifs: Small 4-pointed micro-stars bridge the open negative spaces between motif corners, providing full structural stability and a seamless lace web.
- Border: A continuous scalloped lace edging worked around the entire perimeter to unify the design and add weight to the drape.
🎯 D. SKILL LEVEL
Intermediate to Advanced
This pattern is ideal for crocheters who are comfortable with textured stitches, working into chain spaces, exact stitch placement, and multi-round lace joining techniques.
Techniques Involved:
- 🌸 Magic Ring / Adjustable Ring
- 🧶 Relief post stitches (Front Post Double Crochet / Front Post Treble Crochet)
- 💫 Picots (ch-3, sl st into 1st ch)
- 🔗 Join-As-You-Go (JAYG) slip-stitch attachments
- 📐 Cluster stitches (dc3tog / tr4tog)
- 🌾 Reading multi-round circular motif charts/instructions
📏 E. FINISHED SIZE
Measurements vary based on yarn choice and blocking tension. Guidance below uses DK weight mercerized cotton with a 3.5 mm (E-4) hook:
- 🌸 Single Motif Diameter: Approximately 6.5 in ($16.5\text{ cm}$) after blocking.
- 🛌 Queen Bedspread Coverlet (12 x 14 Motifs):
- Width: approx. 84 in ($213\text{ cm}$)
- Length: approx. 96 in ($244\text{ cm}$)
- 🛋️ Throw Blanket Option (7 x 9 Motifs):
- Approx. 48 in $\times$ 60 in ($122\text{ cm} \times 152\text{ cm}$)
💡 Note: Using fingering/lace thread with a 2.0 mm hook will produce delicate, smaller motifs suitable for table runners or lightweight lace shawls.
🧮 F. GAUGE
- Individual Motif Gauge: 1 unblocked motif = 6.0 in ($15.2\text{ cm}$) across.
- Blocked Motif Gauge: 1 wet-blocked motif = 6.5 in ($16.5\text{ cm}$) across from picot peak to picot peak.
⚠️ Tight tension is essential to maintain stitch definition in the relief post details. If your motif measures larger than 7 inches, consider dropping down half a hook size to prevent sagging in the bedspread.
🧶 G. REQUIRED YARN AMOUNTS
Amounts listed apply to a Queen Size Bedspread (approx. 168 main motifs + fill-in stars) using DK Weight 100% Mercerized Cotton Yarn (e.g., 125 meters / 136 yards per 50g ball).
- 🧵 Main Color (Silver Grey / Mist Grey): Approx. 4,200 g / 8,400 meters (approx. 9,180 yards / 84 balls of 50g).
- 🧵 Single Motif Yarn Usage: Approx. 22–24 meters (24–26 yards) per motif.
🧰 H. MATERIALS
- 🪡 Hook Size: 3.5 mm (US E-4) or size needed to obtain gauge.
- 🧵 Yarn: DK / Light Worsted Weight Mercerized Cotton (100% Cotton recommended for drape and durability).
- ✂️ Tapestry Needle: Fine steel yarn needle for weaving in ends.
- 📍 Blocking Supplies: Stainless steel T-pins, foam blocking boards, and spray bottle / steam iron.
- 🔖 Stitch Markers: 8 locking stitch markers per motif (optional, for tracking join points).
🔤 I. ABBREVIATIONS – US TERMS
- beg – Beginning
- ch – Chain
- ch-sp – Chain space
- dc – Double crochet
- dc3tog – Double crochet 3 together (cluster)
- FPdc – Front Post double crochet
- FPtr – Front Post treble crochet
- hdc – Half double crochet
- MR – Magic Ring
- picot – ch 3, sl st into 1st ch
- rem – Remaining
- rnd(s) – Round(s)
- sc – Single crochet
- sk – Skip
- sl st – Slip stitch
- sp – Space
- st(s) – Stitch(es)
- tr – Treble crochet
📝 J. NOTES BEFORE YOU BEGIN
- 🧵 Work in Continuous or Joined Rounds: All motifs are worked in joined rounds with the right side facing at all times.
- 📌 Join-As-You-Go (JAYG): The first motif is completed fully through Round 7. Subsequent motifs are joined to adjacent motifs during Round 7 by replacing a
ch-2in a outer picot loop withch 1, sl st into adjacent motif's picot loop, ch 1. - 🧼 Blocking is Key: Lace motifs naturally curl during stitching. Wet-blocking every motif (or steam-blocking finished rows) expands the openwork and highlights the picot edging.
- 🧵 Yarn Tails: Leave a 6-inch tail at the beginning and end of each motif to weave thoroughly along back stitches to ensure longevity through washings.
🪡 K. COMPLETE PATTERN
🌸 Main Victorian Floral Medallion (Make 168 Motifs for Queen Size)
🔘 Center Core & Inner Ring
- Rnd 1: Into a MR, ch 1 (does not count as st), 16 sc into ring. Join with sl st to first sc. (16 sc)
- Rnd 2: Ch 3 (counts as 1 dc), dc in same st, 2 dc in each st around. Join with sl st to top of beg ch-3. (32 dc)
- Rnd 3: Ch 1, FPdc around same st, ch 2, sk next st, *FPdc around next st, ch 2, sk next st; rep from * around 14 more times. Join with sl st to first FPdc. (16 FPdc, 16 ch-2 sps)
🌼 Inner Petal Layer
- Rnd 4: Sl st into first ch-2 sp, ch 2 (counts as part of cluster), dc2tog in same sp (counts as dc3tog cluster), ch 3, *dc3tog in next ch-2 sp, ch 3; rep from * around 14 more times. Join with sl st to top of first cluster. (16 clusters, 16 ch-3 sps)
- Rnd 5: Sl st into first ch-3 sp, ch 1, (2 sc, picot, 2 sc) in each ch-3 sp around. Join with sl st to first sc. (16 picot petal tips)
🌺 Outer Arch & Openwork Expansion
- Rnd 6: Ch 6 (counts as 1 dc + ch-3), *sk picot group, sc in space between sc groups, ch 5, sc in next space, ch 3, dc in next space; rep from * around 7 times, omitting final dc on last rep. Join with sl st to 3rd ch of beg ch-6. (8 main arch sections)
🏵️ Final Outer Picot Petal Border (Full Motif 1)
- Rnd 7: Sl st into ch-3 sp, ch 1, *(3 sc, picot, 3 sc) in ch-3 sp, (4 sc, picot, 4 sc) in ch-5 sp, (3 sc, picot, 3 sc) in next ch-3 sp; rep from * around to end. Join with sl st to first sc. Fasten off and weave in ends.
🔗 Join-As-You-Go (JAYG) Attachment (Motifs 2 onwards)
When completing Rnd 7 on subsequent motifs, join to adjacent completed motifs at corresponding picot peaks:
- Joining Picot: Replace
(picot = ch 3, sl st in 1st ch)with:ch 1, sl st into corresponding picot on adjacent motif, ch 1, sl st into 1st ch of current motif. - Attach across 2 or 3 adjacent picot points along shared sides as indicated in the assembly grid.
🌟 Fill-in Star Motif (For Negative Spaces Between 4 Motifs)
- Rnd 1: Into a MR, ch 1, 8 sc. Join with sl st to first sc. (8 sc)
- Rnd 2: *Ch 4, sl st in corresponding picot of main motif corner, ch 4, sl st in next sc of star center, sc in next sc of star center; rep from * 3 more times to attach to all 4 surrounding motifs. Fasten off.
👑 Scalloped Lace Border
Worked continuously around the outer edge of the assembled bedspread grid.
- Rnd 1 (Base Anchor): Attach yarn at any outer corner picot. Ch 1, *sc in picot, ch 5, dc in join sp between motifs, ch 5; rep from * around perimeter, working
(sc, ch 5, sc)into each corner picot. Join with sl st. - Rnd 2 (Shell Arc): Ch 1, *(4 sc, picot, 4 sc) into each ch-5 sp around. Join with sl st.
- Rnd 3 (Picot Crown): Ch 3, *sk 2 sts, (dc, picot, dc) in next st, sk 2 sts, sc in next st; rep from * around edge. Fasten off.
🎨 L. STYLING / ASSEMBLY / STABILITY / FINAL SHAPING
🧱 Assembly Grid Structure
- Arrange 168 main motifs into a 12-column by 14-row grid.
- Join motifs linearly into strips of 12, then join strips together side-by-side.
- Insert 143 Fill-in Star Motifs into the interior four-corner gaps to secure the lace web.
📍 Wet-Blocking & Shaping
- Submerge finished bedspread or motif sections in lukewarm water with mild wool wash for 15 minutes.
- Gently squeeze out excess water in towels (never wring).
- Pin edge scallops down onto blocking mats using stainless T-pins to stretch out openwork.
- Allow to dry completely before unpinning.
💡 M. HELPFUL CROCHET TIPS
- 💡 Tip 1: Weave in ends as you go! Do not leave hundreds of yarn ends until the project is assembled.
- 💡 Tip 2: Use locking stitch markers on corner picots when joining motifs to prevent accidental twisting.
- 💡 Tip 3: Maintain consistent tension on Front Post stitches so the core floral texture remains uniform across all motifs.
- 💡 Tip 4: If yarn weight varies slightly between dye lots, mix skeins every few rows to keep color subtle and seamless.
- 💡 Tip 5: Wet-block a sample 4-motif block before completing all motifs to confirm your overall dimensions.
- 💡 Tip 6: Keep a digital tally or physical counter for completed motifs to stay motivated through long-term crafting!
🧼 N. CARE INSTRUCTIONS
- 🧺 Washing: Hand wash in cold water using gentle laundry soap.
- 🌬️ Drying: Lay flat to dry on clean towels or blocking boards. Do not tumble dry.
- 🥌 Pressing: Steam gently from 2 inches away if needed; avoid pressing hot iron directly onto cotton stitches.
❓ R. FAQ
❓ Can I make this bedspread in a different yarn weight?
Yes! Working with Sport or Fingering weight yarn will produce a lighter, delicate coverlet, whereas Worsted weight yarn will yield a heavier, plush blanket. Ensure you adjust hook size accordingly.
❓ How do I alter the size for a Twin or King mattress?
- Twin (6 x 12 Motifs): 72 Motifs Total.
- Full (10 x 14 Motifs): 140 Motifs Total.
- King (15 x 15 Motifs): 225 Motifs Total.
❓ Do I have to use Join-As-You-Go (JAYG)?
No, you can complete all Round 7 motifs fully and sew them together through outer picot loops using a tapestry needle and whipstitch, though JAYG provides a cleaner finish.
❓ How much does the finished Queen size bedspread weigh?
A completed Queen coverlet in DK cotton weighs approximately 3.8–4.2 kg (8.3–9.2 lbs), giving it a luxurious, weighted drape.