📖 B. INTRODUCTION
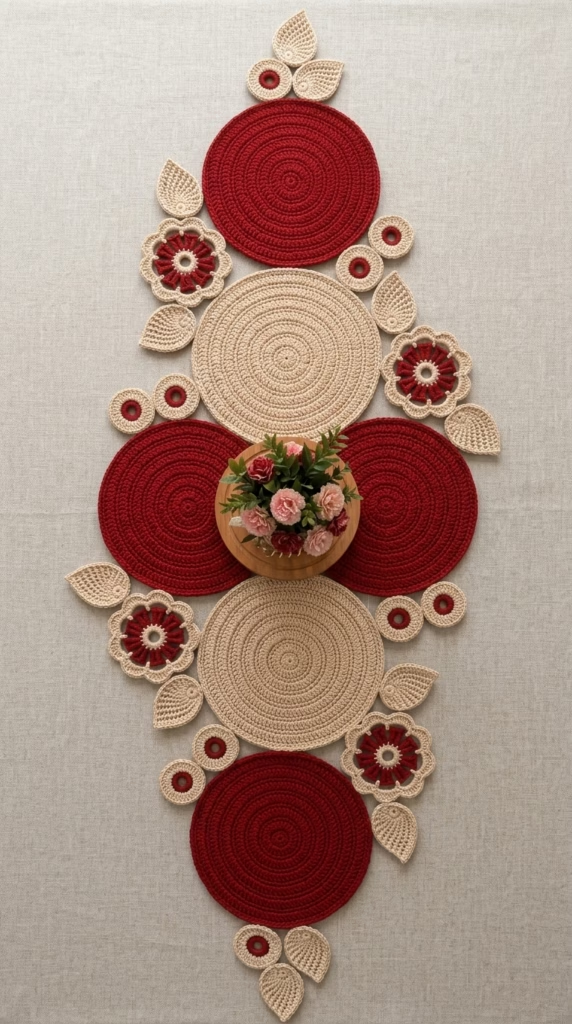
Elevate your dining space with the Crimson Bloom Crochet Table Runner, a striking modular design that combines bold geometric shapes with delicate floral accents. This project utilizes a clever overlapping assembly technique, transforming simple flat circles, textured flowers, and structured leaves into a cohesive, high-impact centerpiece.
Perfect for holiday tablescapes, romantic dinners, or everyday elegance, this runner uses worsted weight cotton yarn to ensure durability, heat resistance, and an immaculate drape. The rich crimson red and warm beige tones offer a classic, sophisticated palette that suits a wide variety of interior styles.
Because the entire project is constructed from individual motifs, it is the ultimate portable project. You can easily customize the final length by adding or subtracting large central circles, or personalize the look by experimenting with different seasonal color combinations.
🔍 C. MAIN PATTERN OVERVIEW
This table runner is built entirely from separate crocheted components that are later arranged and sewn together into a staggered, overlapping silhouette.
The design consists of five distinct motifs:
- Large Red Circles: Solid, dense circles that form the structural anchor of the runner.
- Large Beige Circles: Identical in size to the red circles, providing visual contrast along the center axis.
- Crimson Center Flowers: Decorative accents featuring a solid red core surrounded by open, scalloped beige petals.
- Two-Tone Small Circles: Miniature medallions that balance the edges of the arrangement.
- Beige Leaves: Pointed, textured leaves that fill out the floral clusters and add dynamic movement to the edges.
🎯 D. SKILL LEVEL
Easy to Intermediate
This pattern is accessible to adventurous beginners comfortable with working in the round. The challenge lies in the meticulous blocking and assembly of the overlapping motifs.
Skills Required:
- Working in a Magic Ring (MR)
- Standard stitches: sc, hdc, dc, tr
- Increasing in the round to maintain a perfectly flat circle
- Working in chain spaces (for the flower petals)
- Invisible seaming/whipstitching for assembly
📏 E. FINISHED SIZE
When assembled exactly as instructed, the finished table runner measures approximately:
- Length: 42 inches (106 cm) from tip to tip.
- Width: 16 inches (40 cm) at the widest central point.
Size adjustments: The dimensions can be easily modified. Changing to a lighter DK weight yarn and a smaller hook will yield a more delicate, narrower runner. Adding an extra Large Motif to the center axis will increase the length by approximately 7 inches (18 cm).
🧮 F. GAUGE
- Flat Circle Gauge: After Round 3 of the Large Circle Motif, the piece should measure exactly 3.5 inches (9 cm) in diameter.
- Note on Gauge: While strict gauge is not critical for fit, consistent tension is crucial. If your circles begin to ruffle, your tension is too loose or your hook is too large. If they bowl upwards, your tension is too tight.
🧶 G. REQUIRED YARN AMOUNTS
This project requires Category 4 Worsted Weight Cotton Yarn (e.g., Lily Sugar ‘n Cream, Dishie, or Ricorumi).
| Color Name | Approximate Yardage Required | Recommended Skeins (100g) |
| Crimson Red | 350 yards (320 m) | 2 Skeins |
| Sand Beige | 300 yards (274 m) | 2 Skeins |
Estimates include enough yardage for sewing tails and minor tension variations.
🧰 H. MATERIALS
- Crochet Hook: Size G/6 (4.0 mm) — or size needed to obtain gauge.
- Yarn: Worsted weight cotton in Crimson Red and Sand Beige.
- Tapestry Needle: Sharp-tipped for weaving in ends, and blunt-tipped for seaming.
- Scissors: Sharp craft scissors.
- Stitch Markers: 🧶 Essential for tracking the beginning of rounds.
- Blocking Mats and Rust-Proof Pins: ⚠️ Strongly recommended for flattening the motifs before final assembly.
🔤 I. ABBREVIATIONS – US TERMS
- ch: chain
- MR: magic ring
- sl st: slip stitch
- sc: single crochet
- hdc: half double crochet
- dc: double crochet
- tr: treble (triple) crochet
- inc: increase (place 2 stitches in the same stitch)
- st(s): stitch(es)
- sp: space
- BLO: back loop only
- FO: fasten off
📝 J. NOTES BEFORE YOU BEGIN
- Joined Rounds: The circular motifs in this pattern are worked in joined rounds to ensure a perfectly symmetrical edge. At the end of each round, join with a sl st to the first stitch of the round (not the turning chain).
- Turning Chains: The initial ch-2 at the beginning of double crochet rounds does not count as a stitch. Place your first stitch of the round in the same base stitch as the chain.
- Color Changes: When changing colors (e.g., in the Small Two-Tone Circles), complete the final pull-through of the last stitch of the old color using the new color.
- Sewing Tails: Unless otherwise instructed, leave an 18-inch (45 cm) tail when fastening off motifs that will be sewn onto other pieces.
🪡 K. COMPLETE PATTERN
🔴 Large Motif (Make 4 in Red, 2 in Beige)
These dense, flat circles form the foundation of the runner.
Yarn: Crimson Red (make 4) and Sand Beige (make 2)
R1: MR, ch 2, 12 dc in the ring. Join with sl st to first dc. (12 sts)
R2: ch 2, inc (2 dc) in each st around. Join. (24 sts)
R3: ch 2, (1 dc, inc) x 12. Join. (36 sts)
R4: ch 2, (2 dc, inc) x 12. Join. (48 sts)
R5: ch 2, (3 dc, inc) x 12. Join. (60 sts)
R6: ch 2, (4 dc, inc) x 12. Join. (72 sts)
R7: ch 2, (5 dc, inc) x 12. Join. (84 sts)
R8: ch 2, (6 dc, inc) x 12. Join. (96 sts)
R9: ch 1, sc in each st around to create a clean, sturdy edge. Join. (96 sts)
FO: Weave in all ends. (These pieces will be sewn together using separate lengths of yarn to keep the seams invisible).
🌸 Crimson Center Flower Motif (Make 4)
Features a solid center with open, scalloped petals.
Center (Yarn: Crimson Red)
R1: MR, ch 2, 12 dc in the ring. Join with sl st to first dc. (12 sts)
R2: ch 2, inc (2 dc) in each st around. Join. (24 sts)
FO Red.
Petals (Yarn: Sand Beige)
R3: Join Beige in any st. ch 4, skip 2 sts, sl st in the next st. Repeat from * to end. (8 ch-4 loops created)
R4: sl st into the first ch-4 space. In each ch-4 space around, work the following petal sequence: (1 sc, 1 hdc, 3 dc, 1 hdc, 1 sc). (8 petals created)
FO: Leave a long tail for sewing the flower onto the runner assembly.
🔘 Small Two-Tone Circle Motif (Make 6)
Small medallions used to cap the ends and fill side gaps.
Yarn: Start with Crimson Red.
R1: MR, ch 2, 12 dc in the ring. Join with sl st to first dc. (12 sts)
R2: ch 2, inc (2 dc) in each st around. Join. (24 sts)
FO Red. Join Sand Beige.
R3: (In Beige) ch 2, (1 dc, inc) x 12. Join. (36 sts)
R4: ch 1, sc in each st around. Join. (36 sts)
FO: Leave a long tail for sewing.
🍃 Beige Leaf Motif (Make 8)
A structured, pointed leaf worked around a foundation chain.
Yarn: Sand Beige
Row 1 (Foundation): ch 14.
Round 1 (First Side): Working into the 2nd ch from hook, 1 sc. Then work the following sequence along the chain: 1 hdc, 1 dc, 1 tr in each of the next 6 chs, 1 dc, 1 hdc, 1 sc. In the very last chain, work 3 sc to turn the corner.
Round 1 (Second Side): Working down the opposite side of the foundation chain: 1 sc, 1 hdc, 1 dc, 1 tr in each of the next 6 chs, 1 dc, 1 hdc, 1 sc. Join with sl st to the first sc.
Round 2 (Edging): ch 1, sc in each st around the entire leaf. Place 3 sc in the very tip of the leaf (the center st of the 3-sc group from the previous round) to maintain a sharp point. Join.
FO: Leave a long tail for sewing.
🎨 L. STYLING / ASSEMBLY / STABILITY / FINAL SHAPING
Blocking is absolutely mandatory for this project. Cotton yarn holds shape beautifully once wet-blocked. Pin every motif flat on a blocking mat, spray heavily with water, and let dry completely for 24 hours before assembly.
Assembly Layout Guide
Arrange the pieces on a flat surface exactly as follows before sewing:
- The Core Axis: Lay out the Large Motifs in a vertical line, slightly overlapping them (about 1 to 1.5 inches of overlap). Top to bottom:
- Large Red Circle
- Large Beige Circle
- Center Anchor: Two Large Red Circles placed side-by-side (overlapping slightly in the middle)
- Large Beige Circle
- Large Red Circle
- The End Caps: At the very top and very bottom of the runner, arrange a cluster consisting of one Small Two-Tone Circle and two Beige Leaves pointing outward.
- The Flanks: Nestled in the curves where the large circles meet on the left and right sides of the runner, place the remaining Flowers, Leaves, and Small Two-Tone Circles as asymmetrical accents.
Sewing Instructions
- Pinning: 📌 Pin all pieces together securely. Take a photo of your layout with your phone so you can reference it if pieces shift.
- Joining the Core: Thread your blunt tapestry needle with Crimson Red yarn. Working from the back of the pieces, whipstitch the overlapped sections of the large circles together. Only catch the back loops of the stitches so the seam remains completely invisible from the front.
- Attaching Accents: Switch to Sand Beige yarn. Sew the beige edges of the flowers, small circles, and leaves to the main red and beige circles. Again, stitch only from the back, catching the underside of the stitches to preserve the distinct layered look.
✅ Final Finishing Checklist
- ✅ All motifs have been firmly wet-blocked prior to sewing.
- ✅ Center axis is perfectly straight (use a ruler or tape measure to verify).
- ✅ Left and right floral flanks mirror each other closely in visual weight, even if slightly asymmetrical in placement.
- ✅ Overlap seams are tight enough that the runner can be lifted without buckling.
- ✅ All loose ends are woven securely into the back of motifs matching their own color.
💡 M. HELPFUL CROCHET TIPS
- 💡 Preventing the Hexagon Effect: When working standard flat circle increases, the corners can start to look hexagonal. If this bothers you, stagger your increases. For example, on an even round like R4
(2 dc, inc), start with1 dc, inc, then continue with(2 dc, inc)around, ending with1 dc. - 💡 Yarn Management: Keep your red and beige yarn scraps separate. You will need them for invisible seaming during the final assembly phase.
- 💡 Crisp Leaf Points: To make your leaves exceptionally pointed, you can replace the center single crochet at the tip with a
(sc, ch 2, sl st in 2nd ch from hook, sc)picot stitch. - 💡 Sewing Tension: Do not pull your seaming stitches too tight. The runner needs to lay perfectly flat on the table. If you sew too tightly, the fabric will pucker and buckle.
- 💡 Heat Proofing: Because this is 100% cotton, it acts as a great trivet for warm dishes. However, avoid placing extremely hot, straight-from-the-oven cast iron directly on the seams, as it could warp the thread.
🧼 N. CARE INSTRUCTIONS
- Washing: 100% cotton can be machine washed, but due to the intricate seaming of this table runner, hand washing is highly recommended. Fill a basin with cool water and a mild detergent. Submerge and gently press the water through the fibers.
- Drying: Never wring or twist the runner. Roll it in a clean, dry towel and press to remove excess moisture.
- Reshaping: Lay flat on a blocking mat or dry towel, pull into its original shape, and allow to air dry completely. You may use a warm iron with steam on the reverse side to press out any stubborn wrinkles.
- Storage: Roll the runner loosely around a cardboard tube (like an empty wrapping paper roll) to prevent harsh creases when storing it between seasons.
❓ R. FAQ
❓ Can I use acrylic yarn instead of cotton?
While you can use acrylic, it is not recommended for a table runner. Acrylic is prone to pilling with friction, does not block as crisply as cotton, and can melt if hot dishes are placed upon it. Cotton or a linen blend is strongly preferred.
❓ My large circles are rippling at the edges. What went wrong?
Rippling occurs when there are too many stitches for the circumference, usually caused by tight tension in the center rounds and loose tension on the outer rounds. Try dropping down half a hook size, or strictly monitor your tension to ensure it remains consistent throughout the 8 rounds.
❓ How do I make the runner longer?
The beauty of this modular design is its flexibility! To add length, simply crochet additional Large Red and Beige Circles. Alternate them along the center axis before capping the ends with the leaf and small circle clusters.
❓ Is there a trick to keeping the seaming thread invisible?
Yes! Always match your seaming yarn to the color of the motif that sits on top in the overlap. Work your stitches exclusively through the back loops of the bottom motif and the underside loops of the top motif.
❓ Can I attach the pieces using a slip stitch join as I go? A join-as-you-go method is difficult for this specific pattern because the aesthetic relies heavily on the motifs overlapping each other, rather than sitting perfectly edge-to-edge. Whipstitching after blocking provides the neatest, most structurally sound result.