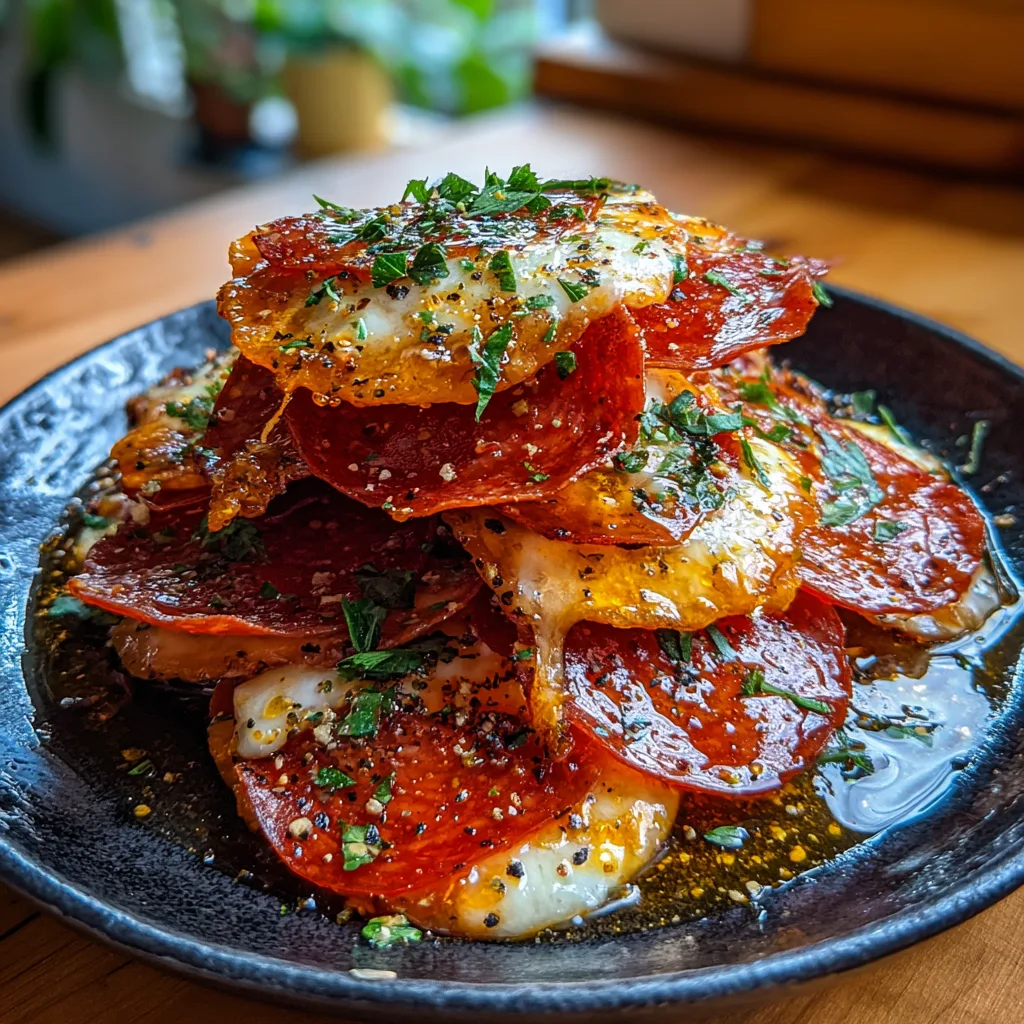
Pepperoni Cheese Crisps
The Ultimate Low-Carb Snack: Irresistible Pepperoni and Cheese Crisps
If you are a pizza lover living a low-carb lifestyle, or simply someone who appreciates a savory, crunchy snack, your world is about to change. Enter Pepperoni and Cheese Crisps—the bite-sized, crunchy, cheesy marvels that deliver all the satisfaction of a pepperoni pizza without the carb-heavy crust. These little gems have taken the internet by storm, becoming a staple in keto households and a favorite appetizer at parties where guests don’t even realize they are eating “diet food.”
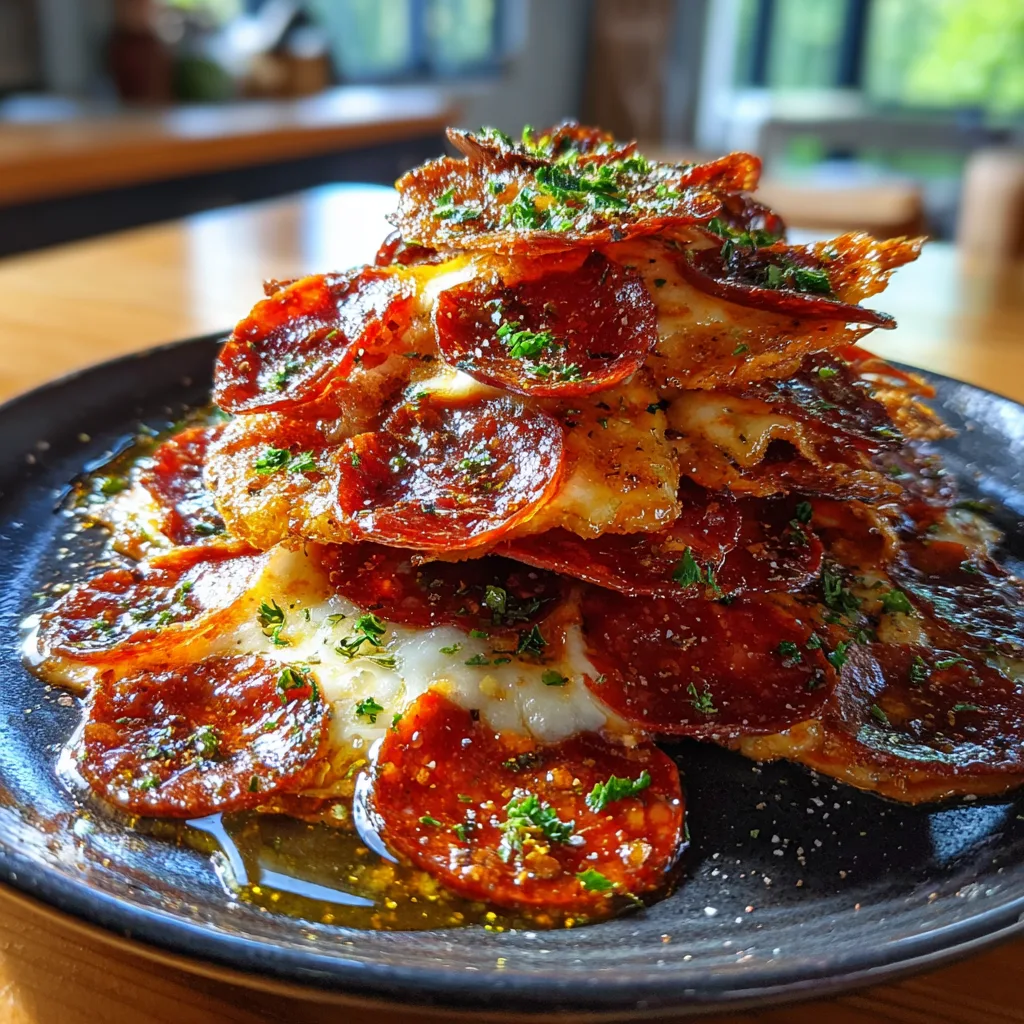
Imagine the best part of the pizza—the crispy, curled-up pepperoni edges and the golden, bubbling cheese—isolated into a single, perfect bite. That is exactly what this recipe delivers. The heat of the oven transforms soft mozzarella and fatty pepperoni into a sturdy, cracker-like chip that can hold its own against dips or be devoured straight from the baking sheet. The texture is a magnificent interplay between the shatteringly crisp pepperoni and the chewy-yet-crunchy caramelized cheese.
In this guide, we are going to walk you through exactly how to achieve that perfect “cheese pull” turned “cheese crisp” texture. We will discuss the science of rendering fat for maximum crispiness, the best cheeses to use, and how to store them (if you don’t eat them all immediately!). Whether you are looking for a game-day snack, a school lunchbox addition, or a midnight craving buster, this recipe is your answer.
Why This Recipe is a Game Changer
There are plenty of snack recipes out there, but here is why Pepperoni and Cheese Crisps reign supreme:
- Simplicity: You literally need two main ingredients. It’s hard to mess this up.
- Speed: From fridge to mouth in under 15 minutes. It is faster than ordering a pizza delivery.
- Dietary Friendly: These are naturally gluten-free, keto-friendly, carnivore-friendly, and grain-free.
- High Satiety: Unlike potato chips which leave you hungry an hour later, the high protein and fat content in these crisps keep you full and satisfied.
Ingredients
To get that ultra-glossy, flavorful result, stick to these ingredients:
- Pepperoni Slices (24-30 slices): Use regular or turkey pepperoni. For the best result, look for “cup and char” style pepperoni, which curls up slightly, holding the melted cheese inside like a little bowl.
- Mozzarella Cheese (1/2 cup, shredded or sliced): You can use pre-shredded mozzarella for convenience, but cutting a block of low-moisture mozzarella into small squares often yields a better melt. Provolone is a great substitute.
- Italian Seasoning (1 tsp): This brings that authentic “pizza” aroma.
- Coarse Black Pepper (to taste): Freshly cracked is best for a spicy kick.
- Fresh Parsley (1 tbsp, chopped): For a pop of color and freshness to cut through the rich oils.
- Optional Dipping Sauce: Low-sugar marinara or ranch dressing.
Instructions
Follow these steps to ensure your crisps are crunchy, not soggy.
1. Preheat and Prep
Preheat your oven to 400°F (200°C). Line a large baking sheet with parchment paper. Do not use foil, as the cheese tends to stick, and do not use a silicone mat if you want maximum crispiness—parchment paper absorbs just enough excess oil to help them crisp up.
2. Arrange the Base
Lay your pepperoni slices out on the baking sheet in a single layer. Leave about half an inch of space between each slice. They will shrink slightly as they cook, but you want airflow around them to ensure the edges get crispy.
3. Cheese It Up
Place a small pinch of shredded mozzarella (about 1 teaspoon) or a small square of cheese slice directly in the center of each pepperoni slice. Try to keep the cheese mostly on the meat so it doesn’t melt off onto the pan, though crispy cheese frico edges are delicious too!
4. Season
Sprinkle the Italian seasoning and coarse black pepper evenly over the tops of the cheese-covered pepperoni.
5. Bake to Perfection
Place the baking sheet in the oven and bake for 8 to 10 minutes. Keep a close eye on them after the 7-minute mark. You are looking for the cheese to be bubbling vigorously and turning a golden-brown color. The pepperoni edges should look dark and crisp.
6. The Cool Down (Crucial Step)
Remove the pan from the oven. The crisps will still be soft and pliable while hot. You must let them sit on the baking sheet for at least 2-3 minutes to cool. During this time, the rendered fats will settle, and the cheese will harden into a crisp shell. If you try to pick them up too early, they will be greasy and floppy.
7. Garnish and Serve
Once crisp, transfer them to a paper towel-lined plate if you want to remove excess oil (though the oil adds flavor!). Sprinkle with fresh chopped parsley and serve immediately with your favorite dip.
Tips for the Crispiest Results
Blot the Grease: Pepperoni releases a lot of oil. If you find your crisps are too greasy, you can pat the pepperoni slices with a paper towel before baking, or dab them lightly after they come out of the oven.
Cheese Choice Matters: Avoid fresh mozzarella (the wet balls in brine). It has too much water content and will make your crisps soggy. Stick to low-moisture mozzarella or provolone.
Spice It Up: For a spicy kick, add a slice of fresh jalapeño on top of the cheese before baking, or sprinkle with red pepper flakes.
The Microwave Method: In a rush? You can make these in the microwave. Place pepperoni on a paper towel-lined plate, top with cheese, and microwave for 40-60 seconds. They won’t be quite as crispy as the oven version, but they are a quick fix.
Serving Suggestions
While delicious on their own, these Pepperoni and Cheese Crisps are versatile:
- Keto Nachos: Use these crisps as the “chips” and pile them high with guacamole, sour cream, and olives.
- Salad Croutons: Crumble them up and toss them into a Caesar salad for a protein-packed crunch.
- Soup Topper: Float a couple of crisps on top of a bowl of tomato soup instead of crackers.
- Charcuterie Board: Add them to a meat and cheese board for a warm, crunchy element.
Variations to Try
The “Meat Lover”: Add a tiny piece of cooked sausage or bacon crumble on top of the cheese before baking.
The “Greek”: Swap mozzarella for feta cheese and top with oregano. Note that feta doesn’t melt the same way, but it becomes deliciously warm and soft.
The “Taco”: Use cheddar cheese instead of mozzarella and sprinkle with taco seasoning instead of Italian seasoning.
Fun Facts & Cultural Context
While pepperoni is often associated with Italian cuisine, it is actually an Italian-American invention. It was created in the early 20th century by Italian immigrants in the United States who adapted their traditional spicy salamis to American ingredients. Today, it is America’s most popular pizza topping.
The concept of “frico” (cheese crisps) hails from the Friuli region of Italy, where Montasio cheese is fried until crisp. This recipe is essentially a modern, Americanized fusion of a classic Italian frico and the beloved pepperoni pizza, perfectly adapted for the modern low-carb movement.
Pepperoni and Cheese Crisps
Ingredients
Equipment
Method
- Preheat oven to 400°F (200°C). Line a large baking sheet with parchment paper.
- Arrange pepperoni slices in a single layer on the baking sheet, spacing them slightly apart.
- Top each pepperoni slice with a generous pinch of shredded mozzarella cheese.
- Sprinkle Italian seasoning and black pepper over the cheese.
- Bake for 8-10 minutes, or until the cheese is bubbly and golden brown and pepperoni edges are crisp.
- Remove from oven and let cool on the pan for 2-3 minutes to allow cheese to crisp up before serving.
- Garnish with fresh parsley and serve with marinara sauce if desired.