Biscuit Garlic Butter Cheese Bombs Recipe
The Ultimate Guide to Gooey Biscuit Garlic Butter Cheese Bombs
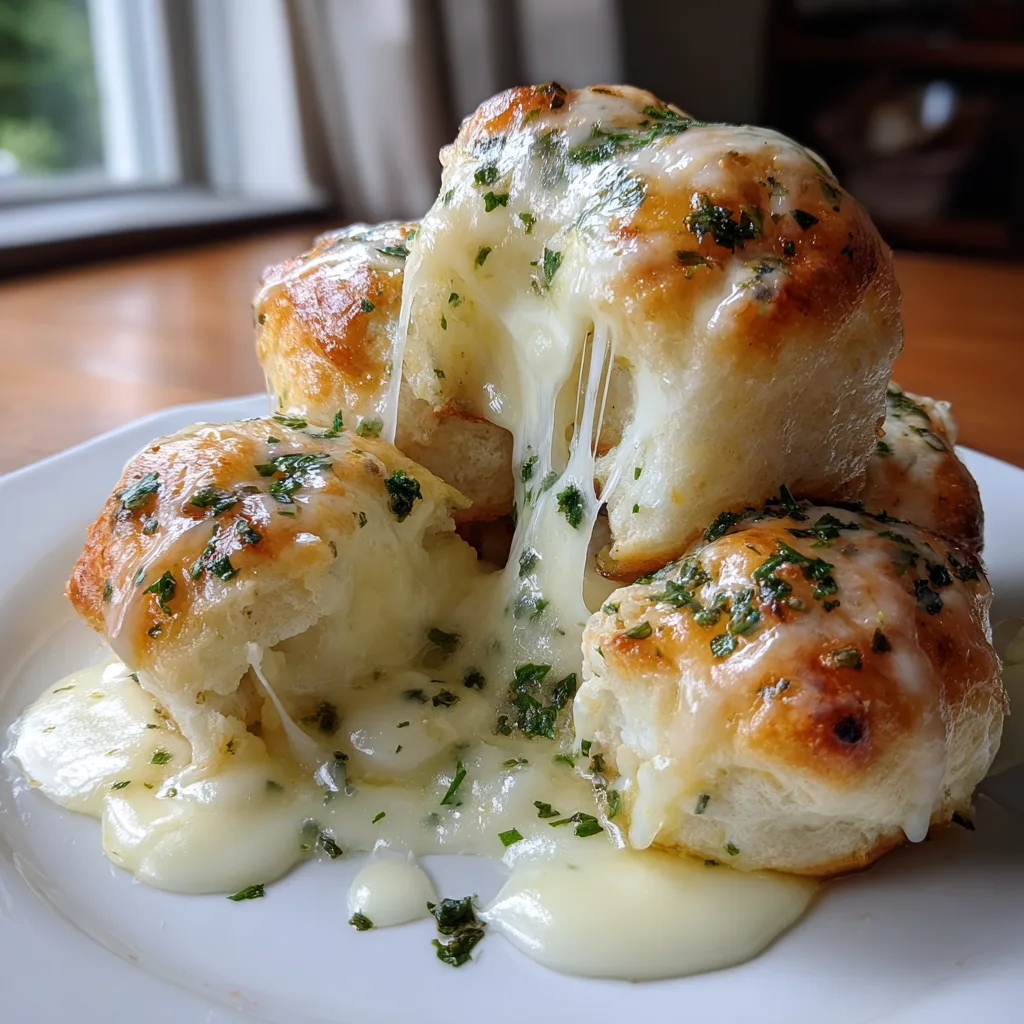
If there is one universal language of comfort food, it is spoken in the dialect of melted cheese and warm, buttery carbohydrates. Enter the Biscuit Garlic Butter Cheese Bomb. This isn’t just a dinner roll; it is an experience. Imagine sinking your teeth into a golden, flaky crust that has been brushed generously with a savory garlic-herb butter, only to discover a molten core of stretchy mozzarella cheese waiting inside. It is the perfect marriage of a garlic knot and a mozzarella stick, yet somehow better than both combined.
Whether you are looking for the star appetizer for your next game day party, a quick side dish for pasta night, or simply a midnight snack that hits all the right dopamine receptors, these cheese bombs are the answer. In this comprehensive guide, we will explore everything you need to know to master this viral recipe. We will cover the science of the perfect cheese pull, the debate between homemade dough versus canned biscuits, variation ideas to keep things exciting, and expert tips to ensure your bombs don’t explode in the oven before they reach your mouth.
Why You Will Fall in Love With This Recipe
There are countless reasons why this recipe has taken the internet by storm, becoming a staple in home kitchens everywhere. Here is why you need to make them immediately:
- Effort vs. Reward Ratio: This recipe delivers gourmet-level satisfaction with incredibly minimal effort. Using refrigerated biscuit dough cuts the prep time down to mere minutes, making it accessible for even the most novice cooks.
- The “Wow” Factor: There is something inherently impressive about breaking open a bread roll to reveal a string of cheese that stretches for miles. It is a visual and culinary delight that guests rave about.
- Versatility: While the classic garlic butter and mozzarella combination is unbeatable, this recipe serves as a blank canvas for endless creativity. You can stuff them with everything from pepperoni for a pizza version to jalapeños for a spicy kick.
- Crowd Pleaser: We have yet to meet a person who declines a warm, cheese-filled garlic biscuit. They are kid-friendly, adult-approved, and perfect for any occasion.
The Anatomy of the Perfect Cheese Bomb
To understand how to make the best cheese bomb, we must analyze its components. Simplicity is key here, but the quality of your technique matters.
1. The Dough
The vessel for your cheese is crucial. While you can certainly make a yeast dough from scratch, the magic of this recipe often lies in the “Grand’s” style refrigerated biscuits. They are engineered to be flaky and pull-apart, creating those distinct layers that trap the butter and contrast beautifully with the smooth cheese. When baked, the layers puff up, creating a light, airy exterior that isn’t too dense or doughy.
2. The Cheese
Not all cheese is created equal when it comes to melting. For the iconic “cheese pull” seen in the photos, Mozzarella is non-negotiable. Specifically, you want block mozzarella that you cube yourself, or string cheese (which is low-moisture mozzarella). Pre-shredded cheese often contains anti-caking agents that prevent it from melting together into a cohesive, stretchy mass. Cubes provide a concentrated pocket of cheese that melts slowly, ensuring it doesn’t just absorb into the dough.
3. The Garlic Butter Bath
This isn’t just a garnish; it’s a flavor component. The mixture of melted butter, minced garlic, dried or fresh parsley, and a touch of parmesan creates a savory lacquer that permeates the outer layers of the biscuit. Applying it both before and after baking ensures the flavor is locked in and the finish is glistening and appetizing.
Ingredients
Gather these simple ingredients to get started. Don’t scrimp on the butter!
- Refrigerated Biscuit Dough: 1 can (16 oz), typically containing 8 biscuits (Grand’s style Flaky Layers recommended).
- Mozzarella Cheese: 8 oz block, cut into 1-inch cubes (or 4-5 mozzarella string cheese sticks cut into chunks).
- Unsalted Butter: ½ cup (1 stick), melted.
- Garlic: 3-4 cloves, fresh minced (or 1 tsp garlic powder if fresh isn’t available).
- Fresh Parsley: 2 tbsp, finely chopped (dried parsley works too, use 1 tbsp).
- Parmesan Cheese: 2 tbsp, grated (optional, for the topping).
- Italian Seasoning: 1 tsp (optional, for extra herbaceous flavor).
- Salt: A pinch (if using unsalted butter).
Step-by-Step Instructions
Follow these steps to ensure your cheese stays inside the biscuit and your tops come out perfectly golden.
- Preheat and Prep: Preheat your oven to 375°F (190°C). Line a baking sheet with parchment paper or a silicone baking mat. This is crucial because if any cheese leaks (and it happens to the best of us), the parchment paper makes cleanup easy and prevents burning.
- Prepare the Dough: Open the can of biscuits and separate the 8 rounds. If you want smaller, bite-sized appetizers, you can peel each biscuit in half horizontally to create 16 thinner rounds. For substantial “bombs” (as pictured), stick to the 8 original biscuits. gently flatten each biscuit round with your hand to create a wider circle.
- Stuff the Biscuits: Place a cube of mozzarella cheese (approx. 1 inch) into the center of each flattened dough circle. Tip: Ensure the cheese is dry; excess moisture can make the dough soggy inside.
- Seal the Bombs: This is the most critical step. Pull the edges of the dough up and over the cheese, gathering them at the top. Pinch the seams together tightly—really pinch them! Roll the ball gently between your palms to smooth out the seams and ensure the cheese is fully enclosed. Place the balls seam-side down on the prepared baking sheet.
- Make the Garlic Butter: In a small bowl, whisk together the melted butter, minced garlic, chopped parsley, Italian seasoning, and salt.
- First Brush: Brush about half of the garlic butter mixture over the tops of the unbaked biscuit balls. This helps the crust brown and infuses the flavor early on.
- Bake: Place the baking sheet in the oven and bake for 10 to 15 minutes. You are looking for a deep golden-brown color. If they look pale, give them another minute or two, but watch closely so the garlic doesn’t burn.
- Final Glaze: Remove the biscuits from the oven. Immediately brush the remaining garlic butter mixture generously over the hot biscuits. Sprinkle with grated parmesan cheese if desired.
- Serve: Let them cool for 2-3 minutes (molten cheese burns are real!), then serve warm.
Tips for Success
The “Leak” Prevention Strategy:
The most common issue with stuffed breads is the cheese leaking out. To prevent this, ensure your dough is not stretched too thin in any one spot. When sealing, pinch the dough aggressively. Placing the seam side down uses the weight of the biscuit to keep it sealed during the initial rise.
Garlic Variations:
If you are worried about burning fresh garlic in the oven, you can use garlic powder for the pre-bake brushing and save the fresh minced garlic for the post-bake brushing. The residual heat of the biscuit is enough to take the raw edge off the garlic without burning it bitter.
Dip It Good:
While delicious on their own, these bombs are elevated by dipping sauces. Warm marinara is the classic choice, creating a pizza-like experience. Ranch dressing, garlic aioli, or even a spicy queso dip are also fantastic pairings.
Creative Variations
Once you master the basic technique, try these fun twists:
1. The Pizza Bomb
Add a slice of pepperoni and a teaspoon of pizza sauce inside the biscuit along with the mozzarella. Top with oregano and parmesan.
2. The Breakfast Bomb
Stuff the biscuit with scrambled eggs, cooked crumbled bacon, and cheddar cheese. Brush with maple butter instead of garlic butter for a sweet and savory breakfast treat.
3. The Jalapeño Popper Bomb
Mix cream cheese with diced jalapeños and shredded cheddar. Use a dollop of this mixture as the filling. Top with bacon bits.
4. Sweet Cinnamon Bombs
Skip the savory ingredients. Stuff the biscuit with a cube of cream cheese or a caramel square. After baking, brush with melted butter and roll in cinnamon sugar.

Storage and Reheating
Storage:
These are best eaten fresh, but leftovers can be stored in an airtight container in the refrigerator for up to 3 days.
Reheating:
Do not microwave them if you want to keep the flaky texture! The microwave will turn the biscuit chewy and tough. Instead, place them in a toaster oven or air fryer at 350°F for 3-5 minutes until heated through and the cheese is melty again.
Freezing:
You can freeze the unbaked assembled bombs! Flash freeze them on a baking sheet, then transfer to a freezer bag. Bake from frozen, adding an extra 3-5 minutes to the cooking time.
Nutritional Considerations
Let’s be honest: this is comfort food. It is rich in carbohydrates and fats, which is exactly what makes it so delicious. However, you can make lighter modifications. Using low-fat biscuit dough or part-skim mozzarella can reduce the calorie count slightly. But for the full experience, we recommend enjoying the full-fat version in moderation.
Conclusion
The Biscuit Garlic Butter Cheese Bomb is a testament to the power of simple ingredients coming together to create something magical. It’s a recipe that invites you to get your hands dirty, to gather around the kitchen island, and to enjoy the simple pleasure of pulling apart warm bread to find a cheesy treasure inside. Whether you are a seasoned chef or a college student with a toaster oven, this recipe is fail-proof and guaranteed to bring smiles to faces.
So, grab that can of biscuits, chop up that garlic, and get ready to bake the most addictive appetizer you’ve ever tasted. Your kitchen is about to smell like an Italian bakery, and your taste buds are in for a ride.
Biscuit Garlic Butter Cheese Bombs
Ingredients
Equipment
Method
- Preheat oven to 375°F (190°C). Line a baking sheet with parchment paper to catch any cheese leaks.
- Remove biscuits from the can. Gently flatten each biscuit round with your hand to make it wider.
- Place one cube of mozzarella cheese in the center of each dough circle.
- Pull the edges of the dough up around the cheese and pinch tightly to seal. Roll into a smooth ball. Place seam-side down on the baking sheet.
- In a small bowl, whisk together melted butter, minced garlic, parsley, Italian seasoning, and salt.
- Brush half of the garlic butter mixture over the unbaked biscuit balls.
- Bake for 10-15 minutes, or until the biscuits are golden brown and puffed up.
- Remove from oven and immediately brush with the remaining garlic butter. Sprinkle with parmesan cheese.
- Serve warm while the cheese is still gooey and stretchy.