Red, White, and Blue Chocolate Covered Strawberries
Red, White, and Blue Chocolate Covered Strawberries: The Ultimate Patriotic Treat
When it comes to celebrating patriotic holidays like the Fourth of July, Memorial Day, or Labor Day, the dessert table is often the star of the show. You want something that screams festivity, tastes fresh and delicious, and ideally, doesn’t require turning on a hot oven in the middle of summer. Enter the Red, White, and Blue Chocolate Covered Strawberry. This simple yet stunning treat combines the natural sweetness of fresh berries with creamy white chocolate and a festive crunch of blue sugar. It is the perfect bite-sized dessert that looks as good as it tastes.
In this guide, we will walk you through everything you need to know to create these glistening, gem-like treats. From selecting the perfect berries to mastering the art of the smooth dip, we have you covered. These strawberries aren’t just food; they are an edible decoration that will elevate any barbecue, picnic, or pool party.
Why You Will Love This Recipe
There is a reason chocolate-covered strawberries are a classic. They strike the perfect balance between indulgence and freshness. However, this patriotic twist adds a layer of fun that makes them irresistible to kids and adults alike.
- No-Bake Dessert: Keep your kitchen cool! This recipe requires only a microwave or a stovetop to melt the chocolate.
- Visual Impact: The stark contrast between the bright red berry, the creamy white chocolate, and the electric blue sugar makes for photos that pop.
- Quick Preparation: You can whip up a large batch in under 30 minutes, making it perfect for last-minute party prep.
- Versatile: While perfect for the 4th of July, you can easily swap the blue sugar for other colors to match different themes (pink for Valentine’s, green for Christmas).
Ingredients
The beauty of this recipe lies in its simplicity. You only need three main components, but quality matters.
- Fresh Strawberries: Look for large, firm berries with vibrant green leaves. The stem is crucial as it acts as your handle while dipping. Avoid berries that are bruised or overly soft, as they will release juice and spoil the chocolate coating.
- White Chocolate or Candy Melts:
- High-Quality White Chocolate Chips: These contain cocoa butter and offer a rich, creamy flavor. However, they can be finicky to melt.
- White Candy Melts/Almond Bark: These are designed for dipping. They melt smoothly, harden quickly, and have a bright white color that is perfect for the “white” stripe of our flag theme.
- Blue Sanding Sugar or Sprinkles:
- Sanding Sugar: This provides a beautiful, gem-like sparkle and a satisfying crunch. It adheres well to wet chocolate.
- Blue Nonpareils: These are tiny round balls that give a great texture but a more opaque look.
- Blue Jimmies: The classic long sprinkles. They work well but can sometimes look a bit messy on strawberries.
- Optional: Coconut Oil: A teaspoon of coconut oil added to the white chocolate can help thin it out for a smoother, glossier dip.
Kitchen Tools You Will Need
- Baking Sheet: To place the finished berries on.
- Parchment Paper or Wax Paper: Essential for preventing the chocolate from sticking to the tray.
- Microwave-Safe Bowl: A deep, narrow bowl or a glass measuring cup works best for dipping.
- Paper Towels: Vital for drying the strawberries completely.
- Small Bowl: For holding the blue sugar.
Instructions
Step 1: Prep the Strawberries
Wash your strawberries gently in cold water. Do not soak them, as strawberries act like sponges and will absorb water, which leads to mushy fruit and seized chocolate. Once washed, dry them thoroughly. This is the most critical step. Use paper towels to pat them dry, getting into the crevices around the leaves. Let them sit on a dry towel for 10-15 minutes to air dry completely. If there is any water on the berry, the chocolate will not stick and may slide right off.
Step 2: Set Up Your Dipping Station
Line a baking sheet with parchment paper. Pour your blue sanding sugar into a small, deep bowl. You want the sugar deep enough that you can dip the tip of the berry without hitting the bottom of the bowl.
Step 3: Melt the Chocolate
Place your white chocolate chips or candy melts in a microwave-safe bowl. Microwave in 30-second intervals, stirring vigorously between each interval. Do not overheat, or the chocolate will clump. Stop when the chocolate is mostly melted and stir until the residual heat melts the remaining lumps. If the mixture is too thick, stir in a teaspoon of coconut oil or vegetable shortening to loosen it up.
Step 4: The Dip
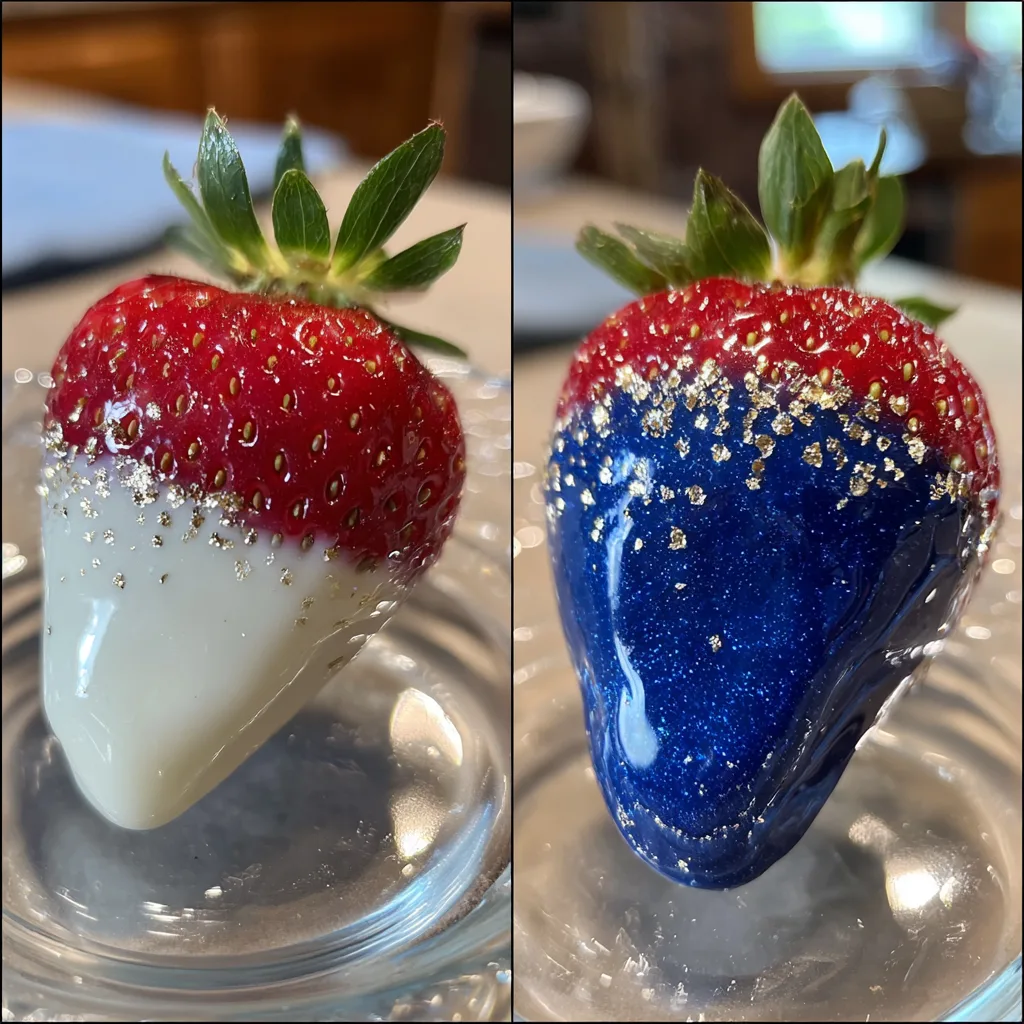
Grab a strawberry by the green stem or leaves. Gather the leaves up so they don’t drag in the chocolate. Dip the strawberry into the white chocolate, submerging it about two-thirds of the way up. You want to leave the top third (the red part) visible. Lift the berry out and gently shake it or tap your hand against the bowl to let the excess chocolate drip off. Scrape the bottom of the berry lightly against the rim of the bowl to remove the “tail” of chocolate.
Step 5: The Blue Tip
Immediately after dipping in the white chocolate (while it is still wet), dip the bottom third of the strawberry into the blue sugar. Do not submerge the whole white part; just dip the very tip (about the bottom 1/3 of the berry). Alternatively, you can hold the berry over the bowl and sprinkle the blue sugar onto the tip for more precision.
Step 6: Set and Cool
Place the finished strawberry on the parchment-lined baking sheet. Repeat with the remaining berries. once the tray is full, place it in the refrigerator for about 15-20 minutes to let the chocolate set completely. The shell should be hard and snappy.
Tips for the Perfect Dip
Temperature Matters: Ensure your strawberries are at room temperature before dipping. If they are ice-cold from the fridge, the chocolate will harden too fast (shock cooling) and may crack or slide off as the berry sweats.
Avoid “Seizing”: Water is the enemy of melted chocolate. Even a single drop of water falling into your bowl can cause the chocolate to turn into a gritty, clumping mess (seizing). Keep all utensils bone dry.
The Toothpick Trick: If your strawberries have very short stems that are hard to hold, insert a toothpick into the top green center to use as a handle. Remove it gently after the chocolate sets.
Variations to Try
While the classic Red, White, and Blue is the goal, you can get creative with this method:
- Dark Chocolate Base: Dip the berry in dark chocolate first, let it set, then do a second dip in white chocolate and blue sugar for a multi-layered flavor profile.
- Cheesecake Stuffed: Hollow out the center of the strawberry and fill it with a no-bake cheesecake mixture before dipping. This adds a creamy tang that cuts through the sweetness of the white chocolate.
- Sparkler Berries: Instead of blue sugar, use blue Pop Rocks candy. The strawberries will literally “pop” in your mouth, mimicking fireworks!
- Drizzle Effect: Instead of dipping in blue sugar, you can dye a small portion of white chocolate blue and drizzle it over the white-dipped berry for a more abstract artistic look.
Storage and Serving Suggestions
Chocolate-covered strawberries are best enjoyed the day they are made. Ideally, make them in the morning for an afternoon event.
Storage: If you must store them, keep them in the refrigerator in a single layer on a paper towel-lined container. The paper towel helps absorb any condensation. Do not use an airtight lid; leave it slightly cracked to allow airflow, which prevents the berries from getting mushy.
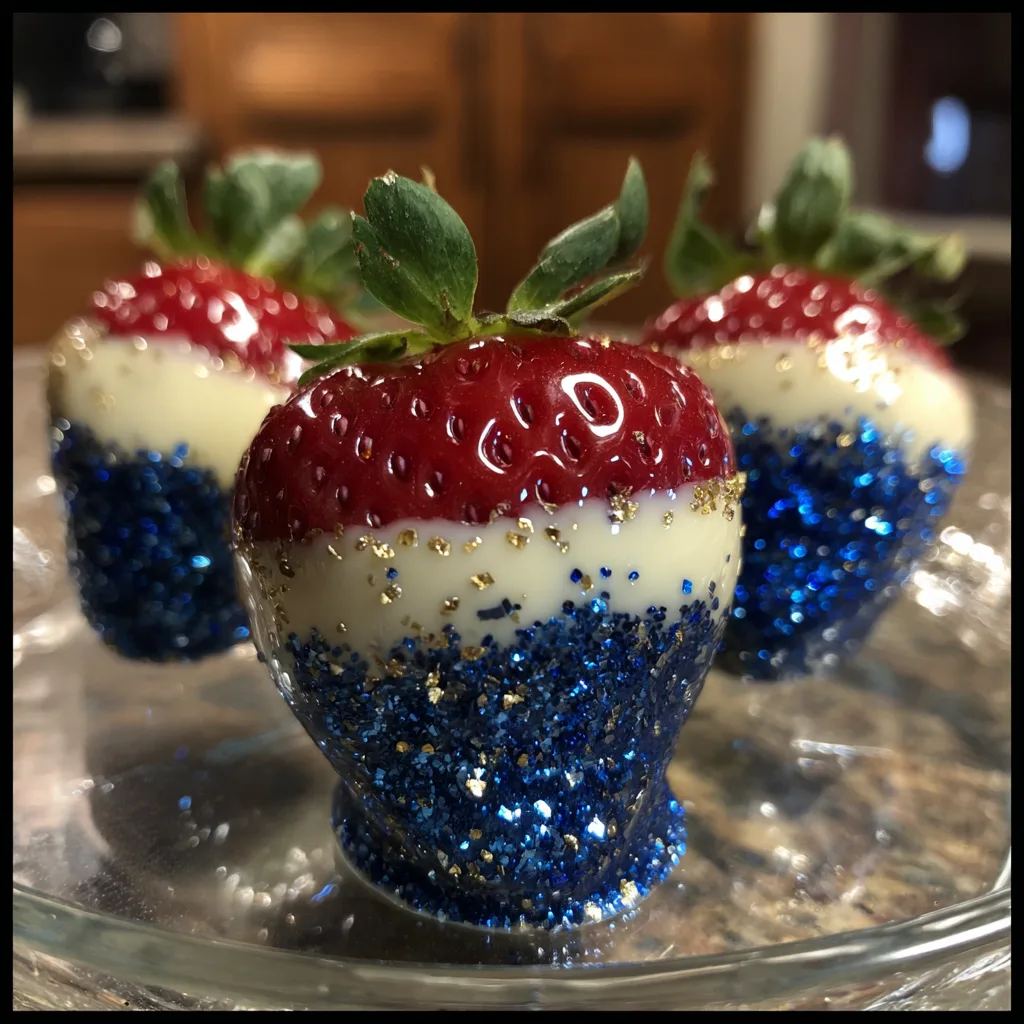
Serving: Arrange them on a white platter to make the colors pop. They look fantastic surrounding a bowl of fruit dip or arranged in the shape of a flag on a rectangular serving board.
Frequently Asked Questions
Can I freeze these strawberries?
No, freezing is not recommended. When strawberries thaw, they release moisture and become mushy, causing the chocolate shell to collapse and the texture to become unappealing.
Why is my chocolate sliding off the strawberry?
This usually happens for two reasons: either the strawberry was still wet when you dipped it, or the berry was too cold, causing condensation to form between the fruit and the chocolate.
Can I use coloring gel instead of blue sugar?
Yes, you can dye white chocolate blue using oil-based candy coloring. Do not use water-based liquid food coloring found in the baking aisle, as it will seize the chocolate. However, the blue sugar adds a nice textural crunch that dyed chocolate lacks.
Conclusion
These Red, White, and Blue Chocolate Covered Strawberries are the epitome of festive summer snacking. They are light, sweet, and bursting with fresh flavor. Whether you are a seasoned baker or a complete novice in the kitchen, this recipe guarantees a professional-looking result with minimal effort. The combination of juicy red fruit, creamy white shell, and crunchy blue crystals captures the spirit of celebration in every bite. So, grab a carton of berries and get dipping—your guests will thank you!
Patriotic Red, White, and Blue Strawberries
Ingredients
Equipment
Method
- Rinse strawberries gently and pat them completely dry with paper towels. Let them sit for 15 minutes to air dry to ensure chocolate adheres.
- Line a baking sheet with parchment paper. Pour blue sanding sugar into a small bowl.
- In a microwave-safe bowl, melt white chocolate (and coconut oil if using) in 30-second intervals, stirring in between until smooth.
- Holding a strawberry by the stem, dip it into the white chocolate about 2/3 of the way up, leaving the top red part visible.
- Shake off excess chocolate, then immediately dip the bottom 1/3 of the berry into the blue sugar.
- Place on the parchment-lined baking sheet. Repeat with remaining berries.
- Refrigerate for 15-20 minutes until the chocolate coating is set and firm. Serve immediately.