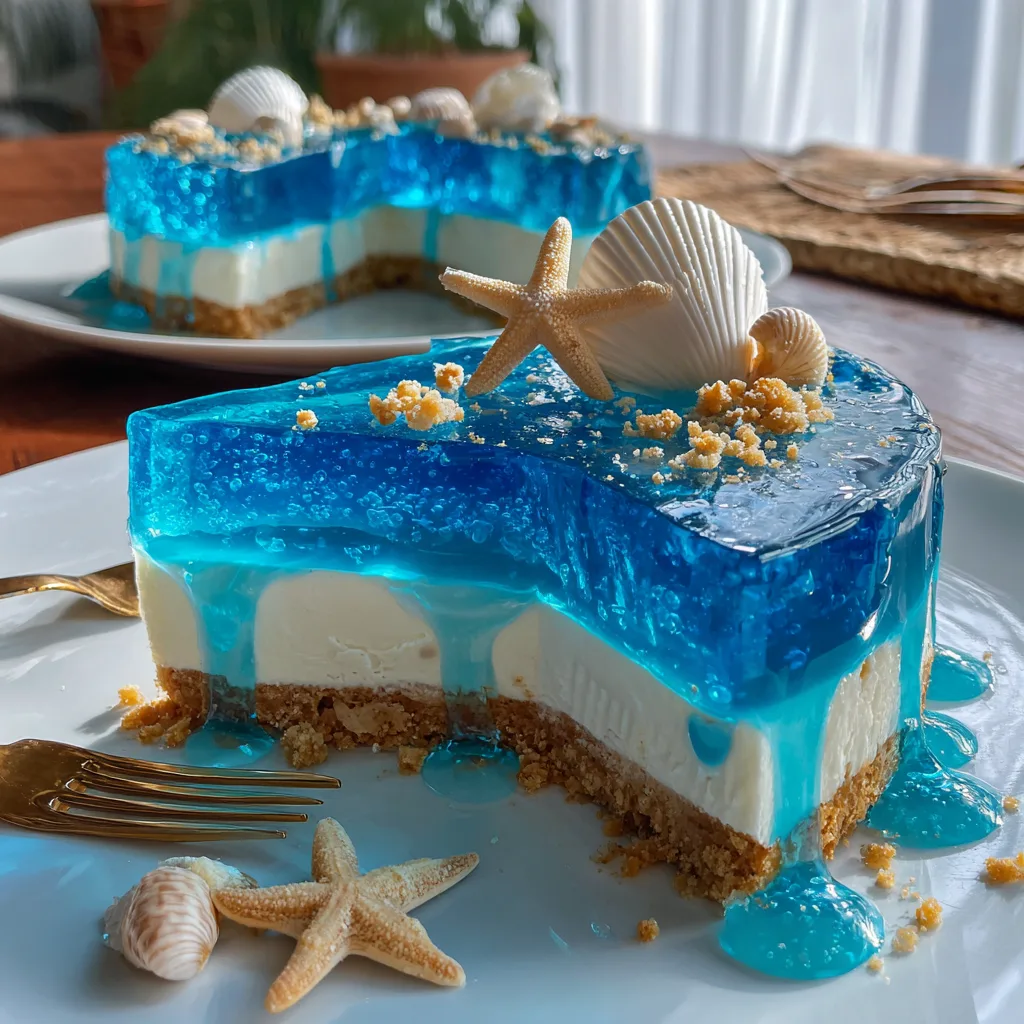
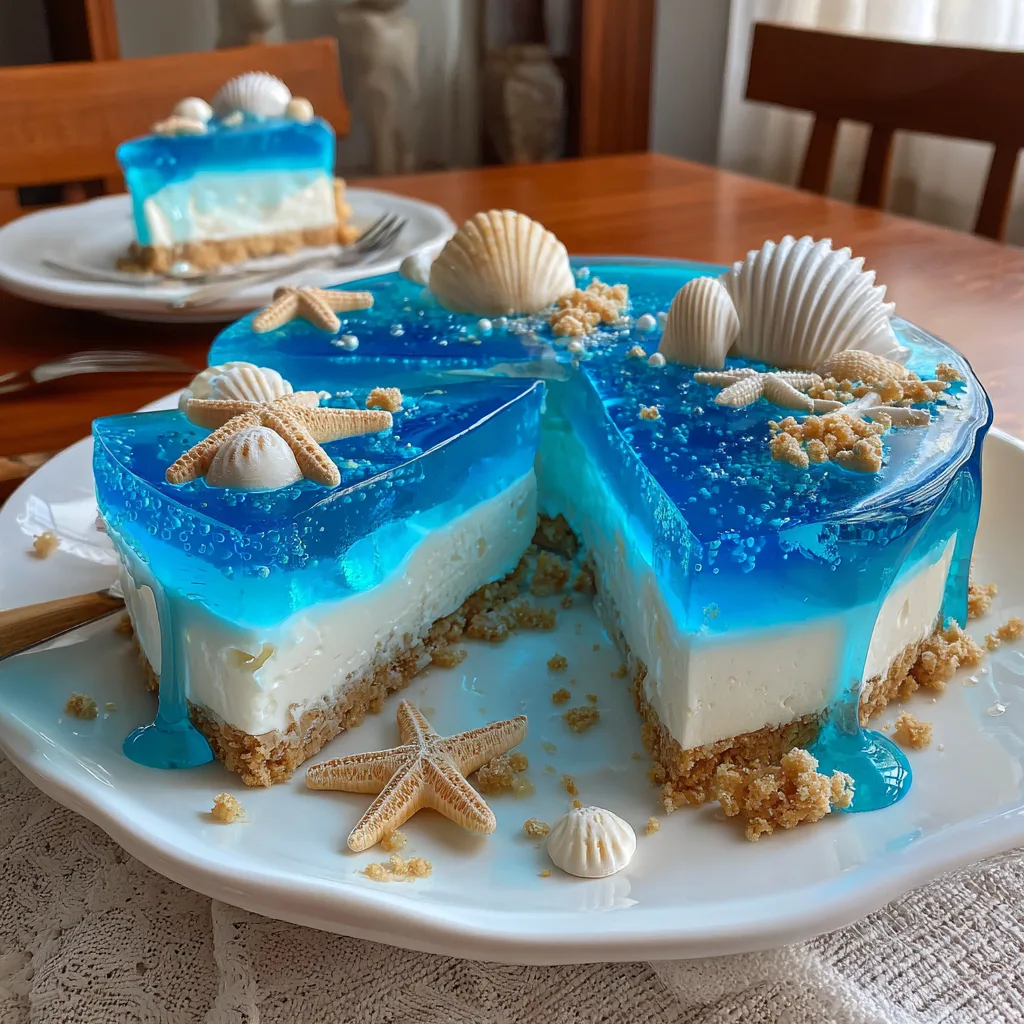
Ocean Beach Cheesecake
Stunning No-Bake Ocean Beach Cheesecake: The Ultimate Summer Dessert Guide
Welcome to the most comprehensive and enchanting guide on how to create a spectacular No-Bake Ocean Beach Cheesecake. If you have been searching for the ultimate summer dessert to wow your family, friends, and party guests, you have officially found it. This dessert is not just a sweet treat; it is a captivating, edible work of art that transports you straight to a tropical paradise. Featuring a buttery, sandy graham cracker crust, a luxuriously smooth and creamy no-bake vanilla cheesecake filling, and a dazzling, jewel-toned blue jelly topping that mimics the crystal-clear waters of the ocean, this cake is guaranteed to be the centerpiece of any gathering. In this extensive article, we will explore every single detail, technique, and secret required to master this breathtaking beach-themed creation.
Why This Ocean Cheesecake is the Perfect Summer Dessert
When the weather gets warm, the last thing anyone wants to do is turn on a hot oven. That is the first reason why this dessert is an absolute triumph: it is completely no-bake. From the crust to the filling to the topping, your oven remains entirely off. But the appeal of this dessert goes far beyond its convenient preparation method. It is the visual impact that truly sets it apart. The bright, translucent blue of the gelatin contrasting with the pristine white cheesecake and the golden, sandy biscuit crumbs creates a mesmerizing aesthetic that immediately evokes feelings of summer vacations, beach trips, and tropical getaways.
Furthermore, this cheesecake is incredibly versatile for various occasions. Whether you are hosting a Moana-themed birthday party for children, a sophisticated summer luau, a poolside barbecue, or even a nautical-themed baby shower, this ocean cheesecake fits the bill perfectly. The combination of textures—the crunch of the base and the “sand,” the velvety richness of the cream cheese filling, and the light, fruity snap of the jelly—provides a multi-sensory eating experience that is just as delightful as looking at the cake itself.
Breaking Down the Layers of the Beach
To truly understand how to build this masterpiece, we need to look at it not just as a recipe, but as a construction project consisting of four distinct, carefully crafted elements. Each layer plays a vital role in both the flavor profile and the structural integrity of the final dessert.
The “Sand” Layer: A Buttery Biscuit Base
The foundation of our ocean scene is the sandy beach. To achieve this, we use a classic combination of crushed digestive biscuits or graham crackers mixed with melted unsalted butter. The butter acts as the glue, binding the crumbs together so they can be pressed firmly into the bottom of a springform pan. It is crucial to press this layer down very firmly and chill it thoroughly; a solid base is necessary to support the weight of the dense cheesecake and the liquid jelly that will eventually go on top. We also reserve some of these dry, unbuttered crumbs to use later as the decorative loose sand on top of the cake.
The “Sea Foam” Layer: The No-Bake Cheesecake Filling
The pristine white layer of this cake represents the foamy crests of the ocean waves meeting the shore. Because we want a stark white canvas to make the blue jelly pop, this is a classic no-bake vanilla and cream cheese filling. It relies on full-fat block cream cheese, heavily whipped heavy cream, and powdered sugar. The aeration from the whipped cream is what gives the no-bake cheesecake its light, mousse-like texture, while the fat from the cream cheese provides stability as it chills. Adding a touch of fresh lemon juice or a high-quality clear vanilla extract brightens the flavor without tinting the crisp white color.
The “Ocean Water” Layer: Bright Blue Gelatin
This is the magic layer. The top of the cheesecake is covered in a brilliant blue gelatin that looks exactly like rippling ocean water. You have two main options here: using a pre-packaged blue gelatin dessert (like berry-flavored blue Jell-O), or making your own clear gelatin and coloring it with a tiny drop of neon blue food coloring and flavoring it with a clear extract (like coconut or lemon). The secret to success here is temperature control. The jelly must be cooled to room temperature before it is poured over the cheesecake; if it is poured while still warm, it will melt the cream cheese layer, creating a cloudy, disastrous mess instead of a clear, crisp ocean.
The “Beachcomber” Decor: White Chocolate Shells
What is a beach without some beautiful seashells? To complete the illusion, we use silicone fondant or candy molds to create intricate little starfish, conch shells, and scallops out of melted white chocolate. You can also use white candy melts for ease of use. These are placed strategically along the “shoreline” where the blue jelly meets the reserved biscuit crumbs, creating a seamless and realistic transition from sand to sea.
Ingredients You Will Need
For the Sandy Crust:
- – 2 cups graham cracker crumbs or digestive biscuit crumbs (about 15-20 crackers)
- – 1/2 cup (1 stick) unsalted butter, melted
- – 2 tablespoons granulated sugar (optional, if you prefer a sweeter crust)
For the Cheesecake Filling:
- – 24 oz (3 blocks) full-fat cream cheese, softened to room temperature
- – 1 and 1/4 cups powdered sugar, sifted
- – 1 teaspoon clear vanilla extract (or coconut extract for a tropical twist)
- – 1 tablespoon fresh lemon juice
- – 1 and 1/2 cups heavy whipping cream, cold
For the Ocean Jelly Topping:
- – 1 box (3 oz) blue gelatin dessert (like Blue Raspberry Jell-O) OR 1 packet unflavored gelatin mixed with 1 cup clear soda/water, sweetened, and tinted blue
- – 1 cup boiling water
- – 1/2 cup cold water
For the Decorations:
- – 1/2 cup white chocolate chips or white candy melts
- – 1/4 cup reserved crushed graham crackers/biscuits (for the sand)
Step-by-Step Instructions
Step 1: Preparing the Beach Foundation
1. Prepare an 8-inch or 9-inch springform pan by lightly greasing the bottom and sides, or lining the bottom with a circle of parchment paper for easy removal.
2. In a medium bowl, combine the 2 cups of graham cracker crumbs, melted butter, and granulated sugar (if using). Stir until the mixture resembles wet sand. Remember to reserve an extra 1/4 cup of dry, unbuttered crumbs in a separate small bowl for later.
3. Pour the buttered crumb mixture into the prepared springform pan. Use the bottom of a flat measuring cup or a glass to press the crumbs firmly and evenly into the bottom of the pan. You want a solid, compact layer.
4. Place the pan in the refrigerator to chill and set for at least 30 minutes while you prepare the filling.
Step 2: Whipping Up the Cheesecake “Foam”
5. In a large mixing bowl, use an electric hand mixer or a stand mixer fitted with a whisk attachment to beat the cold heavy whipping cream until stiff peaks form. Be careful not to over-whip into butter. Set the whipped cream aside in the refrigerator.
6. In a separate large bowl, beat the softened cream cheese on medium speed until it is completely smooth, creamy, and free of any lumps. This is crucial for a silky texture.
7. Add the sifted powdered sugar, clear vanilla extract, and lemon juice to the cream cheese. Beat again until well combined and smooth.
8. Gently fold the chilled whipped cream into the cream cheese mixture using a rubber spatula. Fold carefully to keep the mixture light and airy; do not stir vigorously.
9. Remove the chilled crust from the refrigerator. Pour the cheesecake filling over the crust and use an offset spatula to smooth the top as flat and level as possible. A flat surface is vital for an even ocean layer.
10. Return the cheesecake to the refrigerator and chill for at least 4 to 6 hours, or preferably overnight, until completely firm and set.
Step 3: Creating the Gelatin Ocean
11. Once the cheesecake is fully set, it is time to make the jelly. In a heatproof bowl or large measuring cup, combine the blue gelatin powder and the 1 cup of boiling water. Whisk continuously for about 2 minutes until the gelatin is completely dissolved.
12. Stir in the 1/2 cup of cold water. Now comes the most important step: You must let this gelatin mixture sit at room temperature until it is completely cool to the touch. If it is even slightly warm, it will melt the cream cheese layer, ruining the white-to-blue transition. This cooling process usually takes about 30 to 45 minutes.
13. Once the gelatin is completely cool but not yet setting, remove the firm cheesecake from the fridge. Gently and slowly pour the cooled blue jelly over the top of the cheesecake. Pouring it over the back of a large spoon can help break the fall of the liquid and prevent it from digging into the white filling.
14. Carefully return the pan to the refrigerator and chill for another 2 to 3 hours until the jelly layer is completely firm and set.
Step 4: Crafting the White Chocolate Shells
15. While the jelly is setting, prepare your decorations. Place the white chocolate chips or candy melts into a microwave-safe bowl.
16. Microwave in 20-second bursts, stirring thoroughly after each interval, until the chocolate is completely melted and smooth.
17. Spoon or pipe the melted white chocolate into your silicone seashell and starfish molds. Tap the molds gently on the counter to release any trapped air bubbles.
18. Place the molds in the refrigerator or freezer for 15-20 minutes until the chocolate is completely hardened. Carefully pop the shells out of the molds and set aside.
Step 5: Decorating Your Beach Masterpiece
19. Once the jelly layer is firmly set, carefully remove the sides of the springform pan. You may need to run a thin knife dipped in warm water around the very edge of the jelly to prevent tearing before releasing the clasp.
20. Now, design your beach! Take the reserved dry graham cracker crumbs and sprinkle them over about one-third of the blue jelly surface to create a “shoreline.” Let the crumbs naturally fade into the blue water.
21. Arrange your hardened white chocolate seashells and starfish along the crumb shoreline, placing some half-in and half-out of the “water” for a realistic effect.
22. Keep the cheesecake refrigerated until the moment you are ready to serve and slice.
Pro-Tips for a Flawless Presentation
Making a no-bake dessert might seem foolproof, but when aesthetics are this important, attention to detail is key. To get that perfectly sharp line between the white cheesecake and the blue jelly, your cheesecake layer must be extremely cold and firm. Do not rush the initial chilling process. When pouring the jelly, ensuring your springform pan has a tight seal is vital. If your pan is prone to leaking, the liquid jelly will run down the sides of the cake, ruining the beautiful layered effect. You can prevent this by running a small bead of the cream cheese filling around the very inside edge of the pan to seal any microscopic gaps before pouring the jelly.
When cutting the cake, the varying textures (jelly, cream, crust) can make getting a clean slice difficult. The trick is to use a very sharp, thin knife. Run the blade under hot water, wipe it completely dry with a paper towel, and make your first cut. Repeat the heating and wiping process for every single slice. This melts cleanly through the jelly and the cream cheese without dragging the layers into each other.
Exciting Flavor Variations to Try
While this recipe focuses on a classic vanilla and blue raspberry flavor profile, you can easily customize the taste to fit your theme. For a truly tropical experience, swap the vanilla extract for coconut extract in the filling, and fold in half a cup of finely shredded, sweetened coconut. You can also use a piña colada flavored gelatin if you can find one, or make a clear agar-agar topping flavored with pineapple juice and tinted blue.
If you prefer a tangier dessert, a lemon cheesecake filling pairs wonderfully with the sweet jelly. Simply increase the fresh lemon juice to 3 tablespoons and add the zest of one whole lemon to the cream cheese mixture. The bright yellow zest combined with the white filling and blue top creates an incredibly vibrant, fresh summer dessert.
Storage and Make-Ahead Instructions
Because this dessert requires multiple chilling stages, it is actually the perfect make-ahead recipe for a party. You can easily make the entire cake, minus the crushed graham cracker sand on top, up to 48 hours in advance. Keep it stored in the refrigerator, loosely covered or in a tall cake dome so the cover doesn’t touch the jelly surface. Wait to add the decorative “sand” and the white chocolate shells until just a few hours before serving, as the crumbs can become soggy if left on the jelly for too long.
Please note that this cheesecake does not freeze well. The freezing and thawing process will destroy the structural integrity of the gelatin layer, causing it to weep liquid and ruin the cream cheese layer beneath it. It is best enjoyed fresh from the refrigerator within 3 to 4 days of making it.
No-Bake Ocean Beach Cheesecake
Ingredients
Equipment
Method
- Mix graham cracker crumbs (reserving 1/4 cup) with melted butter and sugar. Press firmly into the bottom of a 9-inch springform pan. Chill for 30 minutes.
- Whip heavy cream to stiff peaks in a bowl. Set aside in the fridge.
- In a separate bowl, beat softened cream cheese, powdered sugar, vanilla, and lemon juice until completely smooth.
- Gently fold the whipped cream into the cream cheese mixture until combined. Pour over the chilled crust, smooth the top completely flat, and refrigerate for 4-6 hours until firm.
- Dissolve blue gelatin in boiling water, then stir in cold water. Let sit at room temperature until COMPLETELY cool.
- Gently pour the cooled jelly over the firm cheesecake layer. Refrigerate for another 2-3 hours until the jelly is set.
- Melt white chocolate and pour into silicone seashell molds. Chill until hardened.
- Before serving, remove cheesecake from pan. Decorate the top with reserved graham cracker sand and white chocolate shells.