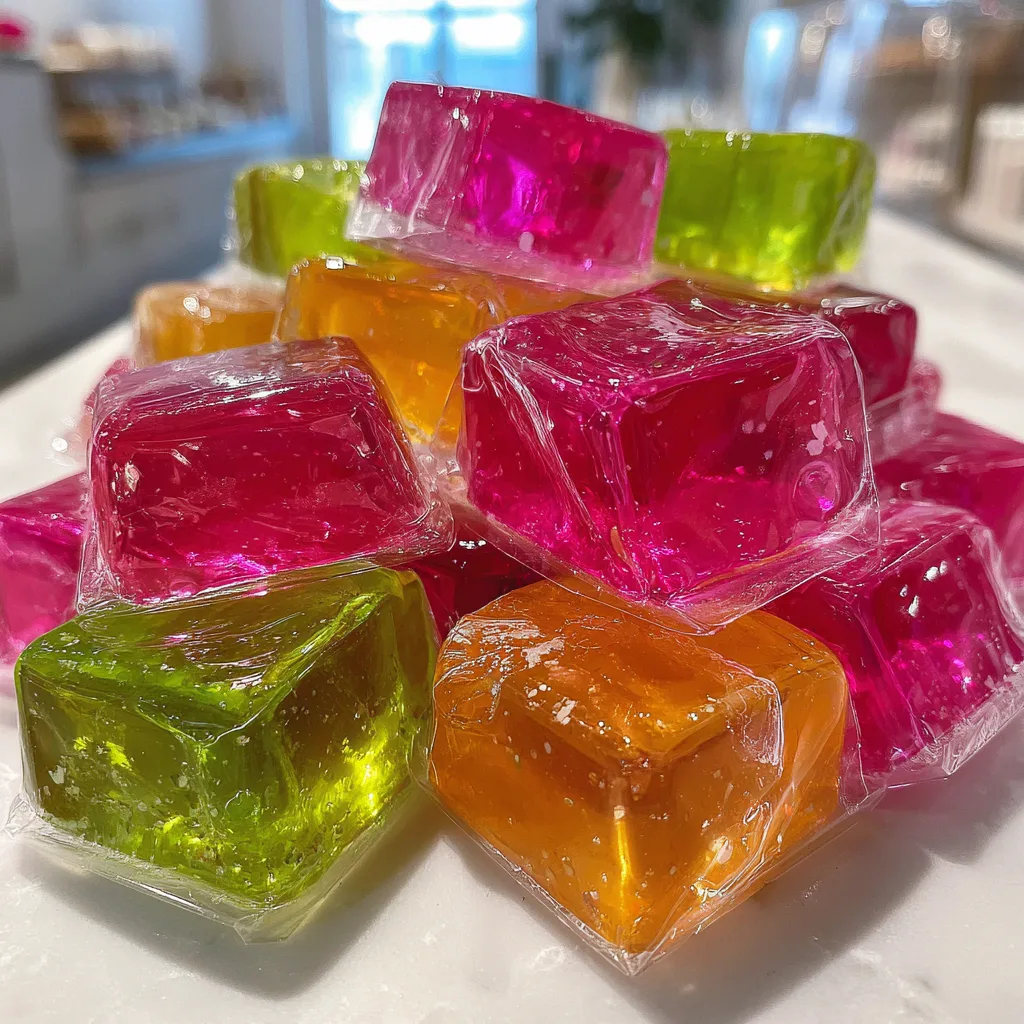
Japanese Fruit Jellies
Homemade Japanese Fruit Jelly Candies: A Vibrant, Jewel-Like Treat
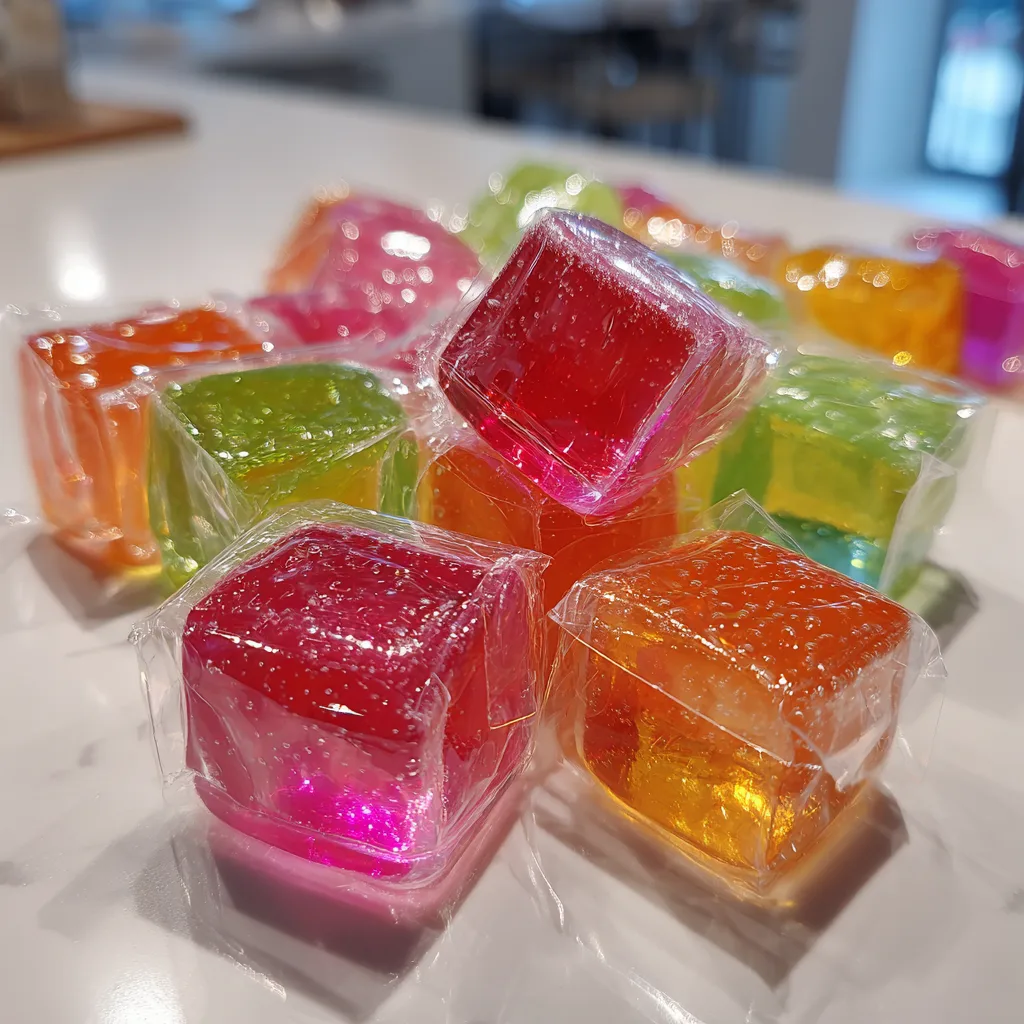
Welcome to a magnificent culinary journey where we will transform simple ingredients into breathtaking, jewel-like confections. If you have ever wandered through an Asian supermarket or a specialty candy boutique, you have likely been captivated by the sight of delicate, brightly colored fruit jelly cubes wrapped in charming clear cellophane. These treats, often utilizing agar-agar to achieve their unique texture, are a beloved staple in Japanese confectionery, known for their stunning translucence, clean fruity flavors, and delightful bite. Today, we are bringing that magic directly into your home kitchen with this comprehensive, foolproof guide to making your very own Homemade Japanese Fruit Jelly Candies.
There is a profound sense of satisfaction that comes from creating your own candy from scratch. Unlike complex chocolates or temperamental hard caramels, these fruit jellies are surprisingly accessible to beginners, yet they yield a result that looks incredibly professional and high-end. Whether you are looking for a stunning addition to a holiday gift basket, a vibrant treat for a springtime tea party, or simply a fun, creative weekend project to enjoy with your family, these vibrant, glossy cubes are the perfect choice. They are visually arresting, delightfully sweet, and infinitely customizable to suit whatever flavor profile your heart desires.
The Magic of Agar-Agar: The Secret to Vegan Candy Making
Before diving into the recipe, it is absolutely crucial to understand the star ingredient that makes these jellies possible: agar-agar. If you are accustomed to Western-style gummy bears or Jell-O, you might assume these candies are made with gelatin. However, traditional Japanese jellies (often referred to generically as kanten sweets) rely exclusively on agar-agar, a plant-based gelling agent derived from red algae or seaweed.
The distinction between gelatin and agar-agar is monumental in candy making. Gelatin is animal-derived and produces a bouncy, chewy, elastic texture that melts at body temperature. Agar-agar, on the other hand, is entirely vegan and produces a firmer, more brittle texture with a very clean “bite.” It does not have the chewiness of a gummy bear; instead, it yields smoothly to the teeth, allowing the pure flavor of the fruit to take center stage without leaving a sticky residue. Furthermore, agar-agar sets at room temperature and remains stable even in warm climates, making it an incredibly resilient ingredient for candies that need to be packaged, shipped, or displayed on a dessert table.
Working with agar-agar requires a specific technique. Unlike gelatin, which simply needs to be dissolved in warm liquid, agar-agar must be brought to a rolling boil and simmered for several minutes to fully activate its gelling properties. If it is not boiled sufficiently, your candies will not set. Understanding this fundamental rule is the absolute key to your success in this recipe.
Why You Will Fall in Love With This Recipe
You might be wondering why you should dedicate your time to making fruit jellies from scratch when they are so readily available for purchase. The answer lies in the unparalleled quality, the joy of customization, and the purity of ingredients. Commercial candies are often laden with high-fructose corn syrup, artificial preservatives, and heavy artificial flavorings that can leave a chemical aftertaste. When you make these jellies at home, you have complete control over what goes into the pot.
Additionally, the aesthetic appeal of these candies is simply unmatched. The way the light catches the translucent, jewel-toned cubes makes them look like precious gemstones rather than food. Wrapping them individually in classic, crinkly cellophane wrappers adds a touch of nostalgic elegance that transforms them from a simple snack into a deeply thoughtful, gourmet gift. They are an expression of culinary artistry that is guaranteed to impress anyone lucky enough to receive them.
Exploring Flavor Profiles and Essential Extracts
The beauty of this base recipe is that it acts as a blank canvas for your imagination. The sugar and agar provide the structure and sweetness, but the flavor and color are entirely up to you. To replicate the classic assortment seen in popular Japanese fruit jelly mixes, we focus on four primary profiles: Strawberry (pink/red), Melon (green), Pineapple or Orange (yellow/orange), and Grape (purple).
To achieve robust, candy-store-quality flavor, you will need to utilize highly concentrated candy flavoring oils or high-quality extracts. Standard grocery store extracts (like a weak strawberry extract) will often bake out or lose their potency when boiled. Candy oils are designed to withstand high heat and deliver a punchy, vibrant flavor. Furthermore, you can enhance the fruitiness by adding a tiny pinch of citric acid to the mixture just before pouring it into the mold. Citric acid provides that mouth-watering “zing” that perfectly balances the intense sweetness of the sugar, mimicking the natural tartness of fresh fruit.
Essential Ingredients for Fruit Jelly Cubes
Gathering high-quality ingredients is the foundation of this candy-making endeavor. Here is exactly what you will need to create a stunning, multi-colored batch of fruit jellies:
The Base Mixture:
- – 2 teaspoons high-quality agar-agar powder (do not use flakes, as they require different measurements and longer boiling times)
- – 1 1/2 cups filtered water
- – 2 cups granulated white sugar (do not substitute with brown sugar or liquid sweeteners, as this will alter the structure and clarity)
For Flavoring and Coloring (To be divided):
- – 1/4 teaspoon concentrated strawberry candy flavoring oil
- – 1/4 teaspoon concentrated melon candy flavoring oil
- – 1/4 teaspoon concentrated pineapple or orange candy flavoring oil
- – 1/4 teaspoon concentrated grape candy flavoring oil
- – Liquid or gel food coloring in pink/red, green, orange, and purple
- – 1/2 teaspoon citric acid (optional, but highly recommended for a tart, fruity kick)
Step-by-Step Instructions to Perfect Homemade Jellies
Candy making is a science, and following these steps with precision will ensure your jellies set beautifully and slice cleanly. Have your molds (such as square silicone molds or a parchment-lined baking dish) ready before you begin.
- Prepare Your Molds: If using a glass baking dish (like an 8×8 inch pan), line it smoothly with parchment paper, ensuring it comes up the sides for easy removal later. If using individual silicone cube molds, lightly grease them with a flavorless oil (like canola or grapeseed) using a paper towel to wipe out any excess.
- Activate the Agar: In a medium-sized, heavy-bottomed saucepan, whisk the agar-agar powder into the cold filtered water until completely dissolved. Let it sit for 5 minutes to hydrate.
- Boil the Mixture: Place the saucepan over medium-high heat and bring the water and agar mixture to a rolling boil. You must whisk constantly to prevent the agar from sticking to the bottom of the pan. Once boiling, lower the heat slightly and let it simmer vigorously for exactly 2 to 3 minutes. This step is non-negotiable; the agar must be boiled to activate.
- Incorporate the Sugar: Pour the granulated sugar into the boiling agar mixture. Stir continuously until the sugar is entirely dissolved and the liquid returns to a rolling boil. Simmer for another 2 minutes until the liquid becomes slightly syrupy and completely clear. Remove from heat.
- Divide and Flavor: Quickly divide the hot syrup evenly into four separate heat-proof bowls. You must work swiftly, as agar begins to set as it cools to room temperature.
- Color and Mix: Into the first bowl, add the strawberry flavor, a pinch of citric acid, and pink food coloring. Into the second, add melon flavor, citric acid, and green coloring. Repeat with the pineapple/orange and grape flavors. Stir each bowl thoroughly but gently to avoid creating excessive air bubbles.
- Pour and Set: Pour the colored mixtures into your prepared molds. If bubbles appear on the surface, lightly mist the top with rubbing alcohol from a spray bottle, or pop them gently with a toothpick. Allow the jellies to sit undisturbed at room temperature for at least 2 to 3 hours, or until completely firm to the touch.
- Cut and Wrap: Once set, lift the jelly blocks out of the pan using the parchment paper. Using a sharp, lightly oiled knife, slice the blocks into perfectly uniform, bite-sized cubes. Wrap each individual cube in a clear, food-safe cellophane wrapper, twisting the ends tightly to seal.
Expert Troubleshooting and Consistency Tips
Even with a straightforward recipe, minor hiccups can occur in candy making. Here are professional solutions to common jelly-making issues:
The Jelly Didn’t Set: The number one reason agar jellies fail to set is insufficient boiling. Agar must reach 185°F (85°C) to melt and activate. If you only brought it to a gentle simmer, it will remain liquid. If this happens, you can actually pour the mixture back into a pot, bring it to a hard boil for three minutes, and re-pour it into the molds.
The Jellies are “Weeping”: If your set jellies are leaking pools of water, it usually means there was an improper ratio of agar to liquid, or the sugar was not fully dissolved. Ensure you are using exact measuring spoons for the agar powder, not standard eating utensils.
Cloudy Jellies: The hallmark of these candies is their glass-like translucence. If your jellies are cloudy, it is often due to impurities in the sugar or using hard tap water. Always use filtered water and high-quality, fine granulated sugar for the clearest results. Skim any foam off the top of the boiling mixture before dividing it into bowls.
Packaging, Gifting, and Storage Suggestions
Presentation is everything when it comes to these Japanese fruit jellies. The classic method is to wrap them in small, precut squares of clear cellophane. You place the jelly cube in the center of the square, roll it up like a small tube, and twist the two open ends in opposite directions, creating that nostalgic “candy wrapper” look. You can find patterned cellophane wrappers online, featuring tiny illustrations of fruits like strawberries, melons, and pineapples, which adds an incredible layer of authenticity and charm to your homemade creation.
Because these candies are made with agar-agar, they are incredibly shelf-stable. They do not require refrigeration and will not melt in a warm room like gelatin-based candies would. Store your wrapped jellies in an airtight container or a beautiful glass jar at room temperature. They will easily keep for two to three weeks, making them a fantastic make-ahead gift for holidays, wedding favors, or party bags.
Cultural Context: The History of Kanten in Japan
To truly appreciate these candies, it helps to understand their deep roots in Japanese culinary history. Agar-agar, known as “kanten” in Japan, was reportedly discovered by accident in the mid-17th century by a Japanese innkeeper named Mino Tarozaemon. He noticed that leftover seaweed soup that had been thrown outside in the freezing winter air had frozen, thawed, and dried into a translucent, papery substance. When boiled in water again, it created a remarkable jelly.
Since then, kanten has become a cornerstone of Wagashi (traditional Japanese sweets). It is prized not only for its clear, beautiful appearance and firm texture but also because it is virtually calorie-free and extremely high in dietary fiber. While traditional Wagashi often uses kanten combined with sweet red bean paste (anko) to make delicacies like Yokan, the clear, fruit-flavored iterations have become massively popular in modern times as a refreshing, visually appealing snack.
Conclusion: Your Journey into Sugar Craft
Creating Homemade Japanese Fruit Jelly Candies is an incredibly rewarding process that bridges the gap between culinary science and edible art. With just water, sugar, agar-agar, and a splash of vibrant flavoring, you can craft a confection that looks like it belongs in the display case of a high-end boutique. By mastering the simple technique of boiling agar and playing with endless flavor combinations, you have unlocked a candy-making skill that will delight your friends, family, and your own sweet tooth for years to come. So gather your ingredients, prepare your molds, and enjoy the magical, colorful process of making these exquisite fruit jellies.
Homemade Japanese Agar Fruit Jellies
Ingredients
Equipment
Method
- Line an 8×8 baking dish with parchment paper or lightly oil a square silicone cube mold.
- In a saucepan, whisk the agar-agar powder into the cold filtered water. Let sit for 5 minutes to hydrate.
- Bring the water and agar to a rolling boil over medium-high heat, whisking constantly. Boil vigorously for 2 to 3 minutes.
- Add the granulated sugar and stir until fully dissolved. Return to a boil and simmer for 2 more minutes until the liquid is clear and slightly syrupy.
- Remove from heat and quickly divide the hot syrup into 4 separate bowls.
- Quickly whisk in 1/4 tsp of a different flavor extract and a drop of coordinating food coloring into each bowl. Add a pinch of citric acid if using.
- Pour the colored mixtures into your prepared molds. Let set at room temperature for 2 to 3 hours until completely firm.
- Remove from molds, cut into uniform bite-sized cubes with a sharp knife, and wrap individually in clear cellophane candy wrappers.