Iridescent Glitter Marshmallows
Gourmet S’mores: How to Make Iridescent Toasted Glitter Marshmallows (✨🔥)
For too long, the humble marshmallow has been a passive participant in the s’mores ritual. While a well-charred mallow is undeniably delicious, it lacks visual flair and sophistication. Well, my friends, that era has officially ended. Today, we are not just making marshmallows; we are making *art*. I am absolutely stoked to share with you a recipe that has become my latest dessert obsession: **Gourmet Iridescent Toasted Glitter Marshmallows**. Yes, you read that right. Marshmallows that are galaxy-themed, iridescent, and edible, specifically designed to catch the fire and look like a mesmerizing, sparkling, sugar-dripping jewel before you squish them between graham crackers. If you want to impress your friends at your next bonfire, s’mores bar, or simply need a visual dessert party for one, this is the treat you never knew you needed. I made a batch of these for my family, and my kids lost their minds. Now, I’m the cool aunt, and I have these marshmallows to thank.
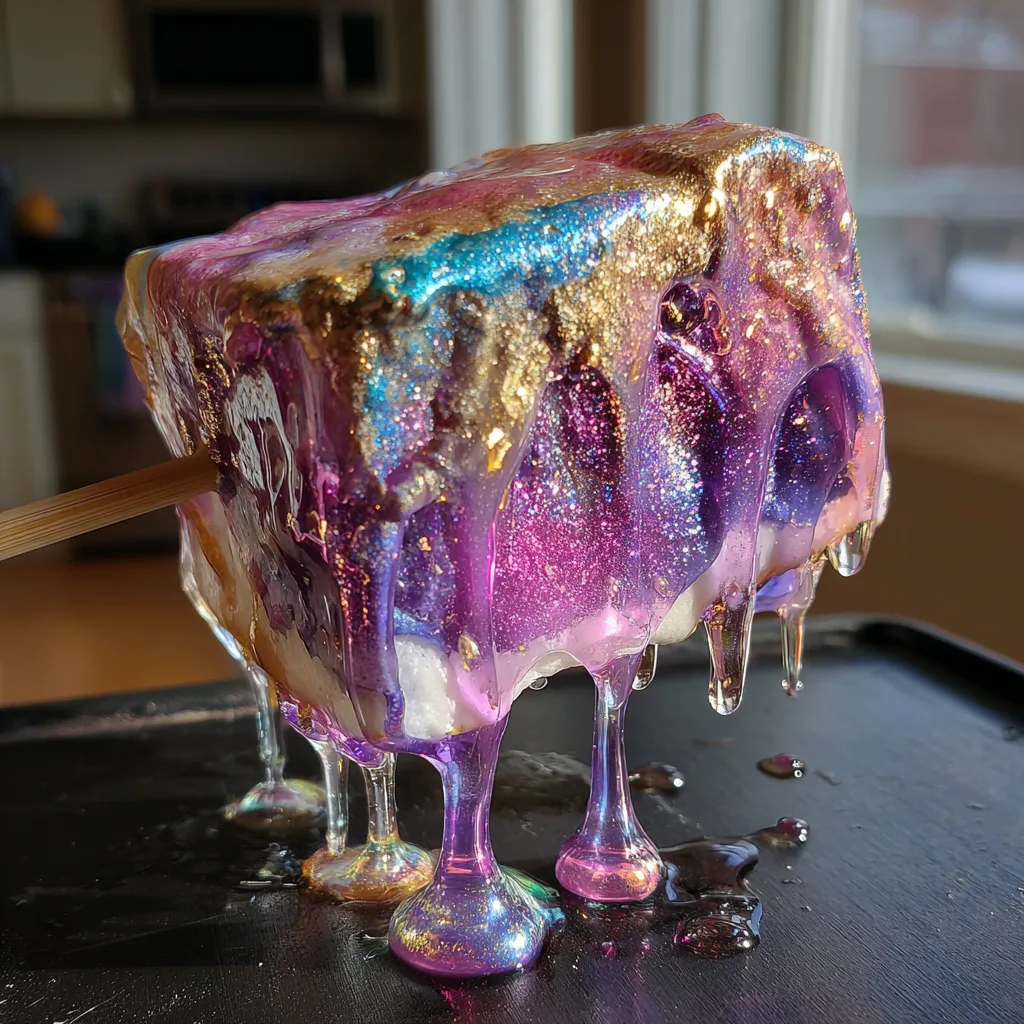
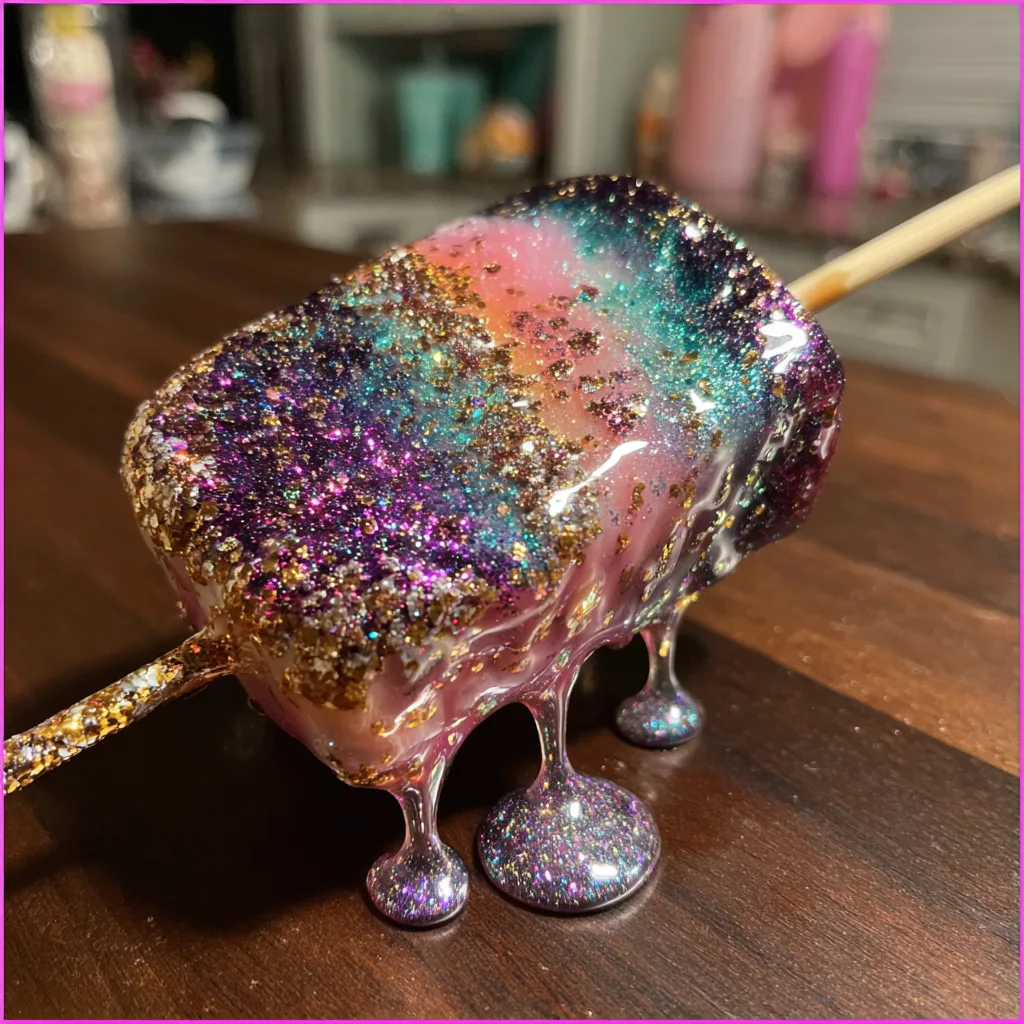
When you see the photo, it looks intimidating, like some impossible space food. It is not. The secret is that the iridescence is an edible coating you apply *after* the marshmallow has set, not something mixed into the batter itself. This technique makes it approachable for any home cook, and it lets you create a stunning effect that looks completely magical when exposed to a torch or campfire. The way the clear sugar melts and creates those long, thick, glistening drips *over* the glitter paste is just… cheff’s kiss. Every single surface looks ultra shiny and glossy, like liquid glass. So, grab your mixing bowls, let’s get ready to sparkle, and let’s toast some serious gourmet s’mores.
Why You Will Fall in Love with Iridescent Glitter Marshmallows
There are so many reasons to make this recipe your new summer standard. First, they are a show-stopper. The sheer visual impact is undeniable. When you are toasting these, they don’t just char; they put on a sparkling, iridescent show. The melted sugar creates an oil slick shine that reflects the firelight. Secondly, they represent the ultimate s’mores upgrade. You are taking a standard, supermarket product and turning it into a high-end, hand-crafted dessert component. It elevates the entire s’mores experience. Thirdly, they are a blast to make and customize. You are essentially painting your food with edible glitter! It’s fun, creative, and you can play with different color gradients for a specific theme or party. Lastly, they are surprisingly easy. If you can make a simple marshmallow batter (which is easier than you think!), you can make these. The galaxy glitter is just the icing on the cosmic cake.
The Magic of the Ingredients: A Galactic Breakdown
To create these stunning, galaxy-themed, shimmering treats, we are going to use a specific set of high-quality ingredients, each playing a crucial role in both the texture and the cosmic look.
The Marshmallow Batter: The Cloud-Like Foundation
The base is a classic vanilla marshmallow, which is exceptionally easy to make and provides the perfect blank canvas. For the setting agent, we will use plain unflavored gelatin. Gelatin gives that essential bounce and structure that makes a marshmallow… well, a marshmallow. A combination of corn syrup and regular granulated sugar creates the perfect sweet, smooth batter that can be whipped into a super glossy peak. Clear vanilla extract is a great option here if you want to keep the mallows pristine white before painting, but regular vanilla works too. A pinch of salt is crucial for balancing the sweetness and enhancing the other flavors. *Do not skip the salt!* The correct combination is a simple, straightforward vanilla-almond flavor base.
The Iridescent Galaxy Coating: Painting with Light
This is where the magic really happens. To create the stunning galaxy effect, we will use edible luster dust in various colors. These ultra-fine powders reflect light with intense shimmer. I recommend a range of cosmic colors: deep purple, electric blue, fuchsia pink, and shimmering gold. When you mix these luster dusts with high-proof alcohol, it creates an edible paint that applies smoothly and dries quickly, leaving behind a flawless, shimmering galaxy-patterned surface that torches into that incredible ultra-shiny, liquid glass appearance.
The S’mores Essentials: The Complete Package
While the focus is on the marshmallows, you still need your supporting cast for s’mores. A good quality, dark chocolate (70% or higher) is an excellent contrast to the sweet marshmallow. The graham crackers can be standard, but an artisanal graham cracker (maybe with a hint of sea salt) adds another layer of texture. We need the right vessel for our masterpiece, so high-quality, long bamboo or metal skewers are essential. The ultimate tool for achieving that perfectly dripping look in a controlled way is a gourmet kitchen torch. It puts the power in your hands and gives you that professional finish with ease.
Ingredients You Will Need
Gather these ingredients to start your cosmic kitchen journey. Make sure all your dairy-free, sugar-related items are the best quality you can find!
For the Vanilla Marshmallows:
- – 3 packets (0.75 oz total) unflavored gelatin
- – 1/2 cup cold water (divided)
- – 1 and 1/2 cups granulated sugar
- – 1 cup light corn syrup
- – 1/4 teaspoon kosher salt
- – 1 tablespoon clear vanilla extract (or regular vanilla)
- – 1/2 cup powdered sugar
- – 1/2 cup cornstarch
For the Iridescent Galaxy Coating:
- – 1/2 teaspoon each of edible luster dust (Purple, Blue, Pink, Gold)
- – 1/2 teaspoon edible coarse clear sugar (for extra sparkle texture)
- – 2 tablespoons high-proof alcohol (like vodka or clear grain alcohol) or food-safe flavor extract
- – Small food-safe paintbrushes
- – Long skewers
For S’mores Assembly (Optional):
- – Graham crackers
- – Good quality dark chocolate squares
- – S’mores stand or platter
- – Kitchen torch
Step-by-Step Instructions for Cosmic S’mores Perfection
This process has two distinct phases: making the marshmallows and applying the galaxy coating. Follow the steps precisely for the best results.
- Prepare the Pan: Grease a 9×13 inch baking pan with non-stick spray. In a small bowl, whisk together the powdered sugar and cornstarch. Generously dust the bottom and sides of the pan with the sugar-cornstarch mixture, tapping out any excess. Set aside. This will prevent your mallows from sticking later.
- Bloom the Gelatin: In the large bowl of a stand mixer fitted with the whisk attachment, sprinkle the unflavored gelatin over 1/4 cup of the cold water. Give it a gentle swirl to make sure all the gelatin is submerged. Set aside for about 10 minutes to bloom. It will look like a solid mass.
- Make the Sugar Syrup: While the gelatin blooms, combine the granulated sugar, corn syrup, salt, and the remaining 1/4 cup of cold water in a medium saucepan. Stire just to combine. Place over medium heat and stir constantly until the sugar has dissolved. Clip a candy thermometer to the side of the pot. Bring the mixture to a boil *without stirring* and cook until the thermometer registers 240°F (115°C) (the “soft-ball” stage). It should take about 10-15 minutes.
- Whip the Batter: Turn the stand mixer to low speed to gently break up the bloomed gelatin. Carefully and slowly pour the hot sugar syrup in a steady stream down the side of the mixer bowl. *Be extremely careful as the syrup is dangerously hot!* Once all the syrup is added, increase the mixer speed gradually to high. Beat for 12-15 minutes, or until the mixture is thick, glossy, cool to the touch, and holds stiff peaks. Stir in the vanilla extract during the last minute of mixing. The mixture will be incredibly shiny, glistening, and drool-worthy.
- Set the Marshmallows: Scrape the thick, incredibly glossy marshmallow batter into the prepared pan. Use a greased offset spatula to spread it evenly and smoothly. Dust the top with the remaining sugar-cornstarch mixture. Let the marshmallows sit at room temperature for at least 6 hours, or overnight, to firm up completely.
- Cut the Marshmallows: Once the mallows are fully set, remove them from the pan by running a knife around the edges and inverting the pan onto a large cutting board dusted with more sugar-cornstarch. Use a sharp, greased chef’s knife or a greased pizza cutter to slice the slab into 2-inch squares. Sift additional sugar-cornstarch over any newly exposed cut edges to prevent sticking. Place the cut marshmallows in a single layer on a parchment-lined baking sheet and let them “cure” for a few hours.
- Create the Galaxy Paint: In four separate small bowls, mix each color of luster dust (Purple, Blue, Pink, Gold) with a few drops of vodka or alcohol-based flavoring. The goal is to create a thick, paint-like paste, not a watery liquid. You want a saturated, vibrant color. Keep adding alcohol one drop at a time until you reach a consistency that applies smoothly. Add the coarse clear sugar to the pink and blue paints for extra texture.
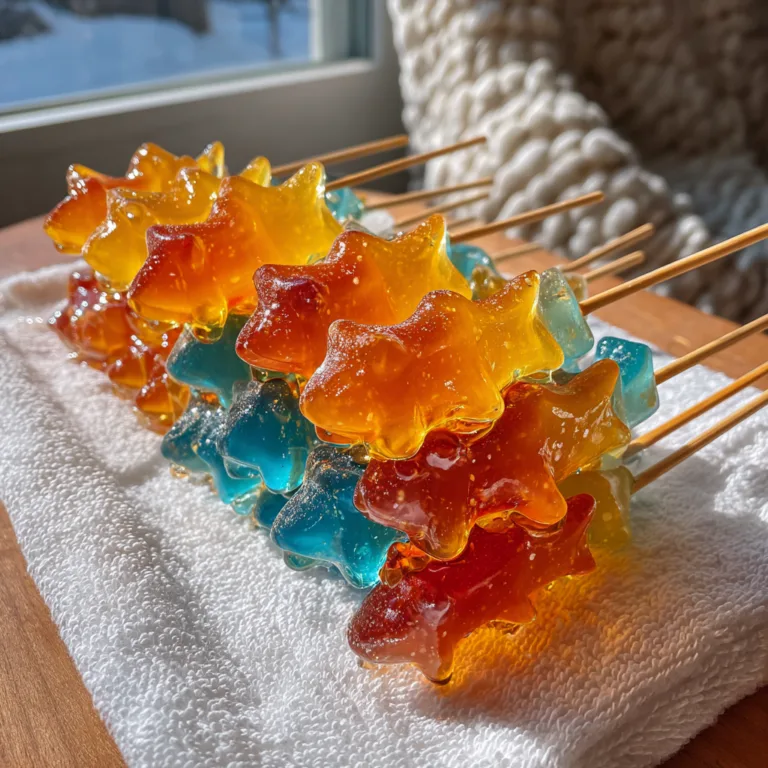
- Paint the Marshmallows: Working one mallow at a time, thread a square onto a skewer. This makes painting much easier. Using a food-safe brush, apply the purple and blue pastes in an abstract, swirling pattern, layering them to create depth. Use the pink for highlighting specific areas, and then use the gold for adding cosmic star trails or a dramatic gradient edge. *Do not overthink this – an imperfect, swirling look is the goal!* The result should be a glistening, incredibly saturated galaxy. Lay the painted marshmallows on a parchment-lined sheet to dry completely, which should only take about 10-15 minutes due to the high alcohol content.
- Toast to Perfection: When you are ready for your s’mores show, light your kitchen torch or find a calm spot over your campfire. Bring the flame near the side of the painted marshmallow. This is where you will see the magical transformation! The edible glitter will catch the light, and the underlying sugar will melt rapidly, creating those incredible, long, thick, glistening drips of clear melted sugar that pool around the edges and drip heavily down the sides. The whole surface will look ultra shiny and glossy, like liquid varnish, as the fire interacts with the cosmic coating. Toast until you have achieved your desired level of char and gooeyness. *Watch in awe as the galaxy comes alive!*
- Assemble and Enjoy: Once your marshmallow is gooey, molten, and dripping with ultra-shiny cosmic goodness, immediately place it on a graham cracker topped with a square of dark chocolate. Press down with the second graham cracker and slide the skewer out. Your Iridescent S’mores is complete and ready to eat! Enjoy the magical, visual, and delicious experience of your cosmic creation!
Pro Tips for Achieving maximum Gloss and Glam
You can make a good marshmallow s’mores, or you can make a gourmet masterpiece. Use these expert tips to ensure your marshmallows are the talk of the bonfire:
The Alcohol Matters: High-proof alcohol (like 100-proof vodka) works best for the galaxy paint. It evaporates quickly, leaving a vibrant, opaque coating. Lower proof alcohols, like regular vodka, can make the mallows wet and sticky. For an alcohol-free option, you can use food-safe extract, but it may not produce the same intense shimmer, but will still create the ultra-shiny drips when torched.
Gradients are Your Friend: When painting, think about a color gradient. Instead of four separate blobs of color, try blending the deep purple into the electric blue, then a pop of fuchsia pink on the edges, and finish with a gold center. This gradient effect creates depth and makes the galaxy look far more complex.
Control the Torch: A kitchen torch is your best friend for control. When toasting, use a sweeping motion. Do not hold the flame in one place for too long. If you want the dramatic sugar drips, focus the flame on the upper part of a side. This melts the sugar, allowing gravity to do its job and create those thick, glistening ribbons. Over a campfire, find a consistent low-flame spot that will heat the mallow slowly rather than scorching it immediately.
Creative Galaxy S’mores Variations to Try
Once you have mastered the basic recipe, you can play with different colors and textures:
Mermaid Sparkle: Use a combination of teal blue, ocean green, and iridescent silver luster dust for a mythical, glistening look. Replace the dark chocolate with white chocolate for a softer flavor profile.
Solar Flare: For a more fiery cosmic theme, use deep red, orange, and yellow luster dust. This creates a scorching-hot look that pairs perfectly with extra-dark chocolate.
Add-In Cosmic Bling: For an even more intense sparkle, try adding a few edible star-shaped sprinkles or other fun shapes *onto* the painted mallows before they dry. This creates an extra dimension of galaxy-themed bling when torched.
Perfect Serving and Presentation Ideas
This is a dessert that deserves to be shown off. Here is how to create a s’mores bar or presentation that is truly cosmic:
Create a dedicated **Gourmet Cosmic S’mores Bar**. Have a large glass jar filled with the pre-painted, shimmering marshmallows on their skewers. Arrange a selection of high-end dark, milk, and white chocolates. For the ultimate interactive experience, provide each guest with their own mini-kitchen torch. Present the graham crackers (or shortbread cookies) on a beautiful slate or wooden board. This interactive setup allows everyone to become a cosmic s’mores artist. For a more formal gathering, present the s’mores already assembled on a platter dusted with edible silver stars, making it look like a celestial constellation on the table. Pair your s’mores with a rich, dark hot cocoa, a robust coffee, or a good quality smoky whiskey.
Storage, Curing, and Gifting Instructions
You can make these ahead of time, making them perfect for event prep.
Storage: The painted, cured marshmallows should be stored in an airtight container in a cool, dry place. A single layer is best to prevent any colors from rubbing off. They will keep for up to 2-3 weeks, though they are always best within the first week. *Do not store them in the refrigerator, as the moisture will cause the coating to bleed and the marshmallow to become sticky.*
Curing: The drying process, or curing, is vital. It creates that firm exterior shell that is perfect for painting. Give your mallows a full day to set, cut, and then rest for a few hours before you even think about applying the cosmic glitter. This ensures the coating goes on flawlessly.
Gifting: These make an incredible, unique gift. Carefully stack a few of the dry, glistening galaxy marshmallows in a beautiful, clear glass jar. Add some festive twine and a tag that includes instructions for toasting and creating a cosmic s’mores. It’s a thoughtful, artistic gift that is guaranteed to impress.
Frequently Asked Questions (FAQs)
Why didn’t my marshmallows get ultra glossy? The ultra-shiny effect comes from two places: the glossy nature of the batter and the toasting process. Ensure you whip your batter long enough to reach those super stiff, reflective peaks. Then, when you toast, you need that close flame to melt the sugar *coating* the surface, creating that liquid glass sheen and the thick drips. A calm, controlled flame is best.
Can I use store-bought marshmallows? Technically, yes, you can skip the batter-making and go straight to the painting. However, home-made marshmallows have a better, more airy, and slightly less rubbery texture that is far superior for toasting and soaking up the flavor of the vanilla. Plus, the fresh batter is naturally glossier and holds the paint better.
Why is the luster dust coating sticky? Stickiness can be caused by two issues: the marshmallows weren’t fully cured (dried), or the alcohol you used was not high-proof enough. If the mallow itself is too soft, it won’t hold the paint. If the alcohol takes too long to evaporate, it will make the surface tacky. Always start with a fully dry mallow and use high-proof alcohol for the best result.
In conclusion, this Gourmet Iridescent Toasted Glitter Marshmallow recipe is more than just a s’mores treat; it’s a creative expression, a visual feast, and the ultimate culinary upgrade. You are taking simple, basic ingredients and transforming them into a cosmic dessert that is completely unforgettable. So, let your inner s’mores artist shine, light that torch, and create some truly magical, galaxy-themed memories. Enjoy the sparkle and the gooey, dripping deliciousness! ✨🔥
Iridescent Toasted Glitter Marshmallows
Ingredients
Equipment
Method
- Prepare a 9×13 inch pan by spraying with non-stick spray and dusting with a mix of powdered sugar and cornstarch.
- Bloom gelatin by sprinkling over 1/4 cup of cold water in a stand mixer bowl. Set aside for 10 minutes.
- Combine granulated sugar, corn syrup, salt, and 1/4 cup of cold water in a saucepan over medium heat. Stir until dissolved.
- Bring sugar syrup to a boil without stirring, until a candy thermometer reads 240°F (115°C).
- With the stand mixer on low, slowly pour the hot syrup down the side of the bowl. Gradually increase speed to high and whip until thick, glossy, and holds stiff peaks (about 12-15 minutes). Beat in vanilla extract.
- Scrape batter into the prepared pan, smooth the top, dust with the sugar-cornstarch mix, and let set for at least 6 hours at room temperature.
- Once set, invert mallows onto a dusted board, cut into 2-inch squares, and let cure for a few hours. Sift more dusting over cut edges.
- Create galaxy paint by mixing each luster dust with a few drops of alcohol in separate bowls. Thread a marshmallow onto a skewer and paint abstract swirls of cosmic colors (purple, blue, pink, gold) on all sides. Let dry (about 15 minutes).
- Toast the painted marshmallow with a kitchen torch or over a campfire. Watch as the sugar melts, creating dramatic, glistening drops of liquid glass. Serve immediately with graham crackers and chocolate.