📖 B. INTRODUCTION
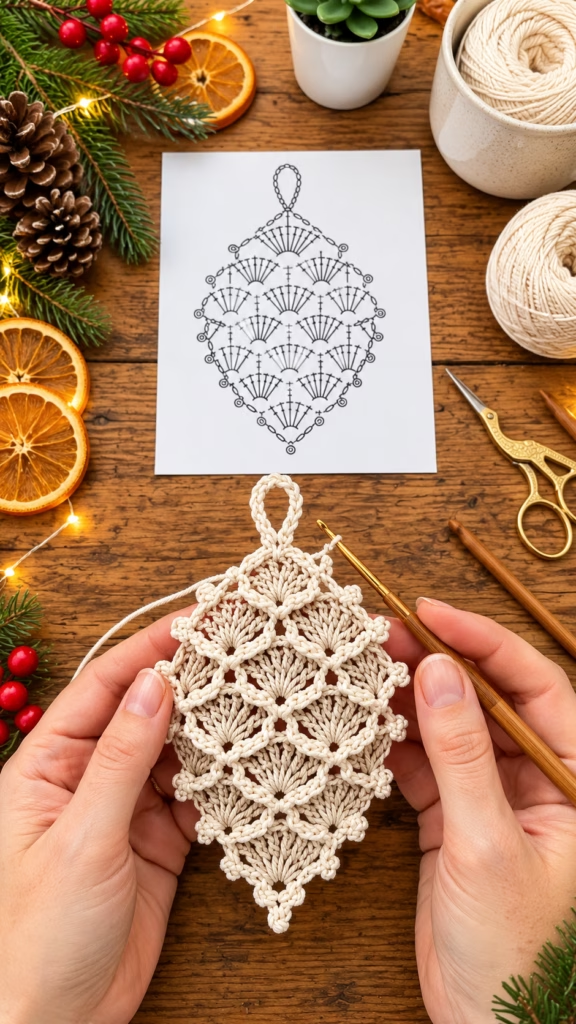
Bring the rustic charm of a winter woodland straight into your home this holiday season with this exquisite crochet pinecone ornament. Designed with delicate, textured shell scales that mimic the natural overlapping layers of a real pinecone, this piece captures the cozy magic of a snowy forest. Whether you are looking to elevate your Christmas tree styling, create a handmade garland, or gift a treasured keepsake to a fellow nature lover, this project offers a rewarding and visually stunning make.
The design features a classic teardrop silhouette topped with a convenient hanging loop, beautifully articulated using rich shell stitches and airy chain spaces. It works up surprisingly fast in a natural, neutral cotton yarn that highlights every intricate stitch definition, though you can easily experiment with metallic yarns, rich jewel tones, or frosted white tips for a snowy effect. Dive into this project to add an heirloom-quality, handmade touch to your seasonal celebrations that you will look forward to unboxing year after year.
🔍 C. MAIN PATTERN OVERVIEW
This pattern is worked flat from the pointed bottom tip upward toward the wide body, culminating in a structured hanging loop at the top. The construction relies on a clever combination of foundational chain stitches, single crochets, double crochets, and specialized shell clusters that naturally build out the overlapping, textured scales visible in the reference image. As you progress through the rows, the pinecone widens symmetrically before tapering back in and finishing with a neat loop for instant hanging.
🎯 D. SKILL LEVEL
- Intermediate: This pattern is best suited for crocheters who are comfortable reading standard stitch diagrams, working shell stitches, and maintaining consistent tension across shaping rows.
- Specific techniques involved:
- Working into foundation chains and starting magic rings or small loops.
- Executing multi-stitch shell clusters (groups of double crochets worked into a single space).
- Creating symmetrical increases and decreases to form a diamond-to-teardrop silhouette.
- Working post or chain spaces to anchor subsequent shell rows securely.
📏 E. FINISHED SIZE
- Approximate Dimensions: 5 inches (13 cm) in height (excluding the hanging loop) and 3.5 inches (9 cm) at its widest point.
- Size Adjustments: Finished sizing can vary based on your choice of yarn weight, hook size, and personal tension. Using a heavier yarn with a larger hook will yield a larger statement ornament, while finer thread creates a delicate miniature version suitable for packages or miniature trees.
🧮 F. GAUGE
- Gauge: 2 shell repeats and 4 rows measure approximately 4 inches (10 cm) square using the recommended materials.
- Note: Exact gauge is not strictly critical for decorative ornaments; however, maintaining a firm, consistent tension ensures that the pinecone scales hold their shape crisply without gaping or flopping.
🧶 G. REQUIRED YARN AMOUNTS
- Main Color (Natural Cream/Ecru): Approximately 45–55 yards (41–50 meters) of sport to light DK weight cotton yarn.
- Total Project Estimate: One small ball or partial skein of standard 50g cotton yarn is more than sufficient to complete a single ornament.
🧰 H. MATERIALS
- 🧶 Yarn: Sport or light DK weight 100% cotton yarn (such as a smooth mercerized cotton) in a natural ecru or pinecone shade.
- 🪝 Crochet Hook: 3.0 mm (or size needed to match your preferred firm tension).
- ✂️ Scissors: Precision embroidery scissors for clean yarn cutting.
- 🧷 Stitch Markers: 2 locking stitch markers to keep track of working loops or anchor points if needed.
- 🪡 Tapestry Needle: Blunt-tip yarn needle for weaving in final ends.
- 📌 Blocking Supplies: Blocking mat and rust-proof T-pins to crisp up the shell points after finishing.
🔤 I. ABBREVIATIONS – US TERMS
- ch: chain
- dc: double crochet
- sc: single crochet
- sl st: slip stitch
- sp: space
- st(s): stitch(es)
- sk: skip
- rep: repeat
- RS: right side
- WS: wrong side
- pm: place marker
📝 J. NOTES BEFORE YOU BEGIN
- 🧵 Construction Direction: The ornament is worked from the bottom point upward. Pay close attention to the chart reference or written instructions for anchoring each shell row into the previous row’s chain spaces.
- 🧵 Tension Control: Cotton yarn has very little stretch. Keep your stitches snug and consistent so that the dimensional texture of the pinecone scales pops outward cleanly.
- 🧵 Blocking Recommendation: For the sharpest, most professional look, lightly steam or wet-block your finished ornament while pinning out the outer points of the shell layers.
🪡 K. COMPLETE PATTERN
- pinecone body and hanging loop (worked continuously from bottom to top)
🌲 Pinecone Body & Loop
- Yarn/color: Natural Cream/Ecru
- Quantity to make: 1
- Starting point: Bottom tip foundation ring
- Row 1 (RS): Ch 4, work 1 sc in the 4th ch from hook (counts as base ring and starting point), ch 3, turn. (1 small ring created, 1 ch-3 sp)
- Row 2: Work 5 dc in the ch-3 sp, ch 1, turn. (5 dc)
- Row 3: Sc in first dc, ch 3, sk next dc, sc in next dc, ch 3, sk next dc, sc in last dc, ch 3, turn. (3 ch-3 sps)
- Row 4: Work a shell of (3 dc, ch 1, 3 dc) in the first ch-3 sp, ch 1, sc in the middle ch-3 sp, ch 1, work a shell of (3 dc, ch 1, 3 dc) in the last ch-3 sp, ch 1, turn. (2 shells, 1 sc)
- Row 5: Ch 3, sc in the ch-1 sp of the first shell, ch 3, sc in the top of the sc between shells, ch 3, sc in the ch-1 sp of the second shell, ch 3, work 1 dc in the turning ch space, ch 3, turn. (4 ch-3 sps)
- Row 6: Work shell in first ch-3 sp, ch 1, sc in next ch-3 sp, ch 1, shell in next ch-3 sp, ch 1, sc in next ch-3 sp, ch 1, shell in last ch-3 sp, ch 1, turn. (3 shells)
- Row 7: Ch 3, sc in first shell ch-1 sp, (ch 3, sc in next ch-1 sp) across to last shell, ch 3, work 1 dc in turning ch space, ch 3, turn. (5 ch-3 sps)
- Row 8: Work shell in first ch-3 sp, (ch 1, sc in next ch-3 sp, ch 1, shell in next ch-3 sp) twice, ch 1, turn. (3 main wide shells with intervening spacing)
- Row 9 (Tapering Begins): Sl st across the first 3 dc to reach the ch-1 sp, ch 1, sc in ch-1 sp, (ch 3, sc in next shell ch-1 sp) across, leaving the final shell unworked, ch 3, turn.
- Row 10: Work 1 shell in the first ch-3 sp, ch 1, sc in next ch-3 sp, ch 1, shell in last ch-3 sp, ch 1, turn. (2 shells)
- Row 11: Sl st across first 3 dc to ch-1 sp, ch 1, sc in ch-1 sp, ch 3, sc in next shell ch-1 sp, ch 3, turn.
- Row 12: Work 1 shell in the final ch-1 sp. (1 top shell)
- Hanging Loop: Ch 12 directly from the peak of the final shell, sl st back into the base of the same shell to form a secure hanging ring. Fasten off securely, leaving a 6-inch tail.
🎨 L. STYLING / ASSEMBLY / STABILITY / FINAL SHAPING
- 🎨 Weaving Ends: Thread your tapestry needle with the remaining yarn tails and weave them neatly along the backside of the central spine stitches so they remain entirely invisible from the front.
- 🎨 Shaping the Scales: Gently finger-press each double-crochet shell outward so they cup slightly, creating the signature 3D overlapping texture characteristic of a real pinecone.
- 🎨 Blocking for Crisp Edges: Pin the finished ornament flat onto a blocking board, mist lightly with water or a fabric stiffener spray if a rigid ornament is desired, and allow to dry completely before hanging.
💡 M. HELPFUL CROCHET TIPS
- 💡 Maintain Even Tension: Keep your pulling motion uniform when working multi-stitch shells to ensure every scale matches in size and width.
- 💡 Use Stitch Markers: If you lose track of your turning chain spaces on rows 5 through 8, place a small locking marker in the center ch-1 space of each shell.
- 💡 Choose the Right Fiber: 100% mercerized cotton provides the best stitch definition and stiffness, helping the ornament maintain its crisp shape without requiring excessive heavy starch.
- 💡 Customize the Hanging Loop: If you prefer a ribbon loop instead of a crocheted chain, simply skip the final chain loop and secure a length of velvet or satin ribbon through the top stitch.
- 💡 Add Festive Sparkle: Hold a strand of ultra-fine metallic thread alongside your cotton yarn for a subtle, elegant holiday shimmer.
🧼 N. CARE INSTRUCTIONS
- 🧼 Spot Cleaning: Gently spot-clean any dust or minor marks using a damp cloth with mild liquid detergent. Avoid harsh rubbing to protect the cotton fibers.
- 🧼 Hand Washing: If a deeper cleaning is required, hand wash gently in lukewarm water with mild soap. Do not wring or twist the ornament; press out excess moisture gently in a clean towel.
- 🧼 Storage: Store flat in a breathable cotton pouch or tissue paper during the off-season to protect the crisp shape and prevent dust accumulation.
❓ R. FAQ
- ❓ Can I use acrylic yarn instead of cotton?
- Yes, acrylic yarn works well, though it will yield a softer, more relaxed drape. You may wish to use light starch or blocking pins to help the pinecone scales hold a sharper, more rigid shape.
- ❓ Is this pattern beginner-friendly?
- While the stitches themselves (sc, dc, ch) are straightforward, reading the chart progression and working symmetrical increases and decreases makes this project best suited for confident crocheters with some experience reading patterns.
- ❓ How do I make the ornament stiffer so it doesn’t bend?
- You can apply a fabric stiffener or a half-and-half mixture of white school glue and water to the back of the ornament, pin it flat to shape, and let it dry thoroughly.
- ❓ Can I scale this pattern up for a larger wall hanging?
- Absolutely! You can use a bulky or super-bulky cotton cord with a corresponding 6.0 mm to 8.0 mm crochet hook to create a large statement wall hanging or oversized holiday accent piece.