Kiwi Grape Fruit Turtles
Adorable and Healthy Kiwi Grape Fruit Turtles: The Ultimate Snack Guide
When it comes to feeding young children, or even just adding a spark of joy to your own afternoon snack, presentation is absolutely everything. We all know the struggle of trying to encourage kids to eat more fresh fruits and vegetables. Sometimes, all it takes is a little bit of creativity and a whimsical approach to transform an ordinary piece of produce into an irresistible, edible toy. Enter the delightful Kiwi Grape Fruit Turtles. This ingenious, incredibly simple, and wonderfully healthy snack takes just a few basic ingredients—kiwis, green grapes, and tiny chocolate chips—and turns them into a cute, engaging treat that children and adults alike will absolutely adore. In this comprehensive guide, we will explore everything you need to know about crafting these little green reptiles, the nutritional benefits they provide, and how to make snack time the best part of the day.
The Magic of Food Art for Picky Eaters
If you have ever dealt with a picky eater, you understand that the battle is rarely about the actual taste of the food; it is almost always about the perception, the texture, or simply the mood of the moment. Children are highly visual creatures. They are drawn to bright colors, recognizable shapes, and things that look like fun. Food art bridges the gap between nutrition and play. By assembling everyday fruits into the shape of a friendly turtle, you completely change the narrative around snack time.
Instead of saying, “eat your fruit,” you are inviting them to interact with a character. This playful interaction reduces the anxiety and resistance that often surrounds eating healthy foods. The Kiwi Grape Fruit Turtles are particularly effective because they use familiar, naturally sweet fruits. The bright, vibrant green of the kiwi and grapes is visually stimulating, and the tiny addition of chocolate chip eyes gives the turtles a personality that is hard to resist. Furthermore, involving children in the creation of these fruit animals can drastically increase their willingness to eat them. When kids have a hand in preparing their food, they feel a sense of ownership and pride, making the eventual consumption a rewarding experience rather than a chore.
Nutritional Spotlight: The Incredible Benefits of Kiwi and Grapes
While the primary draw of these fruit turtles is their adorable appearance, the actual nutritional value packed into this snack is nothing short of phenomenal. Let us break down the health benefits of the two main components: kiwis and green grapes.
The Mighty Kiwi: Do not let their small size fool you; kiwis are an absolute nutritional powerhouse. They are exceptionally high in Vitamin C, even surpassing oranges in their concentration. Vitamin C is crucial for a healthy immune system, which is especially important for growing children who are constantly exposed to germs at school or daycare. Kiwis are also loaded with dietary fiber, which aids in digestion and helps keep little tummies feeling full and satisfied. Additionally, they contain actinidin, a unique enzyme that helps break down proteins and further assists the digestive process. They are rich in antioxidants, potassium, and folate, making them a top-tier fruit for overall health.
The Goodness of Green Grapes: Grapes are a fantastic, hydrating snack, consisting of over 80% water. This makes them perfect for warm afternoons or post-playtime refreshment. They are a great source of Vitamins C and K, and they contain a variety of powerful antioxidants, including resveratrol, which is known for its heart-health benefits. The natural sugars in grapes provide a quick, healthy burst of energy without the crash associated with processed, refined sugary snacks. Combined, the kiwi and grapes provide a balanced, hydrating, and vitamin-rich mini-meal that parents can feel incredibly good about serving.
Ingredients for Kiwi Grape Fruit Turtles
The beauty of this recipe lies in its extreme simplicity. You do not need a pantry full of obscure ingredients or any complicated culinary tools. Here is exactly what you need to gather to bring these little creatures to life:
- – 3 large, ripe kiwis (yielding about 3 to 4 thick slices each)
- – 1 large bunch of seedless green grapes (you will need whole ones for the heads and cut ones for the legs)
- – 1 small handful of mini semi-sweet chocolate chips (for the eyes)
- – Optional: A tiny dab of honey, peanut butter, or cream cheese (to act as edible “glue” for the eyes, if needed)
Step-by-Step Instructions
Creating these fruit turtles is more of an assembly craft than traditional cooking, making it a perfect kitchen activity to do with kids. Follow these simple steps for perfect results every time:
- Wash and Prep the Fruit: Begin by thoroughly washing the green grapes under cold running water and patting them completely dry with a clean kitchen towel. Moisture is the enemy when trying to attach the chocolate chip eyes, so ensure the grapes are as dry as possible.
- Peel and Slice the Kiwis: Carefully peel the brown, fuzzy skin off the kiwis. You can do this with a vegetable peeler or by slicing the ends off and sliding a spoon between the flesh and the skin. Once peeled, cut the kiwis crosswise into thick, round slices—about 1/2 inch to 3/4 inch thick. These robust slices will serve as the realistic-looking shells of your turtles.
- Prepare the Turtle Appendages: Sort through your grapes. Select one medium-sized, relatively round grape for each turtle head you plan to make. For the legs, take other grapes and cut them in half lengthwise. Depending on the size of your grapes and your aesthetic preference, you can leave them as halves or cut those halves again into quarters to make smaller, stubbier legs.
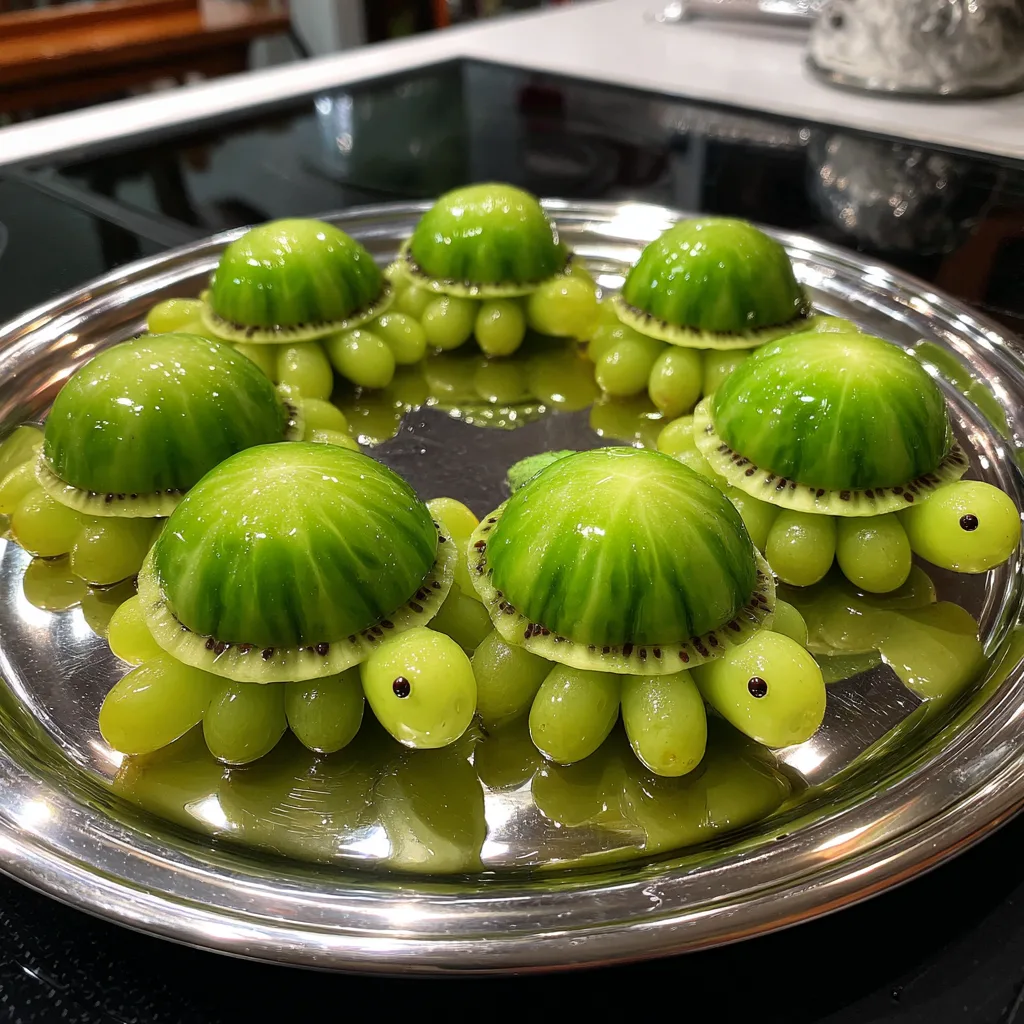
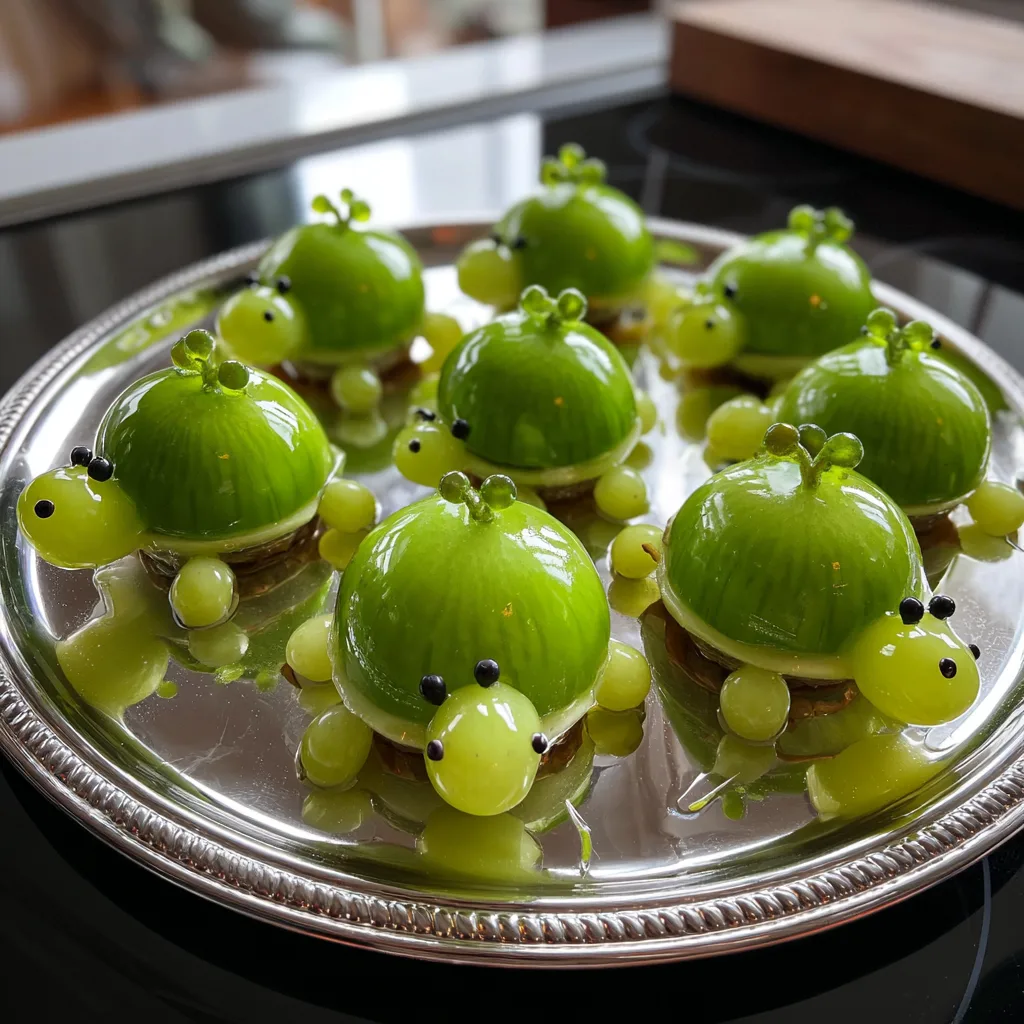
- Assemble the Body: Place your kiwi slices flat on your serving platter or cutting board. Position one whole grape at the top of the kiwi slice to act as the head. Then, arrange four grape halves (or quarters) around the sides of the kiwi slice to mimic the four legs of a swimming turtle. Sometimes, tucking the cut end of the grape slightly under the kiwi slice helps secure it in place and makes it look more cohesive.
- Give Them Sight: Now for the finishing touch—the eyes! Take two mini chocolate chips and gently press the pointy ends into the top of the grape head. If the grape skin is too taut and the chocolate chips are falling off, you can use a toothpick to poke two tiny starter holes in the grape, or use a microscopic dab of honey, cream cheese, or yogurt on the flat side of the chocolate chip to glue it onto the grape.
- Serve and Enjoy: Arrange your fleet of fruit turtles on a fun platter, perhaps on a bed of blue-tinted yogurt to look like the ocean, and serve immediately to the delight of your guests or family!
Tips for the Perfect Fruit Turtles
While this recipe is virtually foolproof, a few professional tips can elevate your fruit presentation from good to spectacular. First, fruit selection is key. When shopping for kiwis, look for fruit that yields slightly to gentle pressure; if it is rock hard, it will be too sour, and if it is too squishy, it will fall apart when you try to slice it. For the grapes, ensure you are buying the seedless variety to prevent any choking hazards for young children.
If you are preparing these for a party and need to make them ahead of time, there is a trick to keeping them looking fresh. While kiwi does not brown as quickly as apples or bananas, it can start to look a bit dry if left out. Assemble the bodies (kiwi and grapes) on your tray, cover tightly with plastic wrap, and store in the refrigerator. Wait to add the chocolate chip eyes until right before serving, as condensation in the fridge can cause the chocolate to bloom or slide off the grapes. Always serve fruit chilled for the best flavor and texture.
Creative Variations and Substitutions
The concept of fruit animals is highly adaptable. Once you have mastered the turtle, you can let your imagination run wild with different ingredients and shapes. If someone in your household is allergic to kiwi, or simply does not like the tart flavor, you can easily substitute a thick slice of green apple for the shell. Just be sure to brush the apple slice lightly with lemon juice to prevent it from oxidizing and turning brown.
You can also create a multi-colored turtle army by using different colored fruits. A slice of peeled mandarin orange makes a beautiful orange shell, and red or purple grapes can be used for the heads and legs. If you want to avoid chocolate, you can use tiny currants, black sesame seeds, or even tiny dots of black decorating icing for the eyes. For a more substantial snack, you can serve these turtles on top of a “beach” made of graham cracker crumbs, or floating in a “pond” of vanilla or blueberry yogurt.
Serving Suggestions for Parties and Playdates
These Kiwi Grape Fruit Turtles are the absolute stars of any themed event. They are practically mandatory for an “Under the Sea” birthday party, a mermaid-themed gathering, or a Teenage Mutant Ninja Turtle movie marathon. Because they are individual bite-sized (or a few bites-sized) portions, they are perfect finger foods for playdates where kids are running around and don’t want to sit down for a heavy meal.
Consider creating an entire edible landscape. Use a large rectangular platter and spread a layer of blue-dyed cream cheese or Greek yogurt across the bottom to represent water. Place your kiwi turtles swimming across the dip. You can add goldfish crackers around them, use celery sticks to represent seaweed, and create little beach areas with crushed crackers. This kind of immersive, interactive food station will have kids raving about the snacks long after the party is over.
Fun Facts About Kiwis and Grapes
Turning snack time into an educational moment is a great way to engage children. As you assemble these turtles together, share some fun trivia about the ingredients! Did you know that kiwis are technically classified as berries? Or that they originally come from China and were initially called “Chinese gooseberries” before being renamed by New Zealanders after their native, fuzzy brown Kiwi bird? Grapes have an equally fascinating history; they are one of the oldest cultivated plants in the world, with evidence of grape farming dating back over 8,000 years! Sharing these little nuggets of information makes the eating experience richer and fosters a lifelong curiosity about where our food comes from.
Getting Kids Involved in the Kitchen
As mentioned earlier, getting children involved in food preparation is a fantastic developmental activity. Making these fruit turtles helps hone fine motor skills, especially the pincer grasp required to place the tiny chocolate chips onto the grapes. It also teaches basic kitchen safety and food hygiene, like washing hands and rinsing produce before eating.
Set up an assembly line at the kitchen table. You handle all the knife work—peeling and slicing the kiwi, and halving the grapes. Then, give the kids a plate with all the prepped components and let them build their own turtles. Do not worry if their turtles look a little abstract or have six legs instead of four; the goal is creative expression and positive reinforcement surrounding healthy food. The pride they feel in eating their own creations is immeasurable.
Conclusion
The Kiwi Grape Fruit Turtles are a testament to the fact that healthy food does not have to be boring. With just three ingredients, ten minutes of your time, and a little bit of imagination, you can create a wholesome, vitamin-packed snack that brings a smile to anyone’s face. Whether you are desperately trying to get a toddler to eat their daily serving of fruit, planning an elaborate ocean-themed birthday bash, or simply looking for a fun culinary craft to do on a rainy afternoon, these adorable edible reptiles are guaranteed to be a massive hit. So grab some fresh fruit, gather the family, and start building your very own delicious turtle squad today!
Kiwi Grape Fruit Turtles
Ingredients
Equipment
Method
- Thoroughly wash and completely dry the green grapes to ensure the chocolate chips will stick later.
- Carefully peel the kiwis and cut them crosswise into thick, round slices (about 1/2 to 3/4 inch thick). These are the turtle shells.
- Select 12 whole grapes to use as the turtle heads. Cut the remaining grapes in half lengthwise to create the turtle legs.
- Lay the kiwi slices flat on a serving platter. Place one whole grape at the top of each slice for the head.
- Arrange four grape halves around the sides of each kiwi slice to act as the four legs.
- Gently press two mini chocolate chips into the top of each whole grape to make the eyes. If they won’t stick, use a tiny dab of honey or yogurt to secure them.
- Serve immediately or cover tightly and refrigerate until ready to eat.