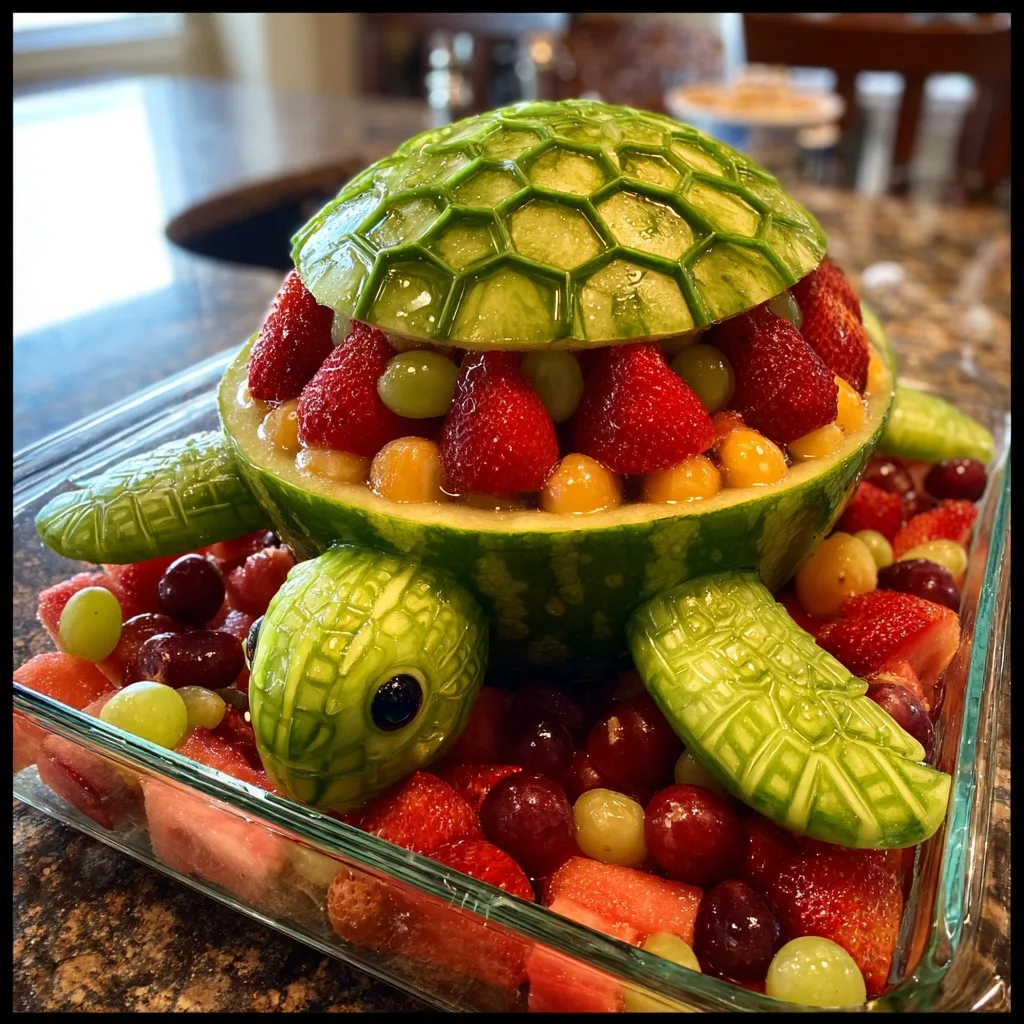
Watermelon Turtle Fruit Bowl
Watermelon Turtle Fruit Bowl
The Ultimate Summer Centerpiece: Why This Watermelon Turtle Steals the Show
When the summer heat reaches its peak and backyard barbecues, pool parties, and family picnics become the highlight of the week, bringing a dish that is both refreshing and visually stunning is a guaranteed way to become the star of the gathering. Enter the Watermelon Turtle Fruit Bowl—a magnificent, whimsical, and entirely edible centerpiece that will have guests of all ages reaching for their cameras before they reach for their plates. This clever creation transforms a simple, humble watermelon into an adorable sea turtle, its shell acting as a lid that opens to reveal a vibrant, sweet, and juicy treasure trove of fresh fruit salad.
What makes this watermelon turtle so exceptional is not just its charming appearance, but its dual functionality. It serves as both the serving vessel and the primary ingredient for a healthy, crowd-pleasing dessert or side dish. In a world where party foods are often heavy, processed, or laden with refined sugars, a massive bowl of fresh, hydrating fruit is a welcome oasis. The natural sweetness of the watermelon, paired with the crispness of grapes, the tartness of strawberries, and the mellow flavor of cantaloupe, creates a symphony of flavors and textures that scream summer.
Furthermore, crafting this turtle is a fantastic way to unleash your inner artist. You do not need a culinary degree or professional carving tools to pull this off; a sharp knife, a melon baller, and a bit of patience are all it takes. Whether you are hosting a tropical-themed luau, a child’s under-the-sea birthday party, or a casual Sunday cookout, this comprehensive guide will teach you exactly how to carve, construct, and fill the perfect Watermelon Turtle Fruit Bowl.
The Art of Fruit Carving: A Brief Overview
The practice of carving fruits and vegetables into elaborate shapes and figures is not a modern internet trend; it is a culinary art form with deep historical roots. Known as Mukimono in Japan and Kae Sa Luk in Thailand, the tradition dates back centuries. Originally, these techniques were used to garnish the plates of royalty and elevate the dining experience to a visual spectacle. The intricate floral patterns carved into melons, papayas, and root vegetables showcased the immense skill and dedication of the chef.
Today, this art form has trickled down to home kitchens, taking on a more playful and accessible form. While we may not be carving impossibly delicate lotus flowers out of daikon radishes, turning a watermelon into a sea turtle honors that same tradition of making food beautiful, engaging, and fun. It turns the act of eating into an interactive experience. Children who might normally turn their noses up at a simple bowl of fruit are suddenly eager to scoop melon balls out of a turtle’s belly. It bridges the gap between culinary preparation and artistic expression, proving that we absolutely eat with our eyes first.
Choosing the Perfect Watermelon for Your Turtle
The success of your fruit carving project hinges entirely on the canvas you choose. Not all watermelons are created equal, and selecting the right one requires a discerning eye. Here is what to look for when picking the perfect melon for your turtle:
Shape is Crucial: For a sea turtle, you want an oblong or oval watermelon rather than a perfectly round one. The elongated shape naturally lends itself to the look of a turtle’s shell and body. Look for a melon that is relatively symmetrical so your turtle doesn’t look lopsided.
The Field Spot: Turn the watermelon over and examine its underside. You should see a creamy, yellow splotch known as the field spot. This is where the melon rested on the ground while ripening in the sun. If the spot is white or non-existent, the watermelon was picked too early and will lack flavor and sweetness. A deep, buttery yellow spot indicates peak ripeness.
The Webbing: Look for brown, web-like scarring on the rind. These marks show where bees pollinated the flower. According to agricultural folklore, more webbing often correlates with a sweeter fruit.
The Weight and Sound: Pick the watermelon up; it should feel surprisingly heavy for its size, indicating high water content and juiciness. Give it a firm tap or thump with your knuckles. You want to hear a deep, hollow sound. A dull thud usually means the flesh has gone soft and mealy.
Rind Thickness: For carving, a slightly thicker rind is actually beneficial as it provides structural stability for the shell, head, and flippers. Standard seeded watermelons often have better rinds for carving than the hyper-engineered seedless varieties, though either will work.
Tools of the Trade
You do not need to invest in a professional culinary carving kit, but having the right basic tools will make the process infinitely easier and safer.
A Large Chef’s Knife: Essential for making the initial, clean cut to separate the top and bottom halves of the watermelon.
A Small Paring Knife: This is your primary carving tool. A sharp paring knife offers the precision needed to carve the intricate hexagon shapes into the shell and to cut out the delicate flippers and head.
A Melon Baller: While you can simply cut the fruit into cubes, a melon baller creates beautiful, uniform spheres that elevate the look of the fruit salad and make it look like little turtle eggs.
A Channel Knife or V-Shaped Carving Tool (Optional): If you want to make scoring the shell easier, a channel knife (often used by bartenders for citrus twists) easily cuts a shallow, uniform groove into the rind.
Toothpicks or Wooden Skewers: These are the hidden structural supports that will hold the head and flippers securely to the body of your turtle.
Ingredients for the Perfect Fruit Salad Filling
The beauty of the fruit salad inside your turtle is that it is entirely customizable. However, aiming for a variety of colors, textures, and flavors will yield the best results. Here is our recommended lineup:
– Watermelon (from the bowl itself): You will scoop out the interior of the melon to create the bowl, yielding plenty of sweet, red melon balls or chunks.
– Cantaloupe or Honeydew: Adding a second or third type of melon introduces a beautiful contrast in color (orange or pale green) and a slightly different, musky sweetness.
– Grapes: Crisp, seedless green or red grapes add a satisfying snap and a tart-sweet flavor profile that breaks up the soft texture of the melons.
– Strawberries: Bright red, halved strawberries add a punch of vibrant color, a wonderful aroma, and a slight acidity that balances the sugar.
– Blueberries or Blackberries: These dark berries offer a dramatic color contrast against the lighter fruits and pack a nutritional punch.
– Optional Extras: Pineapple chunks, kiwi slices, or even a squeeze of fresh lime juice and a sprinkle of chopped mint can take the flavor profile to the next level.
Step-by-Step Instructions: Bringing Your Turtle to Life
Do not be intimidated by the final picture. Breaking the process down into manageable steps makes creating this masterpiece surprisingly simple.
- Wash the Melon: Always wash the exterior of your watermelon thoroughly under cold running water. Because your knife will pass through the rind into the flesh, you want to ensure no dirt or bacteria is transferred to the fruit you will be eating.
- The Initial Cut: Decide which side of your oblong watermelon will sit flat on the table. You may need to slice a very thin sliver off the bottom to create a stable base so the turtle doesn’t roll away. Next, make a horizontal cut about halfway up the watermelon (or slightly higher if you want a deeper bowl) to separate the top “shell” from the bottom “bowl.”
- Hollow Out the Bowl: Take the bottom half of the watermelon. Using your melon baller, scoop out as much of the red flesh as possible, placing the melon balls into a large mixing bowl. Once you have balled as much as you can, use a spoon to scrape the remaining flesh away until you have a smooth, clean, green bowl. Set the bowl aside.
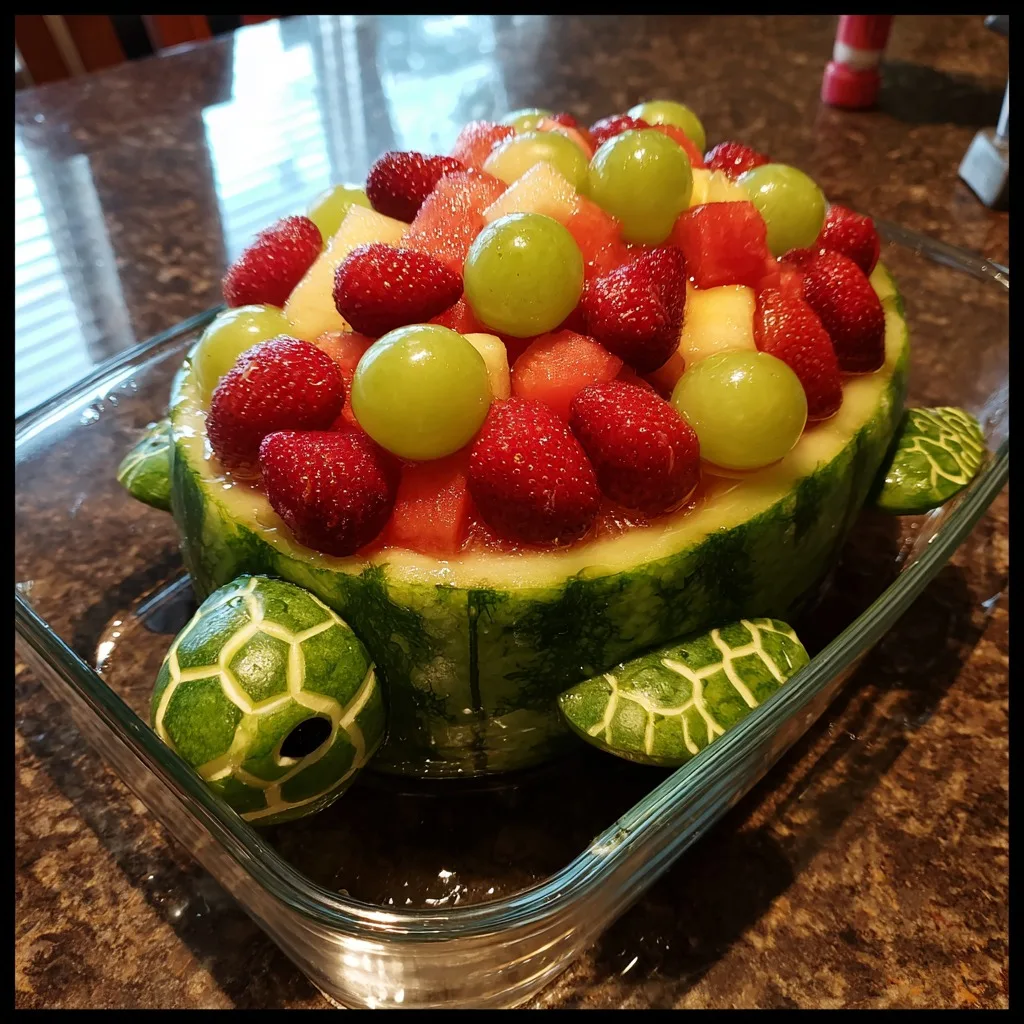
- Carve the Shell: Take the top half of the watermelon. This is where you will carve the shell pattern. Using your paring knife or channel knife, lightly score the dark green surface of the rind, cutting just deep enough to expose the pale green/white layer beneath. Create a pattern of connecting hexagons (six-sided polygons) in the center, surrounded by pentagons or simple lines toward the edges to mimic the scutes of a real turtle shell. Hollow out the inside of this top half just like you did the bottom to make it lighter.
- Create the Appendages: You will need extra watermelon rind to create the head and four flippers. If your watermelon was very large, you might be able to use the leftover rind from the hollowing process. If not, you may need a second, smaller watermelon (or use the rind from half of a honeydew). Sketch out the shapes of four curved flippers (two slightly larger front flippers, two smaller back flippers) and an oval-shaped head with a short neck. Carefully cut these shapes out with your paring knife. You can even carve small scale patterns into the flippers!
- Add the Eyes: For the eyes on the head, you can use whole cloves pushed into the rind, black peppercorns, small blueberries attached with a piece of toothpick, or even small raisins.
- Assemble the Fruit Salad: In your large mixing bowl, gently toss together the watermelon balls, cantaloupe balls, grapes, strawberries, and any other fruit you are using. Keep the mixture chilled in the refrigerator until you are ready to serve.
- Assemble the Turtle: Place the hollowed-out bottom bowl on your serving platter or a glass dish. Fill it to the brim (and slightly overflowing) with your mixed fruit salad. Take the head and the four flippers and attach them to the outside of the bowl using sturdy toothpicks or broken wooden skewers. Press them firmly into the rind so they hold secure. Finally, carefully rest the beautifully carved “shell” lid on top of the fruit salad, slightly angled so the fruit peeks out.
Pro-Tips for a Flawless Turtle
To elevate your fruit carving skills, keep these professional tips in mind:
Keep it Cold: A cold watermelon is much easier to carve than a room-temperature one. The flesh is firmer and less likely to collapse or leak excessive juice while you are working. Chill your watermelon overnight before beginning.
Draw Before You Cut: Do not rely on freehand carving if you are nervous. Use a non-toxic, washable marker or a dry-erase marker to sketch your hexagon shell pattern and your flipper shapes directly onto the rind before you make a single cut. You can easily wipe away the marker lines later with a damp paper towel.
Manage the Juice: Scooping out a watermelon creates a lot of excess juice. Be sure to drain this juice from the hollowed-out bowl before adding your fruit salad back in, otherwise, your other fruits (especially strawberries) will become soggy and waterlogged.
Prevent Browning: If you are including fruits that oxidize and turn brown when exposed to air (like apples or pears, though they are less common in this specific mix), toss them lightly in lemon or lime juice before adding them to the salad.
Delicious Fruit Salad Variations
While a classic melon and berry mix is traditional, you can customize the filling of your turtle to suit different themes or taste preferences.
The Tropical Turtle: Fill the bowl with diced mango, pineapple chunks, kiwi slices, sliced bananas, and a sprinkle of shredded coconut. Drizzle with a tiny bit of passionfruit juice for an authentic island flavor.
The Citrus Splash: Combine grapefruit segments, blood orange slices, mandarin oranges, and pomegranate arils. This provides a wonderfully tart and refreshing contrast to the sweet watermelon bowl.
The Adult Swim (Boozy Fruit): If this turtle is for an adults-only pool party, you can infuse the fruit! Soak the watermelon and cantaloupe balls in coconut rum, vodka, or tequila for an hour before draining them and adding them to the salad. Just be sure to label it clearly so the kids don’t accidentally grab a spiked strawberry!
Serving and Storage
Presentation is everything when it comes to the Watermelon Turtle. As seen in many popular setups, placing the turtle in a clear rectangular glass baking dish not only provides a stable base but also catches any inevitable drips or pooling juices, keeping your picnic table clean. You can even sprinkle some brown sugar around the base of the glass dish to look like beach sand, or surround the turtle with extra blueberries to mimic the ocean water.
Because it is made entirely of fresh fruit, the carved turtle is highly perishable. It is best assembled just before your guests arrive. If you need to prepare it in advance, carve the shell, bowl, and appendages the day before, wrap them tightly in plastic wrap, and store them in the refrigerator. Prepare the fruit salad and store it in a separate airtight container. Assemble the entire piece right before serving. Leftover fruit salad should be consumed within 2 to 3 days for optimal freshness and texture.
Conclusion
Creating a Watermelon Turtle Fruit Bowl is a joyous intersection of food prep and crafting. It requires a bit of time, a steady hand, and a playful spirit, but the resulting masterpiece is undeniably worth the effort. It transforms a standard backyard gathering into a memorable event, bringing a touch of whimsy and spectacular color to your food spread. Beyond its stunning visual appeal, it delivers exactly what we crave on a hot summer day: cool, hydrating, naturally sweet refreshment. So, the next time you are tasked with bringing a dish to a summer potluck, skip the heavy potato salad and the store-bought brownies. Grab your knives, pick out the melon, and carve a centerpiece that will have everyone smiling, snapping photos, and coming back for seconds.
Watermelon Turtle Fruit Bowl
Ingredients
Equipment
Method
- Wash the watermelon thoroughly. Cut a thin slice off the bottom so it sits flat, then cut horizontally across the middle to separate the top ‘shell’ from the bottom ‘bowl’.
- Use a melon baller to scoop the flesh out of both halves, reserving the watermelon balls for the salad. Scrape the remaining flesh to create clean, hollow rinds.
- Take the top half (the shell) and use a paring knife to lightly score a hexagon pattern into the green rind, mimicking a turtle shell.
- Using leftover rind (from a second melon or scraps), carve an oval head and four curved flippers.
- Attach cloves or small berries to the head to create eyes.
- In a large bowl, mix the reserved watermelon balls, cantaloupe, grapes, and strawberries.
- Place the hollowed-out bottom bowl on a serving dish. Fill it generously with the mixed fruit salad.
- Use toothpicks to pin the head and flippers to the sides of the bottom bowl. Carefully rest the carved shell lid on top of the fruit.