Watermelon Shark Fruit Bowl
The Ultimate Watermelon Shark Fruit Bowl: A Show-Stopping Summer Party Centerpiece
When the summer heat reaches its peak and backyard barbecues become the weekend norm, bringing a dish that is both refreshing and visually spectacular is the ultimate goal. Enter the Watermelon Shark. This incredible fruit carving is not just a healthy snack; it is a jaw-dropping, show-stopping centerpiece that will have guests of all ages reaching for their cameras before they reach for their plates. Whether you are hosting a pool party, celebrating a summer birthday, or gearing up for the highly anticipated Shark Week, this creative fruit bowl is the perfect addition to your feast. In this comprehensive guide, we will dive deep into everything you need to know to create the perfect watermelon shark, from selecting the right melon to mastering the carving techniques.
Why Make a Watermelon Shark?
Food is inherently visual, and we often eat with our eyes first. A standard bowl of cubed fruit is delicious, but presenting that same fruit spilling out of the gaping, toothy maw of a hand-carved watermelon shark elevates the entire experience. It transforms a simple, healthy snack into an interactive piece of edible art. Kids who might usually turn up their noses at healthy options are suddenly eager to “rescue” the fruit from the shark’s mouth. Adults appreciate the whimsical nostalgia and the undeniable effort that goes into such a creative presentation.
Furthermore, this project is surprisingly accessible. You do not need to be a master culinary artist to pull this off. With a sharp knife, a bit of patience, and a good sense of humor, anyone can create a recognizable and delightful fruit shark. It is an excellent weekend project and a fantastic way to engage older children or teenagers in kitchen prep, teaching them basic knife safety and creative food presentation along the way.
The Art and History of Fruit Carving
While a watermelon shark might seem like a modern, internet-era invention, the tradition of fruit and vegetable carving stretches back centuries. Originating in Eastern countries, particularly Thailand, China, and Japan, the art of Mukimono (Japanese food carving) and Kae Sa Luk (Thai fruit carving) was historically reserved for royal banquets and high society gatherings. Artisans would spend hours transforming melons, papayas, and root vegetables into intricate floral arrangements, dragons, and mythical creatures.
Today, this ancient culinary art has filtered down into everyday celebrations. The watermelon shark is a playful, modern, and accessible interpretation of this tradition. It takes the core concept—transforming a natural food item into a recognizable shape—and applies it to a fun, pop-culture-friendly motif. Understanding this rich history adds a layer of appreciation to the carving process. You aren’t just making a snack; you are participating in a centuries-old tradition of culinary artistry!
Choosing the Perfect Watermelon for Carving
The success of your watermelon shark hinges heavily on the canvas you choose. Not all watermelons are created equal when it comes to fruit carving. Here is a detailed guide on how to select the ideal melon for your aquatic masterpiece:
1. Shape is Everything: While round watermelons are great for eating, they make for very chubby, un-shark-like creatures. You need an oblong, elongated watermelon to mimic the sleek, torpedo-like body of a great white shark. Look for a melon that is distinctly oval.
2. Check the Field Spot: Turn the watermelon over and look for the field spot—the area where it rested on the ground while growing. You want this spot to be a creamy, buttery yellow. If it is white or green, the watermelon was picked too early and won’t be as sweet. If it is a deep, dark yellow, it might be overripe and mushy, making carving difficult.
3. The Thump Test: Give the watermelon a firm tap with your knuckles. You are listening for a deep, hollow sound, which indicates that the fruit is full of water and perfectly ripe. A dull thud means the rind is too thick or the flesh hasn’t fully matured.
4. Look for the Webbing: The brown, web-like scars on the rind are actually a good thing! They indicate where bees pollinated the flower. More webbing usually translates to a sweeter watermelon.
5. Weight Matters: Pick up a few watermelons of similar size. The one that feels heaviest for its size is the juiciest and best choice for carving, ensuring you have plenty of fruit to fill the mouth later.
Essential Tools for Your Fruit Carving Adventure
Before you make your first cut, gather your tools. Having the right equipment will make the process smoother, safer, and much more enjoyable.
- A Large Chef’s Knife: Essential for cutting the initial angle and slicing off the bottom to create a stable base.
- A Paring Knife: This is your most important tool. A small, sharp paring knife gives you the precision needed to carve the intricate teeth and the eye sockets.
- A Dry-Erase Marker: Using a washable or dry-erase marker allows you to sketch your design directly on the rind before cutting. If you make a mistake, you can simply wipe it away.
- A Melon Baller or Large Spoon: Crucial for hollowing out the interior of the shark without piercing the rind.
- Sturdy Toothpicks: These are the hidden heroes of your carving, used to attach the dorsal fin and the blueberry eyes.
- A Large Cutting Board: Watermelons are messy. Ensure you have a large, stable surface to work on, preferably one with a juice groove to catch the inevitable spills.
Ingredients
You only need a few simple items to bring this creation to life.
- 1 large, oblong seedless watermelon
- 2 fresh blueberries (for the eyes)
- 3 to 4 sturdy wooden toothpicks
Step-by-Step Instructions
Follow these numbered steps carefully to bring your watermelon shark to life. Take your time, especially when carving the teeth!
- Wash and Prep: Thoroughly wash the exterior of the watermelon and dry it. This removes dirt and ensures your marker will stick to the rind.
- Create a Stable Base: Identify the side of the watermelon that will be the bottom. Using your large chef’s knife, slice a small, flat section off the bottom so the watermelon sits securely on your cutting board without rolling. Do not cut too deep; you just want to remove the rounded edge.
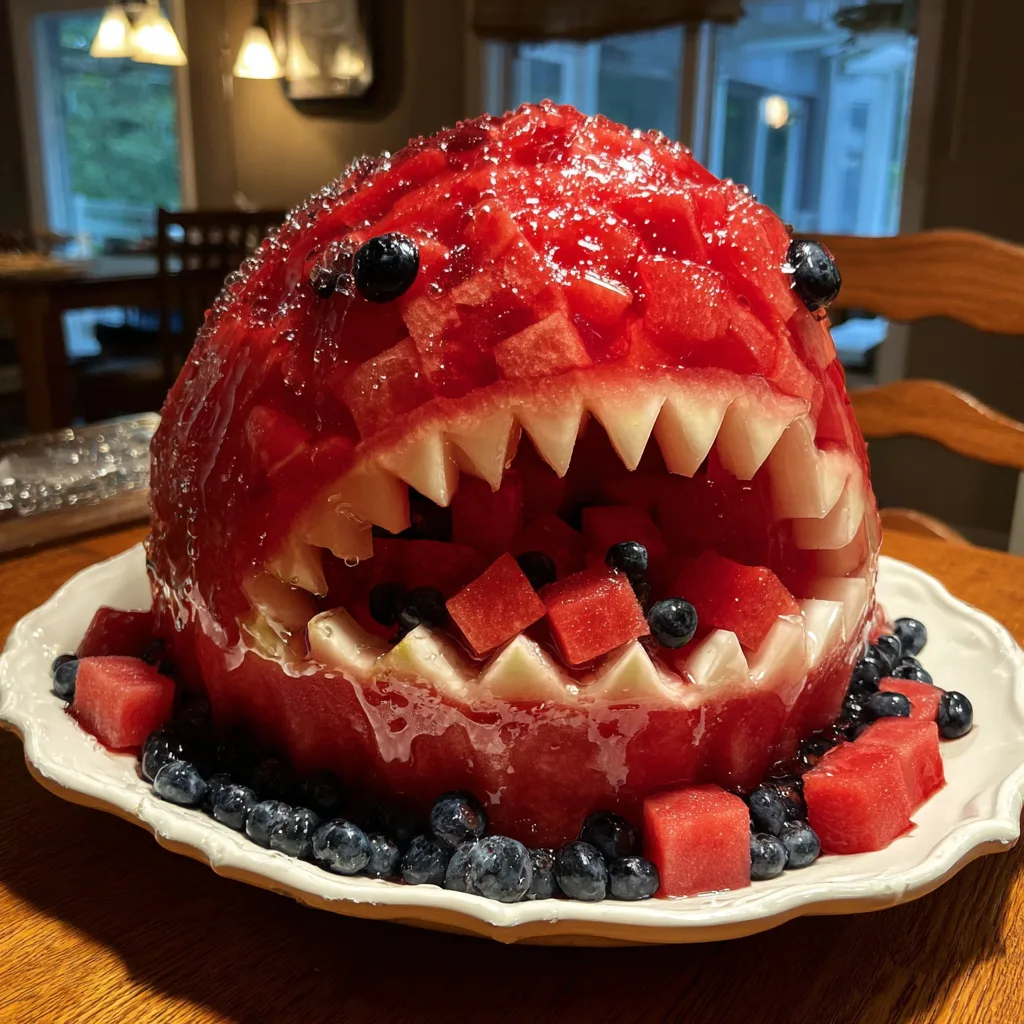
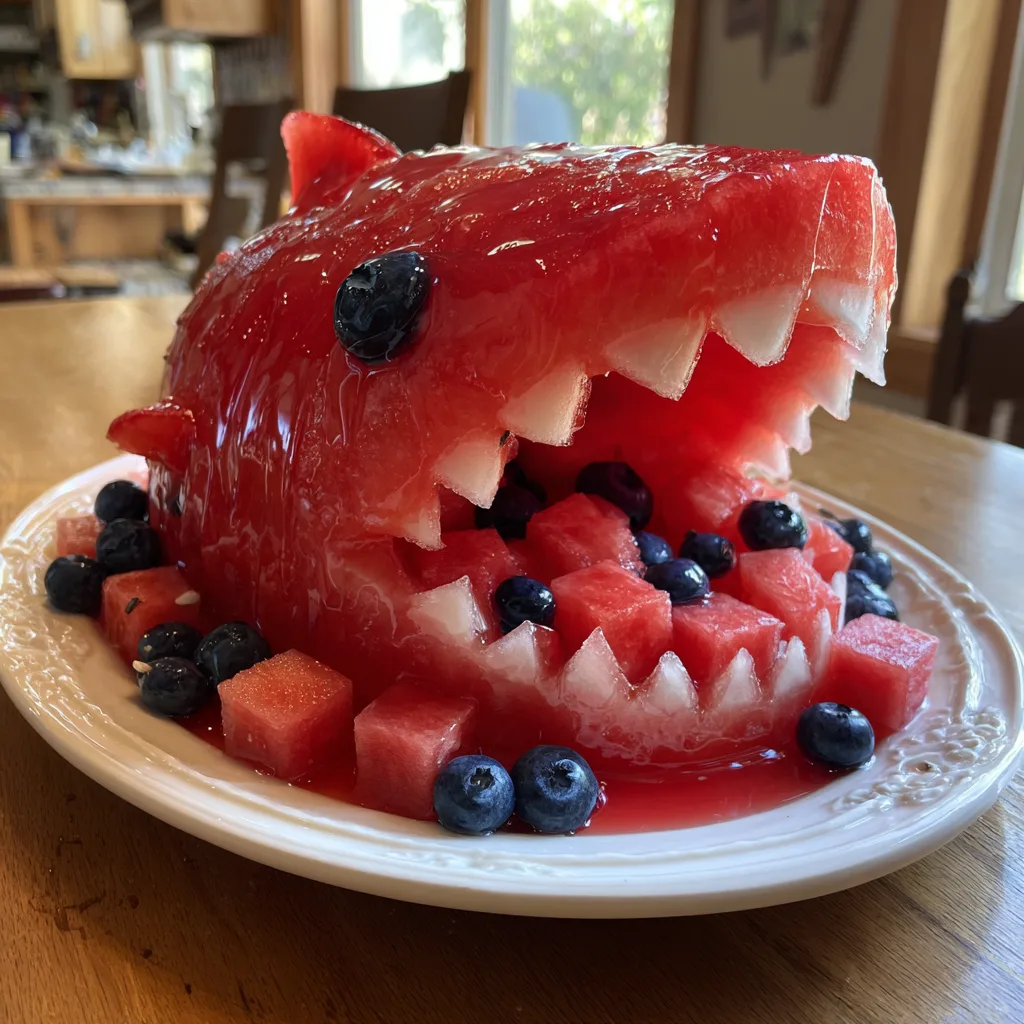
- Map the Mouth: Stand the watermelon up on its new base. Using your dry-erase marker, draw a large, open wedge shape on the front (the slightly narrower end of the oblong melon). This wedge should look like an open mouth, extending about a third of the way back into the melon.
- Cut the Mouth Opening: Carefully follow your marker lines with a sharp knife to cut out the wedge. Remove this large piece of watermelon and set it aside—do not throw it away! You will need the rind from this piece to create the shark’s dorsal fin.
- Hollow Out the Shark: Using a melon baller or a large spoon, scoop out the red flesh from the mouth opening and the interior of the watermelon. Transfer the scooped flesh to a large bowl. Scrape the inside walls relatively clean, but be careful not to puncture the outer green rind.
- Carve the Teeth: This is the most delicate step. Using your paring knife, score a line about 1/2 inch around the outside edge of the mouth opening. Carefully peel away the dark green skin within this 1/2-inch border to reveal the white rind beneath. Once the white rind is exposed, use the paring knife to cut jagged, triangular teeth all the way around the upper and lower jaws.
- Make the Fin: Take the large wedge of rind you set aside in step 4. Hollow out any remaining red flesh. Cut a triangle shape out of this rind to serve as the dorsal fin. Attach it to the top back of the shark using 2 or 3 sturdy toothpicks.
- Add the Eyes: Use your melon baller to carve out two small, shallow circular divots on either side of the head, just above the corners of the mouth. Place a blueberry in each divot, securing them with a broken half-toothpick if necessary.
- Cut the Gills: Use your paring knife to cut three small, curved slits on both sides of the shark’s head, behind the mouth, to represent gills.
- Fill and Serve: Cut the scooped-out watermelon flesh into neat bite-sized cubes. Fill the shark’s hollow interior with the cubes, letting them spill out of the gaping mouth onto your serving platter.
Pro Tips for the Best Watermelon Shark
To ensure your creation looks amazing and stays fresh throughout your event, keep these expert tips in mind:
Temperature Control is Key: Carving a warm watermelon is messy and can lead to a mushy final product. Chill your whole watermelon in the refrigerator for at least 12 hours before carving. The cold fruit will hold its shape much better, and the cuts will be cleaner.
Drainage Matters: Watermelons release a lot of liquid once cut. After hollowing out your shark, let it sit upside down on some paper towels for about 10-15 minutes to allow excess juice to drain before filling it. This prevents your fruit salad from turning into a soupy mess.
Keep it Fresh: If you are carving the shark a few hours ahead of your party, wrap the carved, empty rind tightly in plastic wrap and store it in the fridge. Keep the cubed fruit in a separate airtight container. Assemble the final piece just before your guests arrive.
Toothpick Safety: Always warn your guests, especially parents of young children, that there are toothpicks securing the fin and the eyes. Safety first!
Creative Variations and Add-Ins
While an all-watermelon filling is classic, you can treat your shark like a true fruit salad bowl. Here are some ways to customize your creation:
The “Blood and Guts” Mix: Mix your watermelon cubes with fresh strawberries, raspberries, and pomegranate seeds for a fiercely red, thematic interior.
Tropical Ocean Blend: Create a colorful contrast by mixing the red watermelon with bright yellow pineapple chunks, green kiwi slices, and orange mango cubes. The vibrant colors popping out of the green rind look spectacular.
The Candy Catch: For a kid-friendly twist, scatter gummy fish (like Swedish Fish), gummy sharks, or blue gummy rings among the fruit cubes. It looks like the shark just took a massive bite out of a school of colorful fish.
Blue Jell-O Ocean: For the ultimate display, serve your watermelon shark on a large platter surrounded by a shallow pool of set blue gelatin to simulate ocean water. You can even float some gummy boats or life preservers in the Jell-O!
Serving Suggestions for Summer Parties
The presentation of your watermelon shark is almost as important as the carving itself. Choose a large, sturdy platter or a rimmed baking sheet covered in decorative foil to serve it on. The rim is crucial, as the watermelon will continue to weep juice as it sits, and you don’t want a sticky puddle ruining your table.
Surround the base of the shark with extra fruit, graham cracker crumbs (to look like sand), or brown sugar. If you are hosting a Shark Week viewing party, pair this centerpiece with blue punch, fish-shaped crackers, and sandwiches cut out with a shark-shaped cookie cutter. It sets an immersive, incredibly fun theme that requires very little extra effort once the main centerpiece is done.
Nutritional Benefits of Watermelon
Beyond being incredibly fun to look at, this party treat is phenomenally good for you. Watermelon is appropriately named; it is about 92% water, making it a fantastic way to stay hydrated during hot summer days. But it’s not just sugar water; it is packed with essential nutrients.
Watermelon is one of the best dietary sources of lycopene, a powerful antioxidant linked to heart health and sun protection. It also provides a healthy dose of Vitamin C, which is crucial for immune function, and Vitamin A, which promotes healthy skin and eyes. Additionally, the fruit contains citrulline, an amino acid that may help reduce muscle soreness after a long day of swimming in the pool. So, when your guests are devouring this shark, they are getting a fantastic, guilt-free nutritional boost.
How to Store Leftovers
If you somehow end up with leftover fruit from your shark (which is rare!), storage is simple. Remove all the fruit from the carved rind. Store the fruit pieces in an airtight container in the refrigerator for up to 3-4 days. Unfortunately, the carved rind itself will start to break down and become slimy after about 24-48 hours, so it is best to discard the “shark” to the compost bin at the end of your party. If you want to save the leftover fruit for longer, you can freeze the chunks on a baking sheet and then transfer them to a freezer bag—they make incredible natural ice cubes for summer cocktails or perfect additions to morning smoothies!
Conclusion
Creating a Watermelon Shark is a rite of passage for summer party hosting. It combines culinary creativity, healthy eating, and pure, unadulterated fun into one spectacular package. By following the steps outlined above, taking your time with the carving, and letting your imagination run wild with the fillings and presentation, you are guaranteed to create a memorable centerpiece. So grab your knives, pick out the perfect melon, and get ready to make a splash at your next summer gathering!
Watermelon Shark Fruit Bowl
Ingredients
Equipment
Method
- Wash and dry the exterior of the watermelon thoroughly.
- Cut a small, flat slice off the bottom of the watermelon so it sits securely on a cutting board without rolling.
- Using a dry-erase marker, draw a large wedge shape for the mouth on the front end of the watermelon.
- Use a chef’s knife to cut out the wedge. Save the rind from this piece to make the dorsal fin.
- Using a melon baller or spoon, scoop out the flesh from the mouth and hollow out the interior. Save the flesh in a bowl.
- With a paring knife, peel back a 1/2-inch border of green skin around the mouth opening to expose the white rind. Carve jagged triangles into this white rind to create teeth.
- Cut a triangle shape out of the reserved rind wedge. Attach this dorsal fin to the back of the shark using toothpicks.
- Carve two small divots above the mouth and insert a blueberry into each for the eyes, securing with broken toothpicks if needed.
- Cut the scooped watermelon flesh into bite-sized cubes and fill the hollowed-out shark, letting the fruit spill out of the mouth.