Ultimate Frozen Brownie Ice Cream Cake
Ultimate Frozen Brownie Ice Cream Cake: The Best Summer Dessert
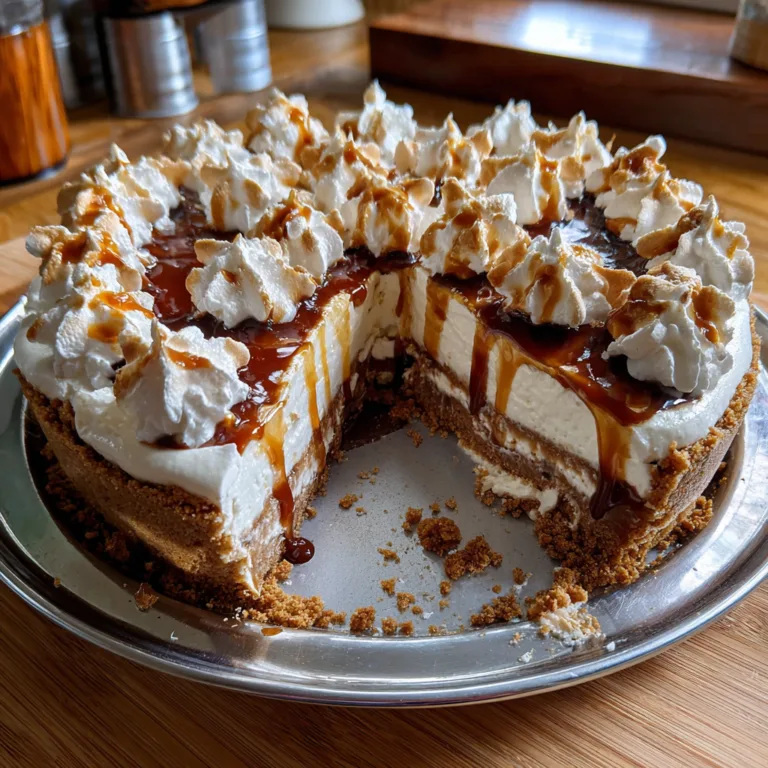
There is something undeniably magical about the combination of warm, fudgy brownies and cold, creamy ice cream. It is a classic pairing that has graced dessert menus for decades. However, when you combine these two elements into a single, sliceable masterpiece, you get the Frozen Brownie Ice Cream Cake. This isn’t just a scoop of vanilla on a square of chocolate cake; it is a carefully constructed architecture of flavor and texture designed to satisfy the deepest chocolate cravings.
Imagine a dense, chewy brownie base that remains soft even when frozen, supporting a thick layer of premium vanilla ice cream studded with even more brownie chunks. To top it all off, a cascading waterfall of homemade hot fudge sauce or ganache that freezes into a sticky, glossy glaze. This dessert is the centerpiece of summer parties, birthday celebrations, or just a treat yourself Friday night.
In this comprehensive guide, we will walk you through everything you need to know to create this show-stopping dessert. From baking the perfect “freezer-friendly” brownie to assembling the layers for a clean cut, we have you covered.

Why You Will Love This Recipe
- Texture Contrast: The interplay between the dense, chewy brownie and the smooth, melting ice cream is perfection.
- Make-Ahead Friendly: This cake actually needs to be made ahead of time, making it the perfect stress-free dessert for entertaining. You can assemble it days in advance.
- Customizable: While we love the classic brownie and vanilla combo, this recipe is a blank canvas for mint chip, peanut butter swirl, or coffee ice cream.
- Crowd Pleaser: It serves a large group and looks incredibly professional, despite being easy to assemble in a home kitchen.
The Science of Frozen Brownies
One common pitfall with ice cream cakes is the crust. If you use a standard cake recipe, it can freeze into a rock-hard block that is impossible to cut and unpleasant to eat. The secret to this recipe is a brownie base that is high in fat (butter and chocolate) and sugar. Sugar acts as an anti-freeze agent, lowering the freezing point of the water in the batter. This ensures that even straight out of the freezer, your brownie base remains fudgy and chewy rather than icy and hard.
Ingredients
For the Fudgy Brownie Base
- Unsalted Butter (1/2 cup / 115g): Melted. This provides the dense, fudgy texture we want. Do not substitute with oil if you want that rich buttery flavor, though oil creates a softer crumb.
- Granulated Sugar (1 cup / 200g): Essential for the structure and for keeping the brownie soft when frozen.
- Cocoa Powder (1/3 cup / 30g): Use high-quality Dutch-processed cocoa for a deeper, less acidic chocolate flavor.
- All-Purpose Flour (1/2 cup / 65g): We use a low amount of flour to ensure the brownies are fudgy, not cakey.
- Eggs (2 large): Room temperature is best for emulsification.
- Vanilla Extract (1 tsp): Enhances the chocolate flavor.
- Salt (1/4 tsp): Balances the sweetness.
For the Ice Cream Layer
- Vanilla Bean Ice Cream (1.5 quarts / 1.4L): Use a high-quality brand with low overrun (less air) for a creamier texture. You will need to soften it before assembling.
- Brownie Chunks (1 cup): You can reserve a portion of the brownie base to crumble into the ice cream, or bake a slightly larger batch. Alternatively, store-bought brownie bites work well for the mix-ins.
For the Chocolate Ganache Topping
- Semi-Sweet Chocolate Chips (1 cup / 170g): Provides the perfect balance of sweet and bitter.
- Heavy Cream (1/2 cup / 120ml): Creates a pourable, luscious sauce that thickens as it hits the cold ice cream.
- Corn Syrup (1 tbsp – Optional): This is the secret to that “ultra-shiny” bakery look. It prevents the chocolate from becoming dull when frozen.
Instructions
Step 1: Bake the Brownie Base
- Preheat your oven to 350°F (175°C). Grease a 9-inch springform pan generously with butter or cooking spray. Lining the bottom with parchment paper is highly recommended for easy removal later.
- In a medium saucepan (or microwave-safe bowl), melt the butter. Remove from heat and stir in the sugar and cocoa powder until smooth and combined. The mixture might look gritty; this is normal.
- Add the eggs one at a time, beating vigorously after each addition. You want the batter to become shiny and pull away slightly from the sides of the bowl. Stir in the vanilla.
- Gently fold in the flour and salt until just combined. Do not overmix, or you will develop gluten that makes the brownie tough.
- Pour the batter into the prepared springform pan. Smooth the top with a spatula.
- Bake for 20-25 minutes. A toothpick inserted into the center should come out with moist crumbs, but not wet batter. Do not overbake!
- Crucial Step: Allow the brownie to cool completely in the pan on a wire rack. Once cool, place the pan in the freezer for at least 30 minutes. A cold base prevents the ice cream from melting on contact.
Step 2: Prepare the Ice Cream Layer
- Take your ice cream out of the freezer and let it sit on the counter for about 15-20 minutes. You want it to be spreadable (like soft serve), but not liquid.
- While the ice cream softens, chop up your extra brownies into bite-sized cubes if you haven’t already.
- In a large bowl, quickly stir the brownie chunks into the softened ice cream. Work fast so it doesn’t melt completely.
Step 3: Assemble the Cake
- Remove the brownie base from the freezer.
- Dollop the softened ice cream mixture over the brownie base.
- Use an offset spatula to spread the ice cream into an even, flat layer. Press down gently to ensure there are no air pockets between the brownie and the ice cream.
- Cover the pan tightly with plastic wrap and return to the freezer. Freeze for at least 4-6 hours, or preferably overnight. The ice cream needs to re-harden completely.
Step 4: The Ganache & Topping
- Once the cake is fully frozen, prepare the topping. Place the chocolate chips in a heatproof bowl.
- Heat the heavy cream in a small saucepan or microwave until it just begins to simmer (do not boil).
- Pour the hot cream over the chocolate chips. Let it sit undisturbed for 5 minutes.
- Gently whisk from the center outwards until the mixture is smooth, glossy, and dark. Stir in the corn syrup if using.
- Let the ganache cool for about 10 minutes so it is not scorching hot, but still pourable.
- Take the cake out of the freezer. Run a knife dipped in hot water around the inside edge of the springform pan to loosen it, then release the ring.
- Pour the ganache over the top of the cake. Use a spatula to push it to the edges, allowing it to drip down the sides in luscious ribbons.
- Top immediately with extra brownie cubes, chocolate curls, or sprinkles before the chocolate sets.
- Return to the freezer for 15 minutes to set the topping, or serve immediately.
Tips for the Perfect Slice
Serving an ice cream cake can be tricky. Here is how to get those clean, Instagram-worthy layers:
- The Hot Knife Method: Run a large chef’s knife under hot tap water for 30 seconds. Dry it off with a towel, then make your cut. The heat will melt through the frozen ganache and ice cream effortlessly. Clean and reheat the knife between every single cut.
- Temper the Cake: Let the cake sit on the counter for 5-10 minutes before slicing. This softens the brownie base slightly and makes it easier to cut through without crushing the ice cream layer.

Variations to Try
While the classic chocolate and vanilla is hard to beat, you can easily adapt this recipe to fit your cravings:
- Peanut Butter Lover’s: Use a peanut butter cup ice cream and swirl 1/2 cup of melted peanut butter into the ganache topping.
- Mint Chocolate Chip: Swap the vanilla ice cream for mint chip. The cooling mint pairs beautifully with the dense dark chocolate brownie.
- Salted Caramel: Drizzle salted caramel sauce over the brownie base before adding the vanilla ice cream, and add another drizzle over the top ganache.
- Coffee Break: Use coffee ice cream and add a teaspoon of espresso powder to the brownie batter for a mocha twist.
Storage and Freezing
This cake is a survivor. If you have leftovers (unlikely!), wrap the remaining cake tightly in plastic wrap and then in aluminum foil. It will keep in the freezer for up to 1 month. Just be aware that ice crystals may form on the surface after prolonged freezing, so it is best enjoyed within the first week.
Whether you are celebrating a birthday or just surviving a heatwave, this Frozen Brownie Ice Cream Cake is the ultimate treat. It requires patience for the freezing times, but the actual hands-on effort is minimal for a dessert that looks and tastes this spectacular.
Frozen Brownie Ice Cream Cake
Ingredients
Equipment
Method
- Preheat oven to 350°F (175°C). Grease a 9-inch springform pan.
- Mix melted butter, sugar, and cocoa powder. Beat in eggs one at a time, then vanilla.
- Fold in flour and salt until just combined. Pour into pan and bake 20-25 minutes.
- Cool brownie completely, then freeze for 30 minutes.
- Soften ice cream and mix in brownie chunks. Spread over cold brownie base.
- Freeze for 4-6 hours until solid.
- Heat cream and pour over chocolate chips to make ganache. Cool slightly.
- Remove cake from pan, pour ganache over top, and garnish with extra brownies.