Ultimate Chocolate Mousse Cake Recipe
The Ultimate Triple-Layer Chocolate Mousse Cake
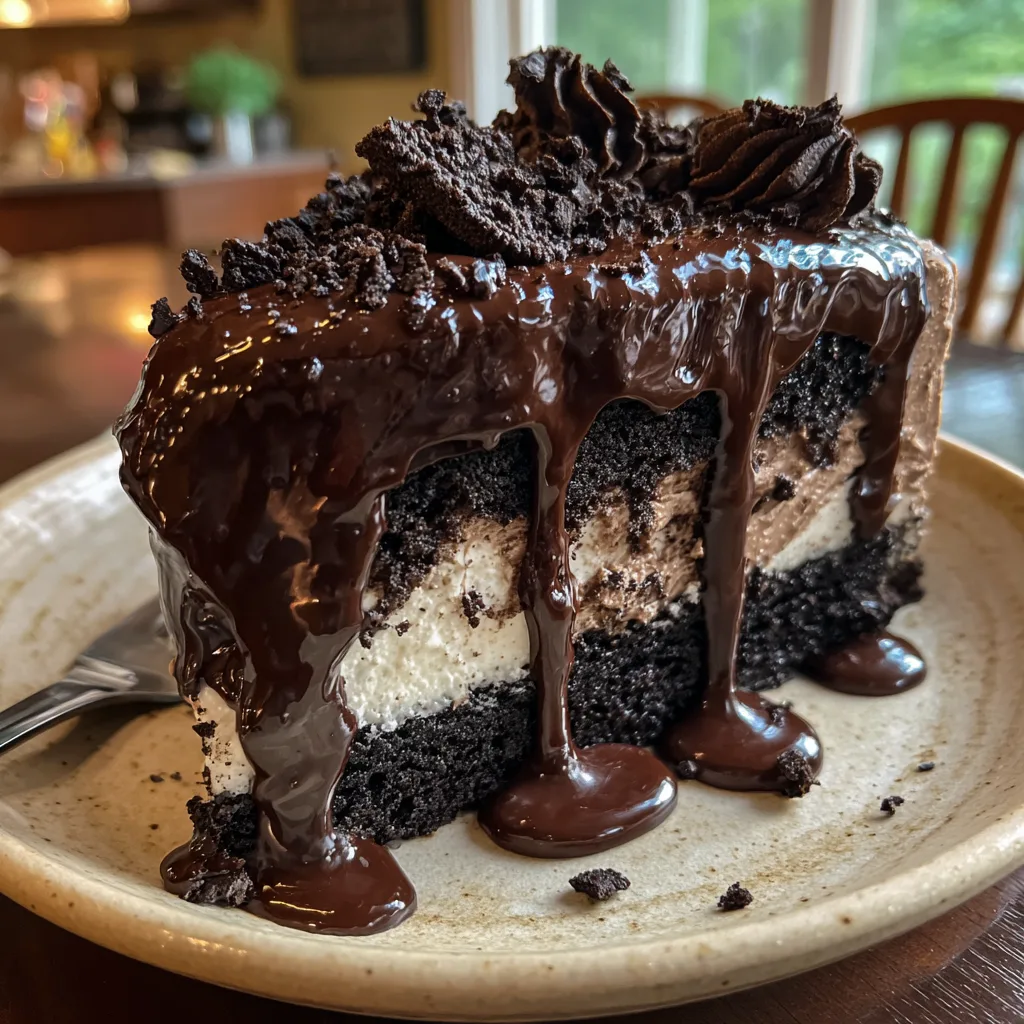
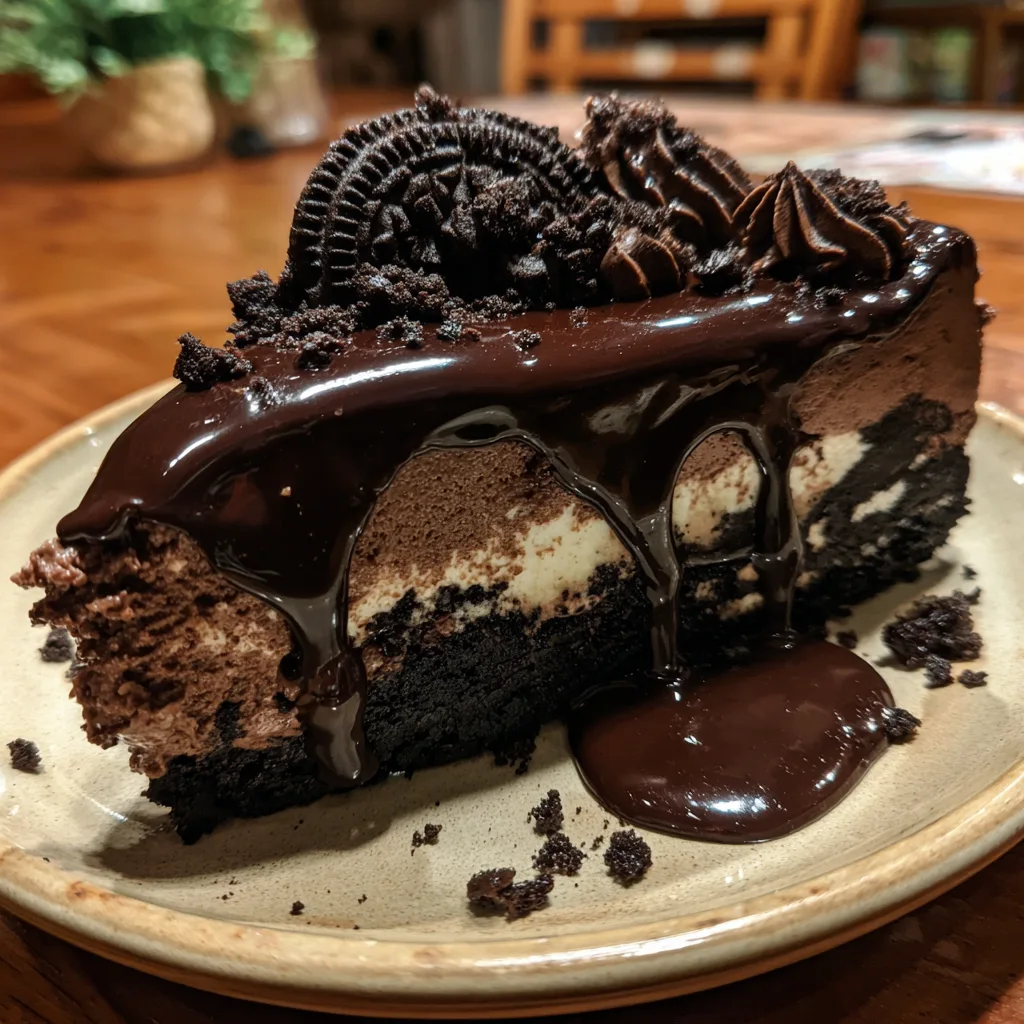
There are desserts, and then there are experiences. This Chocolate Mousse Cake falls firmly into the latter category. Imagine a dessert that captures every texture a chocolate lover dreams of: a crunchy, buttery cookie base, a cloud-like, aerated chocolate mousse center that melts instantly on the tongue, and a silky, rich ganache topping that brings it all together. It is the kind of dessert that stops conversation at a dinner party. It looks incredibly professional—like something you would buy at a high-end patisserie in Paris—but the secret is that it is achievable right in your own kitchen.
Whether you are celebrating a birthday, an anniversary, or simply the fact that you survived the work week, this cake is your answer. It is a masterpiece of textures and flavors, balancing the bitterness of dark chocolate with the sweetness of cream. In this comprehensive guide, we will walk you through exactly how to achieve that perfect, stable mousse height and that mirror-like glossy finish seen in the photos.
Why This Recipe Works
Many home cooks are intimidated by the word “mousse.” It conjures up images of tempered eggs, seized chocolate, and deflated whipped cream. However, this recipe is designed for success. We use a gelatin-stabilized base which ensures that the cake holds its shape perfectly when sliced, without compromising that signature airy texture. The ratio of cream to chocolate is calculated to provide richness without being overly heavy.
Furthermore, the contrast is key here. A mousse on its own can be monotonous. By pairing it with a salty-sweet Oreo crust and biting chunks of chocolate shavings on top, every forkful offers a new dimension of flavor. This is a no-bake friendly recipe (if you skip baking the crust), making it perfect for summer months or when your oven is occupied with savory dishes.
The Three Essential Layers
1. The Foundation: Chocolate Cookie Crust
Everything starts with the base. We skip the traditional sponge cake here in favor of a pressed cookie crust. Why? Because the crunch provides a necessary counterpoint to the soft mousse. Using chocolate sandwich cookies (like Oreos) gives a deep, black-cocoa flavor that anchors the dessert.
2. The Heart: Silky Chocolate Mousse
This is the star of the show. We use real high-quality semi-sweet chocolate. The mousse gets its lift from whipped cream folded gently into a chocolate ganache base. The key is patience—folding gently to keep those air bubbles intact is what makes it “mousse” and not just “pudding.”
3. The Crown: Ganache and Garnish
To finish, a pour-over ganache adds a glossy “wet” look that makes the cake irresistible. Topped with hand-shaved chocolate curls and piped chocolate whipped cream, it adds height and visual drama.
Ingredients
For the Crust:
- 24 chocolate sandwich cookies (like Oreos), whole with filling
- 6 tablespoons unsalted butter, melted
- Pinch of salt
For the Chocolate Mousse Filling:
- 1 tablespoon unflavored gelatin powder
- 3 tablespoons cold water
- 12 oz (340g) semi-sweet chocolate (chop bars, don’t use chips if possible), roughly chopped
- 3 cups heavy whipping cream, divided
- 1/2 cup powdered sugar
- 1 teaspoon pure vanilla extract
- Pinch of sea salt
For the Topping & Garnish:
- 4 oz (115g) dark chocolate (60% or higher)
- 1/2 cup heavy whipping cream
- Chocolate shavings or curls (for decoration)
- Optional: Whipped cream for piping swirls
Step-by-Step Instructions
Phase 1: Prepare the Crust
- Crush the Cookies: Place the cookies (filling and all) into a food processor. Pulse until you have fine, sandy crumbs. If you don’t have a processor, place them in a zip-top bag and crush with a rolling pin.
- Mix with Butter: Transfer crumbs to a medium bowl. Pour over the melted butter and add a pinch of salt. Mix with a fork until the crumbs resemble wet sand.
- Press and Chill: Grease a 9-inch springform pan lightly. Press the crumb mixture firmly into the bottom of the pan in an even layer. Use the bottom of a measuring cup to pack it down tight. Place in the refrigerator to set while you make the mousse.
Phase 2: The Mousse
- Bloom the Gelatin: In a small bowl, sprinkle the gelatin powder over the cold water. Let it sit for 5 minutes until it looks like applesauce.
- Melt Chocolate Base: In a heatproof bowl, combine the chopped semi-sweet chocolate and 1 cup of the heavy cream. Microwave in 30-second intervals, stirring in between, until completely smooth. (Alternatively, use a double boiler).
- Dissolve Gelatin: Microwave the bloomed gelatin for 10-15 seconds until it turns to liquid. Whisk this liquid gelatin into the warm chocolate mixture immediately. Whisk vigorously to ensure no clumps remain. Stir in the vanilla and salt. Let this mixture cool to room temperature (do not let it set hard, just cool it down so it doesn’t melt the whipped cream).
- Whip the Cream: In a large mixing bowl (chilled is best), beat the remaining 2 cups of heavy cream with the powdered sugar until stiff peaks form. Be careful not to overbeat into butter.
- The Fold: This is the critical step. Take about 1/3 of the whipped cream and stir it into the cooled chocolate mixture to lighten it. Then, gently fold the chocolate mixture back into the remaining whipped cream. Use a spatula and a “cut and fold” motion to preserve the air bubbles. Stop as soon as no white streaks remain.
- Set: Pour the mousse over the prepared crust. Smooth the top with an offset spatula. Cover loosely and refrigerate for at least 4-6 hours, or overnight for best results.
Phase 3: The Ganache & Assembly
- Make Ganache: Place the dark chocolate in a heatproof bowl. Heat the 1/2 cup heavy cream until it just begins to simmer (do not boil over). Pour the hot cream over the chocolate. Let sit for 5 minutes, then whisk gently starting from the center until glossy and smooth.
- Glaze: Let the ganache cool slightly until it thickens but is still pourable. Pour over the center of the chilled mousse cake and tilt the pan to coat the top evenly.
- Decorate: While the ganache is still tacky, sprinkle with chocolate shavings. If piping swirls (as seen in the photo), wait until the ganache sets, then pipe chocolate whipped cream around the edges.
- Serve: Run a thin knife under hot water, wipe it dry, and run it around the edge of the pan before releasing the springform ring. Slice with a hot knife for clean cuts.
Expert Tips for Perfect Mousse
Temperature Matters: The most common mistake is mixing hot chocolate with cold whipped cream. This causes the chocolate to seize, creating little gritty bits in your mousse. Ensure your chocolate base is cool to the touch (but still liquid) before folding.
Quality Chocolate: Since chocolate is the primary flavor, use the best baking bars you can find (like Ghirardelli, Lindt, or Guittard). Chocolate chips contain stabilizers that prevent them from melting smoothly and can affect the texture of your mousse.
The Gelatin Factor: If you are strictly vegetarian, you can use agar-agar, but be aware the texture will be slightly firmer and less “melty.” For the classic French mousse texture, unflavored powdered gelatin is the standard.
Variations to Try
- Mocha Mousse: Add 1 tablespoon of instant espresso powder to the warm cream when making the chocolate base. Coffee enhances chocolate flavor beautifully.
- Boozy Kick: Stir in 1-2 tablespoons of Baileys, Grand Marnier, or dark rum into the chocolate mixture before folding in the cream.
- Fruit Pairing: Serve with fresh raspberries or a strawberry coulis. The acidity of the fruit cuts through the richness of the chocolate.
- White Chocolate: You can swap the semi-sweet chocolate for white chocolate, but reduce the sugar in the whipped cream as white chocolate is naturally sweeter.
Serving and Storage
Storage: This cake must be kept refrigerated. It will keep well in the fridge for up to 4 days. Cover it with a cake dome or plastic wrap (use toothpicks to keep the wrap off the ganache) to prevent it from absorbing fridge odors.
Freezing: You can freeze this cake! Let it set completely in the fridge first, then freeze the whole cake or individual slices. Wrap tightly in plastic wrap and foil. Thaw in the fridge overnight before serving. It actually tastes like an ice cream cake if eaten semi-frozen!
Serving Size: This dessert is incredibly rich. A small slice goes a long way. This 9-inch cake easily serves 12 to 14 people.
Nutritional Note
While this isn’t a diet food, it is good for the soul. Using dark chocolate adds antioxidants, and the satisfaction factor means you don’t need a huge portion to feel treated. Enjoy it mindfully and savor every bite.
This Chocolate Mousse Cake is more than a recipe; it’s a centerpiece. It’s the birthday cake requested year after year, the dish that gets the “wow” when you bring it to the table. Happy baking!
Ultimate Chocolate Mousse Cake
Ingredients
Equipment
Method
- Crush cookies into fine crumbs and mix with melted butter and salt.
- Press mixture firmly into bottom of a 9-inch springform pan; chill.
- Bloom gelatin in cold water for 5 minutes.
- Melt semi-sweet chocolate with 1 cup heavy cream; stir in melted gelatin, vanilla, and salt. Cool to room temp.
- Whip remaining 2 cups cream with powdered sugar to stiff peaks.
- Gently fold whipped cream into the cooled chocolate mixture until uniform.
- Pour mousse over crust and refrigerate for 4-6 hours until set.
- Make ganache by pouring hot cream over dark chocolate; whisk until smooth.
- Pour ganache over chilled cake, top with shavings, and serve.