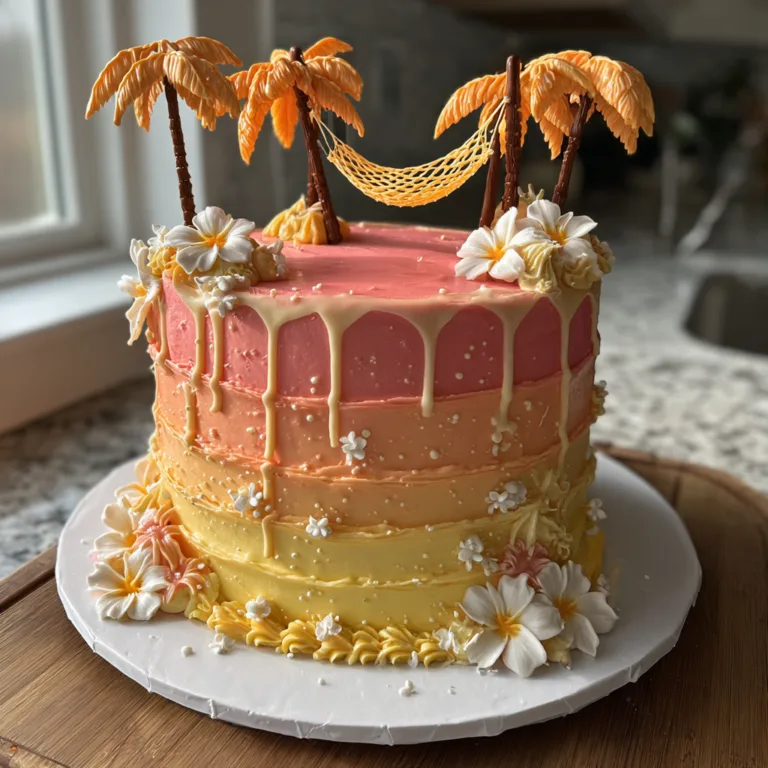
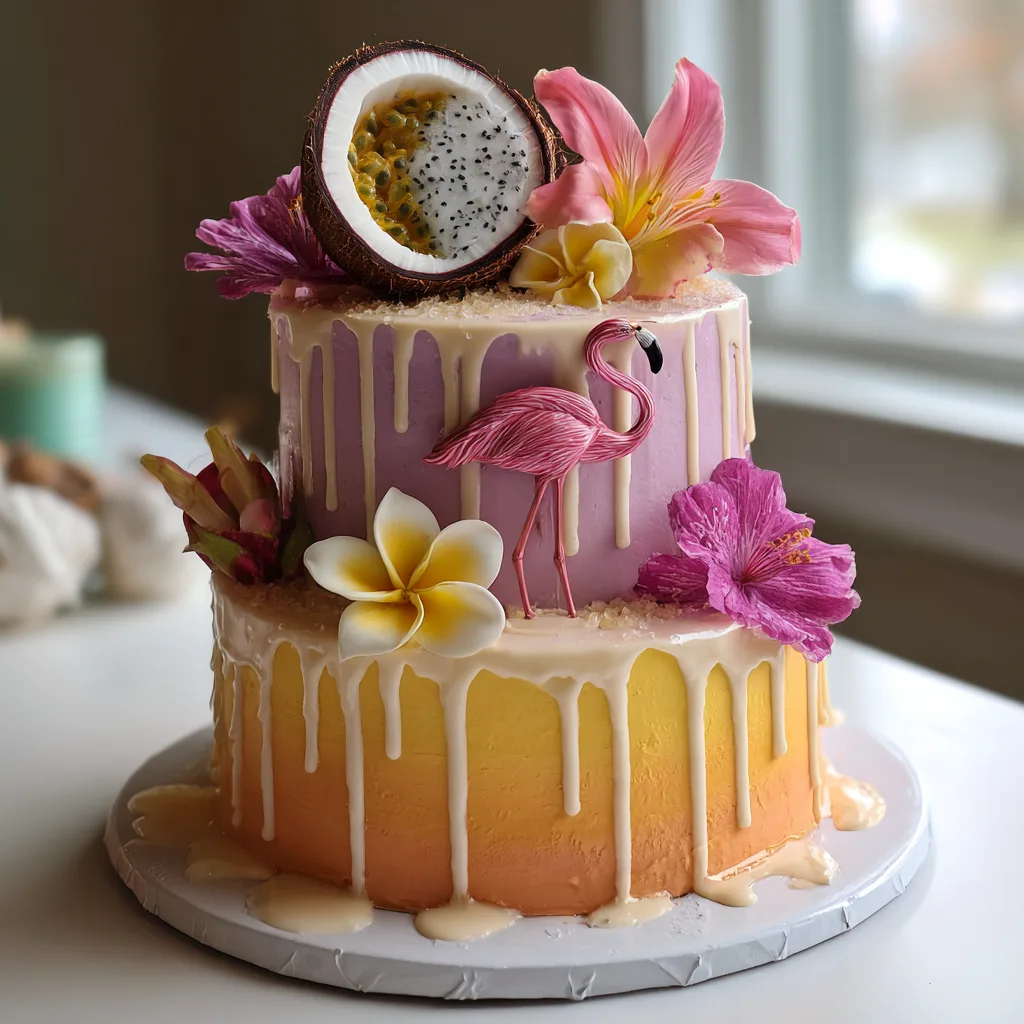
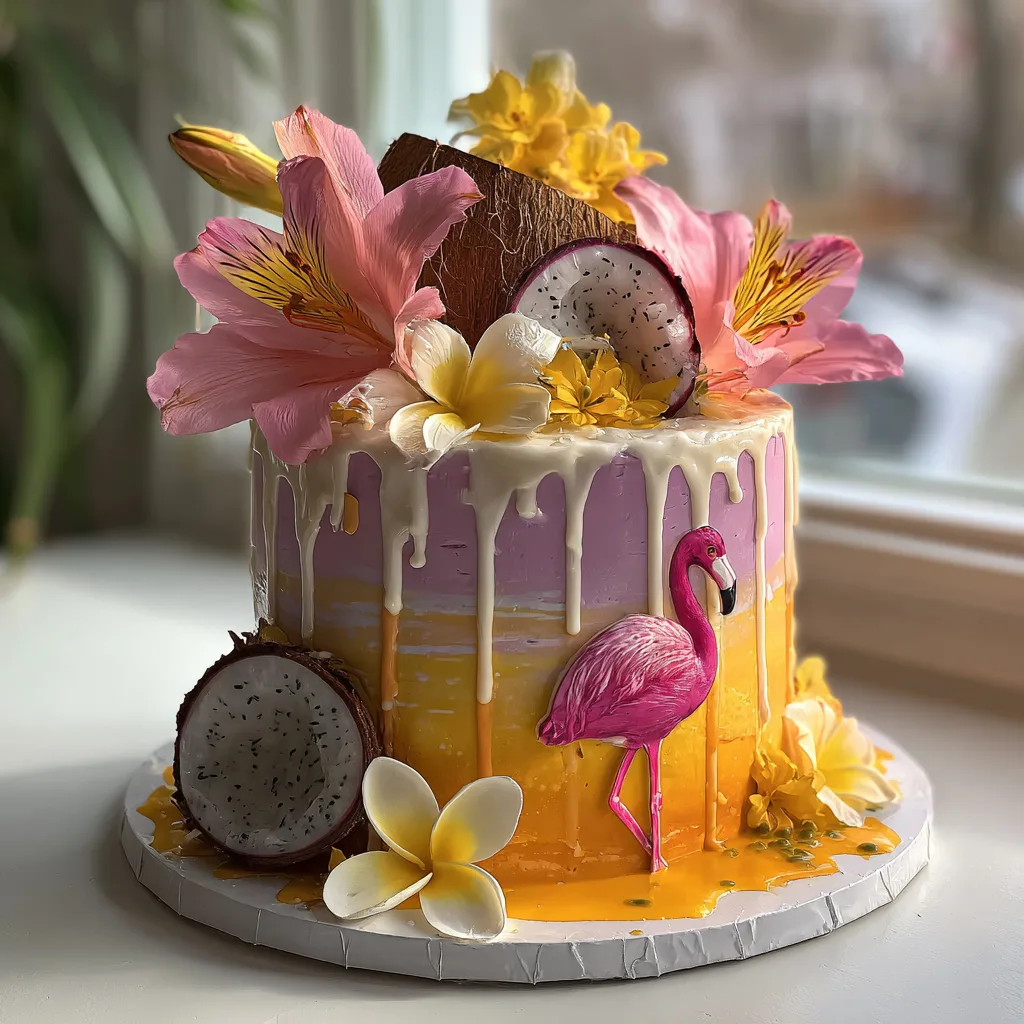
Tropical Flamingo Drip Cake
The Ultimate Tropical Flamingo Ombre Drip Cake Recipe
Welcome to your next summer baking obsession! There is nothing quite like a show-stopping dessert to anchor a party, and this Tropical Flamingo Ombre Drip Cake is the absolute pinnacle of summer celebration baking. Whether you are hosting a backyard luau, a tropical-themed birthday party, or simply want to bring the spirit of a Hawaiian vacation into your kitchen, this two-tiered masterpiece is guaranteed to turn heads and satisfy the most discerning sweet tooth. The stunning visual presentation—featuring a sunset-inspired yellow-to-orange ombre bottom tier, a twilight-inspired purple-to-pink ombre top tier, a pristine white chocolate drip, and an extravagant crown of fresh coconut, dragonfruit, passionfruit, and gorgeous tropical blooms—is matched only by its incredible flavor profile. Inside these vibrant layers lies a tender coconut cake filled with a zesty, bright passionfruit curd and enveloped in a silky smooth Swiss meringue buttercream.
Why You Will Fall in Love with This Tropical Cake
Creating a tiered cake might seem intimidating, but breaking it down into manageable steps makes the process incredibly rewarding. This cake is more than just a dessert; it is an edible work of art. You will fall in love with this recipe because it perfectly balances sweet, tart, and creamy flavors. The coconut milk used in the cake batter provides a rich, velvety crumb that stays moist for days. The passionfruit curd brings a necessary tangy punch that cuts through the richness of the buttercream. Furthermore, the decorating process allows for immense creativity. Working with fresh, exotic fruits like pitaya (dragonfruit) and lilikoi (passionfruit), alongside vibrant, food-safe floral accents, transforms you from a home baker into a pastry artist. Every slice delivers a taste of the tropics, making it the perfect centerpiece for your summer festivities.
Deep Dive: The Flavor Profile and Textures
To truly appreciate this cake, we must explore its intricate layers of flavor and texture. The foundation is the coconut cake. Unlike cakes that rely solely on artificial extracts, this recipe utilizes full-fat coconut milk and toasted desiccated coconut folded directly into the batter. This ensures an authentic, robust coconut flavor and a beautifully textured crumb. The filling is a homemade passionfruit curd. Passionfruit has an intensely aromatic, sweet-tart flavor that acts as the perfect foil to sweet cakes. Its bright, zesty notes awaken the palate. Enclosing everything is a Swiss meringue buttercream. We choose Swiss meringue over traditional American buttercream because it is noticeably less sweet, incredibly silky, and provides the perfect smooth canvas for our ombre coloring and white chocolate drip. The white chocolate ganache drip not only adds a striking visual element but also introduces a milky, sweet crunch once it sets. Finally, the fresh fruit garnishes—the crunchy seeds of the dragonfruit and the tart, jelly-like pulp of the fresh passionfruit—add a refreshing, raw element that ties the whole tropical theme together.
Ingredients for the Ultimate Tropical Cake
For the Coconut Cake Layers:
- – 3 1/2 cups all-purpose flour
- – 1 tablespoon baking powder
- – 1/2 teaspoon baking soda
- – 1 teaspoon salt
- – 1 cup unsalted butter, softened to room temperature
- – 2 cups granulated sugar
- – 5 large eggs, room temperature
- – 1 tablespoon vanilla extract
- – 1 teaspoon coconut extract
- – 1 1/2 cups full-fat canned coconut milk, well shaken
- – 1 cup sweetened shredded coconut
For the Passionfruit Curd Filling:
- – 1/2 cup fresh passionfruit juice or high-quality puree (strained of seeds, though keeping a few is lovely for texture)
- – 1/2 cup granulated sugar
- – 4 large egg yolks
- – 1/4 cup unsalted butter, cubed and chilled
- – A pinch of salt
For the Swiss Meringue Buttercream:
- – 6 large egg whites
- – 2 cups granulated sugar
- – 2 cups (4 sticks) unsalted butter, softened but still cool to the touch
- – 1 tablespoon vanilla extract
- – Gel food coloring (Yellow, Orange, Pink, Purple)
For the White Chocolate Drip:
- – 1/2 cup high-quality white chocolate chips or chopped baking bar
- – 3 tablespoons heavy whipping cream
- – Bright white food coloring (optional, to remove the natural yellowish tint of cocoa butter)
For the Decoration and Garnish:
- – 1 clean, halved coconut shell (flesh intact)
- – 1/2 fresh passionfruit
- – 1 slice fresh dragonfruit (pitaya)
- – Assorted food-safe or faux tropical flowers (e.g., hibiscus, plumeria, lilies)
- – Edible flamingo image or food-safe flamingo cake decal/stencil
Step-by-Step Instructions
- Prepare the Cake Pans: Preheat your oven to 350°F (175°C). Grease and line three 8-inch round cake pans (for the bottom tier) and three 6-inch round cake pans (for the top tier) with parchment paper rounds.
- Mix the Dry Ingredients: In a large mixing bowl, whisk together the all-purpose flour, baking powder, baking soda, and salt. Set aside.
- Cream the Butter and Sugar: In the bowl of a stand mixer fitted with the paddle attachment, beat the softened butter and granulated sugar on medium-high speed until light, fluffy, and pale in color (about 4-5 minutes). Scrape down the sides of the bowl as needed.
- Add Eggs and Extracts: Add the room-temperature eggs one at a time, beating well after each addition until fully incorporated. Mix in the vanilla extract and coconut extract.
- Alternate Dry and Wet Ingredients: With the mixer on low speed, add one-third of the flour mixture, followed by half of the coconut milk. Repeat, ending with the final third of the flour mixture. Mix just until combined; do not overmix. Gently fold in the shredded coconut using a rubber spatula.
- Bake the Cakes: Divide the batter evenly among the prepared cake pans (the 8-inch pans will have slightly more batter than the 6-inch pans). Bake the 6-inch cakes for 25-30 minutes and the 8-inch cakes for 30-35 minutes, or until a toothpick inserted into the center comes out clean. Let the cakes cool in their pans for 10 minutes before turning them out onto wire racks to cool completely.
- Make the Passionfruit Curd: In a heatproof bowl set over a saucepan of simmering water (a double boiler), whisk together the passionfruit juice, sugar, and egg yolks. Cook, stirring constantly with a whisk or silicone spatula, until the mixture thickens and coats the back of a spoon (about 8-10 minutes). Remove from heat and immediately whisk in the cold, cubed butter and salt until smooth. Strain through a fine-mesh sieve into a clean bowl, press a piece of plastic wrap directly onto the surface to prevent a skin from forming, and chill in the refrigerator until completely set.
- Prepare the Swiss Meringue Buttercream: Wipe your mixer bowl and whisk attachment with a little lemon juice or white vinegar to ensure they are completely grease-free. Add the egg whites and granulated sugar to the bowl. Place the bowl over a pot of simmering water. Whisk continuously until the mixture reaches 160°F (71°C) on a candy thermometer and the sugar is completely dissolved (rub a little between your fingers; it should feel perfectly smooth).
- Whip the Meringue: Move the bowl to your stand mixer fitted with the whisk attachment. Whip on high speed until stiff, glossy peaks form and the bowl feels completely cool to the touch (this can take 10-15 minutes).
- Add the Butter: Switch to the paddle attachment. With the mixer on low speed, add the softened butter one tablespoon at a time, ensuring each piece is incorporated before adding the next. Once all the butter is added, mix in the vanilla extract. Turn the speed up to medium and beat until the buttercream is silky smooth. If it looks curdled at any point, keep whipping; it will come together.
- Assemble the Tiers: Level all your cooled cake layers by trimming off any domes. Pipe a dam of buttercream around the edge of the first 8-inch layer. Fill the center with a generous layer of passionfruit curd. Top with the next 8-inch layer and repeat. Place the final 8-inch layer on top. Coat the entire 8-inch tier in a thin “crumb coat” of buttercream and chill for 30 minutes. Repeat this entire process for the 6-inch cakes to create the top tier. Chill both tiers.
- Create the Ombre Frosting: Divide the remaining buttercream. You will need yellow and orange for the bottom tier, and purple and pink for the top tier. Frost the bottom half of the 8-inch cake with yellow and the top half with orange. Use a bench scraper to smooth the sides, allowing the colors to blend into a sunset ombre. Repeat with the 6-inch tier, using purple on the bottom and pink on the top. Chill both frosted tiers until the buttercream is very firm to the touch.
- Stack the Cake: Insert bubble tea straws or wooden dowels into the center of the 8-inch bottom tier, trimming them so they are flush with the top of the frosting. Carefully lift the 6-inch tier (which should be on its own small cake board) and place it centrally on top of the 8-inch tier.
- Apply the Flamingo Decal: If using an edible decal or stencil, carefully apply the pink flamingo design to the smooth orange/yellow frosting on the bottom tier.
- Make the White Chocolate Drip: Place the white chocolate chips and heavy cream in a microwave-safe bowl. Heat in 15-second intervals, stirring in between, until completely smooth. Stir in white food coloring if desired. Let it cool slightly until it is fluid but not hot. Use a spoon or a squeeze bottle to carefully drip the ganache down the edges of both the top and bottom tiers. Chill the cake briefly to let the drip set.
- Decorate with Tropical Flair: Now for the crowning glory! Arrange the half coconut shell atop the 6-inch tier. Strategically place the pink lily, yellow plumeria, dragonfruit slice, and passionfruit half around the cake, using extra buttercream to secure them if necessary. Arrange lush green leaves to frame the flowers. Serve and enjoy your masterpiece!
Mastering the Perfect Drip: Tips and Tricks
The drip effect is a crucial component of this cake’s aesthetic, but achieving the perfect consistency can be tricky. The key is temperature control. If your ganache is too hot, it will run all the way down to the cake board, pooling messily and potentially melting your beautiful ombre buttercream. If it is too cold, it will stop short and look clumpy rather than elegantly cascading. After melting your white chocolate and cream, let it sit for about 5 to 10 minutes at room temperature. The consistency should resemble slightly thick corn syrup. Always perform a “test drip” on the back of your cake or on an overturned chilled glass. Your cake must be thoroughly chilled before you apply the drip; the cold surface of the buttercream arrests the flow of the chocolate, creating those perfect, varied-length teardrops. A squeeze bottle offers the most control, allowing you to dictate exactly where and how much chocolate falls, but a spoon works perfectly fine with a steady hand.
Working with Fresh Flowers on Cakes safely
Adding real flowers, like the lilies and plumerias shown in this design, elevates a cake from standard to extraordinary. However, safety is paramount. Not all flowers are edible, and many commercially grown flowers are treated with pesticides. First, ensure the specific flower varieties you choose are non-toxic to humans. If you are not using specifically cultivated edible flowers, you must create a barrier between the flower and the cake. Never stick a raw stem directly into the cake layers. Instead, use floral tape to tightly wrap the stems, and then insert the wrapped stems into a plastic floral pick or a standard drinking straw that has been cut to size and inserted into the cake. Alternatively, you can dip the cut ends of the stems in melted chocolate to seal them before placing them on the frosting. Always remove the flowers before slicing and serving the cake to your guests.
Storage and Make-Ahead Instructions
This elaborate cake is a project, but thankfully, almost every component can be made in advance. The coconut cake layers can be baked, cooled completely, tightly wrapped in double layers of plastic wrap, and frozen for up to one month. The passionfruit curd can be made and stored in an airtight container in the refrigerator for up to a week. Swiss meringue buttercream also freezes beautifully for up to three months; simply bring it back to room temperature and re-whip it in your stand mixer until it is smooth and fluffy again before assembling. Once the cake is fully assembled and decorated (without the fresh fruit and flowers), it can be stored in the refrigerator for up to 3 days. We recommend adding the fresh coconut, dragonfruit, passionfruit, and flowers on the day you plan to serve the cake to ensure everything looks as vibrant and fresh as possible. Serve the cake at room temperature for the best texture and flavor.
Creative Variations to Try
While this recipe is phenomenal as written, the tropical theme lends itself beautifully to customization. If you cannot find fresh passionfruit for the curd, mango or pineapple puree makes a fantastic and equally tropical substitute. For the cake layers, you could swap the coconut cake for a zesty lime cake or a classic vanilla sponge soaked in a rum syrup for an adults-only piña colada vibe. If Swiss meringue buttercream is too time-consuming, a high-quality cream cheese frosting pairs beautifully with both coconut and passionfruit, though it will be slightly softer and trickier to achieve a flawless ombre finish. No matter how you customize it, the combination of a colorful aesthetic and bright, sunny flavors will make this cake a legendary addition to your recipe repertoire.
Tropical Flamingo Ombre Drip Cake
Ingredients
Equipment
Method
- Preheat oven to 350°F (175°C). Grease and line three 8-inch and three 6-inch round cake pans.
- Whisk dry ingredients (flour, baking powder, baking soda, salt) in a bowl. In a stand mixer, cream butter and sugar until fluffy. Add eggs one at a time, then extracts.
- Alternate adding dry ingredients and coconut milk to the mixer, beginning and ending with dry. Fold in shredded coconut.
- Divide batter between pans. Bake 6-inch pans for 25-30 mins and 8-inch pans for 30-35 mins. Cool completely.
- Make curd: Whisk passionfruit juice, sugar, and egg yolks over a double boiler until thickened. Remove from heat, whisk in cold butter and salt. Strain, cover, and chill.
- Make buttercream: Whisk egg whites and sugar over a double boiler until 160°F. Whip in stand mixer until stiff peaks form and bowl is cool. Gradually beat in butter, then vanilla.
- Assemble layers with buttercream dam and passionfruit curd filling. Crumb coat both tiers and chill.
- Color buttercream and apply sunset ombre (yellow/orange) to bottom tier and twilight ombre (purple/pink) to top tier. Smooth and chill.
- Insert dowels into the bottom tier and carefully stack the top tier on it. Apply flamingo decal.
- Melt white chocolate and cream. Cool slightly, then drip around edges. Garnish with coconut shell, dragonfruit, passionfruit, and flowers.