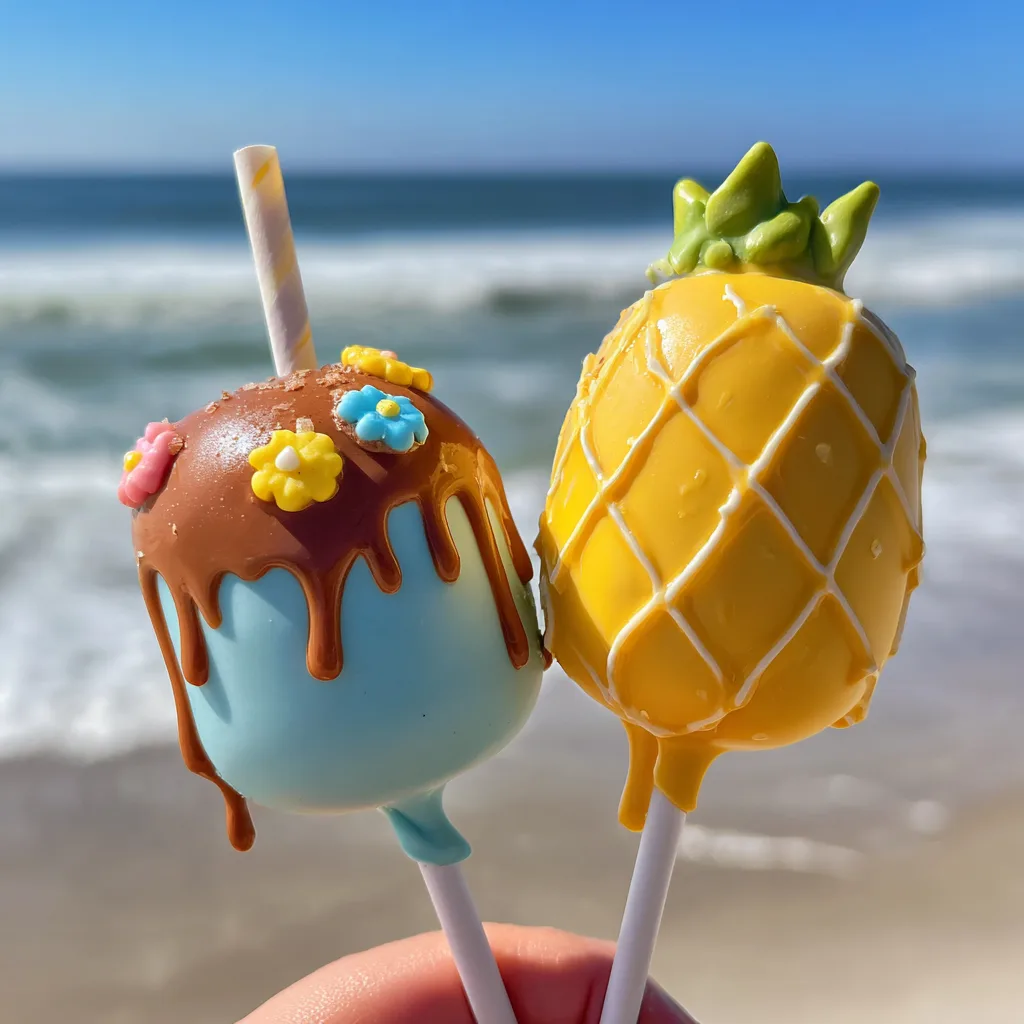
Tropical Cake Pops
The Ultimate Tropical Coconut and Pineapple Cake Pops Recipe
Introduction to Your New Favorite Summer Dessert
When the weather gets warm and the sun starts shining, there is nothing quite like a dessert that transports you straight to a tropical paradise. Welcome to the ultimate guide for making Tropical Coconut and Pineapple Cake Pops! These bite-sized treats are not just incredibly delicious; they are miniature works of edible art that will steal the show at any luau, pool party, summer barbecue, or beach gathering. Imagine the delightful combination of moist, sweet cake mixed with creamy frosting, all encased in a crisp, beautifully decorated candy shell.
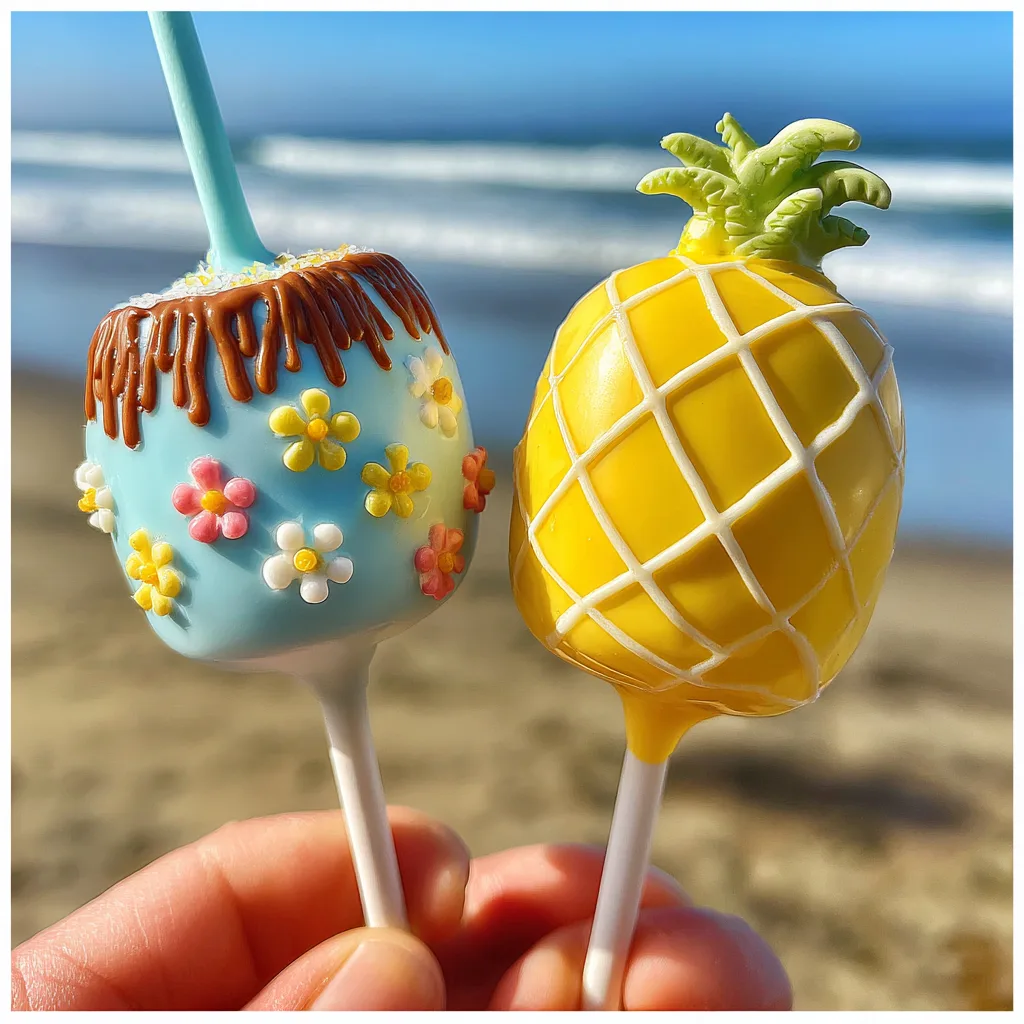
Cake pops have taken the dessert world by storm over the last decade, evolving from simple round balls of cake to elaborate, highly detailed designs. In this comprehensive guide, we are going to walk you through exactly how to recreate these stunning tropical designs: a coconut shell drink complete with a tiny blue straw and vibrant tropical flowers, and a bright yellow pineapple with its signature criss-cross pattern and leafy green crown. Whether you are an experienced baker or a complete novice looking for a fun weekend project, this detailed article will equip you with all the knowledge, tips, and tricks you need to achieve cake pop perfection.
Why You Will Absolutely Love These Tropical Treats
There are countless reasons to fall in love with these tropical cake pops. First and foremost is their visual appeal. In a sea of standard cupcakes and sheet cakes, these individually crafted pops stand out. The attention to detail—from the textured brown coating of the “coconut” to the piped yellow lines on the “pineapple”—makes them incredibly photogenic and fun to eat.
Secondly, cake pops offer built-in portion control. They are the perfect size for satisfying a sweet tooth without committing to a massive slice of cake, making them ideal for parties where guests are mingling and eating on the go. There are no forks or plates required! Finally, the flavor possibilities are endless. While the outside screams tropical paradise, the inside can be customized to your heart’s content. From classic vanilla to rich chocolate, or even a piña colada flavored cake, you can tailor these treats to match your specific taste preferences.
The Magic of the Flavor Profile
While the design is the star of the show, the flavor inside is what will keep people coming back for seconds. For a truly authentic tropical experience, we highly recommend flavoring your cake pop center with coconut and pineapple extracts. You can start with a basic vanilla cake and vanilla buttercream, but by adding a few teaspoons of high-quality extracts, you transform the interior into a piña colada dream.
The candy melt coating also adds a vital textural element. When you bite into a cake pop, you should first experience the satisfying “snap” of the sweet, vanilla-flavored candy shell, which then yields to the dense, fudgy, and moist cake center. It is this contrast between the crisp exterior and the soft interior that makes cake pops so universally beloved.
Essential Equipment You Will Need
Before diving into the recipe, it is crucial to gather your tools. Having the right equipment makes the cake pop making process significantly smoother.
- Large Mixing Bowls: For crumbling the cake and mixing it with the frosting.
- Baking Sheet: Lined with parchment or wax paper for resting the rolled cake balls.
- Lollipop Sticks: Standard 6-inch or 8-inch white paper sticks work best.
- Deep Microwave-Safe Mugs or Measuring Cups: These are essential for dipping. A deep, narrow vessel requires less candy coating to achieve a full dip.
- Styrofoam Block or Cake Pop Stand: This is absolutely critical for letting your cake pops dry upright without flattening one side.
- Piping Bags: For piping the intricate details on the pineapple.
- Toothpicks: Handy for popping tiny air bubbles in the wet candy coating and for helping to attach small decorations.
Ingredients
Gather the following ingredients to create your tropical masterpiece.
For the Cake Pop Dough:
– 1 box (15.25 oz) vanilla or yellow cake mix (plus ingredients called for on the box: water, oil, eggs)
– 1/2 cup to 3/4 cup vanilla buttercream frosting (store-bought or homemade)
– 1 teaspoon coconut extract (optional, for flavor)
– 1 teaspoon pineapple extract (optional, for flavor)
For the Candy Coating and Decoration:
– 1 bag (12 oz) yellow candy melts
– 1 bag (12 oz) light brown or milk chocolate candy melts
– 1/2 cup white candy melts
– 1 tablespoon coconut oil or paramount crystals (for thinning the candy melts)
– White shredded coconut or white jimmies sprinkles (for the coconut drink foam)
– Green fondant or green modeling chocolate (for the pineapple leaves)
– Light blue fondant (for the straws)
– Yellow and light blue fondant (for the tropical flowers)
Step-by-Step Instructions
1. Bake and Cool the Cake: Bake the cake according to the package directions in a 9×13 inch pan. Once baked, allow the cake to cool completely to room temperature. This is crucial; if the cake is warm, it will melt the frosting and make a greasy dough.
2. Crumble the Cake: Cut the cooled cake into quarters and rub the pieces together over a large bowl to create a fine crumb. Make sure there are no large, hard edge pieces remaining. You want a consistent, sandy texture.
3. Bind the Dough: Add the coconut and pineapple extracts to your frosting. Begin by adding 1/2 cup of frosting to the crumbled cake. Use your hands to mix it in. You are looking for a texture similar to play-dough—it should hold its shape when squeezed but not be overly sticky or greasy. If it’s too dry, add a little more frosting, one tablespoon at a time.
4. Shape the Cake Pops: Use a cookie scoop to portion out the dough. For the coconuts, roll the dough between your palms into perfect spheres. For the pineapples, roll the dough into an oval, slightly elongated shape. Place all shaped pops on a wax paper-lined baking sheet.
5. Chill the Cake Balls: Place the baking sheet in the refrigerator for at least 2 hours, or in the freezer for 15-20 minutes. They need to be firm before dipping.
6. Prepare the Decorations: While the cake balls chill, use your fondant to craft the small details. Roll small pieces of green fondant and pinch the ends to create pineapple leaves; cluster 4-5 leaves together for each top. Roll tiny, thin cylinders of light blue fondant and bend the tops slightly to look like straws. Use small fondant cutters to cut out yellow and blue tropical flowers. Set these aside to dry and harden slightly.
7. Melt the Candy Coating: Place your brown candy melts in a deep mug. Microwave at 50% power for 30-second intervals, stirring thoroughly after each interval, until completely smooth. If the coating is too thick, stir in a small amount of coconut oil or paramount crystals until it flows like liquid silk. Repeat this process in a separate mug for the yellow candy melts.
8. Insert the Sticks: Remove a few cake balls from the fridge. Dip the tip (about 1/2 inch) of a lollipop stick into the melted candy coating, then insert it straight into the cake ball, going about halfway through. The melted candy acts as glue. Let these rest for 5 minutes until the “glue” sets.
9. Dip the Coconuts: Take a round cake pop on a stick and submerge it completely into the brown candy melt. Pull it straight up and gently tap the wrist of your holding hand to allow the excess coating to drip off. While the coating is still wet, you can use a stiff bristle brush or a toothpick to gently drag vertical lines into the coating to mimic a hairy coconut shell. Place upright in your styrofoam block to dry.
10. Dip the Pineapples: Take an oval cake pop and submerge it into the yellow candy melt. Tap off the excess and place it upright in the styrofoam block to dry completely.
11. Decorate the Coconuts: Once the brown coating is dry, melt the white candy melts. Spoon a small amount onto the top of the brown cake pop to look like a drink inside a coconut. Immediately sprinkle with white shredded coconut or sprinkles. Before the white candy sets, carefully press your blue fondant straw and the colorful fondant flowers into the top.
12. Decorate the Pineapples: Pour the remaining melted yellow candy into a piping bag with a very small, round tip (or snip a tiny hole in the corner of a ziplock bag). Pipe diagonal lines in one direction across the yellow cake pop, then pipe intersecting diagonal lines to create a diamond pattern. Finally, use a dab of melted candy to attach your pre-made green fondant leafy crown to the very top of the pineapple.
Master The Art of Cake Pop Dipping
Dipping cake pops can be the most intimidating part of the process, but with a few professional techniques, you will achieve smooth, flawless results. The temperature of your cake balls and your candy coating must be perfectly balanced. If your cake balls are frozen solid and you dip them into hot candy coating, the rapid temperature change will cause the candy shell to crack as it dries and expands. Ideally, your cake balls should be firm and chilled, but not frozen, and your candy coating should be warm, not piping hot.
When tapping off the excess chocolate, never bang the stick directly on the side of the cup. This can cause the cake ball to slide right off the stick and into your mug of chocolate! Instead, hold the stick securely and gently tap the hand or wrist that is holding the stick with your other hand. This creates a gentle vibration that encourages the excess chocolate to slide off evenly without dislodging the cake pop.
Pro Tips for Perfect Cake Pops Every Time
Don’t overdo the frosting: The number one mistake beginners make is adding too much frosting to the crumbled cake. This makes the cake balls too heavy and greasy, causing them to fall off the stick when dipped. Start with a small amount; you can always add more.
Thin your candy melts: Brand-name candy melts are notoriously thick straight out of the bag. Using a thinning agent like paramount crystals (which are made of the same oils found in candy melts) or solid coconut oil will dramatically improve the fluidity of your coating, resulting in a thinner, more professional-looking shell.
Work in small batches: Don’t take all your cake balls out of the fridge at once. Take out 4 or 5 at a time to dip. If they sit on the counter too long, they will warm up and become too soft to dip successfully.
Flavor Variations to Try
While a tropical piña colada flavor is perfect for this design, you can easily switch up the interior. Here are a few ideas:
- Strawberry Lemonade: Use a strawberry cake mix and mix it with lemon buttercream.
- Chocolate Coconut: Use a rich devil’s food cake mixed with chocolate frosting and a dash of coconut extract.
- Caramel Pineapple: Yellow cake mixed with caramel frosting and small pieces of dried pineapple folded into the dough.
Serving Suggestions and Display Ideas
Presentation is everything with a treat this cute! Instead of a plain styrofoam block, try filling a decorative bucket or a clear glass vase with brown sugar (to mimic beach sand) and standing the cake pops up in the sugar. You could also arrange them on a platter lined with large, fresh tropical leaves like Monstera or banana leaves. For a party favor, wrap each cake pop individually in a small cellophane bag and tie it with a piece of natural twine or a brightly colored ribbon.
How to Store Cake Pops
Proper storage ensures your hard work doesn’t go to waste. Undipped cake balls can be stored in an airtight container in the refrigerator for up to a week, or frozen for up to a month. Once the cake pops are dipped and fully decorated, they are surprisingly shelf-stable because the candy shell seals in the moisture of the cake. They can be kept at room temperature in a cool, dry place for up to a week. Avoid putting finished cake pops in the refrigerator, as the condensation that forms when they are brought back to room temperature will cause the candy shell to “sweat” and ruin your fondant decorations.
Fun Facts About Tropical Fruits and Cake Pops
Did you know that pineapples are not actually a single fruit, but rather a cluster of hundreds of individual berries that have fused together around a central core? This is why they have that unique, segmented appearance, which we mimic with our criss-cross piping. Pineapples are also considered a symbol of hospitality and welcome in many cultures, making these cake pops the perfect treat to offer guests coming into your home.
As for cake pops, they were popularized in the late 2000s by a famous baking blogger who was looking for a creative way to use up leftover cake scraps. What started as a frugal baking hack has blossomed into a global dessert phenomenon, proving that sometimes the best culinary creations are born out of resourcefulness!
Frequently Asked Questions
Q: My cake pops are falling off the stick in the chocolate. What went wrong?
A: This usually happens for three reasons: the cake ball is too big/heavy, the dough has too much frosting in it, or the cake ball wasn’t chilled enough before dipping. Ensure you are using the “glue” method (dipping the stick in chocolate before inserting it into the cake).
Q: My candy coating is thick and lumpy. How do I fix it?
A: Candy melts can seize if they are overheated or if even a drop of water gets into them. Microwave on low power, stir frequently, and use coconut oil or paramount crystals to thin it out.
Q: Can I use real chocolate chips instead of candy melts?
A: Yes, but real chocolate requires “tempering” to set hard and shiny at room temperature. Candy melts are formulated to set up perfectly without the complicated tempering process, making them much easier for cake pops.
Conclusion
Creating these Tropical Coconut and Pineapple Cake Pops is a rewarding culinary project that yields stunning results. While it requires a bit of patience and attention to detail, the process of mixing, rolling, dipping, and decorating is incredibly fun and allows you to unleash your creativity. Armed with the tips and techniques outlined in this comprehensive guide, you are well on your way to crafting professional-quality cake pops that look just as good as they taste. So put on some luau music, grab your candy melts, and bring a taste of the tropics into your kitchen today!
Tropical Coconut & Pineapple Cake Pops
Ingredients
Equipment
Method
- Bake the cake according to package instructions and let it cool completely.
- Crumble the cooled cake into a fine texture in a large bowl.
- Mix in the frosting and extracts until the dough holds together like clay.
- Roll the dough into round balls (for coconuts) and oval shapes (for pineapples). Chill for 2 hours.
- Melt candy melts. Dip the tip of lollipop sticks into candy melts, then insert halfway into each cake ball. Let set.
- Dip round balls into brown melts for coconuts, and ovals into yellow melts for pineapples. Let dry upright.
- Top brown pops with melted white candy, shredded coconut, a fondant straw, and fondant flowers.
- Pipe criss-cross yellow lines on the pineapple pops and attach green fondant leaves to the top.