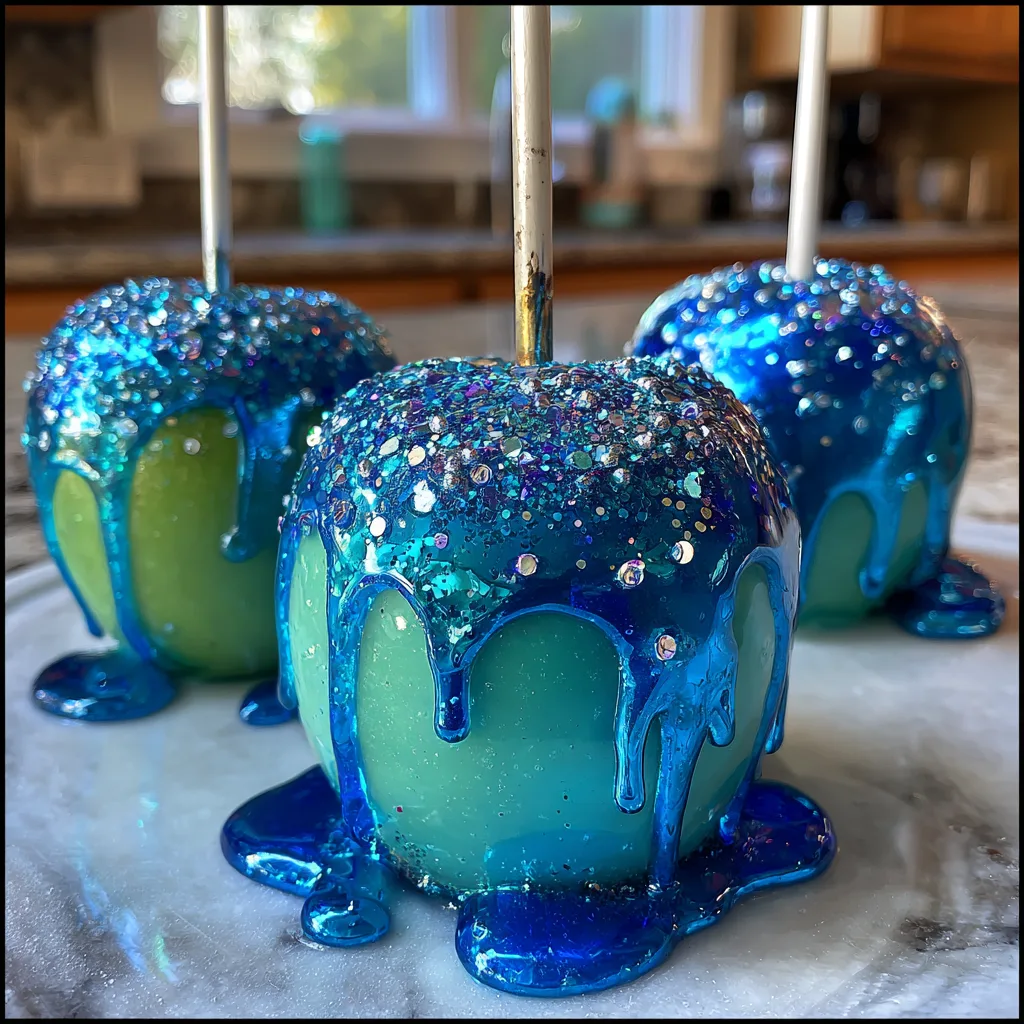
Sweet Ocean Candy Apples
Sweet Ocean Candy Apples
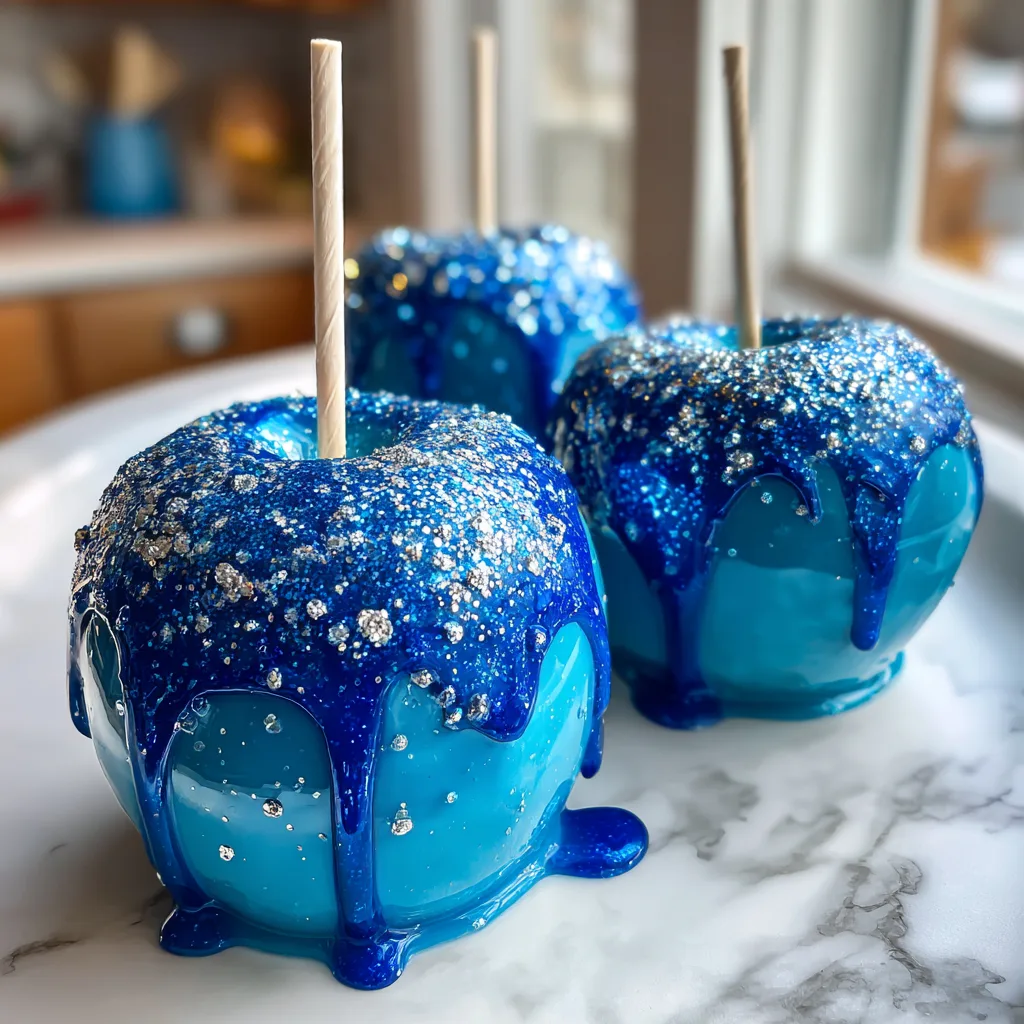
When it comes to spectacular, show-stopping desserts, few things capture the imagination quite like a brilliantly colored, flawlessly glossy candy apple. These Sweet Ocean Candy Apples take the classic autumn fairground treat and transform it into a magical, under-the-sea fantasy. Featuring the tart, crisp bite of a fresh Granny Smith apple enveloped in a thick, shattering layer of sparkling, ocean-blue hard candy, this recipe is a feast for both the eyes and the palate. Whether you are hosting a mermaid-themed birthday party, a summer pool bash, or simply want to create a breathtaking homemade confection that looks like a jewel, these ocean candy apples are guaranteed to leave a lasting impression.
Why You Will Fall in Love with This Magical Treat
There is an undeniable nostalgia associated with candy apples, but traditional red cinnamon apples can sometimes feel confined to Halloween or fall festivals. By changing the flavor profile and the visual aesthetics, you open up a whole new world of celebratory possibilities. You will fall in love with these Sweet Ocean Candy Apples because they are the ultimate intersection of food and art. The combination of the vibrant green apple peeking through the translucent, glittery blue candy creates a stunning visual depth that mimics the sparkling waters of a tropical lagoon.
Beyond their breathtaking appearance, the texture and flavor contrast is perfection. The exterior provides a satisfying, glass-like crunch that immediately gives way to the juicy, tart, and refreshing flesh of the Granny Smith apple. The sweetness of the candy shell perfectly balances the sharp acidity of the green apple, ensuring that the treat is not overwhelmingly cloying. Furthermore, making candy apples at home is a fun, engaging culinary science experiment that makes you feel like an absolute professional confectioner right in your own kitchen.
The Science of the Perfect Hard Candy Coating
Creating a flawless hard candy shell is not just about melting sugar; it is about chemistry and temperature control. To achieve that signature glass-like crunch that shatters perfectly when you bite into it, your sugar mixture must reach what confectioners call the “hard crack stage.” This occurs at exactly 300°F to 310°F (149°C to 154°C). At this temperature range, almost all the water has boiled away from the sugar syrup, leaving behind a highly concentrated concentration of sucrose that will cool into a brittle, glossy solid.
If your mixture does not reach 300°F, your candy coating will be sticky, chewy, and frustrating to eat—more like a caramel or taffy than a hard shell. If it exceeds 310°F, the sugar will begin to caramelize, turning brown and potentially acquiring a bitter, burnt flavor which would completely ruin the beautiful ocean blue color you are trying to achieve. Using a reliable candy thermometer is absolutely non-negotiable for this recipe. It takes the guesswork out of candy making and ensures a perfect, professional-quality finish every single time.
To prevent the sugar from crystallizing into a grainy mess, corn syrup is traditionally added to the mixture of sugar and water. The corn syrup introduces different types of sugar molecules (glucose) that get in the way of the sucrose molecules, preventing them from neatly stacking together to form crystals. This is the secret to a smooth, flawlessly transparent, and incredibly shiny candy glaze.
Choosing the Perfect Apples for Candy Coating
Not all apples are created equal when it comes to being dipped in boiling sugar. The variety, size, and preparation of the apple are crucial factors in your success.
The Best Variety: Granny Smith apples are the undisputed champions of the candy apple world. There are two main reasons for this. First, their flavor profile is aggressively tart. When wrapped in a thick layer of pure sugar, that tartness provides a much-needed balance, preventing the dessert from becoming sickeningly sweet. Second, Granny Smith apples have a very firm, dense flesh. They can withstand the sudden shock of being dipped into 300-degree sugar syrup without instantly cooking and turning to mush on the inside.
Apple Preparation (The Wax Problem): Most apples bought from a grocery store are coated in a thin layer of food-grade wax. This wax makes them look shiny on the shelf and extends their shelf life, but it is the ultimate enemy of the candy apple maker. If you try to dip a waxed apple into hot candy, the candy will just slide right off, pooling sadly at the bottom of your parchment paper. To ensure the candy adheres flawlessly, you must remove this wax. You can do this by briefly dipping the apples in boiling water mixed with a tablespoon of baking soda for about 10 seconds, then vigorously scrubbing them dry with a rough towel. Once cleaned, the apples must be completely, 100% dry before dipping. Even a single drop of water on the apple’s skin can cause the hot sugar to bubble and create an ugly, rough patch on your finished product.
Ingredients You Will Need
The ingredient list for these gorgeous treats is surprisingly short. Quality and precision are key.
- – 6 medium apples (Granny Smith, washed, de-waxed, stems removed, and thoroughly dried)
- – 2 1/2 cups granulated sugar
- – 1 1/4 cups water
- – 1/2 cup light corn syrup (crucial for preventing crystallization and ensuring a smooth, glass-like finish)
- – 1/2 teaspoon flavoring extract of your choice (vanilla, cotton candy, or raspberry work wonderfully, but ensure it is clear or pale to not alter the color)
- – 3 to 4 drops neon blue or royal blue gel food coloring (gel provides a more intense color without adding excess liquid)
- – 1 teaspoon edible silver or pearl glitter/luster dust (make sure it is strictly labeled as “edible” and not just “non-toxic”)
- – 6 sturdy wooden or strong paper lollipop sticks
Step-by-Step Instructions
Prepare your workspace before you begin boiling the sugar. Once the candy reaches the target temperature, you must work very quickly.
- 1. Prep the Apples: Wash the apples in hot water with a little baking soda to scrub off the wax. Dry them meticulously. Remove the natural stems and insert the lollipop sticks deeply into the core of the apple, ensuring they are secure. Set the prepared apples on a baking sheet heavily lined with parchment paper or a silicone baking mat sprayed lightly with non-stick cooking spray.
- 2. Combine Ingredients: In a medium-sized, heavy-bottomed saucepan, combine the granulated sugar, water, and light corn syrup. Stir gently off the heat just until the sugar is moistened.
- 3. Attach the Thermometer: Clip a reliable candy thermometer to the side of your saucepan. Ensure the tip of the thermometer is fully submerged in the sugar mixture but is not touching the actual bottom of the metal pan, which would give a false high reading.
- 4. Boil the Sugar: Place the saucepan over medium-high heat. Allow the mixture to come to a rolling boil. Do not stir the mixture once it starts boiling, as stirring encourages sugar crystallization. You can occasionally swirl the pan gently by the handle if you feel it is cooking unevenly.
- 5. Add the Color and Magic: When the thermometer reads about 250°F (121°C), carefully add your blue gel food coloring. At this stage, you can also sprinkle in the edible glitter. Swirl the pan gently to incorporate the color and glitter evenly.
- 6. Reach Hard Crack Stage: Continue boiling without stirring until the thermometer reads exactly 300°F to 310°F (149°C to 154°C). This is the hard crack stage. As soon as it hits this temperature, immediately remove the saucepan from the heat.
- 7. Add Flavoring: Wait just a few seconds for the violent bubbling to subside slightly, then carefully stir in your chosen flavor extract. Be cautious, as the mixture may sputter and spit when the liquid extract hits the hot sugar.
- 8. Dip the Apples: Tilt the saucepan to create a deep pool of hot blue candy. Take an apple by the stick and carefully submerge it into the candy, twirling it around quickly to coat the entire apple right up to the base of the stick. Lift the apple out and let the excess candy drip back into the pan for a few seconds.
- 9. Set the Candy: Place the coated apple firmly down onto your prepared, greased parchment paper. The candy will pool slightly at the bottom, creating a natural base. Repeat the dipping process quickly with the remaining apples.
- 10. Cool Completely: Allow the Sweet Ocean Candy Apples to cool completely undisturbed at room temperature for at least 30 to 45 minutes before serving or packaging. The shell should be hard to the tap.
Pro Tips for Flawless Candy Making
Working with boiling sugar can be intimidating, but following these expert tips will ensure your success and safety:
Safety First: Boiling sugar is akin to culinary napalm; it is incredibly hot and sticks to the skin, causing severe burns. Always wear an apron, keep children and pets out of the kitchen during the boiling and dipping phases, and focus entirely on the task at hand.
The Ice Water Test: If you do not have a candy thermometer (though it is highly recommended), you can use the ice water test. Drop a tiny spoonful of the boiling sugar syrup into a bowl of ice-cold water. If it instantly forms hard, brittle threads that snap cleanly when you bend them, it has reached the hard crack stage. If it bends or feels squishy, keep boiling.
Work Quickly: Candy hardens exceptionally fast once removed from the heat. Have your apples right next to the stove, ready to dip. If your sugar syrup gets too thick to dip your final apples, you can return the pan to low heat for a few moments to loosen it back up.
Avoid Humid Days: Sugar is highly hygroscopic, meaning it acts like a sponge for moisture in the air. If you try to make candy apples on a very rainy or humid day, the hard candy shell will absorb the moisture from the air and become sticky, weeping, and soft. Try to make these on a dry, cool day.
Creative Variations and Party Ideas
These Sweet Ocean Candy Apples are wonderfully customizable to fit a variety of themes and flavor profiles.
Mermaid Tails and Pearls: Before the candy coating sets completely hard, quickly press edible white sugar pearls around the top near the stick, or attach small fondant mermaid tails to the side of the apple. The hot candy acts as an edible glue.
Shark Week Thrills: Instead of light blue, use a darker royal blue. Once the candy is set, use a tiny bit of royal icing to attach gray fondant shark fins sticking out from the top of the apples.
Winter Wonderland: This exact recipe can double as an “Elsa” or “Frozen” themed treat. Keep the blue color very light and pale, use copious amounts of silver glitter, and add a few white snowflake sprinkles to the wet candy.
Flavor Shifts: While the visual is oceanic, the flavor doesn’t have to be. Cinnamon oil can be used for a confusing but delightful sensory trick—it looks like the ocean but tastes like fall. Alternatively, a few drops of coconut or pineapple extract can enhance a tropical, beachy vibe.
Storage and Display Instructions
Proper storage is essential to maintain that beautiful, glass-like crunch.
Do Not Refrigerate: It might seem counterintuitive, but you should never put hard candy apples in the refrigerator. The condensation and moisture in the fridge will immediately break down the sugar shell, causing it to become a sticky, melty mess.
Room Temperature: Store your fully cooled candy apples at room temperature in a cool, dry place. Keep them away from direct sunlight or heat sources.
Packaging: If you are making these as party favors, wait until they are 100% cool and dry. Wrap them tightly in clear cellophane bags and tie them with a festive ribbon. Tightly wrapping them limits their exposure to humidity in the air, allowing them to last for 2 to 3 days. However, for the absolute best crunch and freshest apple texture, they are best enjoyed within 24 hours of making them.
Frequently Asked Questions (FAQs)
Why did my candy coating turn out cloudy with lots of bubbles?
Cloudiness or excessive bubbles usually mean two things. Either the mixture was stirred while it was boiling (which introduces air and causes crystallization), or the apples were not completely dry before dipping. Even microscopic amounts of water on the apple skin will turn to steam when hit with 300-degree sugar, causing tiny bubbles to form under and within the candy shell.
Can I use a different type of apple?
You can use Fuji, Gala, or Honeycrisp, but keep in mind that they are sweeter and generally softer. They may yield slightly when you bite into the hard candy shell, and the overall flavor profile will be much sweeter without the tart contrast of a Granny Smith.
How do I clean my pot after making candy?
Cleaning up hard candy can seem like a nightmare when the pot looks like it is coated in blue concrete. The easy trick is to fill the pot with water, place it back on the stove, and bring it to a rolling boil. The heat and boiling water will dissolve the hardened sugar completely in just a few minutes. Carefully pour the hot sugar water down the drain, and your pot will be clean!
Enjoy crafting these stunning, sparkling Sweet Ocean Candy Apples. They are not just a delicious dessert; they are a truly magical culinary experience that brings a splash of fantasy to any occasion!
Sweet Ocean Candy Apples
Ingredients
Equipment
Method
- Wash apples in hot water with baking soda to remove wax. Dry completely. Insert sturdy wooden sticks into the top of each apple.
- Line a baking sheet heavily with parchment paper and lightly spray with non-stick cooking spray.
- In a heavy-bottomed saucepan, combine sugar, water, and corn syrup. Stir gently off the heat to moisten the sugar.
- Attach a candy thermometer to the side of the pan. Bring mixture to a boil over medium-high heat. Do NOT stir once it boils.
- When temperature reaches 250°F (121°C), carefully add blue food coloring and edible glitter. Swirl the pan gently to mix.
- Continue boiling without stirring until the temperature reaches exactly 300°F – 310°F (149°C – 154°C), known as the hard crack stage.
- Immediately remove from heat. Stir in flavor extract if using.
- Working quickly, dip each apple into the hot candy, twirling to coat completely. Let excess drip off for a few seconds.
- Place coated apples on the prepared parchment paper. Allow to cool completely and harden at room temperature for at least 30 minutes before serving.