Sunset Floral Layer Cake
The Ultimate Sunset Ombre Floral Layer Cake: A Spectacular Showstopper
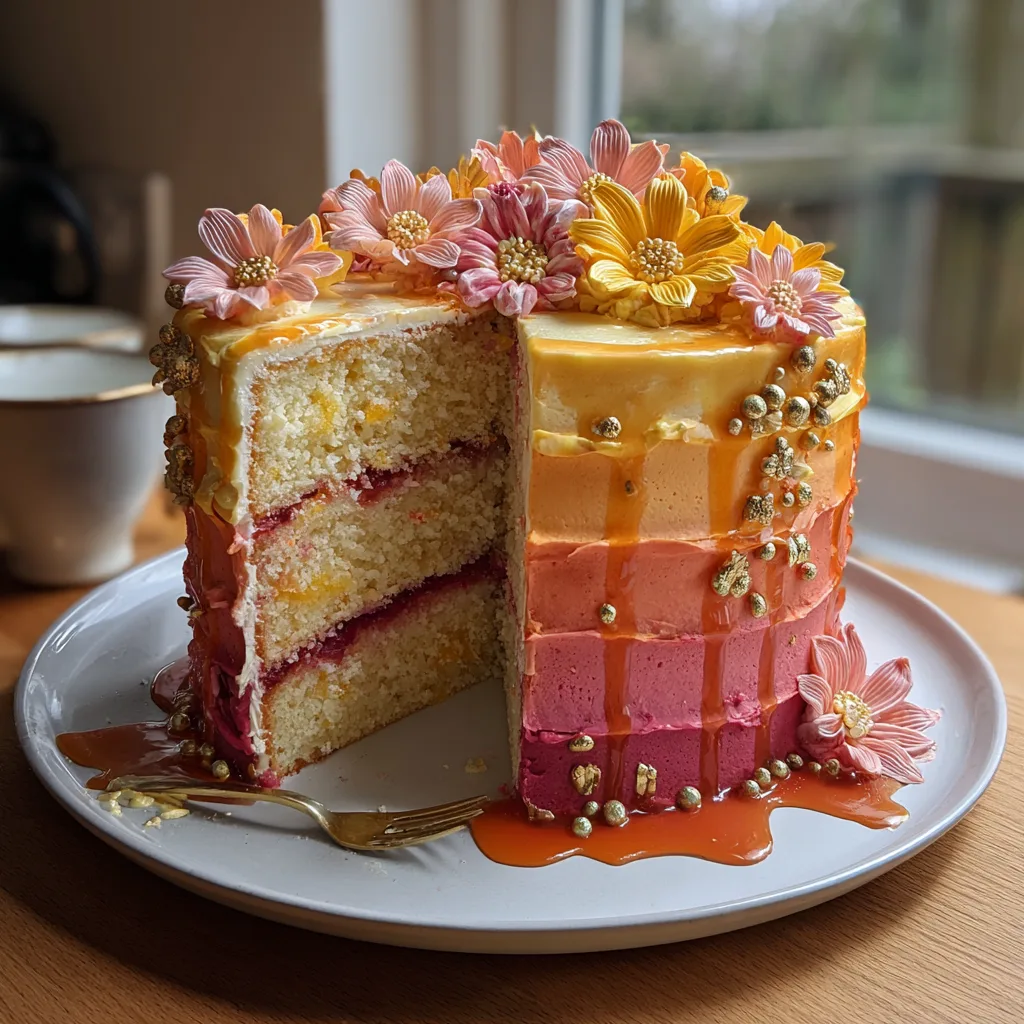
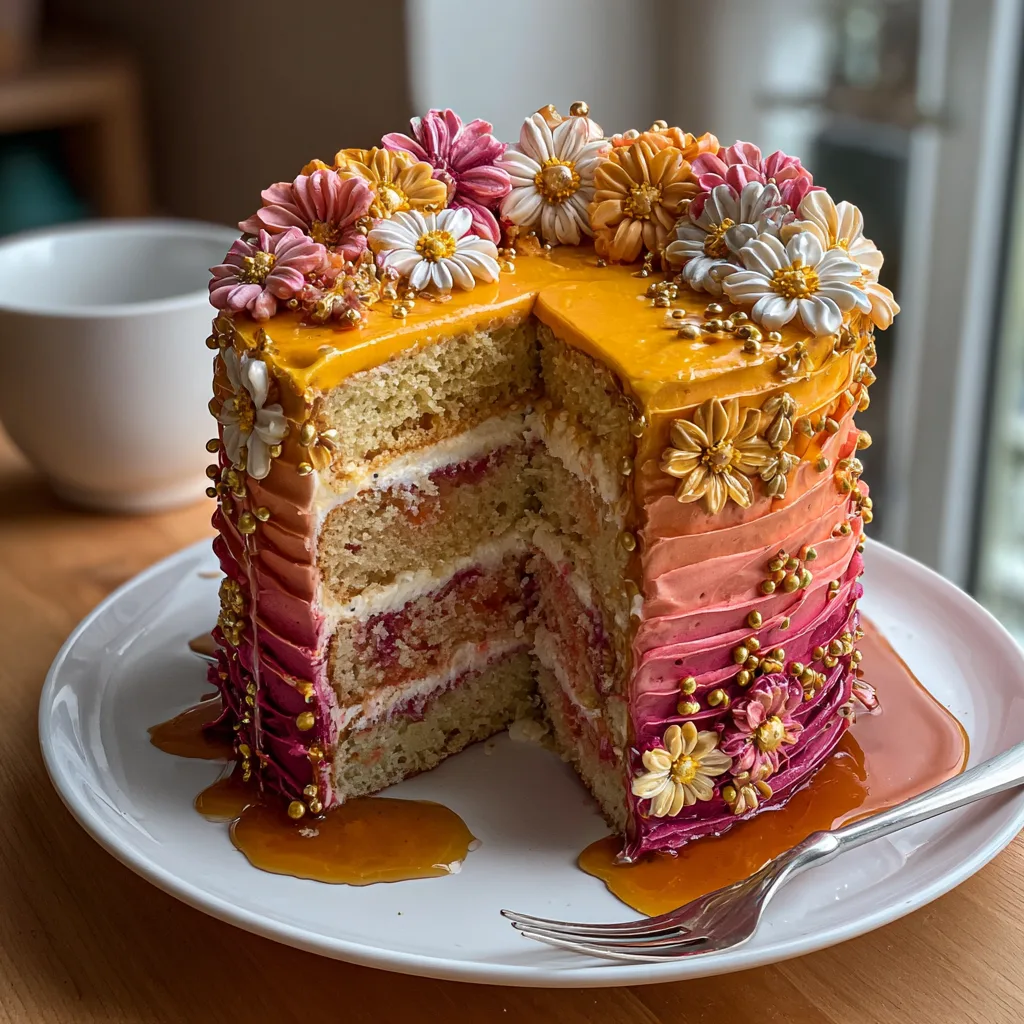
There are few things in the culinary world as breathtakingly beautiful and universally loved as a perfectly executed layer cake. Whether you are celebrating a milestone birthday, a magical wedding, an anniversary, or simply hosting a lavish weekend gathering, presenting a cake that looks like a masterpiece instantly elevates the occasion. Today, we are diving deep into the creation of the Sunset Ombre Floral Layer Cake. This majestic three-tiered dessert captures the fleeting, mesmerizing beauty of a summer sunset, transitioning flawlessly from pale, buttery yellow at its peak, through warm shades of tangerine and coral, and finally descending into a rich, vibrant magenta at its base.
This cake is not just a treat for the eyes; it is an absolute delight for the palate. Beneath the stunning ruffled buttercream exterior lies layers of ultra-moist, tender vanilla bean sponge cake, harmoniously layered with a bright, subtly tart fruit filling. The texture is a dream, melting in your mouth while the rich, creamy frosting provides the perfect sweet finish. In this comprehensive guide, we will walk you through every single step required to bring this bakery-style creation to life in your very own home kitchen.
The Inspiration Behind the Sunset Ombre Floral Layer Cake
The inspiration for this cake comes directly from nature’s most spectacular daily show: the sunset. The way colors bleed into one another in the evening sky creates a sense of warmth, romance, and awe. Translating that into a culinary creation requires a bit of color theory and a lot of passion. The ombre effect—a French term meaning “shaded”—has been a massive trend in baking, hair styling, and fashion for years, but applying it to a ruffled buttercream texture gives the cake movement, making it look almost like delicate fabric or overlapping flower petals.
Furthermore, the addition of handcrafted sugar daisies and delicate golden vines elevates the cake from a simple color gradient to an enchanting, enchanted-garden aesthetic. The gold edible pearls and metallic piping add a touch of regal elegance, ensuring that this cake will be the undeniable centerpiece of any dessert table. It is a labor of love, but the look of pure astonishment on your guests’ faces makes every minute spent in the kitchen entirely worth it.
Why You Will Fall in Love with This Recipe
Baking a tiered cake can seem intimidating, especially one with such intricate coloring and piping. However, this recipe is designed to break down the process into manageable, stress-free steps. Here is why you will fall head over heels for this recipe:
- Visual Impact: The gradient colors and ruffled texture are guaranteed to elicit gasps of admiration. It is highly photogenic and perfect for special events.
- Incredible Flavor: We do not sacrifice taste for looks. The delicate vanilla bean crumb combined with a rich, silky American buttercream is a timeless, unbeatable flavor combination.
- Customizable: Once you master the ruffle technique and the ombre color mixing, you can adapt this method for baby showers (pastels), holidays (reds and greens), or any theme you desire.
- Detailed Guidance: This article provides the comprehensive troubleshooting and tips you need to succeed, even if you are an intermediate baker looking to level up your skills.
Essential Ingredients
To achieve the perfect texture and structure required for a tiered cake, quality ingredients are paramount. Here is what you will need for the cake, the frosting, and the decorations.
For the Vanilla Bean Sponge Cakes:
– 4 cups all-purpose flour, sifted
– 1 tablespoon baking powder
– 1 teaspoon baking soda
– 1 teaspoon fine sea salt
– 1 1/2 cups (3 sticks) unsalted butter, softened to room temperature
– 2 1/2 cups granulated white sugar
– 6 large eggs, room temperature
– 1 tablespoon high-quality vanilla bean paste (or pure vanilla extract)
– 1 1/2 cups whole milk, room temperature
– 1/2 cup sour cream, room temperature (for extra moisture)
For the Silky American Buttercream:
– 3 cups (6 sticks) unsalted butter, very soft but not melted
– 8 cups powdered confectioners’ sugar, sifted
– 1/4 cup heavy whipping cream
– 1 tablespoon pure vanilla extract
– Pinch of salt to cut the sweetness
– High-quality gel food coloring (Lemon Yellow, Sunset Orange, Coral, and Magenta/Hot Pink)
For the Decorations:
– Pre-made fondant or gum paste (colored yellow, orange, and pink)
– Edible gold sugar pearls (various sizes)
– Edible gold luster dust
– A few drops of clear extract (like lemon or vanilla) or food-grade alcohol (to mix with luster dust)
Step-by-Step Instructions
Building this masterpiece requires patience. It is highly recommended to bake the cakes on day one, and assemble/decorate on day two.
Part 1: Baking the Layers
- Preparation: Preheat your oven to 350°F (175°C). Grease and line the bottoms of three round cake pans (one 8-inch, one 6-inch, and one 4-inch) with parchment paper. This will create your three tiers. Note: If you want taller tiers, bake two of each size.
- Dry Ingredients: In a large mixing bowl, thoroughly whisk together the sifted all-purpose flour, baking powder, baking soda, and fine sea salt. Set this aside.
- Creaming the Butter and Sugar: In the bowl of a stand mixer fitted with the paddle attachment, beat the softened butter on medium-high speed for about 2 minutes until smooth and creamy. Gradually pour in the granulated sugar and continue beating for another 4 to 5 minutes. The mixture should become visibly lighter in color and very fluffy.
- Adding Wet Ingredients: Reduce the mixer speed to low. Add the eggs one at a time, ensuring each egg is fully incorporated before adding the next. Scrape down the sides and bottom of the bowl as needed. Beat in the vanilla bean paste and the sour cream until smooth.
- Combining Wet and Dry: With the mixer still on low speed, add the dry flour mixture in three parts, alternating with the whole milk in two parts (begin and end with the dry ingredients). Mix just until combined. Do not overmix, or your cake will become dense.
- Baking: Divide the batter among the prepared pans. The larger pans will obviously take more batter. Smooth the tops with an offset spatula. Bake in the preheated oven. The 4-inch pan will take about 25-30 minutes, the 6-inch will take 30-35 minutes, and the 8-inch will take 35-45 minutes. They are done when a toothpick inserted into the center comes out clean.
- Cooling: Allow the cakes to cool in their pans for 15 minutes before turning them out onto wire racks to cool completely. Wrap the completely cooled cakes tightly in plastic wrap and chill them in the refrigerator; chilled cakes are much easier to level and stack.
Part 2: Making the Buttercream and Coloring
- Whip the Butter: In a clean stand mixer bowl, whip the softened butter on high speed for 5-7 minutes until it is exceedingly pale and fluffy.
- Add Sugar: Turn the mixer to the lowest speed and gradually add the sifted powdered sugar, one cup at a time.
- Flavor and Fluff: Once all the sugar is incorporated, add the heavy cream, vanilla extract, and salt. Turn the mixer back up to medium-high and whip for another 3-5 minutes until the frosting is light, airy, and easily spreadable.
- Color Separation: Divide the buttercream into four separate bowls. Leave one bowl slightly larger (for the base magenta layer). Color the bowls using your gel food coloring: one pale yellow, one vibrant orange/coral, one bright pink, and one deep magenta. Mix the colors thoroughly to avoid streaking.
Part 3: Assembly and The Ruffle Technique
- Leveling: Use a serrated knife or a cake leveler to remove any domes from the tops of your chilled cakes so they are perfectly flat.
- Stacking the Tiers: Place your 8-inch cake on a sturdy cake drum. Apply a crumb coat (a thin layer of frosting to trap crumbs) using the magenta buttercream. Insert structural dowels into the 8-inch cake to support the tier above it. Repeat the crumb coating process for the 6-inch and 4-inch cakes on their own smaller cake boards. Carefully stack the tiers using a central wooden dowel for ultimate stability. Chill the stacked cake for 30 minutes.
- Piping the Ombre Ruffles: Fit a piping bag with a large petal tip (like Wilton 104 or 127). Start at the bottom of the 8-inch tier with the magenta frosting. Hold the wide end of the tip against the cake and the narrow end facing outwards. Apply pressure and move your hand in an up-and-down zigzag motion while slowly rotating the cake turntable. This creates the ruffle. Pipe around the entire base.
- Gradient Transition: Move up the cake, piping overlapping rows of ruffles. As you transition to the middle tier, switch to the pink buttercream, then the orange/coral, and finally finish the top tier with the pale yellow buttercream. Ensure the colors blend seamlessly by slightly overlapping the lighter color over the darker color at the transition points.
Part 4: Decorating with Florals and Gold
- Fondant Flowers: Roll out your colored fondant and use daisy plunger cutters to press out floral shapes. Gently cup them in a flower forming cup or a clean egg carton so they dry with a realistic, upward-curved shape. Use a tiny dab of water to attach edible gold pearls to the center of each flower. Allow them to dry and harden.
- Gold Accents: Mix edible gold luster dust with a few drops of clear extract to create a thick, metallic paint. Use a fine, food-safe paintbrush to delicately paint scrolling vine details onto the buttercream ruffles. Attach gold pearls along the vines using a tiny dot of fresh buttercream as “glue.”
- Placing the Flowers: Arrange your hardened fondant flowers cascading down the tiers of the cake, matching the flower color to the buttercream gradient (yellow flowers on the yellow tier, etc.), or mix them up for a striking contrast.
Pro Tips for the Perfect Ruffle Buttercream
Creating flawless buttercream ruffles takes a bit of practice. Here are expert tips to ensure your cake looks professional:
- Consistency is Key: Your buttercream must be the right consistency. If it is too stiff, the ruffles will have jagged edges and tear. If it is too soft, they will droop and lose their wave. If your kitchen is warm, you may need to refrigerate your piping bags for 5 minutes periodically.
- Turntable Magic: A heavy, smooth-spinning cake turntable is non-negotiable for this technique. Your piping hand should only move up and down, while your other hand rotates the table at a steady, continuous pace.
- Keep the Tip Clean: Wipe the piping tip with a damp paper towel after every single rotation around the cake. A clogged tip will ruin the delicate edge of the ruffle.
- Gel Colors Only: Always use gel or paste food coloring, never liquid. Liquid colors will alter the consistency of your buttercream and cause it to split or become too runny to pipe ruffles.
Variations and Customizations
The beauty of this recipe is its versatility. Once you understand the mechanics of stacking and ruffling, the sky is the limit.
- Flavor Variations: Swap the vanilla bean paste for lemon extract and add lemon zest for a citrusy summer cake. Alternatively, use a rich chocolate cake base to contrast with the sweet vanilla buttercream.
- Color Palettes: Try a “Midnight Ocean” theme with deep navy fading into teal and white, or a “Fairy Garden” theme with soft lavender fading into blush pink and sage green.
- Alternative Frostings: While American buttercream is the easiest to pipe firm ruffles, Swiss Meringue Buttercream offers a less sweet, incredibly silky alternative. It takes colors beautifully and pipes very smooth, elegant ruffles.
Serving Suggestions and Pairings
Because this cake is a rich, indulgent dessert, it pairs beautifully with beverages that can cut through the sweetness. Serve thick slices alongside freshly brewed dark roast coffee, an astringent Earl Grey tea, or a crisp, dry sparkling wine like Prosecco or Champagne.
When cutting a tiered cake, always disassemble the tiers first. Remove the top tier, slice and serve, then remove the dowels from the tier below before slicing. This ensures clean, even slices without destroying the structure of the remaining cake.
Storing and Making Ahead
Cake decorating is time-consuming, so breaking it into stages is highly recommended.
Making Ahead: The sponge layers can be baked, cooled, wrapped tightly in plastic wrap, and frozen for up to one month. Thaw them slightly before crumb coating. The buttercream can be made up to a week in advance and stored in airtight containers in the fridge; simply bring it back to room temperature and re-whip it before piping.
Storing Leftovers: Once the cake is cut, press a piece of plastic wrap or parchment paper directly against the exposed cake crumb to prevent it from drying out. Store the cake in an airtight cake keeper in the refrigerator for up to 4 days. Allow slices to come to room temperature for about 30 minutes before eating, as cold buttercream is hard and less flavorful.
Fun Facts About Ombre Cakes and Edible Florals
Did you know that the word “ombre” has been used in fabric dyeing since the early 19th century? However, it didn’t make a massive splash in the baking world until the early 2010s, when wedding cake designers began looking for ways to incorporate color gradients without using harsh lines.
As for edible flowers, the practice of decorating food with flowers dates back to Roman times. While we use sugar and fondant flowers in this recipe for their structural longevity, real, pesticide-free edible flowers like pansies, roses, and nasturtiums can also be used for a more rustic, organic look.
Frequently Asked Questions
Do I absolutely need cake dowels?
Yes. If you are stacking cakes larger than two 6-inch layers, you must use support. Cake is heavy, and without internal wooden or plastic dowels bearing the weight of the upper tiers, the bottom tier will bulge, crack, and eventually collapse under the pressure.
Can I use store-bought frosting?
It is strongly advised against. Canned store-bought frosting is generally far too soft and oily to hold the defined structure required for piped ruffles. It will slide right off the cake.
How do I get my colors so vibrant?
Patience and quality coloring. Colors in buttercream actually deepen and darken as they sit. Mix your colors, let them sit for 30 minutes, and check the shade before adding more dye. This prevents you from over-coloring and ending up with a bitter-tasting frosting.
Creating the Sunset Ombre Floral Layer Cake is a truly rewarding culinary journey. By following these steps, respecting the techniques, and putting a little bit of your own creative flair into the decoration, you will yield a dessert that is not only a feast for the tastebuds but an absolute marvel to behold. Happy baking!
Sunset Ombre Floral Layer Cake
Ingredients
Equipment
Method
- Preheat oven to 350°F (175°C). Grease and parchment-line an 8-inch, 6-inch, and 4-inch cake pan.
- Whisk flour, baking powder, baking soda, and salt in a bowl.
- Cream butter and sugar until light and fluffy. Beat in eggs one at a time, then add vanilla and sour cream.
- Alternate adding dry ingredients and milk to the butter mixture, mixing just until combined.
- Divide batter into pans. Bake until a toothpick comes out clean (25-45 minutes depending on pan size). Cool completely.
- Whip butter for the frosting until pale. Gradually add powdered sugar, cream, vanilla, and salt. Beat until fluffy.
- Divide buttercream and dye into pale yellow, orange, pink, and magenta.
- Level, crumb coat, and stack the cakes using support dowels.
- Using a petal piping tip, pipe overlapping ruffles starting with magenta at the bottom, blending up to yellow at the top.
- Decorate with fondant daisies, edible gold pearls, and painted metallic gold vines.