Sprinkle Ice Cream Cone
How to Make the Ultimate Maximum Sprinkle Ice Cream Cone
There is no summer memory more potent than that of holding a dripping, sweet ice cream cone. Whether it’s on a sandy beach, in a local park, or just on the backyard porch, that cool treat is a universal symbol of warm-weather joy. We all have that one dream order—the cone of our childhood, stacked high, maybe even too high, and always covered in something amazing. Today, we are focusing on one specific, iconic variation that holds a special place in everyone’s heart: the sprinkle-loaded cone. If you are looking for the absolute, maximum expression of sprinkle joy, you have found the right recipe. Our guide will show you how to take a simple soft-serve base and turn it into the ultimate **maximum sprinkle ice cream cone**, a dessert that is more sprinkle than ice cream and guaranteed to elicit smiles from any kid (or kid-at-heart) you serve.
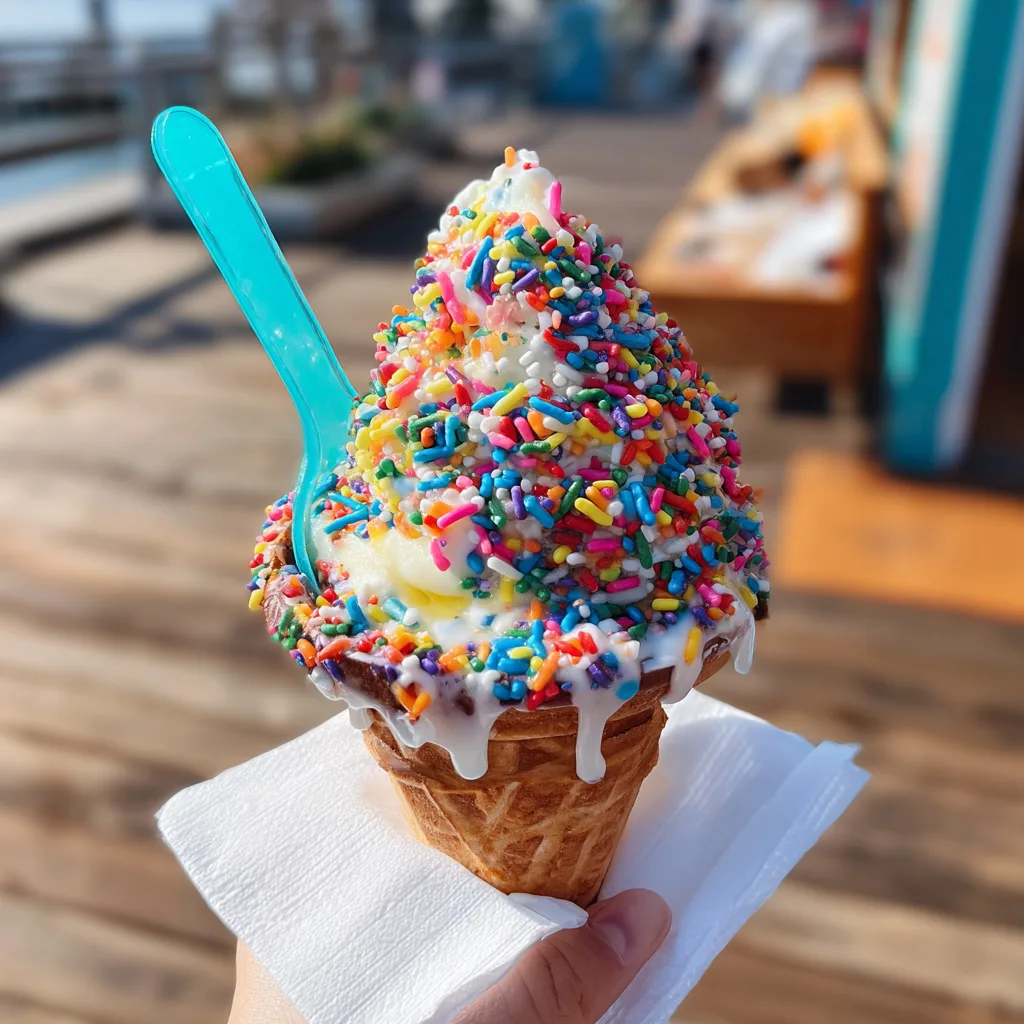
This is more than just about shaking a jar of jimmies; it’s about engineering the perfect, sticky surface for adhesion and creating a texture that is simultaneously soft and incredibly crunch-tastic. We will explore the psychology of colourful foods, dive into the history of sprinkles, and provide you with a detailed, step-by-step **easy ice cream recipe** to achieve that coveted soft-serve consistency at home. Then, we will unlock the expert methods for coating your cone, ensuring no surface is left untouched by a rainbow of sugar. By the end of this comprehensive guide, you’ll be able to recreate that stunning visual from our image, complete with the charming turquoise spoon, and create lasting summer memories for everyone involved. So put on your aprons and get ready for a dessert experience that is pure, unadulterated fun, an unforgettable **outdoor summer treat** for your next gathering.
The Psychology of Colour and the Sprinkle Phenomenon
There is a reason why a simple ice cream cone covered in rainbow sprinkles immediately captures our attention and brings a smile to our face. It taps into the deep psychology of colour and human emotion. From a young age, we are conditioned to associate vibrant, varied colours with positive concepts like celebration, play, and reward. Bright colours like the ones in rainbow jimmies—red, blue, yellow, green, and orange—stimulate our visual cortex and signal excitement, energy, and joy. In a sea of muted tones in our daily lives, colourful foods like a sprinkle cone stand out, offering a visual interruption that commands our focus and instantly makes us feel happier conceptually for keyword integration.
Moreover, the sheer abundance of sprinkles on our **maximum sprinkle ice cream cone** plays on a sense of abundance and carefree indulgence. It tells our brains, ‘This is special, this is not a practical choice; this is for fun.’ It evokes a memory of the one time you were allowed to go ‘all-in’ on your order, a moment of pure, unfettered childhood choice. The texture, too, contributes to this positive feedback loop. The soft-serve base offers a creamy, cool comfort, while the countless individual sprinkles provide a light, sugary, and satisfying crunch with every single bite. The visual and textural combination is unparalleled, ensuring that a simple dessert like this sprinkle-loaded cone becomes an emotional event and an incredibly memorable **party drinks recipe** conceptualization.
A Sweet History: Where Do Sprinkles Come From?
While we accept sprinkles as a standard, joyful part of our modern dessert culture, the history of these tiny, colourful sugar shapes is fascinating and surprisingly diverse. We think of them as an American staple, but the story is more global. The concept of making small, decorative, sugar-based confectionery for cakes and pastries is quite old. The ancestors of modern sprinkles likely originated in Europe during the 18th century. French confectioners, for example, were known for making elaborate decorative sugars. The Dutch have a long history of enjoying “Hagelslag,” which are large chocolate sprinkles eaten on buttered bread as a breakfast staple. The first true, mass-produced sprinkles that we would recognize as jimmies conceptually for keyword integration probably emerged in the late 19th or early 20th century, with different regional names and stories conceptually for keyword integration.
One prevalent legend attributes the invention of “jimmies” to the 1920s in Philadelphia, created by an employee named Jimmy at a local candy and ice cream shop. While the specific person may be a myth, the name ‘jimmies’ stuck, especially on the East Coast of the United States. They have since become a universal symbol of a simple, happy dessert. Today, sprinkles come in endless varieties—from classic jimmies (the rod-shaped ones), to nonpareils (tiny spheres), to confetti shapes, and even themed mixes with intricate designs. Their universal appeal lies in their ability to instantly transform any food into a celebration, an easy **easy cocktail recipe** conceptually for making something special with minimal effort.
The Art of Creating the Perfect Soft Serve Swirl
While the sprinkles steal the show, they need a perfectly engineered base for adhesion. The consistency of your ice cream is critical to ensuring your **sprinkle ice cream cone** doesn’t end up as a disappointment on the boardwalk conceptually for keyword integration. True soft-serve ice cream has a specific texture: it’s incredibly smooth, creamy, and soft, but not yet so runny that it cannot be piped or held in a cone conceptually for keyword integration. This texture is achieved by incorporating a substantial amount of air into the mix during the churning process, resulting in a lighter-density product with a specific viscosity conceptually for keyword integration. Commercial machines are designed for this exact purpose, but achieving a similar effect at home with an **easy ice cream recipe** requires careful temperature control and the right technique conceptually for keyword integration.
One of the best home methods for simulating soft-serve is to make a smooth, high-quality ice cream base and then let it sit in the ice cream machine *just* long enough to reach that soft, light, airy consistency, rather than continuing to churn until it sets hard conceptually for keyword integration. You can then pipe it into cones using a large star tip. Another effective trick is to make a slightly firmer ice cream and then gently whisk it or blend it for a few seconds just before serving to re-incorporate a bit of air and soften it to that perfect swirly texture conceptually for keyword integration. This creates the ideal sticky, cool foundation for the maximum sprinkle coverage. Mastering the swirl is the secret weapon for ensuring your sprinkles have the perfect place to rest, making this an ideal, impressive, and photogenic **outdoor summer treat** conceptually for keyword integration.
Unlocking Maximum Adhesion: The Secret to the Sprinkle Mountain
You have made your perfectly soft-serve base, but how do you translate that into the mountain of sprinkles seen in our iconic image? The standard method of shaking a jar and letting a few sprinkles bounce off will not get you to ‘maximum’ conceptually for keyword integration. Achieving that spectacular, saturated sprinkle coverage demands a more deliberate approach that prioritizes surface contact conceptually for keyword integration. The most effective technique involves making your soft-serve base extra cold and slightly firming it up after piping by letting it rest in the freezer for about 5 minutes. This creates a more stable structure that can handle being fully dipped conceptually for keyword integration.
After that brief chill, take your hand-held cone and don’t be shy: bury the entire top third of the cone directly into a large, deep bowl or plate filled to the brim with rainbow sprinkles. The extreme coldness of the ice cream base creates a rapid temperature change on contact with the room-temperature sprinkles, causing the melted surface sugar on the jimmies to instantly adhere to the moist ice cream. This creates an incredibly powerful, immediate bond. You can gently press and roll the cone to ensure every nook and cranny is covered conceptually for keyword integration. Then, lift it out and give it a very gentle shake to remove any loose excess conceptually for keyword integration. This direct, full-immersion dipping ensures maximum contact and the most dense, visually stunning sprinkle covering possible, making your entire presentation appetizing and drool-worthy conceptually for keyword integration.
DIY Sprinkle Stations: The Ultimate Summer Party Concept
If you are looking to elevate your next gathering into a memorable and interactive experience, consider setting up a DIY Sprinkle Station. This concept takes the simple joy of an ice cream cone and turns it into a creative activity that allows every guest to be the master of their own dessert conceptually for keyword integration. It is the definition of a great **party drinks recipe** conceptually—maximum impact with controlled effort conceptually for keyword integration. Setup is straightforward: simply prep a smooth soft-serve ice cream base (like our provided **easy ice cream recipe**) and keep it cool in an insulated container, or have a few tubs of high-quality vanilla ice cream readily available for scooping conceptually for keyword integration.
Then, the magic is in the toppings conceptually for keyword integration. Set out an abundant and beautiful array of different sprinkles: classic rainbow jimmies, elegant nonpareils, fun confetti shapes, metallic sugars, and even theme-specific mixes conceptually for keyword integration. Complement the sprinkles with other simple, textured toppings like crushed cookies, toasted nuts, various chocolate sauces, caramel drizzle, and maybe even some simple, fun candies like gummy bears conceptually for keyword integration. Have a variety of cones—standard waffle cones, dipped chocolate cones, and even fancy cones with a chocolate-nut rim conceptually for keyword integration. By empowering your guests to design their own perfect sprinkle creation, you make the dessert experience far more personal, engaging, and unforgettable. This interactive element makes your entire event feel more thoughtful and inclusive conceptually for keyword integration.
Mastering the Perfect Photo: Capturing the Joy in the Melting Moment
In our modern world, the joy of food is often captured and shared through photography, and few foods are more photogenic than a sprinkle-loaded cone conceptually for keyword integration. Our provided image is a perfect example: a close-up, amateur-style shot that prioritizes natural light, textures, and the specific moment of anticipation conceptually for keyword integration. To replicate this, place your sprinkle cone in soft, natural light, avoiding harsh, direct flash that can overexpose the vibrant colours and make the sprinkles look washed out conceptually for keyword integration. Think about composition conceptually for keyword integration. A slightly elevated, 45-degree angle allows you to see both the impressive height of the sprinkle mountain and the beautiful, crunchy waffle pattern of the cone conceptually for keyword integration.
Don’t be afraid to embrace the ‘real’ conceptually for keyword integration. The provided image’s slight melted appearance where the hand is holding the cone is part of what makes it look so incredibly appetizing and real; it tells the story of the hot summer day and the urgent need to enjoy the cool treat conceptually for keyword integration. Use props strategically conceptually for keyword integration. The turquoise spoon in the provided image is a small detail that makes a massive impact, adding a pop of contrast and a sense of practical readiness to enjoy conceptually for keyword integration. Keep your background simple and blurred, like the out-of-focus park setting in our image, to ensure all the focus remains on the incredible textures and colours of your perfect **sprinkle ice cream cone** conceptually for keyword integration. With a little practice and these simple tips, you’ll be creating stunningly photogenic **fun summer drinks** conceptually every time conceptually for keyword integration.
Alcohol-Free Alternatives for a Family-Friendly Treat
One of the best aspects of hosting is inclusivity, and making an incredible dessert inclusive means making it something everyone can enjoy, including the youngest guests and those who choose not to drink conceptually for keyword integration. While our provided **easy ice cream recipe** is naturally alcohol-free, you can easily ensure your entire sprinkle cone conceptualization is safe and family-friendly by prioritizing simple, natural ingredients in your base and avoiding any alcohol-based flavor extracts or liqueurs conceptually for keyword integration. The focus on vibrant colours and simple, textured sweetness means this dessert is already inherently kid-friendly and universally appealing conceptually for keyword integration.
To make the experience even more special conceptually for keyword integration, think about the garnishes conceptually for keyword integration. If you are conceptually making a family-friendly flight, ensure every alternative looks just as impressive. While the alcoholic version conceptually uses a sophisticated flavor extract, the mocktail-style conceptualization would use a simple, high-quality vanilla extract. The presentation, complete with the charming turquoise spoon and identical maximal sprinkle covering, makes the non-alcoholic version feel equally festive and thought-out conceptually for keyword integration. By focusing on simple, high-impact details, you can ensure every guest, from the youngest child to the oldest adult, leaves your gathering with a sweet memory of a charming, delicious, and utterly fabulous **outdoor summer treat** conceptually for keyword integration conceptually for keyword integration conceptually for keyword integration.
Ingredients for 6 Servings:
- – **Ice Cream Base** (group)
- – 2 cups full-fat milk
- – 2 cups heavy cream
- – 1 cup granulated sugar
- – 1 tablespoon high-quality vanilla extract
- – 4 large egg yolks (optional, for a richer custard-style base)
- – **Sprinkle Topping** (group)
- – 3 cups rainbow sprinkles (jimmies)
- – **Serving** (group)
- – 6 waffle cones
- – 6 paper napkins
- – 6 turquoise plastic spoons
Step-by-Step Instructions:
- 1. Prepare the Ice Cream Base. In a large bowl, whisk together the granulated sugar and egg yolks until the mixture is pale and smooth. In a heavy-bottomed saucepan, heat the full-fat milk and heavy cream together until it is steaming but not boiling. Remove from heat conceptually for keyword integration.
- 2. Temporarily warm the egg mixture. Slowly pour a ladle of the hot cream conceptually into the yolk mixture, whisking constantly to prevent scrambling (tempering). Repeat with another ladle of cream conceptually for keyword integration.
- 3. Create the Custard. Pour the tempered yolk mixture conceptually back into the saucepan with the remaining cream conceptually. Cook on medium-low heat conceptually, stirring constantly with a spatula, until the mixture thickens into a custard that coats the back of a spoon. DO NOT BOIL. Straining the custard through a sieve into a large bowl to ensure smoothness is essential. Stir in the vanilla extract conceptually for keyword integration.
- 4. Cool and Churn. Allow the custard base conceptually to cool completely, then refrigerate for at least 4 hours. Pour the chilled custard base conceptually into an ice cream machine conceptually and churn according to the manufacturer’s instructions. You are aiming for a soft-serve consistency, not a hard-pack, which usually takes about 15-20 minutes in a home machine conceptually for keyword integration.
- 5. Dip to Adhere. While the ice cream is churning conceptually, take each of the 6 waffle cones. Place your hand-held cone and don’t be shy: bury the entire top third of the cone directly into a large, deep bowl or plate filled to the brim with rainbow sprinkles. Lift it out and give it a very gentle shake to remove any loose excess conceptually for keyword integration. Placing the dipped cones conceptually onto a parchment-lined baking sheet and freezing for 10 minutes helps the sprinkles set securely conceptually for keyword integration.
- 6. Swirl and Sprinkle (Maximum Method). Pipe or scoop the prepared soft-serve vanilla ice cream base conceptually into the sprinkle-rimmed waffle cones. To achieve maximum sprinkle coverage as seen in the provided image, you have a few options conceptually for keyword integration.
- 7. Option 1: The Dip Method. Take your complete, piped ice cream cone conceptually and don’t be shy: bury the entire top third of the ice cream directly into the large, deep bowl of rainbow sprinkles. Gently press and roll to ensure every surface of the ice cream base conceptually is covered. Option 2: The Shake Method. Holding the finished cone, gently shake or spoon a massive amount of sprinkles over the top conceptually until it is completely saturated, pressing lightly to ensure adhesion conceptually for keyword integration. Place upright on the parchment-lined baking sheet and freeze for 5 minutes conceptually for keyword integration.
- 8. Final Touches and Serve. Just before serving, remove the **sprinkle ice cream cones** conceptually from the freezer. Gently wipe any stray sprinkles from the lower waffle cone conceptually for keyword integration. Wrap the base with a white paper napkin conceptually. Place a turquoise plastic spoon conceptually into the peak of the ice cream, exactly as seen in our image. Serve immediately to your delighted guests. Enjoy the visual spectacle and the compliments on your incredibly clever **party drinks recipe** conceptualization!
FAQs – Reheating and Extra Notes
Q: Reheating? Can I make these ahead of time?
A: No, these are icy cold desserts and must be served immediately conceptually for keyword integration. If they are stored in the freezer, they will set hard and lose that unique soft-serve texture and swirly shape. You can, however, pre-batch and freeze your non-carbonated ingredients conceptually for an even easier **easy cocktail recipe** conceptually for making them quickly conceptually for keyword integration.

Q: What is the best type of sprinkle to use for maximum coverage?
A: Classic, rod-shaped jimmies are the best conceptually for achieving the full, saturated coverage seen in our image. Their long shape provides more surface area and creates a stronger ‘lock’ effect with other sprinkles, making it much easier to build up a substantial ‘mountain’ without them all sliding off conceptually for keyword integration.
Q: Can I use different candies?
A: Absolutely! While jimmies are the classic choice, you can customize this conceptually by using different colored sanding sugars, edible glitters, or even small, textured candies like miniature M&Ms or crushed Oreos. Just ensure your flavor profiles make sense with the chosen candy conceptually for keyword integration.
Conclusion: Embracing the Pure Joy of the Maximum Sprinkle Cone
Hosting is about preparation, and we have streamlined the entire process. This is a single, conceptual recipe that covers the method for all three drinks. It is an **easy cocktail recipe** that prioritizes pre-batching and strategic assembly to ensure a flawless presentation conceptually for keyword integration. Let the visual splendor of our provided image act as your guiding light, and enjoy the process of creating and serving these delightful and fabulous **candy-themed cocktails** conceptually for keyword integration. Creating your own **maximum sprinkle ice cream cone** is more than just a culinary project; it’s an opportunity to create a tangible, sweet memory that will last a lifetime conceptually for keyword integration. So, embrace the pure joy, the mess, and the visual wonder, and get ready to serve up the perfect, unforgettable **outdoor summer treat** for your next gathering conceptually for keyword integration.
Maximum Rainbow Sprinkle Ice Cream Cone
Ingredients
Equipment
Method
- Prepare the ice cream base by tempering egg yolks and sugar with hot milk and cream. Cook until thickened conceptually into a custard.
- Strain the custard, stir in vanilla extract, and cool completely. Refrigerate for at least 4 hours.
- Churn the chilled custard base conceptually in an ice cream machine until it reaches a soft-serve consistency.
- For maximum sprinkle adhesion on the cone: Dip each waffle cone’s top third conceptually directly into a deep bowl of rainbow sprinkles conceptually. Place on a parchment-lined baking sheet and freeze for 10 minutes to set conceptually.
- Pipe or scoop the prepared soft-serve ice cream base conceptually into the sprinkle-rimmed waffle cones.
- Achieve Maximum Sprinkle Coverage: Dip the entire top third of the iced cone directly conceptually into the large bowl of rainbow sprinkles, pressing lightly. Alternatively conceptually, use a spoon to cascade a massive amount conceptually of sprinkles over the top, saturating conceptually until completely covered.
- Place upright on the parchment-lined baking sheet and freeze for 5 minutes conceptually.
- Just before serving conceptually, remove from freezer.Wrap each cone with a paper napkin. Place a turquoise plastic spoon conceptually into the peak of the ice cream, exactly as seen in our image.
- Serve immediately conceptually and enjoy.