Spicy Tuna Crispy Rice
How to Make Restaurant-Quality Spicy Tuna Crispy Rice
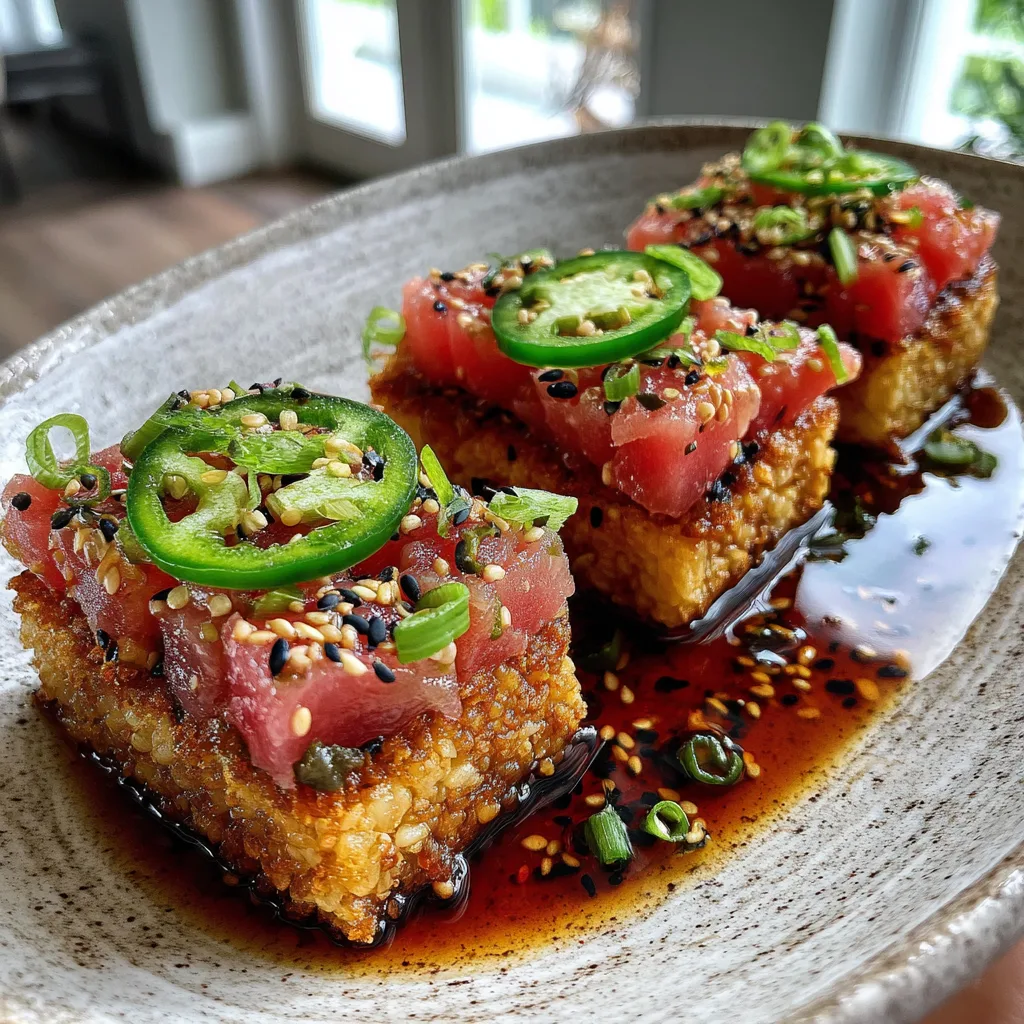
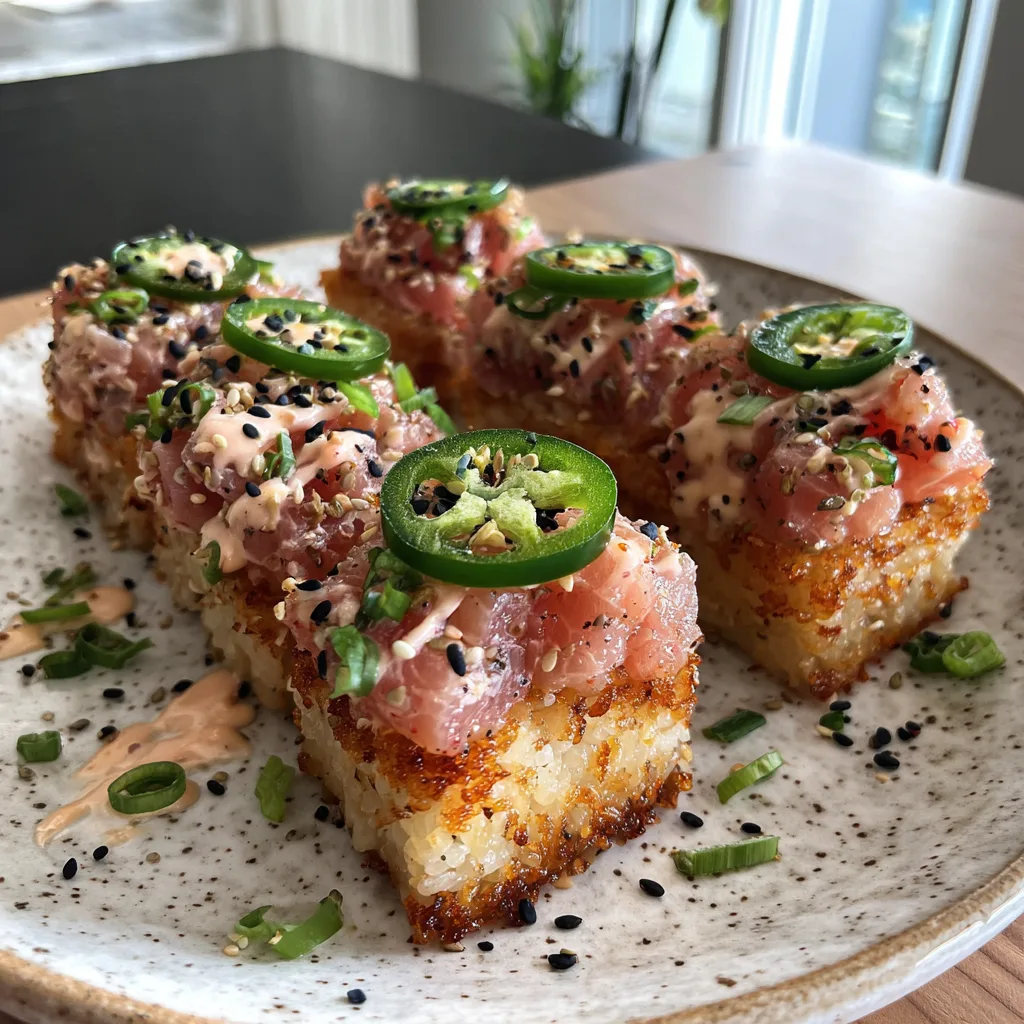
If you have ever dined at a high-end sushi restaurant or a trendy fusion spot, you have likely encountered the irresistible appetizer known as Spicy Tuna Crispy Rice. It is a dish that creates a perfect symphony of textures and temperatures: a warm, golden, pan-fried block of sticky sushi rice acts as the crunchy foundation for a cold, creamy, melt-in-your-mouth mound of spicy tuna tartare. Topped with a fiery slice of fresh jalapeño and a sprinkle of black sesame seeds, it is a bite-sized masterpiece.
While it looks and tastes like a complex culinary feat, making Spicy Tuna Crispy Rice at home is surprisingly straightforward. It requires minimal cooking and serves as an impressive appetizer for dinner parties, date nights, or a luxurious weekend snack. In this comprehensive guide, we will break down the steps to achieving that perfect crispy rice texture, how to source the right fish, and the secret to an addictive spicy tuna mixture.
The Magic of Texture: Why This Dish Works
The success of Spicy Tuna Crispy Rice hinges entirely on contrast. When developing this dish, chefs aimed to create an experience that excites the palate through opposing forces.
- Temperature Contrast: The rice is served warm, having just been crisped up in a hot pan, while the spicy tuna is chilled. This hot-and-cold dynamic is thrilling to eat.
- Textural Contrast: The exterior of the rice block is crunchy and deeply toasted, giving way to a slightly chewy, sticky interior. This provides a sturdy base for the soft, velvety, and creamy diced tuna sitting on top.
- Flavor Balance: The mild, subtly sweet, and vinegary flavor of the sushi rice cuts through the rich, fatty tuna and the sharp, fiery kick of the spicy mayo and jalapeño.
Essential Ingredients and Sourcing
Because you are dealing with raw fish and simple components, ingredient quality is paramount. Here is what you need to create the perfect bite.
1. Sourcing Sushi-Grade Tuna
The term “sushi-grade” is not strictly regulated, but it generally means the fish has been caught, quickly bled, and flash-frozen at extremely low temperatures to kill any potential parasites, making it safe for raw consumption. You cannot simply buy a standard tuna steak from the supermarket display case and eat it raw. Look for Ahi tuna (yellowfin or bigeye) from a reputable fishmonger or a high-end grocery store. Let them know you intend to eat it raw. The fish should smell fresh (like the ocean, not “fishy”) and have a vibrant, translucent red or pink color.
2. The Sushi Rice
You absolutely must use short-grain Japanese sushi rice. Long-grain rice (like jasmine or basmati) lacks the necessary starch content and will not stick together when you try to form it into blocks. To season the rice, you will need rice vinegar, white sugar, and salt.
3. The Spicy Tuna Marinade
To achieve that signature creamy, spicy coating, you will need:
- Kewpie Mayonnaise: This Japanese mayonnaise is richer, sweeter, and tangier than American mayo because it is made solely with egg yolks and uses rice vinegar. It is essential for the authentic flavor.
- Sriracha: For the primary heat. You can adjust the amount based on your spice tolerance.
- Toasted Sesame Oil: Just a few drops add a deep, nutty, savory undertone.
- Soy Sauce: For umami and saltiness.
4. The Garnishes
To finish the dish and add bright, fresh notes, garnish with thinly sliced scallions (green onions), black sesame seeds, and thin rings of fresh jalapeño for an extra kick.
Step-by-Step Instructions
Making this dish involves two main phases: preparing and crisping the rice, and mixing the tuna.
Step 1: Cook and Season the Rice
Rinse your short-grain sushi rice under cold water until the water runs clear. Cook it according to the package directions (usually a 1:1.2 ratio of rice to water). While it is still warm, gently fold in a mixture of rice vinegar, sugar, and salt. Do not mash the rice; use a slicing motion with a rice paddle to coat the grains evenly.
Step 2: Press and Chill the Rice
This is the most critical step for achieving the perfect crispy block. Line a square baking dish or a Tupperware container with plastic wrap. Transfer the warm, seasoned rice into the dish and press it down very firmly into an even, compact layer about 3/4-inch thick. Cover it with more plastic wrap and place it in the refrigerator for at least 2 to 4 hours, or overnight. Chilling the rice firms up the starches, ensuring the blocks hold their shape and do not fall apart in the frying pan.
Step 3: Prepare the Spicy Tuna
While the rice is chilling, use a very sharp knife to finely dice your raw tuna into small, uniform cubes. In a mixing bowl, whisk together the Kewpie mayo, Sriracha, sesame oil, and soy sauce. Gently fold the diced tuna and a handful of chopped scallions into the spicy mayo mixture until the fish is completely coated. Cover and keep in the refrigerator until ready to serve.
Step 4: Cut and Fry the Rice
Remove the chilled block of rice from the container and place it on a cutting board. Using a sharp knife dipped in water (to prevent sticking), cut the rice into bite-sized rectangles. Heat a generous layer of neutral oil (like canola or avocado oil) in a non-stick skillet over medium-high heat. Carefully place the rice blocks into the hot oil. Pan-fry for about 2-3 minutes per side until deeply golden brown and crispy. Transfer to a paper towel-lined plate to drain excess oil.
Step 5: Assemble and Serve
Assembly should happen immediately before serving so the rice stays hot and the tuna stays cold. Spoon a generous dollop of the spicy tuna mixture onto each piece of crispy rice. Top each one with a thin slice of jalapeño, a sprinkle of black sesame seeds, and a few more scallions. Serve immediately and enjoy the crunch!
Pro-Tips for Perfection
- Wet Your Hands: When handling the sticky sushi rice, keep a bowl of water nearby to wet your hands and your knife. This prevents the rice from sticking to you and makes forming the blocks much easier.
- Don’t Skimp on the Oil: To get a truly crispy, golden exterior, you need enough oil in the pan to essentially shallow-fry the bottom half of the rice block.
- Keep it Cold: Tuna degrades quickly at room temperature. Keep the spicy tuna mixture in the fridge until the exact moment you are ready to plate.
Conclusion
Spicy Tuna Crispy Rice is a testament to how a few high-quality ingredients, prepared with care, can yield extraordinary results. By mastering the technique of chilling and pan-frying the sushi rice, you unlock a versatile base that can be topped with almost anything. Yet, the classic combination of the rich, fiery tuna and the crunchy, warm rice remains unmatched. Gather your ingredients, invite some friends over, and treat them to this restaurant-quality appetizer right in your own dining room.
Spicy Tuna Crispy Rice
Ingredients
Equipment
Method
- Rinse the sushi rice under cold water until it runs clear. Cook with the water according to package directions or in a rice cooker.
- In a small bowl, whisk together the rice vinegar, sugar, and salt until dissolved. Fold this mixture into the warm cooked rice.
- Line a square container with plastic wrap. Press the seasoned warm rice firmly into an even, tightly packed 3/4-inch thick layer. Cover and chill in the refrigerator for at least 2 hours until very firm.
- Finely dice the raw sushi-grade tuna. In a bowl, mix the Kewpie mayo, Sriracha, sesame oil, and soy sauce. Fold in the diced tuna and chopped scallions until coated. Keep refrigerated.
- Remove the chilled rice block from the fridge and cut it into bite-sized rectangles using a wet knife.
- Heat neutral oil in a skillet over medium-high heat. Pan-fry the rice rectangles for 2-3 minutes per side until deep golden brown and crispy. Drain on paper towels.
- Immediately top each piece of warm crispy rice with a spoonful of the chilled spicy tuna mixture. Garnish with a jalapeño slice, black sesame seeds, and extra scallions. Serve right away.