Speckled Easter Cake Roll
The Ultimate Speckled Easter Egg Cake Roll
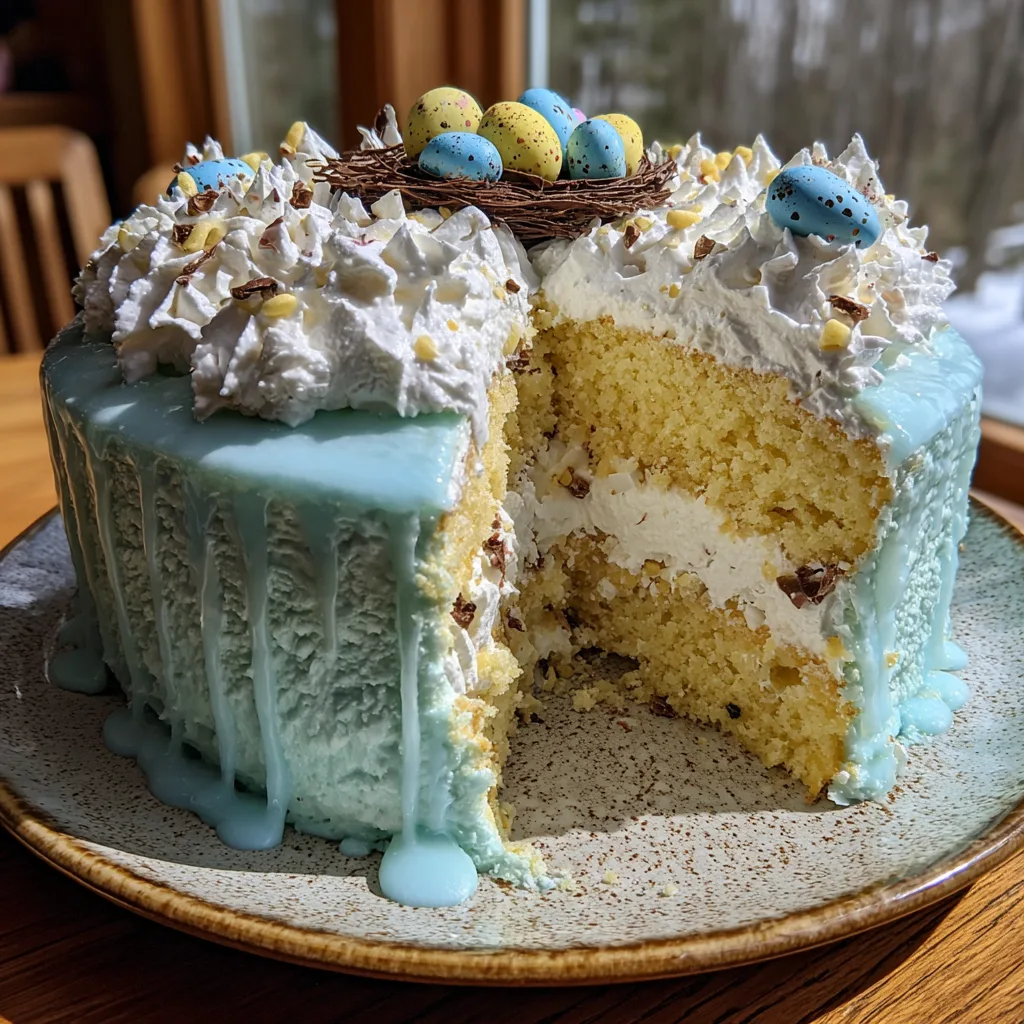
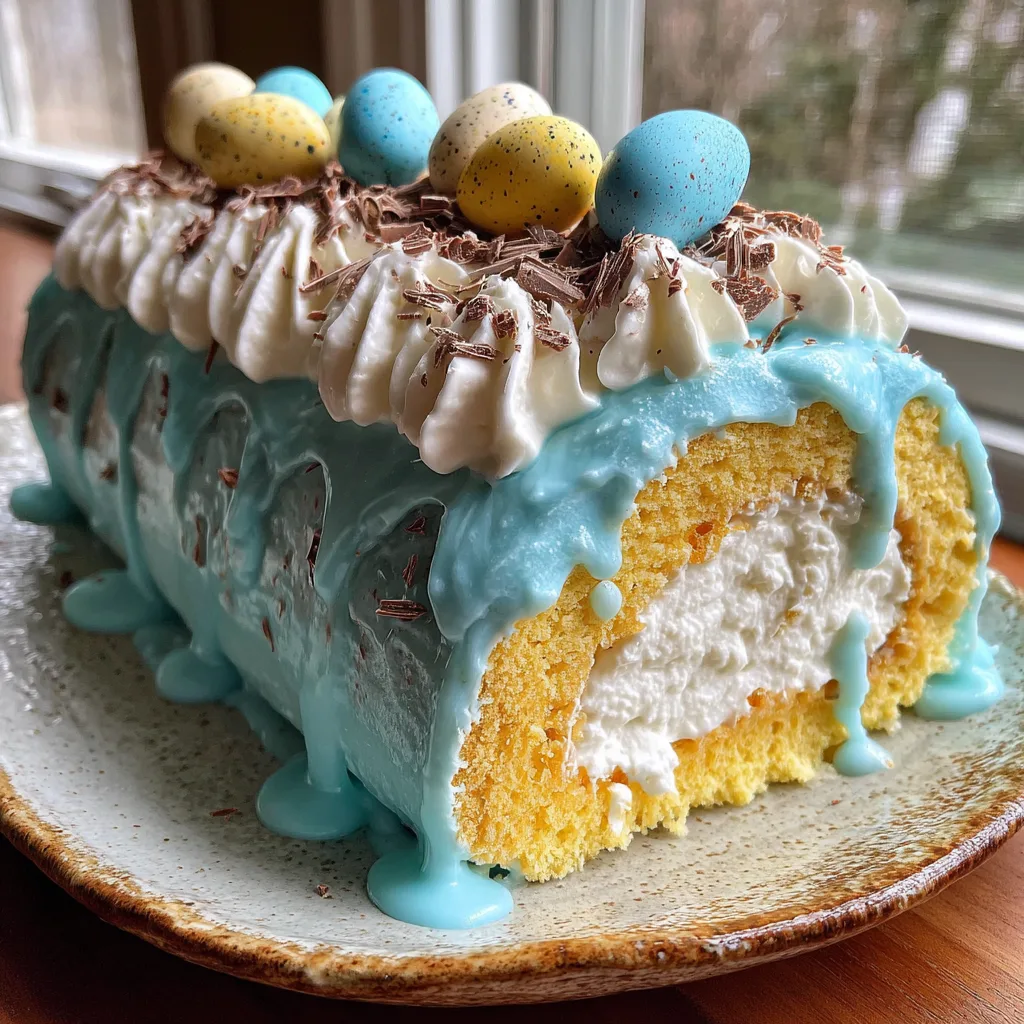
Welcome to the brightest, most cheerful, and absolutely delicious baking project you will undertake this spring. The Speckled Easter Egg Cake Roll is not just a dessert; it is a stunning centerpiece that captures the very essence of the season. Featuring a light-as-air vanilla sponge cake rolled tightly around a generous layer of fluffy, cloud-like whipped cream, the exterior is coated in a gorgeous, textured robin’s egg blue buttercream. Topped with delicate chocolate shavings and pastel speckled candy eggs, it looks exactly like a sweet little bird’s nest. This comprehensive guide will walk you through every single step, from whipping the perfect meringue to achieving that flawless, crack-free roll, ensuring your springtime baking is a resounding success.
The Magic of Spring Baking
There is something undeniably magical about baking in the spring. After a long, dark winter filled with heavy spices, dense fruitcakes, and rich chocolate puddings, our palates crave something lighter. We look for bright colors, airy textures, and flavors that awaken the senses. This Easter egg cake roll is the quintessential representation of that seasonal shift. The pastel blue exterior immediately evokes images of clear spring skies and newly laid robin’s eggs, while the tender, yellow sponge inside is reminiscent of warm sunshine. It is a dessert that brings joy before you even take the first bite.
Why Choose a Cake Roll?
Cake rolls, often known as Swiss rolls or roulades, carry a reputation for being intimidating. Home bakers often shy away from them, fearing the dreaded “crack” that can occur when rolling the sponge. However, the visual payoff of a beautifully executed cake roll is unmatched. When you slice into this dessert, you reveal a mesmerizing spiral of golden cake and stark white cream. It is elegant, it is perfectly portioned, and it offers the ideal ratio of cake to filling in every single bite. Unlike a traditional layered cake where you might get too much frosting or too much dry sponge, a cake roll ensures a harmonious balance. Once you master the technique—which is surprisingly straightforward with the right instructions—you will want to make them for every occasion.
Deconstructing the Flavor and Texture Profile
To truly appreciate this dessert, we must understand how the different components work together to create a symphony of textures and tastes.
The Vanilla Sponge: The foundation of this recipe is a classic genoise or hot milk sponge. It relies heavily on whipped eggs for its leavening, resulting in a cake that is incredibly light, spongy, and flexible. It has a subtle vanilla flavor that does not overpower the other elements.
The Whipped Cream Filling: Instead of a heavy buttercream inside, we use a stabilized whipped cream. This provides a clean, milky sweetness that cuts through the richness of the cake and exterior frosting. The lightness of the cream perfectly complements the airy sponge.
The Blue Buttercream: The exterior is coated in a simple American buttercream tinted to a beautiful robin’s egg blue. This adds a necessary layer of rich sweetness and provides the canvas for our rustic, textured design.
The Nest Toppings: The finishing touch is where the magic happens. Dark chocolate shavings introduce a slightly bitter, earthy note that balances the sugar, while the speckled candy eggs provide a delightful crunch, contrasting beautifully with the soft cake and cream.
Ingredients Deep Dive
For a dessert with so few components, the quality and temperature of your ingredients are paramount. Here is exactly what you need:
For the Vanilla Sponge Cake:
- – 4 large eggs, at room temperature (Crucial for achieving maximum volume when whipping)
- – 3/4 cup granulated sugar
- – 1 teaspoon pure vanilla extract
- – 3/4 cup cake flour (Do not substitute with all-purpose; cake flour ensures a tender crumb)
- – 1 teaspoon baking powder
- – 1/4 teaspoon salt
- – 2 tablespoons unsalted butter, melted and slightly cooled
- – Powdered sugar (for dusting the rolling towel)
For the Whipped Cream Filling:
- – 1 and 1/2 cups heavy whipping cream, very cold
- – 1/4 cup powdered sugar
- – 1 teaspoon pure vanilla extract
- – 1 tablespoon instant vanilla pudding mix (This acts as a stabilizer to keep the cream stiff)
For the Robin’s Egg Blue Frosting:
- – 1/2 cup (1 stick) unsalted butter, softened to room temperature
- – 2 cups powdered sugar, sifted
- – 1 teaspoon vanilla extract
- – 1-2 tablespoons heavy cream or milk
- – Light blue gel food coloring (Gel is preferred over liquid to prevent altering the frosting’s consistency)
For the Nest Decoration:
- – 1/2 cup dark chocolate shavings or curls (Use a vegetable peeler on a slightly warm block of chocolate)
- – 1 cup speckled pastel candy eggs (like Cadbury Mini Eggs or similar)
Step-by-Step Instructions
Part 1: Baking the Perfect Sponge
- Preparation: Preheat your oven to 350°F (175°C). Prepare a 10×15-inch jelly roll pan by greasing it lightly, lining the bottom with parchment paper, and greasing the parchment paper again. This double-greasing method guarantees your cake will release effortlessly.
- Whip the Eggs: In the bowl of a stand mixer fitted with the whisk attachment, beat the room-temperature eggs on high speed for about 3 minutes until they are frothy and pale yellow.
- Add Sugar and Vanilla: Gradually pour in the granulated sugar while the mixer is running. Continue to beat on high for another 4 to 5 minutes. The mixture should become thick, voluminous, and ribbon-like (when you lift the whisk, the batter should fall in a ribbon that sits on the surface for a few seconds before dissolving). Beat in the vanilla extract.
- Sift Dry Ingredients: In a separate bowl, whisk together the cake flour, baking powder, and salt. Sift this dry mixture over the egg mixture in two additions.
- Fold Gently: Using a large rubber spatula, very gently fold the dry ingredients into the egg mixture. Use wide, sweeping motions, scraping the bottom of the bowl. Be incredibly careful not to deflate the eggs; this trapped air is what makes the cake fluffy.
- Incorporate Butter: Drizzle the melted, cooled butter down the side of the bowl and fold it in quickly and gently just until incorporated.
- Bake: Pour the batter into your prepared jelly roll pan. Gently spread it into an even layer all the way to the corners using an offset spatula. Bake for 10-12 minutes, or until the top springs back lightly when touched and the edges just begin to pull away from the pan.
Part 2: The Crucial Rolling Step
- Prepare the Towel: While the cake is baking, lay a clean, lint-free kitchen towel flat on your counter. Dust it generously and evenly with powdered sugar. This prevents the hot cake from sticking.
- Invert the Cake: Immediately upon removing the cake from the oven, run a knife around the edges to loosen it. Swiftly and confidently invert the hot cake pan directly onto the powdered sugar-dusted towel.
- Peel and Roll: Carefully peel off the parchment paper. While the cake is still piping hot, starting from the short end, roll the cake and the towel up together into a tight log.
- Cool Completely: Place the rolled-up cake (still wrapped in the towel) on a wire cooling rack. Let it cool completely to room temperature. This will take about 1 to 2 hours. Rolling the cake while it is hot trains the structure of the crumb to hold a spiral shape without cracking.
Part 3: Making the Filling and Frosting
- Whip the Filling: In a chilled metal bowl, combine the cold heavy whipping cream, powdered sugar, vanilla extract, and instant vanilla pudding mix. Whip on medium-high speed until stiff peaks form. The pudding mix will keep the cream firm enough to slice neatly. Set aside in the refrigerator.
- Make the Blue Frosting: In a medium bowl, beat the softened butter until creamy. Gradually add the sifted powdered sugar, vanilla, and 1 tablespoon of cream. Beat until light and fluffy. Add a tiny drop of light blue gel food coloring and mix. Continue adding coloring in microscopic amounts until you reach that perfect, pale robin’s egg blue. If the frosting is too thick, add the second tablespoon of cream.
Part 4: Assembly and Decoration
- Unroll and Fill: Carefully unroll the cooled cake. It will naturally curl up a bit at the ends; do not try to force it perfectly flat. Spread the chilled whipped cream filling evenly over the surface of the cake, leaving a 1/2-inch border around the edges.
- Re-roll: Gently roll the cake back up, this time without the towel. Place the rolled cake seam-side down on your serving platter.
- Frost the Cake: Coat the entire exterior of the cake roll with the blue buttercream. To get a rustic, natural look, use the back of a spoon or an offset spatula to create swirls and ridges in the frosting.
- Build the Nest: Pipe a thin line of leftover whipped cream or frosting down the top center of the cake to act as glue. Sprinkle the dark chocolate shavings heavily along this line to mimic the twigs of a nest. Finally, nestle your pastel speckled candy eggs into the chocolate shavings.
- Chill: Refrigerate the decorated cake roll for at least 1 hour before slicing. This allows the filling to firm up and makes cutting beautiful, clean slices much easier.
Tips for the Perfect Swiss Roll
Baking a rolled cake is an exercise in timing and temperature control. Here are the professional tips to ensure your success:
Do Not Overbake: A dry sponge will crack instantly when rolled. Keep a close eye on your oven. The cake is done the moment it looks dry on top and springs back to a gentle touch. 10 to 12 minutes is usually the maximum time needed.
Roll Immediately: We cannot stress this enough. The cake must be rolled while it is practically burning your fingers. The steam helps the cake flex and set into the curved shape.
Use a Sharp Knife: When it is time to serve, use a large, sharp chef’s knife. Run the blade under hot water, wipe it dry, and make your cut. Clean the blade between every single slice to keep the beautiful spiral pristine and free of smeared cream or blue frosting.
Variations on a Theme
While this vanilla and blue combination is perfect for Easter, the base recipe is incredibly versatile. Consider these variations:
- Chocolate Spring Roll: Substitute 1/4 cup of the cake flour with high-quality Dutch-processed cocoa powder. Fill with a strawberry whipped cream for a chocolate-covered strawberry vibe.
- Lemon Curd Swirl: Fold half a cup of tangy lemon curd into your whipped cream filling for a bright, citrusy punch that pairs beautifully with the sweet blue frosting.
- Coconut Nest: Instead of chocolate shavings, toast some sweetened shredded coconut and use that to build your bird’s nest on top of the cake. It adds a lovely tropical flavor and a great chewy texture.
Storage and Make-Ahead Guidelines
This Speckled Easter Egg Cake Roll is an excellent make-ahead dessert, which is perfect for busy holiday mornings.
Refrigeration: The fully assembled and decorated cake can be stored in the refrigerator for up to 2 days. Because of the fresh whipped cream filling, it must be kept cold. Place it in a long cake keeper or tent it loosely with aluminum foil (insert a few toothpicks into the cake to keep the foil from messing up your frosting).
Freezing: You can freeze the filled (but unfrosted) cake roll. Wrap the tightly rolled, filled cake in a double layer of plastic wrap and a layer of aluminum foil. Freeze for up to 1 month. Thaw overnight in the refrigerator, then add your blue frosting and nest decorations the day you plan to serve it.
Frequently Asked Questions
Why did my cake crack even though I rolled it hot?
Cracking can still happen if the cake is overbaked and too dry, or if you under-whipped your eggs, resulting in a dense, heavy sponge that lacks flexibility. It can also happen if your kitchen is exceptionally cold, cooling the hot cake too rapidly before you finish rolling.
Can I use a different size pan?
This recipe is specifically formulated for a 10×15-inch jelly roll pan. Using a 9×13 pan will make the cake too thick to roll easily, and using a larger half-sheet pan will make it too thin, causing it to burn and shatter. Stick to the 10×15 for perfect results.
What if I don’t have instant pudding mix?
The instant pudding mix acts as a stabilizer. If you don’t have it, you can stabilize your whipped cream by blooming 1 teaspoon of unflavored gelatin in 1 tablespoon of cold water, melting it slightly in the microwave, and whipping it into your heavy cream. Alternatively, just whip the cream to stiff peaks and serve the cake the same day.
Conclusion
The Speckled Easter Egg Cake Roll is a triumph of spring baking. It combines elegant techniques with whimsical, joyful decoration, resulting in a dessert that tastes as phenomenal as it looks. The contrast between the rich blue buttercream, the tender sponge, the airy cream, and the crunch of the chocolate and candy eggs creates a multi-sensory experience that will delight both children and adults alike. By following these detailed steps, respecting the temperatures, and rolling with confidence, you will create a show-stopping masterpiece that will be the highlight of your seasonal celebrations. Happy baking!
Speckled Easter Egg Cake Roll
Ingredients
Equipment
Method
- Preheat oven to 350°F (175°C). Grease a 10×15-inch jelly roll pan, line with parchment paper, and grease the parchment.
- Beat the eggs on high speed for 3 minutes until frothy. Gradually add the granulated sugar and continue beating for 4-5 minutes until thick and pale. Beat in vanilla.
- Whisk together cake flour, baking powder, and salt. Sift over the egg mixture in two batches, gently folding with a spatula until just combined. Fold in the melted butter.
- Spread batter evenly into the prepared pan. Bake for 10-12 minutes until the top springs back lightly.
- Lay a clean kitchen towel flat and dust generously with powdered sugar. Immediately invert the hot cake onto the towel. Peel off parchment paper.
- While still hot, roll the cake and towel together starting from the short end. Place on a wire rack to cool completely (about 1-2 hours).
- Make the filling: Whip heavy cream, powdered sugar, vanilla, and pudding mix until stiff peaks form. Set aside.
- Make the frosting: Beat softened butter until creamy. Add powdered sugar, vanilla, and cream. Beat until fluffy, then tint with light blue gel coloring.
- Unroll the cooled cake. Spread the whipped cream filling evenly, leaving a small border. Roll the cake back up without the towel.
- Frost the outside of the cake with the blue buttercream, creating rustic swirls. Top with a line of chocolate shavings and nestle the candy eggs on top. Chill for 1 hour before slicing.