Rice Cooker Mango Sticky Rice
Authentic Rice Cooker Mango Sticky Rice (Khao Niao Mamuang)
There are few desserts in the world that balance flavor profiles quite as masterfully as Thai Mango Sticky Rice, known traditionally as Khao Niao Mamuang. It is a symphony of textures and tastes: the chewiness of the sweet rice, the buttery softness of ripe mango, and the luxurious, velvety richness of salty-sweet coconut cream. It is a dish that feels incredibly indulgent yet surprisingly refreshing, making it the perfect end to a spicy Thai meal or a summery treat on its own.
For many home cooks outside of Southeast Asia, the prospect of making authentic sticky rice can be daunting. Traditional methods involve specialized steamer baskets and pots, a process that requires time and specific equipment. However, the modern kitchen has offered a fantastic solution that delivers nearly identical results with a fraction of the effort: the rice cooker. This recipe utilizes your standard rice cooker to achieve that perfect, distinct grain structure—tender but chewy—that defines great sticky rice, making this beloved dessert accessible for any night of the week.
Understanding the Components
To master Mango Sticky Rice, you must understand that it is not just rice and fruit thrown together. It consists of four distinct components that must harmonize perfectly: the glutinous rice, the infusion sauce, the ripe mango, and the salted coconut topping sauce.
The Rice: Glutinous is Non-Negotiable
The most critical error beginners make is using the wrong type of rice. You cannot use jasmine rice, basmati rice, or standard long-grain white rice for this recipe. You must use “glutinous rice,” often labeled as “sweet rice” or simply “sticky rice.”
Despite its name, glutinous rice contains no dietary gluten. It gets its name from its glue-like, sticky texture when cooked. This unique texture comes from its high amylopectin starch content and very low amylose content. When cooked perfectly, the grains should stick together in a mass but still retain their individual identity; it should never be a pile of mush. To achieve this in a rice cooker, soaking the grain is essential to ensure even hydration before the cooking cycle begins.
The Coconut Milk vs. Coconut Cream
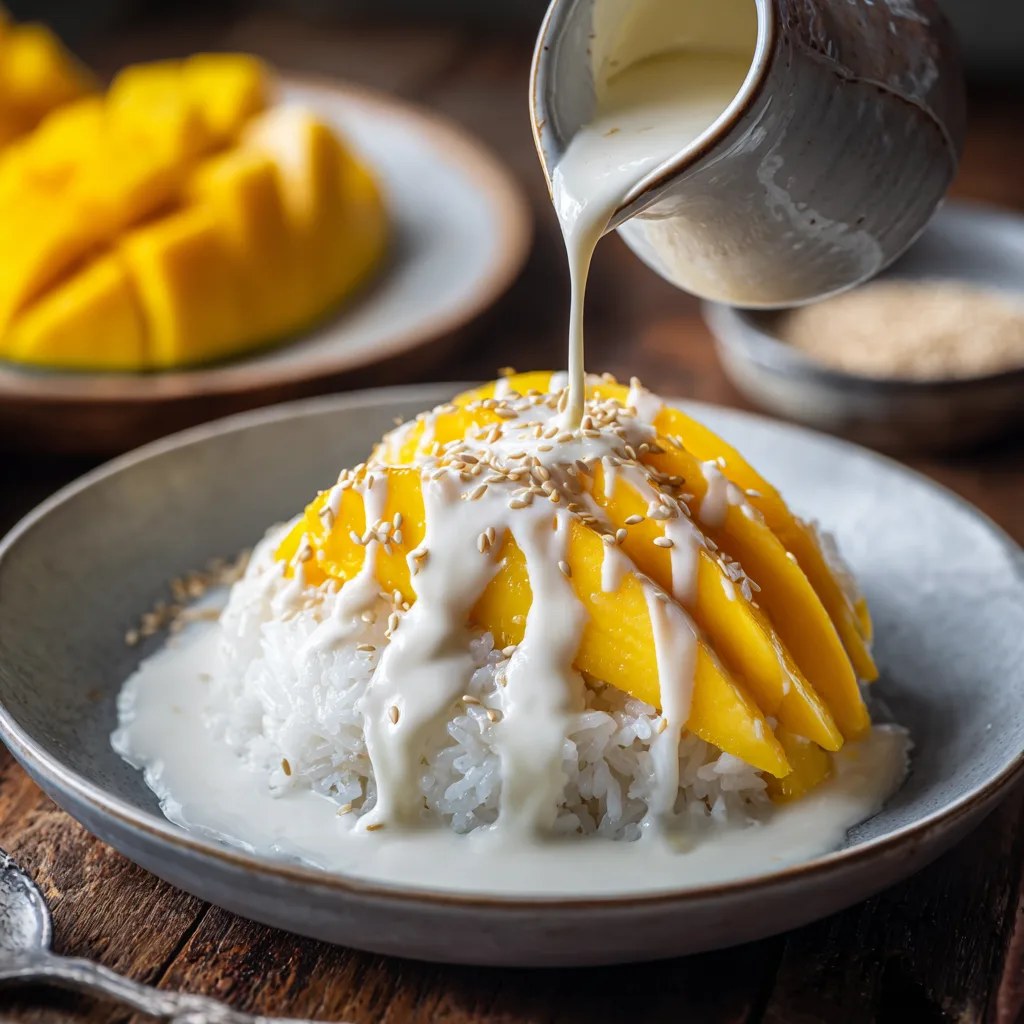
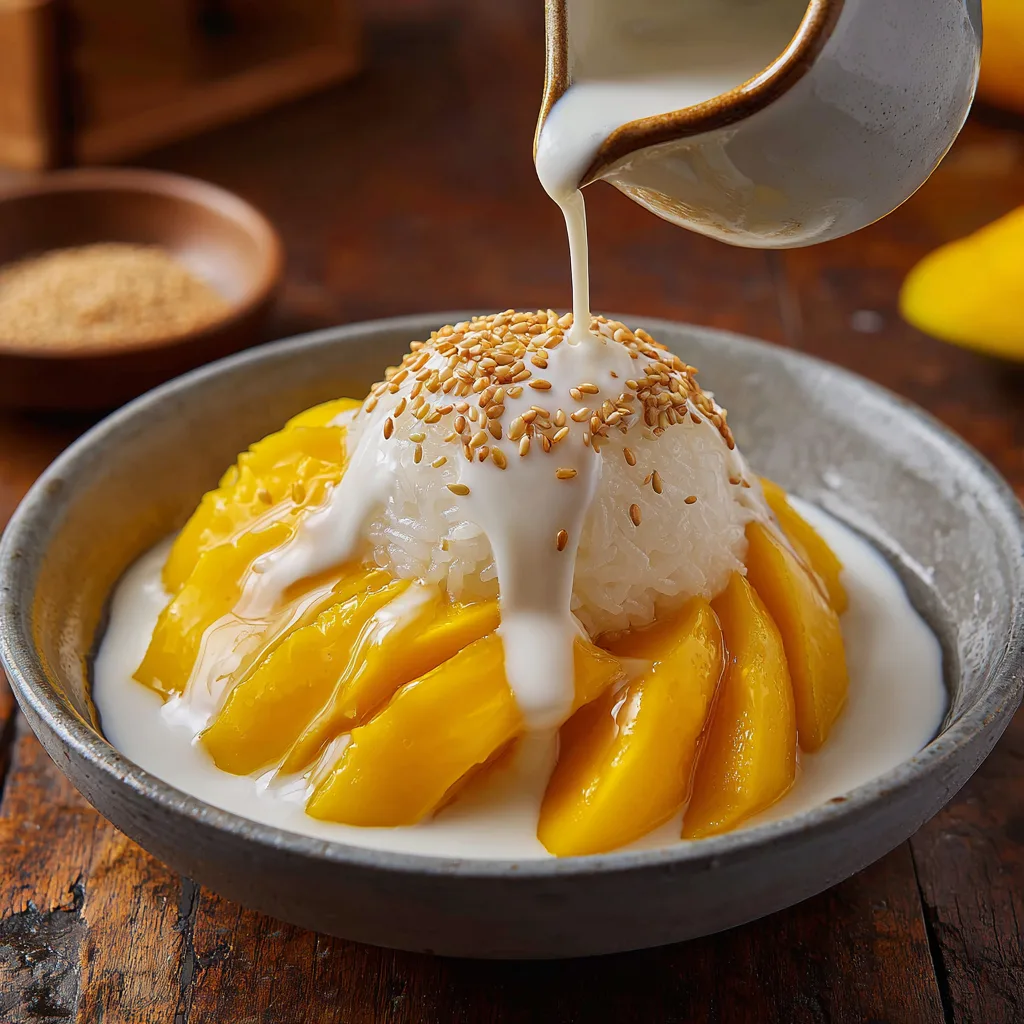
For the richest flavor and best texture, fat is your friend here. You want to use full-fat, high-quality canned coconut milk. Ideally, look for brands with minimal stabilizers. Some recipes call for coconut cream, which is thicker and has a higher fat content. In this recipe, we use standard full-fat coconut milk for infusing the rice, and we often reserve the thicker cream that rises to the top of the can for the final pour-over sauce, as seen in the beautiful photos of the finished dish.
The Mango: The Star of the Show
Since this dessert relies heavily on fresh fruit, the quality of your mangoes will make or break the dish. You want mangoes that are incredibly sweet, fully ripe, but firm enough to slice cleanly without turning to mush. Avoid fibrous varieties that get stringy.
The gold standards for Mango Sticky Rice are the Thai *Nam Dok Mai* variety or the yellow Ataulfo (often called Honey or Champagne) mangoes commonly found in North American supermarkets. They have a buttery, smooth flesh and an intense floral sweetness that pairs perfectly with the creamy rice. If your mangoes are tart, the balance of the dessert will be off.
The Two Sauces: Infusion vs. Topping
A common misconception is that the rice is cooked directly in coconut milk. While possible, the best texture is usually achieved by cooking the rice in water first, and then folding a hot, sweetened coconut “infusion sauce” into the cooked rice. The hot rice absorbs the liquid, becoming sweet and glossy.
The second sauce is the “topping sauce,” depicted being poured in the images. This sauce is thicker, richer, and crucially, slightly saltier than the rice itself. This savory edge cuts through the sweetness of the mango and the rice, creating that addictive savory-sweet contrast that defines Thai cuisine.
The Rice Cooker Method: A Game Changer
Traditional Thai sticky rice is soaked for hours (or overnight) and then steamed over boiling water in a bamboo basket. This method ensures the rice cooks through steam heat, preventing it from becoming waterlogged and mushy.
To replicate this in a rice cooker, we have to trick the machine. We soak the rice to hydrate the grains beforehand. Then, we cook it with slightly less water than we would regular rice. This allows the rice to steam within the cooker chamber rather than boil in excess liquid. Once cooked, the rice will look drier than normal rice—this is perfect because it is about to soak up a significant amount of sweetened coconut milk.
This method is reliable, requires less active monitoring, and makes cleanup a breeze, bringing authentic Thai flavors into the modern home kitchen with ease.
Recipe: Rice Cooker Mango Sticky Rice
Ingredients
For the Sticky Rice:
- 2 cups Thai glutinous rice (sweet rice/sticky rice)
- 2 1/2 cups water (for cooking)
- 1 (13.5 oz) can full-fat coconut milk, divided (do not shake the can before opening if possible)
- 1/2 cup granulated sugar (adjust to preference)
- 1 teaspoon salt
- Optional: 2 pandan leaves, tied into a knot
For the Salted Coconut Topping Sauce:
- 1/2 cup thick coconut cream (scooped from the top of the can mentioned above, or use a separate small can of coconut cream)
- 1 tablespoon sugar
- 1/4 teaspoon salt (more to taste—it should be distinctly salty-sweet)
- 1 teaspoon cornstarch dissolved in 2 teaspoons cold water (slurry)
For Serving:
- 2-3 ripe sweet mangoes (Ataulfo or Nam Dok Mai preferred)
- 1 tablespoon toasted sesame seeds or fried crispy mung beans
Instructions
- Prep the Rice (Soak): Rinse the glutinous rice under cold water until the water runs mostly clear. Place the rice in a large bowl and cover with several inches of cool water. Let it soak for at least 1 hour, preferably 2-3 hours. Drain well.
- Cook the Rice: Place the drained, soaked rice into the bowl of your rice cooker. Add the 2 1/2 cups of fresh water. If using a standard rice cooker, just press “Cook” or “White Rice.” If you have a fancy cooker with a “Sweet Rice” or “Glutinous Rice” setting, use that.
- Separate Coconut Milk: While the rice is cooking, open your can of coconut milk carefully without shaking it. Scoop off about 1/2 cup of the thick, semi-solid cream settled at the top and set it aside for the topping sauce. Pour the remaining thinner milk underneath into a medium saucepan.
- Make the Infusion Sauce: To the saucepan with the thinner coconut milk, add the 1/2 cup sugar, 1 teaspoon salt, and the knotted pandan leaves (if using). Heat over medium-low heat, stirring gently, just until the sugar and salt are completely dissolved. Do not let it come to a rapid boil. Remove the pandan leaves. Keep warm.
- Infuse the Rice: As soon as the rice cooker switches to “Warm,” immediately open the lid. Fluff the hot rice quickly with a rice paddle. Pour the warm infusion sauce from the saucepan over the hot rice. Stir gently but thoroughly to ensure every grain is coated.
- Let it Absorb: Close the lid of the rice cooker immediately and let it sit on the “Warm” setting for another 20 to 30 minutes. The rice will absorb the liquid and become glossy, sweet, and rich.
- Make the Topping Sauce: While the rice absorbs, make the final pour-over sauce. In a small saucepan, combine the reserved 1/2 cup thick coconut cream, 1 tablespoon sugar, and 1/4 teaspoon salt. Heat gently over low heat. Whisk in the cornstarch slurry. Continue heating and whisking until the sauce thickens enough to coat a spoon nicely. Taste it; it should have a distinct salty kick to balance the sweet. Remove from heat.
- Prepare Mangoes: Peel the mangoes using a sharp knife or vegetable peeler. Slice the two cheeks off the pit, then slice the cheeks crosswise into beautiful, uniform segments.
- Plating: To serve, scoop a portion of the warm sticky rice onto a plate or shallow bowl. You can mold it into a neat mound using a small bowl dipped in water. Arrange the sliced mango beside the rice.
- Final Touches: Just before serving, generously pour the thickened salted coconut topping sauce over the rice and the mango slices. Sprinkle the toasted sesame seeds or crispy mung beans over the top for texture. Serve immediately while the rice is warm.
Tips for Success & Variations
- Serving Temperature: This dish is best served when the rice is warm and the mango is room temperature or slightly cool. The contrast in temperature is part of the experience. Do not refrigerate the cooked rice, as it will turn hard and waxy. It must be eaten fresh the day it is made.
- Pandan Power: If you can find fresh or frozen pandan leaves at your local Asian market, use them. They impart a subtle, floral, vanilla-like aroma that is characteristic of authentic Southeast Asian sweets.
- Colorful Rice: For a visual twist, you can naturally color the rice. Soak the rice in water infused with butterfly pea flowers for blue rice, or pandan juice for green rice, before cooking.
- Texture Troubleshooting: If your rice seems too wet after the 30-minute absorption period, let it sit uncovered for a few minutes to let some steam escape. If it seems too hard, you likely didn’t soak it long enough or didn’t add enough infusion sauce.
By using the rice cooker method, this exquisite Thai classic becomes an achievable dessert for home cooks everywhere. The luscious combination of warm, creamy rice, bright, sweet fruit, and savory sauce is truly an unforgettable culinary experience.
Rice Cooker Mango Sticky Rice
Ingredients
Equipment
Method
- Rinse glutinous rice and soak in cool water for at least 1 hour (ideally 2-3 hours). Drain well.
- Add drained rice and 2.5 cups water to rice cooker. Cook on standard white rice setting.
- While rice cooks, carefully open coconut milk can. Scoop off 1/2 cup thick cream from top and reserve for topping sauce. Pour remaining thinner milk into a saucepan.
- Add 1/2 cup sugar and 1 tsp salt to the thinner milk in the saucepan. Heat gently until dissolved to create the infusion sauce. Keep warm.
- When rice cooker finishes, immediately fluff hot rice and pour over the warm infusion sauce. Stir well, close lid, and let sit on ‘Warm’ setting for 20-30 minutes to absorb.
- In a small saucepan, combine reserved thick coconut cream, 1 tbsp sugar, 1/4 tsp salt, and cornstarch slurry. Heat and whisk until thickened into a pourable sauce.
- Peel and slice mangoes.
- Plate warm sticky rice next to mango slices. Pour thickened salted coconut sauce generously over everything and sprinkle with sesame seeds.