Red Velvet Mini Cake Rolls
Decadent Red Velvet Mini Cake Rolls: A Show-Stopping Dessert Experience
When it comes to desserts that command attention and elicit immediate cravings, few things can rival the striking visual appeal and rich, complex flavors of a perfectly executed red velvet cake. But when you take that classic flavor profile—the subtle hint of cocoa, the tangy buttermilk, the luxurious cream cheese—and transform it into elegant, individual-sized mini cake rolls encased in a breathtakingly shiny swirled mirror glaze, you elevate a humble cake into a true masterpiece of home patisserie. These Decadent Red Velvet Mini Cake Rolls, sitting delicately atop a buttery graham cracker base, are not just a dessert; they are a culinary event. Whether you are planning a romantic Valentine’s Day dinner, a festive holiday gathering, or simply want to challenge your baking skills with something extraordinarily rewarding, this recipe will guide you through every meticulous step to achieve bakery-level perfection right in your own kitchen.
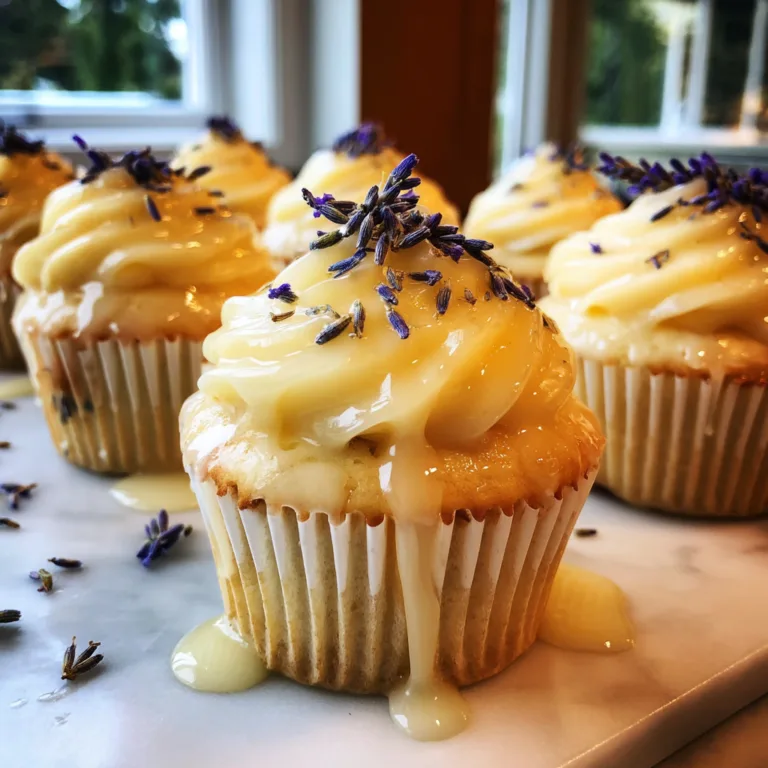
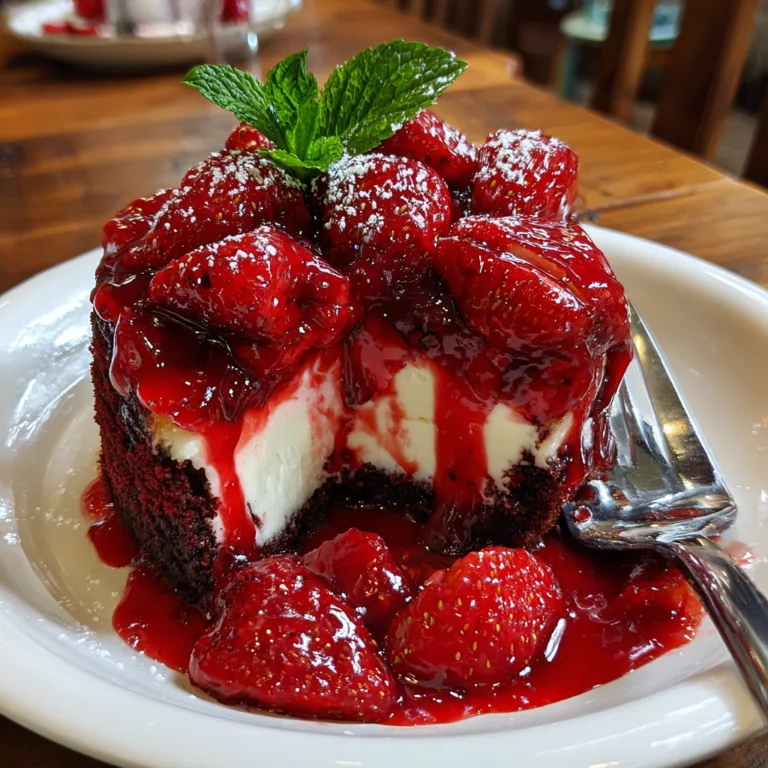
The beauty of this specific dessert lies in its intricate layers of texture and flavor. You have the soft, impossibly tender red velvet sponge that yields effortlessly to the fork. Inside, a generous swirl of dense, tangy-sweet cream cheese filling provides a cool, creamy contrast. At the very bottom, an unexpected but entirely welcome graham cracker crust offers a satisfying, buttery crunch that grounds the entire bite. Finally, the exterior is enrobed in a high-shine, swirled mirror glaze that not only seals in the moisture but provides a delicate, sweet snap and a visual wow-factor that will leave your guests speechless. While it may look intimidating, breaking the process down into manageable components makes this ambitious bake entirely achievable for the passionate home cook.
The Fascinating Lore and Science of Red Velvet
Before diving into the mechanics of rolling sponges and pouring glazes, it is worth understanding what exactly makes red velvet so unique. The origins of red velvet cake are often debated, with roots tracing back to the Victorian era when “velvet” cakes were created to have a softer, finer crumb than the coarser, more common cakes of the time. This soft texture was typically achieved through the introduction of cocoa powder, which breaks down the tough gluten proteins in the flour.

The iconic red color, however, originally had nothing to do with food coloring. Traditional red velvet cake recipes relied on a fascinating chemical reaction between natural, non-Dutched cocoa powder (which is highly acidic) and buttermilk, vinegar, and baking soda. This combination not only produced a beautifully tender crumb through rigorous leavening but also triggered a reaction with the anthocyanins (pigments) in the raw cocoa, turning it a distinct, dark reddish-brown mahogany color. During World War II, when rations were strict, bakers sometimes used boiled beet juices to enhance the color and retain moisture. Today, to achieve that vibrant, fire-engine red we associate with modern red velvet, we rely on high-quality gel food coloring, but the foundational flavor profile of subtle cocoa and tangy buttermilk remains non-negotiable.
Mastering the Components: A Symphony of Flavors and Textures
This recipe is a labor of love that involves four distinct components, each playing a crucial role in the final symphony of the dessert.
1. The Flexible Red Velvet Sponge
Unlike a standard layer cake, a cake roll (or Swiss roll) requires a sponge that is incredibly light, airy, and above all, flexible. If the cake is too dense or baked for even a minute too long, it will crack and shatter when you attempt to roll it. We achieve this flexibility by making a modified chiffon or genoise-style sponge, heavily relying on whipped egg whites to provide structure and lift without adding heaviness. The batter is spread thin and baked quickly at a high temperature, ensuring it sets before it dries out.
2. The Tangy Cream Cheese Filling
The quintessential partner to red velvet is cream cheese frosting. For a cake roll, the filling needs to be slightly firmer than standard frosting so it doesn’t squish out the sides when rolled or sliced. We use full-fat block cream cheese, high-quality butter, and a touch of vanilla, whipping it until voluminous. Chilling the filling slightly before spreading it onto the cake helps maintain defined layers.
3. The Graham Cracker Base
This is where this recipe diverges from the ordinary. By placing the sliced cake rolls onto a pressed graham cracker base, we introduce a textural element that mimics the crust of a cheesecake. The buttery, slightly salty crunch of the graham crackers perfectly balances the soft cake and creamy filling, preventing the dessert from becoming monotonously soft.
4. The Swirled Mirror Glaze
The crowning glory of these mini rolls is the glaze. A mirror glaze (glacage miroir) is a classic French pastry technique made from a precise mixture of gelatin, sugar, water, sweetened condensed milk, and chocolate. When poured at the exact right temperature (usually around 90°F or 32°C), it sets into an ultra-shiny, flawless coating. By gently marbleizing white chocolate glaze with red-tinted glaze, we achieve a stunning, dynamic finish that makes these cakes look like polished jewels.
The Golden Rules of Rolling: How to Prevent Cracking
The most common fear when making a Swiss roll is the dreaded crack. Follow these non-negotiable rules to ensure a smooth, perfect roll every time:
- Do not overbake: The cake should spring back to a gentle touch. Even one extra minute in the oven can dry out the edges, making them brittle.
- Roll while piping hot: As soon as the cake comes out of the oven, it must be rolled up in a clean kitchen towel heavily dusted with powdered sugar (or cocoa powder). The steam from the hot cake trains the crumb to hold a spiral shape without breaking.
- Let it cool completely in the rolled position: Do not unroll the cake until it is 100% cool to the touch. If it is even slightly warm, your cream cheese filling will melt.
- Handle with care: When unrolling to fill, do so very gently. The innermost curl will be the tightest; do not force it completely flat or it will snap.
Ingredients List
For the Red Velvet Cake Roll:
- – 4 large eggs, separated, room temperature
- – 3/4 cup granulated sugar, divided
- – 2 tablespoons vegetable oil or melted butter
- – 2 tablespoons buttermilk
- – 1 teaspoon white vinegar
- – 1 teaspoon pure vanilla extract
- – 1 tablespoon red liquid or gel food coloring
- – 3/4 cup cake flour (do not use all-purpose)
- – 3 tablespoons natural unsweetened cocoa powder
- – 1 teaspoon baking powder
- – 1/2 teaspoon salt
For the Cream Cheese Filling:
- – 8 oz (1 block) full-fat cream cheese, softened
- – 1/4 cup (1/2 stick) unsalted butter, softened
- – 1 1/2 cups powdered sugar, sifted
- – 1 teaspoon vanilla extract
For the Graham Cracker Crust Base:
- – 1 cup graham cracker crumbs
- – 3 tablespoons granulated sugar
- – 4 tablespoons unsalted butter, melted
For the Swirled Mirror Glaze:
- – 3/4 cup granulated sugar
- – 1/2 cup sweetened condensed milk
- – 1/4 cup water
- – 1 tablespoon unflavored gelatin powder (bloomed in 2 tbsp cold water)
- – 1 cup high-quality white chocolate chips
- – Red and white gel food coloring
Step-by-Step Instructions
- Preheat and Prep: Preheat your oven to 350°F (175°C). Line a 10×15 inch jelly roll pan with parchment paper, leaving an overhang on the sides. Spray lightly with non-stick spray.
- Whip the Egg Whites: In a scrupulously clean bowl, whip the 4 egg whites until soft peaks form. Gradually add 1/4 cup of the granulated sugar and continue whipping until stiff, glossy peaks form. Set aside.
- Mix the Wet Ingredients: In another bowl, beat the 4 egg yolks and the remaining 1/2 cup of sugar until pale and thick (about 3 minutes). Beat in the oil, buttermilk, vinegar, vanilla extract, and red food coloring until vibrant and smooth.
- Sift Dry Ingredients: Sift the cake flour, cocoa powder, baking powder, and salt directly into the red yolk mixture. Gently fold with a rubber spatula just until combined.
- Fold in the Whites: Take one-third of the whipped egg whites and stir them vigorously into the red batter to lighten it. Then, carefully and gently fold in the remaining egg whites in two batches, being careful not to deflate the air.
- Bake: Pour the airy batter into the prepared jelly roll pan. Smooth the top gently with an offset spatula. Bake for 10-12 minutes, or until the cake springs back lightly when touched.
- The Hot Roll: While the cake bakes, lay a clean, lint-free kitchen towel flat on the counter and dust it generously with powdered sugar. The moment the cake comes out of the oven, invert it directly onto the sugared towel. Carefully peel off the parchment paper. Starting from the short end, roll the cake and the towel up together into a tight log. Place it seam-side down on a wire rack to cool completely (about 1-2 hours).
- Prepare the Base: While the cake cools, mix the graham cracker crumbs, sugar, and melted butter in a bowl. Press this mixture firmly and evenly into a small 8×8 square pan lined with parchment. Bake for 8 minutes at 350°F. Let it cool completely, then cut into rectangles roughly the size of your final cake roll slices.
- Make the Filling: Beat the softened cream cheese and butter together until completely smooth and fluffy. Gradually add the sifted powdered sugar and vanilla extract. Beat until thick and creamy.
- Fill and Chill: Once the cake is completely cool, gently unroll it. It’s okay if the ends remain slightly curled. Spread the cream cheese filling evenly over the surface, leaving a small 1/2-inch border at the edges. Tightly re-roll the cake (without the towel this time). Wrap the log tightly in plastic wrap and chill in the refrigerator for at least 2 hours, or up to overnight, to firm up.
- Make the Mirror Glaze: In a small saucepan, combine the sugar, condensed milk, and water. Bring to a gentle simmer over medium heat until the sugar dissolves. Remove from heat and immediately stir in the bloomed gelatin until melted. Pour the hot liquid over the white chocolate chips in a heatproof bowl. Let it sit for 2 minutes, then gently whisk until smooth.
- Color and Swirl: Divide the glaze into two bowls. Color one bowl bright red and leave the other white (use white gel coloring if it looks too yellow). Let the glazes cool to exactly 90°F (32°C). Pour the white glaze into the red glaze and give it just one or two gentle swirls with a knife—do not overmix.
- Glaze and Assemble: Remove the chilled cake roll from the fridge and slice off the messy ends. Cut the log into thick, equal slices. Place the slices on a wire rack set over a baking sheet. Pour the swirled mirror glaze generously over each slice, allowing it to coat the sides. Let the glaze set for 15 minutes.
- Final Touch: Crumble the reserved cake ends you trimmed off. Sprinkle these red velvet crumbs down the center or along the edges of the glazed rolls. Carefully use a spatula to transfer each glazed slice onto a prepared graham cracker rectangular base. Chill for 30 minutes before serving.

Storage and Make-Ahead Instructions
Because these mini cakes involve dairy and a gelatin-based glaze, proper storage is essential. The assembled cakes must be kept refrigerated. Place them in an airtight container to prevent the glaze from absorbing fridge odors and to keep the cake moist. They will stay fresh and delicious for up to 4 days in the refrigerator.
If you wish to make these ahead of time for a party, it is highly recommended to bake, roll, and fill the cake log a day in advance. Keep the filled, unglazed log wrapped tightly in plastic wrap in the fridge overnight. The next day, you can prepare the glaze, slice the cake, glaze the pieces, and assemble them on the graham cracker bases just a few hours before your guests arrive. This breaks up the work and ensures the absolute freshest texture and shiniest presentation.
Conclusion
Creating these Decadent Red Velvet Mini Cake Rolls with a Mirror Glaze is undoubtedly a multi-step project, but the result is a breathtaking, bakery-quality dessert that proves your prowess in the kitchen. The delicate dance between the fluffy cocoa sponge, the rich and tangy cream cheese, the crisp graham cracker base, and the visually stunning glaze creates an unforgettable eating experience. By mastering the techniques of the hot roll and the temperature-sensitive glaze, you open the door to a whole new world of sophisticated home baking. Serve these tiny masterpieces at your next celebration, and watch as your guests marvel at both their beauty and their incredible flavor.
Red Velvet Mini Cake Rolls
Ingredients
Equipment
Method
- Preheat oven to 350°F (175°C). Line a 10×15 inch jelly roll pan with parchment and grease lightly.
- Whip egg whites to soft peaks, slowly add 1/4 cup sugar and whip to stiff peaks. Set aside.
- Beat egg yolks with remaining 1/2 cup sugar until pale. Mix in oil, buttermilk, vinegar, vanilla, and red coloring.
- Sift cake flour, cocoa, baking powder, and salt over the yolk mixture. Fold gently.
- Fold whipped egg whites into the batter in three batches, being careful not to deflate.
- Spread batter into pan and bake for 10-12 minutes until springy.
- Immediately invert hot cake onto a powdered sugar-dusted towel. Peel off parchment and roll cake up tightly in the towel. Let cool completely.
- Mix graham crumbs, sugar, and melted butter. Press into an 8×8 pan and bake for 8 minutes. Cool and cut into rectangles.
- Beat cream cheese and butter until smooth. Add powdered sugar and vanilla, beating until fluffy.
- Unroll cooled cake, spread filling evenly, and tightly re-roll. Chill log wrapped in plastic for at least 2 hours.
- For glaze: Simmer sugar, water, and condensed milk. Remove from heat, stir in bloomed gelatin. Pour over white chocolate, let sit, then whisk smooth.
- Divide glaze, dye one part red and one part white. Cool to 90°F. Swirl white lightly into the red.
- Slice the chilled cake log. Pour swirled glaze over each slice on a wire rack. Top with reserved cake crumbs.
- Transfer glazed slices onto graham cracker bases. Chill until ready to serve.