Rainbow Ice Cream Tacos
The Ultimate Guide to Making Rainbow Rolled Ice Cream Tacos at Home
If you are looking for a dessert that absolutely stops people in their tracks, you have found it. Rainbow Rolled Ice Cream Tacos are not just a sweet treat; they are a vibrant, edible work of art that brings the magic of a high-end ice cream parlor right into your home kitchen. Combining the satisfying crunch of freshly made waffle cones with the creamy, melt-in-your-mouth perfection of Thai-style rolled ice cream, this dessert is guaranteed to be the centerpiece of any party, summer barbecue, or highly elevated Taco Tuesday.
While they might look like they require a culinary degree and thousands of dollars in commercial equipment to create, the secret is that you can make these breathtaking treats at home using simple tools like a standard sheet pan and a basic waffle cone maker. In this comprehensive guide, we will break down every single step of the process. From mixing the vibrant, rainbow-colored taco shells to mastering the surprisingly simple technique of scraping ice cream into perfect, photogenic coils, get ready to become the ultimate dessert hero in your household.

What Exactly Are Rolled Ice Cream Tacos?
To understand the brilliance of this dessert, we have to look at its two main components. First is the “taco shell,” which is actually a freshly baked waffle cone that has been dyed with vivid food coloring and gently folded into a taco shape while still warm and pliable. Once it cools, it hardens into a crispy, sweet vessel that holds up beautifully to ice cream.
The filling is inspired by “I-Tim Pad,” the wildly popular stir-fried ice cream that originated on the streets of Thailand. Traditional rolled ice cream is made by pouring a liquid sweet cream base onto a freezing cold metal plate. As the liquid freezes, it is chopped and spread incredibly thin with metal spatulas, then expertly scraped up into tight, satisfying rolls. By nestling these elegant rolls inside our colorful waffle taco shells, we create a handheld dessert that is bursting with texture—crunchy, creamy, chewy, and completely customizable.
The Science of the No-Churn Ice Cream Base
The biggest hurdle home cooks face when trying to make rolled ice cream is the lack of a commercial anti-griddle (the freezing plate). However, you can achieve the exact same effect using a standard metal baking sheet and your home freezer. The secret lies entirely in the base recipe.
Traditional churned ice cream relies on a machine to whip air into a custard base while slowly freezing it, breaking up ice crystals. For rolled ice cream, we actually *want* the base to freeze in a flat, solid sheet. However, if we just poured milk onto a pan, it would freeze solid like an ice cube, making it impossible to roll without shattering.
The solution is a magical two-ingredient base: heavy whipping cream and sweetened condensed milk. The high fat content in the heavy cream prevents the mixture from freezing into a rock-hard block of ice. Meanwhile, the condensed milk is essentially milk with all the water cooked out of it and sugar added. Sugar acts as an antifreeze in ice cream making. This combination creates a frozen sheet that is solid enough to hold its shape, but pliable enough to curl beautifully into a tight roll when scraped with a spatula. It is culinary alchemy at its finest.
Creating the Rainbow Waffle Cone Shells
The visual impact of this dessert relies heavily on the brilliant, saturated colors of the waffle taco shells. To achieve this, you need a standard waffle cone batter. The key is to use gel food coloring rather than liquid food coloring. Gel coloring is highly concentrated, meaning you only need a few drops to achieve a neon-bright hue without adding excess moisture that could ruin the crispness of your baked cone.
Once you mix your master batter, you will divide it into six separate bowls. Then, tint each bowl to match the colors of the rainbow: vibrant red, bright orange, sunny yellow, vivid green, deep blue, and rich purple. When you pour the batter onto your waffle cone maker, it cooks in just a minute or two. The crucial moment happens the second you pull the hot waffle off the iron. You have about 15 seconds before the sugar cools and hardens. During this brief window, you must gently drape the flat waffle over a taco rack, a thick rolling pin, or the spine of a book covered in parchment paper to mold it into that classic taco “U” shape.
Recreating the Six Epic Rainbow Flavors
The beauty of this dessert is that each colored shell can house a completely different flavor profile and topping combination. Let’s break down the ultimate rainbow lineup inspired by the most over-the-top dessert parlors:
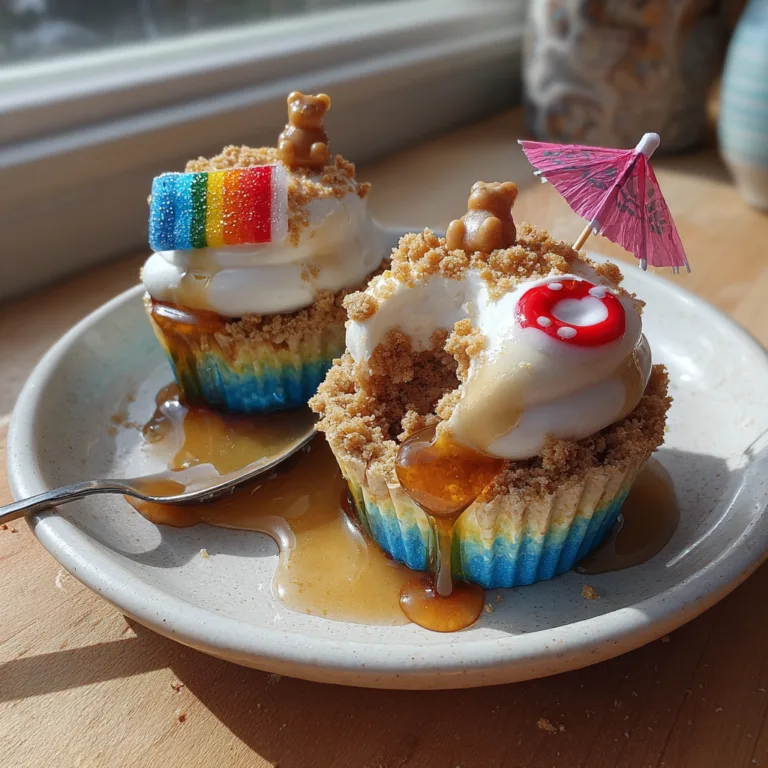
The Red Shell: Strawberry Caramel Dream
Inside the brilliant red shell, swirl a touch of strawberry jam into your ice cream base before freezing it to create pink strawberry rolls. Once nestled in the taco, top it with a mountain of fresh whipped cream, a heavy drizzle of thick, buttery caramel sauce, and crushed graham crackers for a beautiful textural crunch.
The Orange Shell: Campfire S’mores Crunch
For the orange taco, keep the rolled ice cream a classic, creamy vanilla. The magic happens with the toppings. Drizzle the rolls generously with rich dark chocolate syrup. Top with a sprinkle of graham cracker crumbs, and the pièce de résistance: a large marshmallow toasted to golden-brown perfection on a skewer, placed right on top.
The Yellow Shell: Ultimate Rainbow Funfetti
This is the ultimate kid-pleaser. Mix colorful sprinkles directly into the liquid ice cream base so the rolls themselves are speckled with a rainbow of colors. Fill the sunny yellow shell, then add a dollop of electric blue whipped cream, a dusting of Fruity Pebbles cereal, and a vibrant rainbow gummy candy arched over the top.
The Green Shell: Zen Matcha Fortune
A sophisticated twist for the green shell. Whisk a teaspoon of high-quality matcha green tea powder into your base to create beautiful, earthy green ice cream rolls. Top this creation with a vibrant green whipped cream, chewy mochi bits, an authentic fortune cookie, and a couple of green tea Pocky sticks for height and crunch.
The Blue Shell: The Cookie Monster
Inside the vibrant blue shell, create bright blue ice cream rolls using a drop of gel coloring in the base. This decadent taco is topped with classic vanilla whipped cream, a heavy drenching of thick fudge sauce, and halves of crispy chocolate chip cookies or chocolate-drizzled biscotti tucked into the sides.
The Purple Shell: Ube Galaxy
For the final purple taco, use an ube (purple yam) extract in your base to create a stunning lavender rolled ice cream. Top it with a generous swirl of whipped cream, purple sanding sugar, and perhaps a delicate dusting of edible glitter to create a truly intergalactic dessert experience.
Essential Equipment for Success
Before embarking on your ice cream taco journey, make sure your kitchen is equipped with these absolute essentials:
- A Waffle Cone Maker: A standard waffle iron will not work; the grooves are too deep, and the batter will be too thick to fold. You need a specific waffle cone maker that presses the batter thin and crisp.
- Metal Sheet Pans: Aluminum rimmed baking sheets (half-sheet or quarter-sheet size) are perfect. They conduct cold incredibly well.
- Metal Putty Knives or Scrapers: The plastic spatulas in your kitchen drawer won’t cut it. You need a rigid metal scraper (like a bench scraper or a clean putty knife from the hardware store) with a sharp, straight edge to cleanly peel the frozen cream off the metal pan.
- Gel Food Coloring: Essential for achieving the vibrant, non-diluted colors for the taco shells.
- A Taco Holder or Mold: You will need something to drape the hot waffles over so they cool in a taco shape. Commercial metal taco racks work brilliantly for this.
Pro-Tips for Rolling Like a Master
The actual act of rolling the ice cream takes a bit of practice. Here are the secrets to avoiding a crumbly mess and achieving those perfect, photogenic spirals:
1. Your pan must be shockingly cold. Do not just place the pan in the freezer for an hour. Wash it, dry it completely, and leave it in the absolute coldest part of your freezer overnight. The metal must be freezing to the touch before you pour the liquid base on it.
2. The layer must be razor-thin. If you pour too much liquid onto the pan, the ice cream will be too thick to roll; it will just clump up like standard scooped ice cream. You want a layer no thicker than 1/8th of an inch. Use an offset spatula to spread the liquid base as thinly and evenly as possible across the frozen metal.
3. Freeze the base solid, but not forever. Once you spread the base on the frozen pan, put it back in the freezer. It usually takes about 4 to 6 hours to freeze solid enough to roll. If you leave it in there for three days, it will become too brittle and will shatter when you try to scrape it. If it is too hard, let it sit on the counter for exactly 60 seconds to soften slightly before rolling.
4. Speed is your best friend. Once you take the pan out of the freezer to begin rolling, the clock is ticking. Room temperature air immediately starts melting the thin layer of ice cream. Work decisively. Position your scraper at a 45-degree angle, press down firmly against the metal, and push forward in one smooth, continuous motion. If the ice cream starts turning into mush, put the pan back in the freezer for 30 minutes to firm up.
Serving and Party Ideas
Rainbow Rolled Ice Cream Tacos are the ultimate interactive party dessert. If you are hosting a summer birthday party or a festive gathering, consider setting up a DIY Taco Bar. Make all the colorful taco shells the day before and store them in airtight containers so they stay crispy.
Prepare several sheet pans of the frozen ice cream base. When it is time for dessert, bring the pans out one at a time and roll the ice cream fresh in front of your guests. Set out bowls of endless toppings: hot fudge, warm caramel, crushed Oreos, gummy bears, fresh fruit, whipped cream, and sprinkles. Let your guests select their favorite colored taco shell and go wild building their own custom dessert masterpiece.
Frequently Asked Questions (FAQs)
Can I make the waffle cone taco shells ahead of time?
Yes! In fact, it is recommended to break up the work. You can make the shells up to 3 days in advance. Once they have cooled completely and hardened into their taco shape, store them in a large, airtight container at room temperature. Do not put them in the fridge, as the moisture will make them soggy.
Why did my ice cream shatter and break into pieces instead of rolling?
This means the ice cream base was too cold and brittle. This often happens if it is left in the freezer for too many days. If it shatters, just let the pan sit at room temperature for 1 to 2 minutes to soften the fat in the heavy cream, then try rolling again.

Do I have to use sweetened condensed milk? Can I use regular milk?
You must use sweetened condensed milk (or a carefully crafted vegan alternative made with coconut cream and heavy sugar syrup). Regular milk has too much water content. If you use it, your pan will just turn into a sheet of solid, unrollable ice.
Conclusion
Making Rainbow Rolled Ice Cream Tacos at home is a phenomenally rewarding culinary project. It bridges the gap between baking, science, and pure, unadulterated fun. While it requires a bit of patience to let the sheet pans freeze properly and a quick hand to roll the ice cream before it melts, the end result is spectacular. The vibrant colors, the contrasting textures of the crispy shell and the velvety ice cream, and the endless possibilities for over-the-top toppings make this a recipe you will return to time and time again. So gather your ingredients, clear some space in your freezer, and prepare to bring the joy of the world’s most fun dessert right into your own kitchen.
Rainbow Rolled Ice Cream Tacos
Ingredients
Equipment
Method
- Place clean, dry metal sheet pans in the freezer overnight or for at least 8 hours until freezing cold.
- In a bowl, whisk eggs and sugar until light. Whisk in melted butter, milk, and vanilla. Gently fold in flour and salt until just combined.
- Divide the batter evenly into 6 small bowls. Add 1-2 drops of different colored gel food coloring to each bowl to create the rainbow colors. Mix well.
- Heat waffle cone maker. Pour one colored batter onto the center and cook for 1-2 minutes until set but still pliable.
- Immediately remove the hot waffle and drape it over a taco rack or rolling pin. Hold it in a ‘U’ shape for 15-20 seconds until it cools and hardens. Repeat for all colors.
- In a large pitcher or bowl, whisk together the heavy whipping cream, sweetened condensed milk, vanilla extract, and salt until smooth.
- Remove a freezing cold sheet pan from the freezer. Pour about 1/2 cup of the ice cream base onto the pan. Use a spatula to spread it rapidly into a paper-thin, even layer.
- Return the pan to the freezer for 4-6 hours until the ice cream is frozen solid.
- Remove the pan from the freezer. Working quickly, place a metal scraper at a 45-degree angle at the edge of the ice cream and push forward firmly to scrape the ice cream into tight rolls.
- Use tongs to gently pick up the ice cream rolls and nestle them inside the colored waffle cone taco shells.
- Top generously with whipped cream, chocolate syrup, caramel, sprinkles, toasted marshmallows, and candies. Serve immediately before melting.