Pineapple Juice Cake
The Ultimate Pineapple Juice Cake for Any Occasion
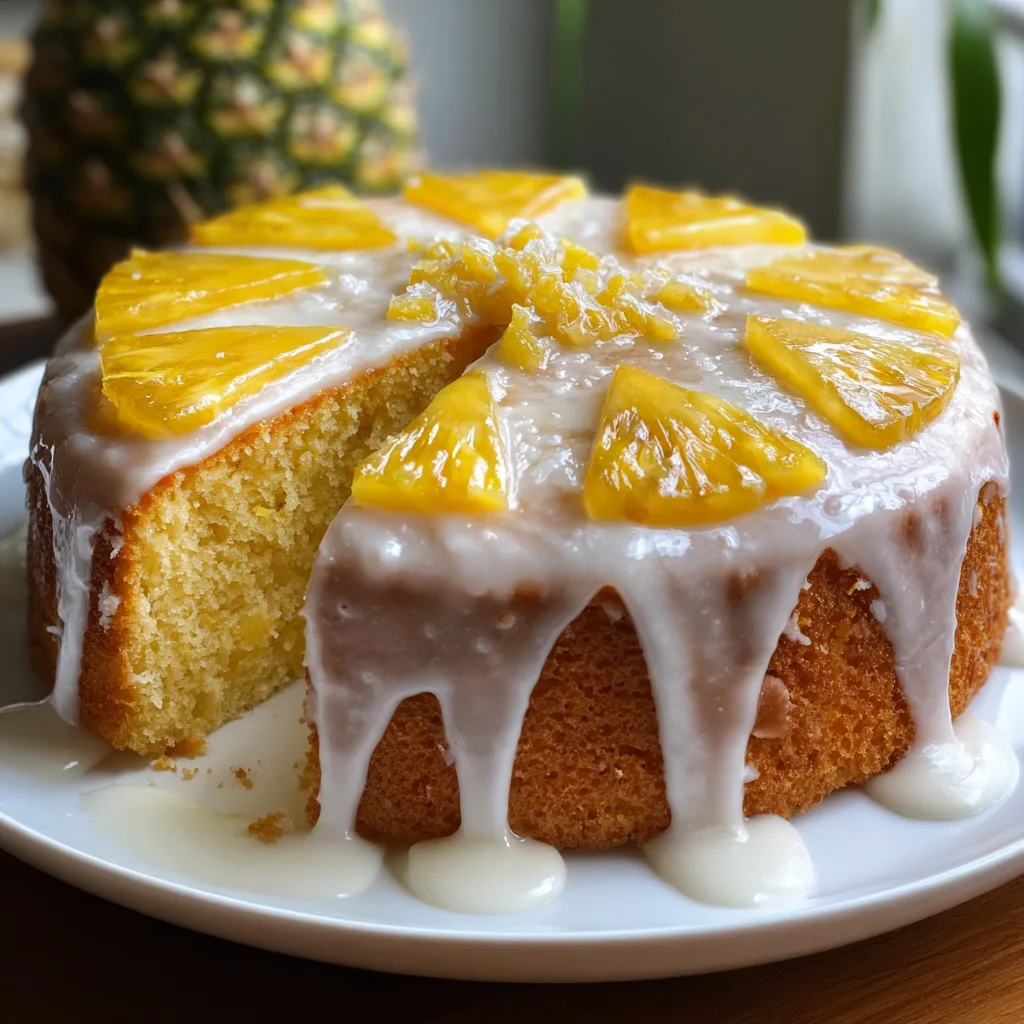
There is something undeniably magical about baking a cake from scratch, especially when that cake promises to transport you to a sun-drenched tropical island with every single bite. The Pineapple Juice Cake is a masterclass in flavor and texture, perfectly marrying the dense, comforting crumb of a traditional yellow cake with the bright, zesty, and refreshing notes of tropical fruit. Whether you are hosting a vibrant summer barbecue, attending a neighborhood potluck, celebrating a family birthday, or simply craving a slice of sunshine on a gloomy, rainy afternoon, this cake is the ultimate crowd-pleaser. With its double layers of incredibly moist sponge, a cascading waterfall of sweet, glossy white glaze, and a beautiful crown of fresh pineapple wedges, it is as much a feast for the eyes as it is for the palate. Prepare to discover your new favorite dessert recipe.
Why Pineapple Juice is the Secret to the Moistest Cake
If you have ever baked a cake that turned out painfully dry or unpleasantly dense, you know the heartbreak of a failed dessert. The secret to avoiding that fate lies entirely in the liquid you choose for your batter. While most traditional cake recipes call for milk, buttermilk, or even plain water, substituting a large portion of that liquid with 100% pure pineapple juice completely revolutionizes the baking process. But why does this work so effectively?
First and foremost, pineapple juice is naturally acidic. In the world of baking chemistry, acid is a miracle worker. When acidic pineapple juice interacts with your leavening agents—specifically baking powder and baking soda—it creates a robust chemical reaction that produces an abundance of tiny carbon dioxide bubbles. These bubbles expand in the heat of the oven, lifting the batter and resulting in a remarkably tender, fluffy, and light crumb. Furthermore, the acid actually helps to tenderize the gluten strands in the flour, preventing the cake from becoming tough or chewy, even if you accidentally overmix the batter slightly.
Beyond the structural benefits, the juice acts as a natural sweetener and flavor enhancer. It infuses the sponge with a subtle, fruity aroma that permeates every single crumb, ensuring that the pineapple flavor is not just sitting on top of the cake, but baked deep into its very soul. The natural sugars in the juice also aid in caramelization, giving the outside edges of your cake layers a beautiful, golden-brown finish.
A Brief History of the Pineapple in Desserts
To truly appreciate this cake, it helps to understand the cultural significance of the pineapple. Centuries ago, pineapples were an incredibly rare and expensive luxury in the Western world, imported at great cost from tropical climates. Serving a pineapple to your guests was considered the ultimate symbol of hospitality, wealth, and welcome. Over time, as transportation improved and the fruit became more accessible, it found its way into home kitchens and eventually into beloved desserts like the famous Pineapple Upside-Down Cake of the 1920s.
The Pineapple Juice Layer Cake is a modern evolution of these vintage recipes. It takes the beloved flavor profile of the upside-down cake but presents it in a more elegant, traditional layer cake format. The addition of the dripping glaze and the fresh fruit garnish pays homage to the fruit’s historical status as a stunning table centerpiece, ensuring that the spirit of warm hospitality lives on in every slice.
Essential Ingredients for Your Pineapple Juice Cake
Baking is a science, and starting with the right ingredients is non-negotiable for success. Gather these high-quality components before you begin:
- – 2 and 1/2 cups all-purpose flour (spooned and leveled, not scooped directly from the bag)
- – 2 teaspoons baking powder (ensure it is fresh and not expired)
- – 1/2 teaspoon baking soda
- – 1/2 teaspoon fine sea salt
- – 1 cup (2 sticks) unsalted butter, softened to room temperature
- – 1 and 1/2 cups granulated white sugar
- – 4 large eggs, at room temperature
- – 1 tablespoon pure vanilla extract
- – 1 cup 100% pure pineapple juice (canned or bottled, not from concentrate if possible)
- – 1/4 cup whole milk or sour cream (for added richness)
For the Pineapple Glaze and Garnish:
- – 2 cups powdered confectioners’ sugar, sifted
- – 3 to 4 tablespoons pure pineapple juice
- – 1 tablespoon unsalted butter, melted
- – Fresh pineapple wedges (about 10-12 pieces) for the sunburst garnish
- – 1/4 cup crushed pineapple, well-drained, for the center
Step-by-Step Instructions for Baking Perfection
Follow these instructions carefully to achieve perfectly level, delightfully moist cake layers.
- Preparation is Key: Preheat your oven to 350°F (175°C). Liberally grease two 8-inch or 9-inch round cake pans with butter or non-stick baking spray. For extra insurance against sticking, line the bottom of each pan with a circle of parchment paper.
- Whisk the Dry Ingredients: In a medium-sized mixing bowl, combine the all-purpose flour, baking powder, baking soda, and salt. Whisk them vigorously for about 30 seconds to ensure the leavening agents are evenly distributed throughout the flour. Set this bowl aside.
- Cream the Butter and Sugar: In the bowl of a stand mixer fitted with the paddle attachment (or using a large bowl and a hand mixer), beat the softened room-temperature butter and granulated sugar together on medium-high speed. Do not rush this step! Beat for a full 3 to 4 minutes until the mixture transforms from yellow and grainy to pale, light, and incredibly fluffy. This process forces air into the batter, which is crucial for a light cake.
- Incorporate the Eggs: Turn the mixer down to medium-low speed. Add the room-temperature eggs one at a time, ensuring each egg is fully incorporated before adding the next. Stop the mixer halfway through and scrape down the sides and bottom of the bowl with a rubber spatula. Add the vanilla extract and mix briefly to combine.
- Alternate Dry and Wet Ingredients: In a measuring cup, mix the 1 cup of pineapple juice with the 1/4 cup of whole milk (or sour cream). With the mixer on the lowest speed, add one-third of your dry flour mixture to the butter mixture. Once it is mostly combined, pour in half of the pineapple juice mixture. Add another third of the flour, followed by the rest of the juice. Finally, add the last third of the flour. Mix only until the last streak of flour disappears. Do not overmix! Overmixing will develop the gluten and make your cake dense and tough.
- Bake the Layers: Divide the batter evenly between your two prepared cake pans. Use a spatula to smooth the tops. Bake in the center of the preheated oven for 30 to 35 minutes. Test for doneness by inserting a wooden toothpick into the center of the cakes; it should come out clean or with a few moist crumbs clinging to it.
- Cooling the Cakes: Remove the pans from the oven and let them cool on a wire rack for exactly 10 minutes. Then, run a butter knife around the edges and carefully invert the cakes out of the pans onto the wire rack. Peel off the parchment paper and allow them to cool completely to room temperature before attempting to glaze or stack them.
The Magic of the Sweet Pineapple Glaze
While buttercream frosting is wonderful, a true Pineapple Juice Cake is best served with a poured glaze. A glaze allows the texture of the sponge to shine through without weighing the dessert down with heavy fats. To make the ultimate glossy, dripping glaze, sift your powdered sugar into a medium bowl to remove any lumps. Add the melted butter (which helps the glaze set up nicely and adds a touch of richness) and 3 tablespoons of pineapple juice. Whisk until perfectly smooth. You want a consistency that is thick like honey but still pourable. If it is too thick, add the remaining tablespoon of juice drop by drop. If it is too thin, add a little more sifted powdered sugar. The glaze should ribbon off your whisk and slowly sink back into the bowl.
Decorating Like a Pro: Fresh vs. Canned Pineapple
The visual appeal of this cake is almost as important as the taste. Once your cake layers are completely cool, place one layer on your serving platter. Drizzle a small amount of glaze over the top to act as a sweet “glue,” then place the second layer on top. Pour the remaining thick glaze directly into the center of the top layer. Use an offset spatula or the back of a spoon to gently push the glaze out toward the edges, allowing it to naturally drip and cascade down the sides of the cake in thick, glossy ribbons.
Before the glaze sets, it is time to garnish. While canned pineapple works in a pinch, using fresh pineapple for the decoration elevates the cake to bakery-level status. Fresh pineapple has a brighter, more vibrant yellow color and a sharper, cleaner flavor. Cut your fresh pineapple into even, triangular wedges. Arrange them in a circular, sunburst pattern around the outer edge of the cake. Finally, take your well-drained crushed pineapple (you can use canned for this specific part, just squeeze all the juice out first) and pile it neatly in the very center of the sunburst. The contrast between the opaque white glaze and the bright yellow fruit is absolutely stunning.
Expert Tips for a Flawless Layer Cake
Even seasoned bakers can run into trouble, so keep these expert tips in mind. First, temperature matters immensely. If your butter is too cold, it will not cream properly with the sugar. If your eggs are cold, they will seize the butter and cause your batter to curdle and separate. Always leave your dairy and eggs out on the counter for at least an hour before baking. Secondly, measure your flour correctly. Plunging a measuring cup into a bag of flour packs it down, resulting in up to 25% more flour than the recipe intends, which leads to a dry cake. Always use a spoon to fluff the flour, gently scoop it into your measuring cup, and level it off with a straight edge.
Creative Variations on the Classic Recipe
The wonderful thing about this base recipe is how easily it can be adapted to suit different tastes.
The Piña Colada Cake: If you love coconut, swap the whole milk in the batter for full-fat coconut milk. Add a teaspoon of coconut extract. When decorating, substitute the crushed pineapple in the center for a generous mound of sweetened shredded coconut, and perhaps sprinkle toasted coconut flakes over the dripping glaze.
The Rum Poke Cake: For an adult-only, incredibly decadent version, take a skewer and poke holes all over the warm cake layers as soon as they come out of the oven. Brush them generously with a mixture of dark rum and pineapple juice. The cake will absorb the liquid like a sponge, creating an impossibly moist, boozy treat.
Cream Cheese Frosting: If you strongly prefer a traditional frosted cake over a glazed one, whip up a batch of pineapple cream cheese frosting. Beat together cream cheese, butter, powdered sugar, and a few tablespoons of reduced, thickened pineapple juice until fluffy, and use it to frost the outside of the cake.
Make-Ahead and Storage Guidelines
This cake actually tastes better the day after it is made, as the pineapple flavor has time to deepen and meld with the vanilla sponge. You can bake the cake layers up to two days in advance. Once they are completely cool, wrap them tightly in a double layer of plastic wrap and store them at room temperature. If you need to make them further in advance, the wrapped layers can be frozen for up to three months. Thaw them overnight in the refrigerator before assembling and glazing.
Once the cake is fully assembled and glazed, it should be stored in an airtight cake dome at room temperature for up to 3 days. Because the glaze seals the outside of the cake, the interior remains wonderfully moist. However, if you live in a very hot or humid climate, it is safer to store the decorated cake in the refrigerator. Just be sure to bring individual slices back to room temperature before serving, as cold cake can taste dense and lose its delicate flavor notes.
Perfect Pairings: What to Serve with Pineapple Cake
While this cake is magnificent on its own, pairing it with the right accompaniments can elevate the dessert experience. A generous scoop of premium vanilla bean ice cream is a classic choice; the cold, creamy vanilla perfectly balances the sweet, tangy pineapple. If you want to lean into the tropical theme, a scoop of mango sorbet or coconut gelato is phenomenal. For beverages, a hot cup of black coffee or an Earl Grey tea provides a lovely bitter contrast to the sweet sugar glaze, making it an excellent option for an afternoon tea party.

Frequently Asked Questions
Can I use crushed pineapple inside the cake batter?
Yes, you can fold about 1/2 cup of very well-drained crushed pineapple into the batter right at the end. However, be aware that this will change the texture of the cake, making it heavier and slightly more dense. If you prefer a light, fluffy sponge, stick to using just the juice.
Can I bake this as a Bundt cake?
Absolutely. This batter works beautifully in a standard 10-cup or 12-cup Bundt pan. Make sure to grease every crevice of the pan thoroughly. You will need to increase the baking time to approximately 45 to 55 minutes. The glaze will look incredible dripping down the ridges of the Bundt shape!
Why did my cake sink in the middle?
Cakes usually sink in the middle for two reasons: either the oven door was opened too early during the baking process, causing a sudden drop in temperature before the structure was set, or the batter was overmixed, developing too much gluten that eventually collapsed under its own weight. Be gentle with your batter and trust your oven window!
Conclusion
The Pineapple Juice Cake is a triumph of home baking. It proves that with a few simple ingredients and a little bit of care, you can create a dessert that looks like it came from a high-end bakery and tastes like a tropical vacation. The tender, juice-infused crumb, combined with that irresistible, glossy, dripping sugar glaze, creates a textural masterpiece that will have your friends and family begging for the recipe. So preheat your oven, dust off your cake pans, and get ready to bake the most spectacular, mouth-watering pineapple dessert you have ever tasted. Happy baking!
Pineapple Juice Cake
Ingredients
Equipment
Method
- Preheat oven to 350°F (175°C). Grease and line two 8-inch round cake pans with parchment paper.
- In a bowl, whisk together the flour, baking powder, baking soda, and salt. Set aside.
- In a large mixer bowl, cream the softened butter and granulated sugar together for 3-4 minutes until light and fluffy.
- Beat in the eggs one at a time, mixing well after each addition. Stir in the vanilla extract.
- Mix the 1 cup pineapple juice and whole milk together. Alternately add the dry ingredients and the juice mixture to the batter, starting and ending with the dry ingredients. Mix just until combined.
- Divide the batter evenly between the prepared pans. Bake for 30-35 minutes or until a toothpick inserted comes out clean.
- Cool cakes in pans for 10 minutes, then invert onto a wire rack to cool completely.
- To make the glaze, whisk the sifted powdered sugar, melted butter, and 3-4 tablespoons of pineapple juice until thick but pourable.
- Stack the cooled cake layers. Pour the glaze over the top, letting it drip heavily down the sides. Decorate with fresh pineapple wedges and drained crushed pineapple before the glaze sets.