Peanut Butter Chocolate Roll
The Ultimate Peanut Butter Cup Chocolate Roll Recipe
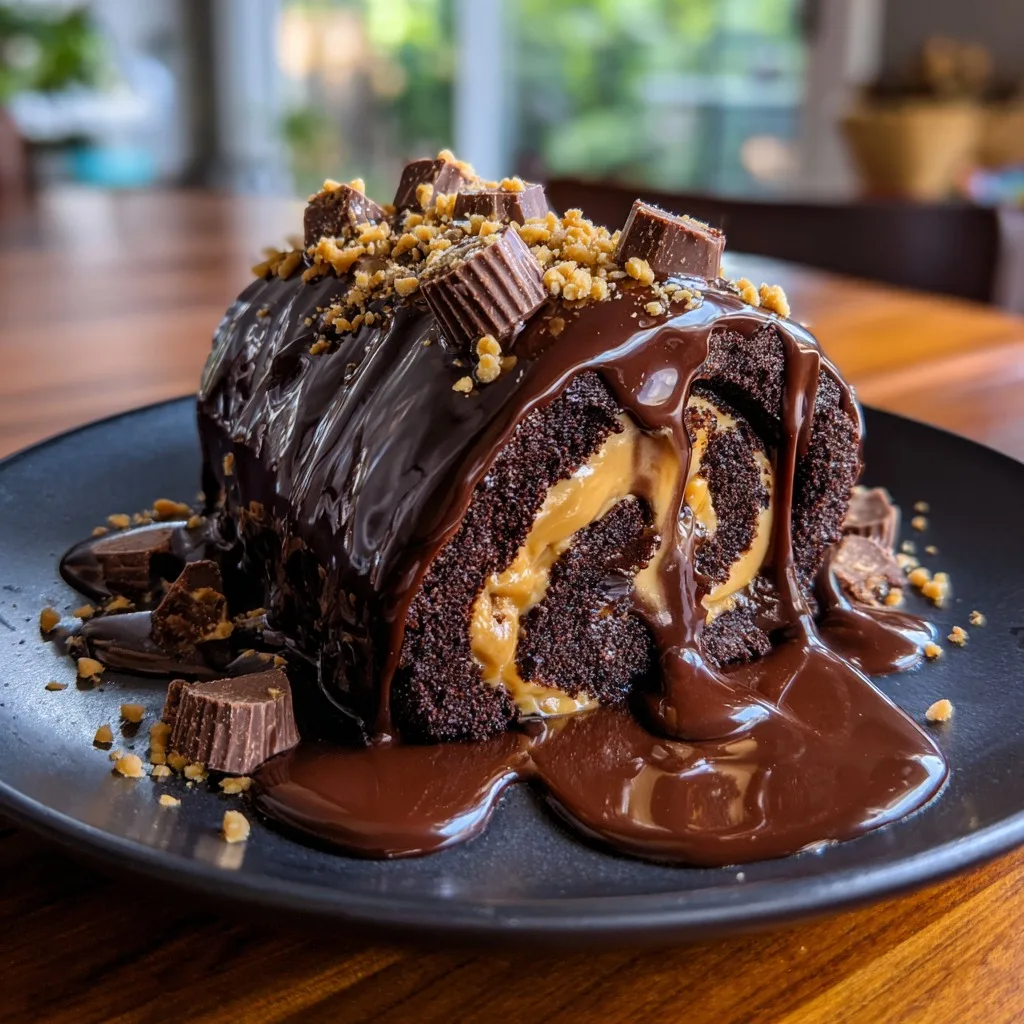
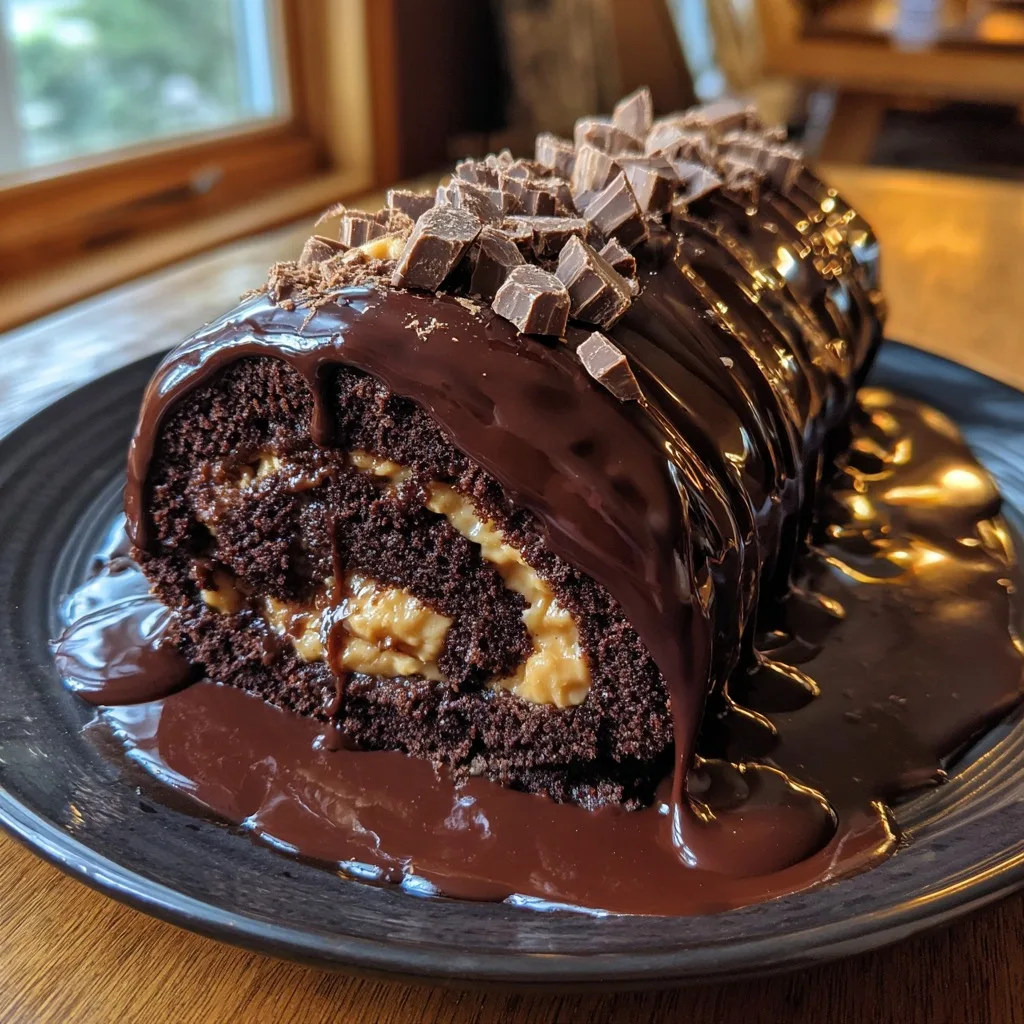
If there is one flavor combination that reigns supreme in the world of desserts, it is undoubtedly the marriage of rich, dark chocolate and salty-sweet peanut butter. The Peanut Butter Cup Chocolate Roll takes this legendary pairing and elevates it into a show-stopping dessert that looks straight out of a gourmet bakery but can be achieved right in your very own kitchen. This decadent treat features a light, airy, and deeply cocoa-flavored chocolate sponge cake that is delicately rolled around a thick, luxurious, melt-in-your-mouth peanut butter frosting. To finish it off, the entire cake roll is draped in a glossy, wet chocolate ganache that drips down the sides, and then generously crowned with chopped peanut butter cups. Every single bite offers a contrast of textures and an explosion of comforting flavors.
Creating a cake roll, often referred to as a Swiss roll or a roulade, can seem intimidating to many home bakers. The fear of the cake cracking or the filling spilling out keeps many people from attempting this beautiful dessert. However, with the right techniques, a bit of patience, and the detailed guide provided in this article, you will master the art of the cake roll. Whether you are baking for a holiday gathering, a birthday celebration, or simply a weekend treat for your family, this Peanut Butter Cup Chocolate Roll is guaranteed to be a massive hit. Get ready to dive deep into the world of sponge cakes, creamy fillings, and rich ganache as we break down everything you need to know to achieve perfection.
Why You Will Fall in Love with This Dessert
There are countless chocolate and peanut butter recipes out there, so what makes this specific chocolate roll stand out from the crowd? For starters, the visual appeal is simply undeniable. The striking swirl of light peanut butter filling contrasting against the dark chocolate cake creates a mesmerizing spiral effect when sliced. The dripping, ultra-glossy chocolate ganache covering the exterior adds a layer of absolute indulgence, making it look incredibly appetizing and professional.
Beyond its stunning appearance, the texture is perfectly balanced. The chocolate sponge is inherently light and springy. Because it is a sponge cake, it does not rely heavily on fats like butter or oil for its structure; instead, it uses whipped eggs to achieve its volume. This lightness prevents the dessert from feeling overwhelmingly heavy, which is crucial because the peanut butter filling and chocolate ganache are quite rich. The filling itself is incredibly smooth, mimicking the exact interior of your favorite peanut butter cup candies, while the topping provides a satisfying, chunky bite. It is a symphony of flavors and textures that hits every single craving.
A Brief History of the Cake Roll
To truly appreciate the art of making a Peanut Butter Cup Chocolate Roll, it helps to understand the origins of the cake roll itself. Despite the common name “Swiss Roll,” this style of rolled sponge cake did not actually originate in Switzerland. Food historians believe that the rolled cake was invented in Central Europe during the 19th century, potentially in Austria or Slovenia. The earliest published recipes for rolled cakes appeared in British baking books in the mid-1800s.
The concept was simple yet ingenious: bake a thin layer of sponge cake on a flat jelly roll pan, spread it with jam or cream, and roll it up tightly into a log. In traditional European baking, this technique is used to create the classic Bûche de Noël, or Yule Log, a festive Christmas dessert shaped and decorated to look like a piece of wood. Over the decades, bakers around the world have adapted the basic roulade formula to incorporate endless flavor combinations, leading to modern masterpieces like the decadent peanut butter and chocolate version we are making today.
Understanding the Essential Ingredients
The success of your Peanut Butter Cup Chocolate Roll relies heavily on using the right ingredients and understanding their roles in the recipe. Here is a detailed breakdown of what you will need for each component of the dessert.
For the Chocolate Sponge Cake
The cake base must be flexible enough to roll without snapping, which is why a specific type of batter is required.
- – Large Eggs: The foundation of the sponge. Whipping the eggs incorporates air, which provides the leavening and structure for the cake. Room temperature eggs whip up much better than cold eggs.
- – Granulated Sugar: Sweetens the cake and helps stabilize the whipped eggs, keeping the air bubbles intact.
- – Unsweetened Cocoa Powder: Provides the deep chocolate flavor. Dutch-processed cocoa powder is highly recommended for a darker color and smoother, less acidic chocolate taste.
- – All-Purpose Flour: Just a small amount is used to give the cake structure. Too much flour will make the cake dense and prone to cracking.
- – Baking Powder: Adds a little extra lift to ensure the cake isn’t too flat.
- – Salt & Vanilla Extract: Essential flavor enhancers that balance the bitterness of the cocoa.
For the Peanut Butter Filling
This filling is essentially a highly aerated, super creamy peanut butter buttercream.
- – Creamy Peanut Butter: Standard commercial creamy peanut butter (like Skippy or Jif) works best here. Natural peanut butters that require stirring can separate and cause the filling to become grainy or greasy.
- – Unsalted Butter: Must be softened to room temperature. It provides structure and a creamy mouthfeel.
- – Powdered Sugar: Sweetens and thickens the filling without adding graininess.
- – Heavy Whipping Cream: A splash of cream lightens the frosting, making it fluffy and easy to spread over the delicate cake.
- – Vanilla Extract: Rounds out the nutty flavor.
For the Glossy Chocolate Ganache & Topping
The crowning glory that seals in the moisture and adds a massive punch of richness.
- – Semi-Sweet Chocolate Chips: A good quality chocolate chip or finely chopped chocolate bar melts smoothly. Semi-sweet balances the sweetness of the filling.
- – Heavy Whipping Cream: Mixed with the chocolate to create the fluid, glossy ganache.
- – Peanut Butter Cups: Chopped into varying sizes. You need these for the signature crunch and thematic decoration.
Step-by-Step Instructions
Follow these numbered steps meticulously for the best results. Baking a cake roll is all about timing and temperature.
Phase 1: Baking and Rolling the Cake
- Preparation: Preheat your oven to 350°F (175°C). Prepare a 10×15 inch jelly roll pan by spraying it lightly with non-stick cooking spray, lining it with parchment paper, and then spraying the parchment paper again. This double-prep ensures the delicate sponge will not stick.
- Sift Dry Ingredients: In a medium bowl, whisk together the flour, cocoa powder, baking powder, and salt. Sifting is crucial to prevent hard lumps of cocoa in your delicate cake.
- Whip the Eggs: In a large mixing bowl, or the bowl of a stand mixer fitted with the whisk attachment, beat the large eggs on high speed for about 3 to 5 minutes until they are thick, pale, and significantly increased in volume.
- Add Sugar and Vanilla: Gradually pour in the granulated sugar and vanilla extract while continuing to beat the eggs. Beat for another 2 minutes until the mixture reaches the ribbon stage (when you lift the whisk, the batter falls back in ribbons that sit on the surface for a moment before dissolving).
- Fold in Dry Ingredients: Gently fold the sifted dry ingredients into the egg mixture using a rubber spatula. Use a sweeping under-and-over motion to avoid deflating the precious air you just whipped into the eggs. Stop as soon as no dry flour streaks remain.
- Bake: Pour the batter into your prepared jelly roll pan. Use an offset spatula to spread it evenly all the way to the corners. Bake for 10 to 12 minutes, or until the top springs back when lightly touched.
- The Crucial Hot Roll: While the cake is baking, lay a clean, thin cotton kitchen towel flat on your counter. Dust it generously with powdered sugar or cocoa powder. The second the cake comes out of the oven, immediately invert the hot pan onto the dusted towel. Peel off the parchment paper carefully. Starting from the short end, tightly roll the hot cake up with the towel inside it. Let the cake cool completely in this rolled-up shape on a wire rack for at least 1 hour.
Phase 2: Making the Filling and Assembling
- Whip the Filling: In a medium bowl, beat the softened butter and creamy peanut butter together until perfectly smooth. Gradually add the powdered sugar, mixing on low speed until combined. Add the vanilla extract and heavy cream. Increase the mixer speed to high and beat for 2 to 3 minutes until the filling is very light, fluffy, and spreadable.
- Unroll the Cake: Once the cake is completely cool to the touch, very carefully unroll it. It is okay if the ends curl up slightly; do not force it to lay completely flat, or it will crack.
- Spread the Filling: Dollop the peanut butter filling over the surface of the unrolled cake. Use an offset spatula to spread it in an even layer, leaving a small half-inch border around the edges so the filling doesn’t squeeze out when rolled.
- Re-roll the Cake: Carefully re-roll the cake, this time without the towel, using the shape the cake has already memorized. Place the rolled cake seam-side down on a serving platter or wire rack. Chill in the refrigerator for 30 minutes to firm up the filling.
Phase 3: The Ganache Glaze
- Make the Ganache: Place the chocolate chips in a heat-proof bowl. In a small saucepan or in the microwave, heat the heavy cream until it just begins to simmer (do not boil). Pour the hot cream over the chocolate chips. Let it sit untouched for 5 minutes. Gently whisk the mixture starting from the center and moving outwards until a glossy, smooth ganache forms.
- Glaze the Cake: Pour the slightly cooled but still liquid ganache evenly over the top of the chilled cake roll, using a spoon to encourage it to drip down the sides in thick, glossy ribbons.
- Decorate: While the ganache is still wet and sticky, generously sprinkle the chopped peanut butter cups all over the top.
- Set and Serve: Refrigerate the cake for at least 1 hour before slicing. This allows the ganache to set and makes for incredibly clean, beautiful slices.
Expert Tips for Rolling Cake Without Cracking
The most common fear when making a cake roll is the dreaded crack. A cracked cake is still delicious, but it lacks that bakery-style perfection. Here are the professional secrets to ensuring a flawless, crack-free roll every single time.
First, do not overbake the sponge. A dry sponge is a brittle sponge. Check the cake exactly at the 10-minute mark; it should be just set. Second, the towel roll is absolutely non-negotiable. Rolling the cake while it is steaming hot out of the oven trains the structure of the cake to cool in a spiral shape. The towel absorbs excess moisture and prevents the cake from sticking to itself. Furthermore, be gentle when unrolling and re-rolling. Work slowly, supporting the cake with your hands. Finally, do not overfill the cake. A massive mound of frosting might seem like a good idea, but it will put too much stress on the delicate sponge during the final roll, causing it to split open.
Exciting Variations to Try
While this Peanut Butter Cup Chocolate Roll is perfect as it is, once you master the technique, you can easily customize the flavor profile to suit different occasions or preferences.
- – Nutella Crunch Roll: Swap the peanut butter in the filling for an equal amount of hazelnut spread (like Nutella) and sprinkle crushed toasted hazelnuts on top of the ganache instead of peanut butter cups.
- – Marshmallow Fluff Core: For a “Fluffernutter” experience, spread a thin layer of marshmallow crème over the cake before adding the peanut butter filling.
- – White Chocolate Glaze: If you want a striking visual contrast, make a white chocolate ganache for the exterior drip, which will make the dark chocolate cake really pop.
- – Salted Caramel Drizzle: Elevate the sweet and salty dynamic by generously drizzling a high-quality salted caramel sauce over the final ganache glaze.
Serving Suggestions
This Peanut Butter Cup Chocolate Roll is incredibly rich, so a standard slice goes a long way. Use a sharp, hot knife to cut clean slices (dip your knife in hot water and wipe it dry between each cut). Serve it slightly chilled or at room temperature. It pairs wonderfully with a cold glass of milk, a hot cup of dark roast coffee, or an unsweetened espresso to cut through the sweetness. If you want to push the indulgence to the absolute maximum, serve a slice alongside a scoop of premium vanilla bean ice cream.
Storage and Freezing Guidelines
Due to the dairy in the filling and ganache, this cake roll must be stored in the refrigerator. Place it in a long airtight container, or loosely wrap it in plastic wrap (use toothpicks to tent the plastic wrap so it doesn’t stick to the ganache). It will stay fresh and moist in the fridge for up to 4 days.
This dessert also freezes exceptionally well. If you want to make it ahead of time, do not apply the ganache. Wrap the filled, unglazed cake roll tightly in a layer of plastic wrap, followed by a layer of aluminum foil. Freeze for up to 2 months. When ready to serve, thaw the roll overnight in the refrigerator, then make the fresh ganache, pour it over the thawed cake, top with candies, and serve.
Frequently Asked Questions (FAQ)
What size pan do I absolutely need?
You must use a 10×15 inch jelly roll pan with raised edges. Using a standard 13×9 inch baking dish will result in a cake that is far too thick to roll, and using a massive half-sheet pan will result in a paper-thin cake that will burn and turn crispy.
Can I use natural peanut butter?
It is highly recommended to use standard, homogenized creamy peanut butter (the kind that does not separate). Natural peanut butter can be too oily and lacks the stabilizers needed to keep the frosting fluffy, which might result in a runny or split filling.
Why did my ganache turn dull and grainy?
Ganache can split if the cream is boiled too vigorously before being poured over the chocolate, or if it is whisked too aggressively while still too hot. Heat the cream just until it simmers, let it sit on the chocolate patiently, and stir gently.
Conclusion
The Peanut Butter Cup Chocolate Roll is a triumphant dessert that bridges the gap between home baking and professional pastry. It brings together the world’s most beloved flavor pairing in a format that is incredibly satisfying to slice and eat. By understanding the science of the sponge cake, utilizing the hot-roll method, and taking your time with the luscious filling and glossy ganache, you can create a centerpiece dessert that will leave your friends and family speechless. So grab your jelly roll pan, preheat your oven, and prepare to roll your way to chocolate and peanut butter perfection.
Peanut Butter Cup Chocolate Roll
Ingredients
Equipment
Method
- Preheat oven to 350°F (175°C). Grease a 10×15 inch jelly roll pan, line with parchment paper, and grease the parchment.
- In a small bowl, whisk together flour, cocoa powder, baking powder, and salt. Set aside.
- In a large bowl, beat the eggs on high speed for 3-5 minutes until thick and pale. Gradually add sugar and vanilla, beating for 2 more minutes.
- Gently fold the dry ingredients into the egg mixture until just combined. Do not overmix.
- Pour batter into the prepared pan and spread evenly to the edges. Bake for 10-12 minutes until the cake springs back when lightly touched.
- Immediately invert the hot cake onto a clean kitchen towel dusted with powdered sugar. Peel off the parchment paper. Roll the cake and towel up together tightly, starting from the short end.
- Let the rolled cake cool completely on a wire rack for at least 1 hour.
- While the cake cools, make the filling: Beat creamy peanut butter and softened butter until smooth. Add powdered sugar, heavy cream, and vanilla. Beat on high for 2-3 minutes until fluffy.
- Carefully unroll the cooled cake. Spread the peanut butter filling evenly over the surface, leaving a small border. Re-roll the cake (without the towel). Chill for 30 minutes.
- For the ganache, heat heavy cream until simmering, then pour over chocolate chips in a heatproof bowl. Let sit for 5 minutes, then gently whisk until smooth and glossy.
- Place the chilled cake roll on a wire rack set over a baking sheet. Pour the warm ganache over the cake. Immediately sprinkle with chopped peanut butter cups. Chill for 1 hour before slicing.