Peach Ring Candied Apples
The Ultimate Bright Orange Peach Ring Candied Apples Recipe
There is a unique kind of culinary magic that happens when you take a crisp, tart, fresh piece of fruit and encase it entirely in a shatteringly crisp, brightly colored sugar shell. Candied apples have been a staple of carnivals, fall festivals, and holiday parties for generations. But why settle for the standard, expected cherry-red apple when you can create something truly show-stopping? Enter the bright orange Peach Ring Candied Apple. With its incredibly vibrant, opaque orange, ultra-glossy hard candy shell and a chewy, nostalgic peach gummy ring resting right on top, this recipe is a modern, whimsical twist on a beloved classic. It is a dessert that demands attention, sparks conversation, and delivers a phenomenal contrast of textures and flavors that will have your guests coming back for more.
Making traditional hard candy from scratch can seem intimidating to many home cooks. The idea of boiling molten sugar to exact temperatures often scares people away from trying these classic confectionary arts. However, with the right tools—specifically, a reliable candy thermometer—and a clear understanding of the process, making these glossy orange candied apples is surprisingly straightforward. In this comprehensive, step-by-step guide, we will demystify the art of the candy apple. We will cover everything from selecting the absolute best type of apple and preparing it properly so the candy adheres flawlessly, to the exact science of the “hard crack” sugar stage. Whether you are prepping for a vibrant Halloween party, a summer fruit-themed baby shower, or simply want to master a fun, impressive kitchen project, these Peach Ring Candied Apples are guaranteed to be a massive success.
Why You Will Fall in Love with These Candied Apples
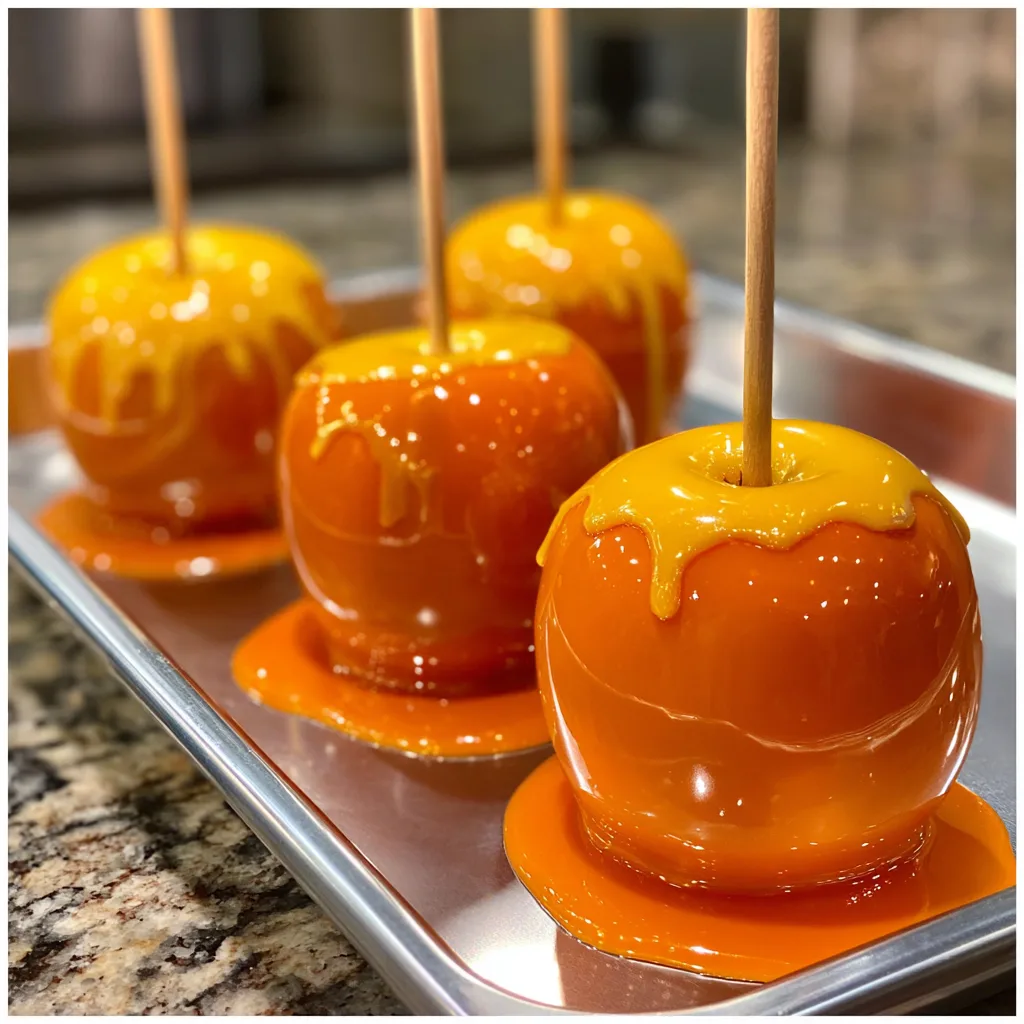
The visual impact of these apples cannot be overstated. Standard red candy apples are beautiful, but they are expected. By utilizing opaque white food coloring alongside vibrant orange gel color, you create a candy shell that looks less like stained glass and more like a shiny, flawless ceramic glaze. The color pops beautifully, making them the ultimate centerpiece for any dessert table. The addition of the peach gummy ring—slipped perfectly over the wooden stick to rest on the crown of the apple—adds a layer of visual whimsy and a hint of the flavor profile waiting inside.
Beyond their stunning appearance, the flavor and texture profile is a masterpiece of contrasts. The initial bite yields a satisfying, glass-like shatter of the sweet, orange-and-peach-flavored hard candy shell. Immediately following that crunch, your teeth sink into the firm, juicy, and aggressively tart flesh of a fresh Granny Smith apple. The extreme sweetness of the candy coating is perfectly balanced by the natural acidity of the fruit, preventing the treat from becoming cloyingly sweet. Finally, the chewy, sugar-sanded peach ring provides a completely different, soft texture that rounds out the entire eating experience. It is a sensory delight from start to finish.
Selecting and Preparing the Perfect Apples
The success of your candied apples begins long before you turn on the stove; it starts in the produce aisle. The type of apple you choose, and more importantly, how you prepare it, dictates whether your candy shell will stick or slide right off into a sticky puddle.
For candied apples, the Granny Smith is the undisputed king. The reason is twofold. First, they are exceptionally firm. The hot molten sugar (which reaches 300°F) will slightly cook the outside of the apple. A softer apple, like a Gala or a Red Delicious, will turn to mush under that intense heat. A Granny Smith holds its structural integrity. Second, and most importantly, Granny Smith apples are incredibly tart. The hard candy shell is essentially pure sugar; pairing it with a sweet apple results in an unbalanced, overly sugary dessert. The sharp, acidic bite of a green apple is essential for flavor harmony.
Once you have your apples, you must remove the wax. Grocery store apples are coated in a food-safe food-grade wax to make them shiny and extend their shelf life. If you dip a waxed apple into hot sugar, the wax will melt, and the candy will slide completely off the fruit as it cools, leaving you with bare apples and a pool of hard candy on your baking sheet. To remove the wax, bring a large pot of water to a rolling boil with a tablespoon of baking soda. Quickly dip each apple into the boiling water for exactly 5 to 10 seconds (no longer, or you will cook the apple), then immediately wipe it dry with a rough paper towel. The wax will wipe away, leaving a dull, perfectly primed surface for your candy.
The Science of the Hard Crack Stage
Making candy apples is a lesson in chemistry. You are essentially boiling a sugar syrup to remove water content until the remaining sugar reaches a specific concentration. For candy apples, you must reach the “hard crack” stage, which occurs exactly between 300°F and 310°F (149°C – 154°C).
If you stop boiling the sugar at 290°F, you will hit the “soft crack” stage. Your apples will look shiny and perfect, but the moment you bite into them, the candy will stick to your teeth like superglue, creating an unpleasant, chewy mess. If you boil the sugar past 310°F, the sugar will begin to caramelize and eventually burn, turning brown and tasting bitter. Therefore, a high-quality digital or classic glass candy thermometer is not optional for this recipe—it is absolutely mandatory. Do not attempt to guess the temperature based on cooking time, as variables like humidity, stove heat, and pot thickness will drastically alter how long it takes to reach 300°F.
Essential Ingredients
To craft these visually stunning and delicious treats, you will need the following components. Have everything measured and ready before you start boiling, as candy making requires your full attention.
- – Granny Smith Apples: (6-8 medium sized) Thoroughly washed, de-waxed, stems removed, and dried completely.
- – Granulated White Sugar: (3 cups) The foundation of the hard candy shell.
- – Light Corn Syrup: (1/2 cup) This is crucial. Corn syrup acts as an “interfering agent,” preventing the sugar molecules from crystallizing and turning your smooth glaze into a grainy, cloudy mess.
- – Water: (1 cup) Used to dissolve the sugar initially; it will boil off during the cooking process.
- – White Food Coloring: (1-2 teaspoons) Liquid or gel. This is the secret to getting an opaque, bright pastel look. Without white food coloring, the candy is translucent, and the green of the apple will muddy the orange color.
- – Orange Gel Food Coloring: (1/2 teaspoon) Gel coloring is preferred because it adds vibrant color without adding excess liquid to your perfectly tempered candy.
- – Peach Candy Flavoring Oil: (1/2 teaspoon) Optional, but highly recommended to tie in the flavor with the gummy ring garnish. Use concentrated candy oils, not extracts, as alcohol-based extracts can evaporate violently in 300°F sugar.
- – Peach Gummy Rings: (6-8 pieces) Classic sugar-coated peach gummy rings for garnishing the top of each apple.
- – Heavy Wooden Popsicle Sticks or Skewers: (6-8 pieces) For holding the apples.
Step-by-Step Instructions
- Prep the Apples and Station: Begin by scrubbing your apples in hot water (or doing the quick boiling water dip mentioned above) to remove all wax. Dry them meticulously with a paper towel. Any remaining moisture will create steam and cause the candy to bubble and peel off. Remove the stems. Push a sturdy wooden popsicle stick deep into the core of each apple through the top, ensuring it is secure. Spray a metal baking sheet very generously with non-stick cooking spray, or line it with a silicone baking mat. Place it right next to your stove.
- Combine the Base: In a medium-sized, heavy-bottomed saucepan, combine the granulated sugar, light corn syrup, and water. Stir gently off the heat until the sugar is mostly dissolved and the mixture looks like wet sand.
- Boil the Syrup: Place the saucepan over medium-high heat. Clip your candy thermometer to the side of the pan, ensuring the tip is submerged in the liquid but not touching the very bottom of the metal pot. Bring the mixture to a boil. Once it starts boiling, DO NOT STIR IT. Stirring can introduce sugar crystals to the sides of the pan, which can cause the whole batch to seize up and crystallize.
- Monitor the Temperature: Watch the thermometer closely. The temperature will rise steadily to 220°F, stall for a bit as the water boils off, and then rapidly climb. You are looking for exactly 300°F (Hard Crack stage). This process usually takes about 15 to 20 minutes depending on your stove.
- Color and Flavor: The moment the thermometer reads 300°F, immediately remove the pot from the heat. Carefully and quickly stir in the white food coloring, orange gel food coloring, and the peach flavoring oil. The mixture will sputter and bubble violently when you add these—this is normal, just stir carefully with a heat-proof silicone spatula until the color is uniform and opaque. Let the mixture sit for about 60 seconds to allow the boiling bubbles to subside (this ensures a smooth, glass-like finish on your apples).
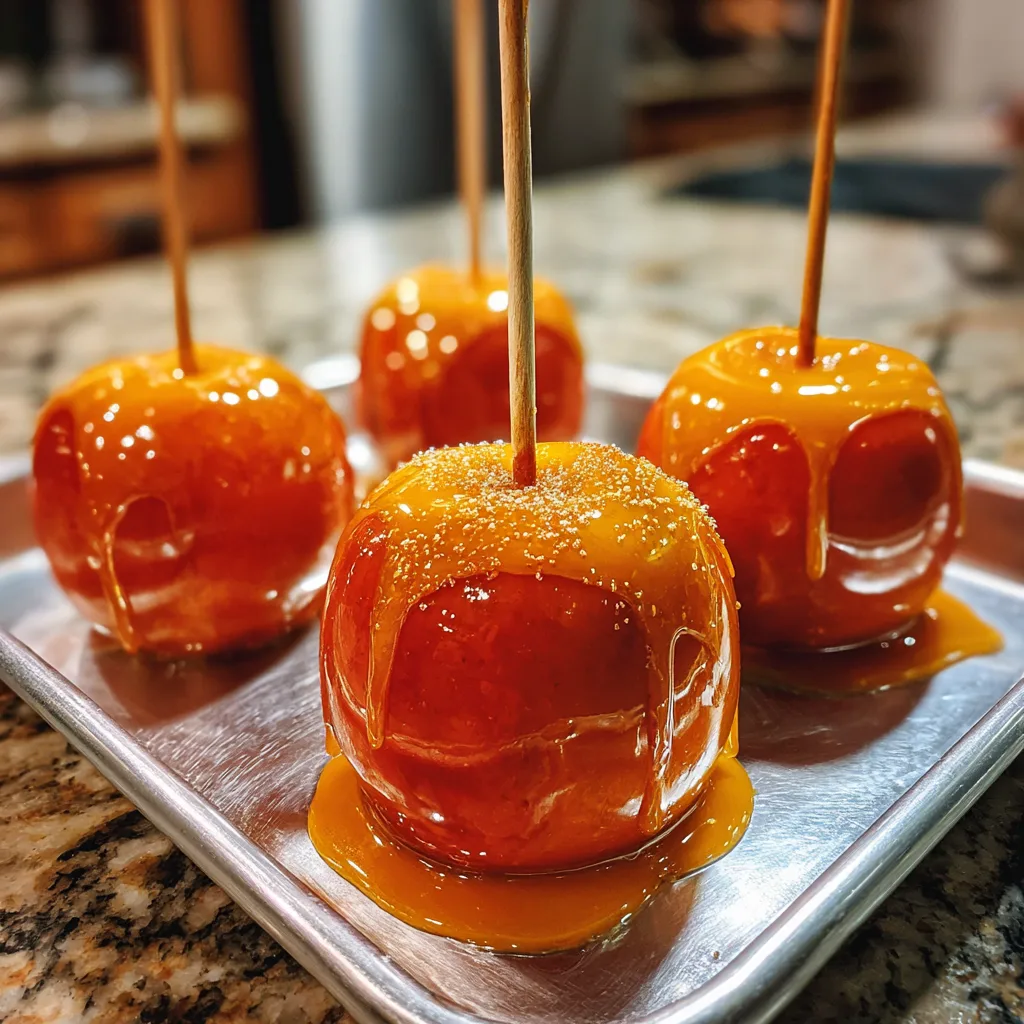
- Dip the Apples: Tilt the saucepan slightly to pool the hot candy to one side. Grab an apple by the wooden stick and plunge it into the molten candy. Swirl it quickly to coat the entire apple, leaving a small circle of green visible at the very top if desired. Pull the apple up and let the excess candy drip back into the pot for a few seconds. Gently scrape the bottom of the apple against the lip of the pot to remove the thickest part of the drip.
- Garnish and Set: Immediately place the dipped apple onto your prepared, greased baking sheet. While the candy is still hot and sticky (you only have a few seconds!), carefully slide a peach gummy ring down the wooden stick so it adheres to the top of the candy apple. Repeat the dipping and garnishing process with the remaining apples. Work quickly, as the candy will begin to harden in the pot.
- Cool Completely: Allow the apples to sit undisturbed at room temperature for at least 30 minutes to allow the hard candy shell to cool and harden completely before serving.
Expert Troubleshooting and Tips for the Perfect Candy Shell
Even with careful attention, candy making can sometimes throw a curveball. The most common issue home cooks face with candy apples is the appearance of tiny bubbles all over the surface of the candy shell. This is usually caused by dipping the apples while the sugar is still aggressively boiling. By taking the pot off the heat and waiting just 60 to 90 seconds for the rolling bubbles to stop, you ensure a smooth, glass-like finish. Furthermore, vigorously stirring the mixture while it boils traps air; always let the boiling action do the mixing.
Another common issue is the candy hardening in the pot before you finish dipping all your apples. If this happens, do not panic. Simply place the saucepan back over low heat for a minute or two until the candy loosens up again. Do not leave it on the heat too long, or you risk burning the sugar.
If you notice the candy pooling heavily at the bottom of the apple on the baking sheet, creating “elephant feet,” you likely did not let enough excess candy drip off before setting it down. Take your time holding the apple over the pot to let gravity do its work. Scraping the bottom against the lip of the pan is a crucial step for achieving a neat, professional look.
Fun Variations and Creative Additions
While the peach and orange combination is brilliant, you can use this exact base recipe to create a rainbow of different candied apples for any occasion.
- – The Caramel Apple Illusion: By using a touch of brown food coloring and a caramel flavor oil in your hard candy base, you can create a candy apple that looks exactly like a traditional soft caramel apple, but features the surprising, satisfying crunch of hard candy.
- – Galaxy Apples: Divide the hot 300°F syrup into two pots. Color one dark blue and one purple. Swirl them together slightly before dipping the apples, then immediately sprinkle with edible edible silver glitter stars before the candy sets.
- – Creamsicle Delight: Keep the bright orange color, but swap the peach flavoring oil for a sweet vanilla or marshmallow flavoring oil. The combination of the tart apple and the creamy vanilla-orange shell tastes exactly like a nostalgic summer popsicle.
- – Abstract Drizzles: As seen on some gourmet apples, you can reserve a tiny bit of the candy in the pot. Once your apples are dipped and set, use a fork to rapidly flick thin, abstract strings of the remaining candy over the apples for an artistic, textured look.
Storage, Packaging, and Serving Suggestions
Candied apples are best enjoyed on the exact day they are made. Because apples have a high water content, the moisture inside the fruit will eventually begin to break down the sugar shell from the inside out. If you live in a humid climate, this process happens even faster, causing the candy shell to become sticky, tacky, and eventually melt.
Do not store candied apples in the refrigerator. The condensation and moisture in the fridge will ruin the hard candy shell incredibly quickly. Instead, keep them at room temperature in a cool, dry place.
If you are making these as party favors, wait until they are completely cool and hard to the touch. Wrap each apple tightly in a clear cellophane bag and tie it tightly around the stick with a decorative ribbon. The cellophane acts as a barrier against ambient humidity, keeping the apples crisp for an extra day. When serving, especially for children, it is often easiest to place the apple on a cutting board and slice it into wedges with a large, sharp knife, as biting directly into a whole hard candy apple can be challenging.
Conclusion
Mastering the art of the candied apple is a remarkably rewarding kitchen endeavor. There is an immense sense of satisfaction that comes from transforming basic pantry ingredients and fresh fruit into a glowing, professional-looking confection. These Bright Orange Peach Ring Candied Apples take that traditional technique and elevate it with striking, opaque colors, whimsical gummy garnishes, and a fantastic, balanced flavor profile.
By taking the time to properly prep your Granny Smith apples, respecting the chemistry of the hard crack sugar stage, and working quickly and carefully, you can produce a batch of flawless, glass-like treats that look like they belong in the window of an artisanal candy shop. Whether you are delighting trick-or-treaters, impressing guests at a fall festival, or just treating yourself to a sweet, crunchy, and tart masterpiece, this recipe is sure to become a beloved staple in your dessert repertoire. Grab your thermometer, pick out the perfect apples, and get ready to create some edible magic!
Peach Ring Candied Apples
Ingredients
Equipment
Method
- Wash apples in hot water to remove wax, dry completely, and insert a heavy wooden stick into the core of each.
- Generously grease a metal baking sheet with non-stick cooking spray.
- In a saucepan, combine sugar, corn syrup, and water. Stir gently, then bring to a boil over medium-high heat. Do not stir once boiling.
- Clip a candy thermometer to the pot. Boil until the mixture reaches exactly 300°F (hard crack stage).
- Immediately remove from heat. Carefully stir in white food coloring, orange food coloring, and peach flavoring.
- Wait 60 seconds for bubbles to subside. Tilt pan and quickly dip each apple, swirling to coat. Let excess drip off, scrape the bottom against the lip of the pot, and place on the greased pan.
- Immediately slide a peach gummy ring down the stick onto the wet candy so it sticks to the top.
- Let apples cool completely at room temperature for 30 minutes until the shell is hard like glass.