Pastel Chocolate Strawberries
Beautiful Pastel Chocolate Covered Strawberries: The Ultimate Gourmet Spring Dessert
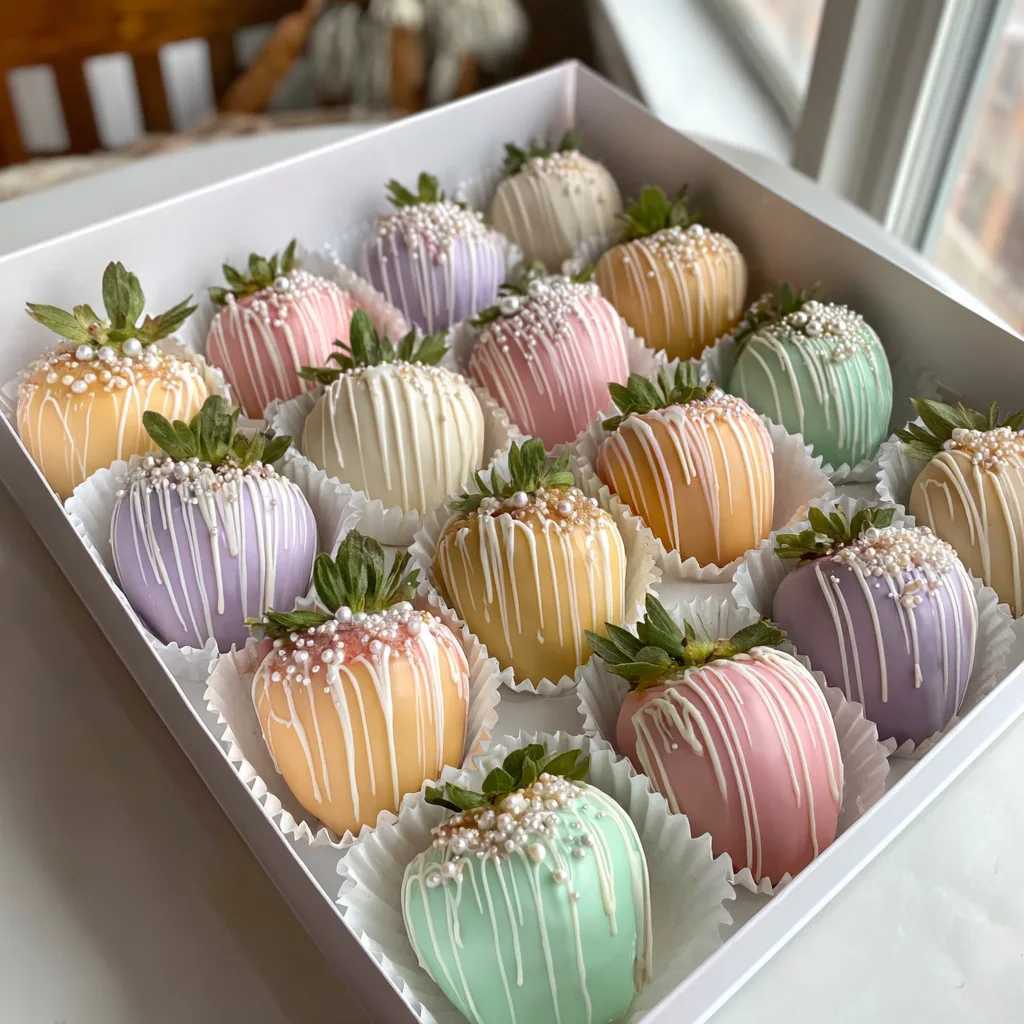
When it comes to elegant, visually stunning, and universally loved desserts, few treats can rival the classic chocolate-covered strawberry. But when you want to elevate this timeless confection to something truly magical, transforming them into Beautiful Pastel Chocolate Covered Strawberries is the ultimate game-changer. These gorgeous, spring-inspired treats are coated in high-quality white chocolate or candy melts tinted in delicate shades of peach, pale green, soft yellow, and lavender. Finished with matching elegant drizzles and delicate white sugar pearls, they look like they came straight out of a high-end gourmet boutique.
Whether you are planning a delightful spring garden party, preparing a sweet surprise for Mother’s Day, organizing a baby shower, putting together a stunning dessert table for a bridal shower, or simply craving a luxurious homemade treat, these pastel chocolate covered strawberries are guaranteed to steal the show. The contrast between the crisp, sweet, colorful chocolate shell and the juicy, tart, bright red strawberry hidden inside creates a flavor and texture experience that is absolutely irresistible. In this comprehensive guide, we will walk you through every single step, tip, and trick you need to know to master the art of dipping, coloring, and decorating strawberries at home.
Why You Will Love These Pastel Chocolate Covered Strawberries
There are countless reasons why these pastel chocolate covered strawberries will quickly become your go-to dessert for special occasions. First and foremost is their undeniable visual appeal. The soft pastel palette brings a touch of whimsy, elegance, and springtime joy to any setting. Arranged neatly in a pristine white bakery box with individual paper liners, they look professionally crafted, making them the perfect edible gift.
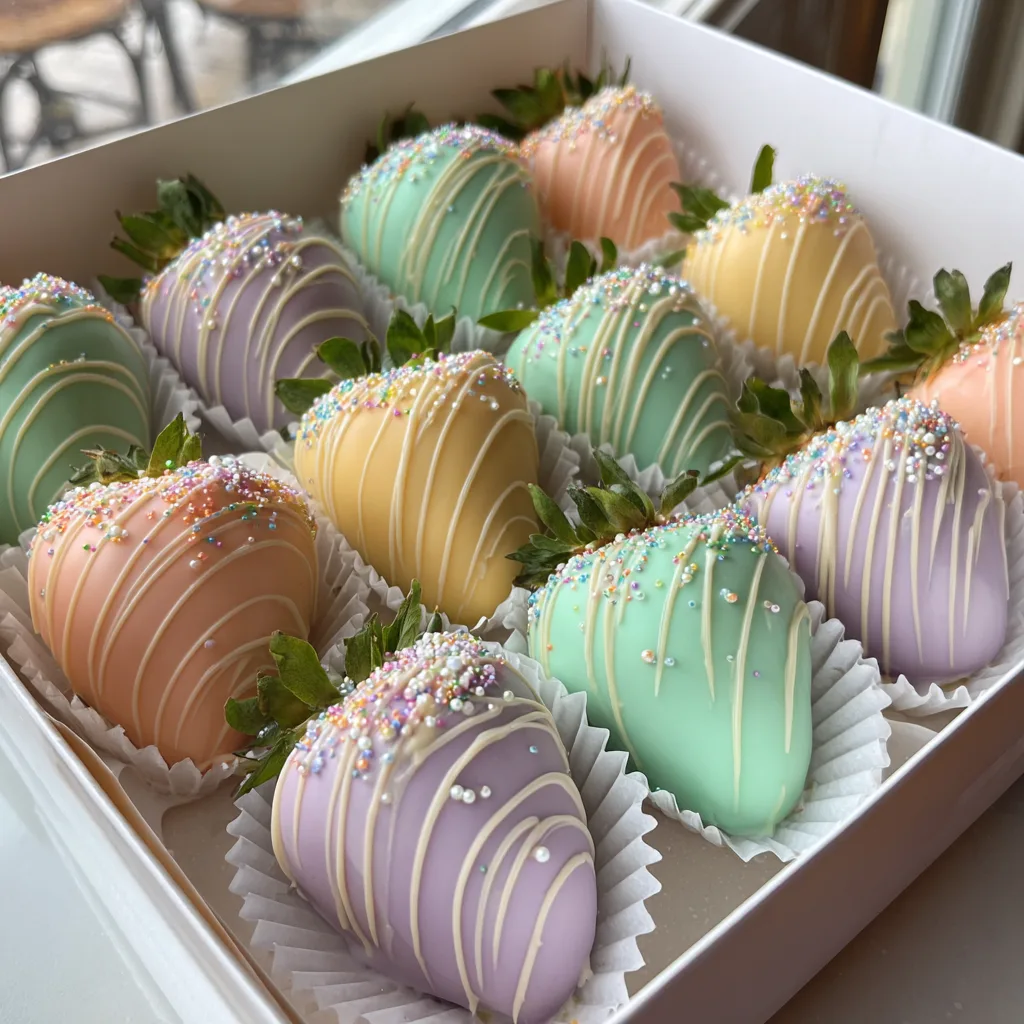
Secondly, they are incredibly customizable. While we have chosen a beautiful palette of peach, mint green, pale yellow, and lavender, you can easily adapt the colors to match any theme or holiday. From vibrant neon colors for a summer birthday bash to soft blue and pink for a gender reveal party, the possibilities are entirely endless. The decorating options are equally versatile; while we feature elegant drizzles and tiny white nonpareils (sugar pearls), you can experiment with edible gold leaf, crushed nuts, or sanding sugar.
Finally, despite their intricate and professional appearance, these treats are surprisingly accessible for home cooks. With the right ingredients—specifically, quality white chocolate and the correct type of food coloring—and a little bit of patience, anyone can achieve perfectly smooth, beautifully decorated dipped strawberries in their own kitchen. You do not need to be a trained pastry chef to create a drool-worthy dessert that will leave your friends and family amazed.
The Magic of White Chocolate and Candy Melts
The foundation of these beautiful pastel treats lies in the coating. When making colored chocolate covered strawberries, you have two primary options: pure white chocolate (couverture) or candy melts (also known as almond bark or confectionery coating). Understanding the difference is crucial for your success.
Pure white chocolate contains cocoa butter, sugar, milk solids, and vanilla. It has a rich, creamy, and complex flavor profile that melts beautifully on the tongue. However, because it contains real cocoa butter, pure white chocolate requires a process called “tempering” to set properly with a crisp snap and a glossy finish. If you melt pure white chocolate without tempering it, it may dry dull, streaky, or become too soft at room temperature.
On the other hand, candy melts are formulated with vegetable oils (like palm kernel oil) instead of cocoa butter. This means they do not require tempering. You simply melt them, dip your strawberries, and they will set quickly at room temperature with a beautiful, uniform finish. For beginners or those looking for a quick, reliable result without the fuss of candy thermometers, candy melts or high-quality almond bark are often the preferred choice. They also tend to hold bright colors very well. Whichever you choose, ensure you are starting with a fresh, high-quality product for the best taste and texture.
The Golden Rule of Coloring Chocolate: Use Oil-Based Colors
If there is one crucial piece of information you take away from this article, let it be this: you must absolutely, unequivocally use oil-based food coloring when tinting white chocolate or candy melts. This is the single most common stumbling block for home bakers attempting colored chocolate treats.
Standard liquid food coloring or gel food coloring found in most grocery stores is water-based. Because chocolate and water are sworn enemies, adding even a single drop of water-based color to melted chocolate will cause it to instantly “seize.” Seized chocolate transforms from a smooth, silky liquid into a thick, gritty, clumpy, unusable paste in a matter of seconds. It cannot be saved or used for dipping.
Oil-based food coloring, also known as candy colors, is specifically formulated to blend seamlessly with the fats in the chocolate. It will tint your melted coating beautifully without altering its smooth, liquid consistency. These specialty colors can be found at craft stores, baking supply shops, or easily ordered online. A little goes a long way, especially when you are aiming for soft, delicate pastel shades.
Fun Facts and Cultural Context
Did you know that the chocolate-covered strawberry is a relatively modern invention? While chocolate and fruit have been paired for centuries, the specific creation of the chocolate-dipped strawberry is widely credited to a woman named Lorraine Lorusso. In the 1960s, Lorraine was working at a small gourmet store in Chicago called Stop N’ Shop. She had the brilliant idea to take fresh, seasonal strawberries and dip them into the store’s tempered gourmet chocolate. She placed them on display in the front window, and they were an instant sensation. The simple yet luxurious combination quickly spread across the country, becoming a staple of romance, Valentine’s Day, and luxury gifting.
Today, chocolate-covered strawberries are synonymous with celebration and indulgence. They bridge the gap between a healthy fruit snack and a decadent confectionery delight. In Japanese culture, perfectly shaped, premium strawberries are often given as high-end gifts, sometimes beautifully packaged and occasionally dipped in chocolate. The evolution of the dessert has led to the vibrant, creatively decorated, and themed varieties we see today, moving far beyond the traditional dark or milk chocolate dip into the realm of edible art.
Ingredients
To create these stunning pastel treats, you will need the following items. Ensure your strawberries are the freshest you can find.
- – 20 large, fresh strawberries (preferably uniform in size with healthy green stems)
- – 24 oz (680g) high-quality white candy melts or premium white chocolate chips
- – Oil-based food coloring (candy colors) in peach, green, yellow, and purple
- – 2 tablespoons white sugar pearls (nonpareils) for decoration
- – 1 tablespoon refined coconut oil or paramount crystals (optional, for thinning the chocolate if needed)
Step-by-Step Instructions
Follow these detailed steps carefully for flawless, professional-looking pastel chocolate covered strawberries.
- Prepare the Strawberries: Begin by thoroughly washing the strawberries under cold water, leaving the green leaves intact. This is a critical step: you must dry the strawberries completely. Use paper towels to pat them dry, then let them sit on a dry towel at room temperature for at least 30 minutes. Even a microscopic drop of water will ruin your melted chocolate. Ensure they are at room temperature before dipping to prevent excessive condensation later.
- Prepare Your Workstation: Line a large baking sheet with parchment paper or a silicone baking mat. Have your white sugar pearls ready in a small, shallow bowl. If using a white bakery box and cupcake liners for presentation, have those ready as well.
- Melt the Chocolate: Divide the white candy melts or white chocolate evenly into four microwave-safe bowls (about 6 oz per bowl). Working with one bowl at a time, microwave on 50% power for 30 seconds. Stir well. Continue microwaving in 15-second bursts at 50% power, stirring thoroughly after each interval, until completely smooth and liquid. If the chocolate is too thick, stir in a tiny pinch of paramount crystals or a drop of refined coconut oil to thin it out.
- Color the Chocolate: Add a very small drop of oil-based food coloring to each bowl—one for peach, one for green, one for yellow, and one for purple. Stir vigorously until the color is uniform. Remember, it is easier to add more color than to take it away, so start with a tiny amount to achieve the perfect soft pastel shades.
- Dip the Strawberries: Grab a perfectly dry strawberry by the green stem and leaves. Pull the leaves back slightly so they don’t get dipped. Dip the strawberry into the melted colored chocolate, swirling it gently to coat all sides up to the base of the leaves. Lift the strawberry straight up and let the excess chocolate drip back into the bowl. You can gently tap your wrist to encourage the excess to fall off. Wipe the very bottom of the strawberry on the lip of the bowl to prevent a large “foot” of chocolate from forming on the parchment paper.
- Set and Decorate: Place the dipped strawberry onto the parchment-lined baking sheet. While the chocolate is still wet, gently sprinkle the white sugar pearls onto the strawberry. Repeat this process until you have 5 strawberries of each pastel color. For the drizzled effect, reserve a small amount of each colored chocolate, pour it into a small piping bag or a ziplock bag with the very tip snipped off, and quickly pipe thin lines back and forth over the dried strawberries. Let all strawberries set completely at room temperature for about 15-20 minutes, or pop them in the refrigerator for 5 minutes to speed up the process.
Expert Tips for Perfect Chocolate Covered Strawberries
Achieving bakery-quality results at home requires attention to detail. The most vital tip, as mentioned, is absolute dryness. After washing, use a fan or let them air dry completely. Moisture will not only seize your chocolate in the bowl, but if the berry is wet, the chocolate coating will slide right off the fruit.
Another expert tip is to avoid dipping strawberries straight out of the refrigerator. Cold strawberries dipped in warm chocolate will quickly “sweat” as they come to room temperature. This condensation creates a wet, slippery layer between the fruit and the chocolate shell, causing the chocolate to crack and weep. Always let your berries sit at room temperature for about 30 minutes to take the chill off before dipping.
If you find that your melted coating is too thick and creating a heavy, clunky shell rather than a delicate, smooth coat, you need to thin it out. While you might be tempted to add milk or water, doing so will ruin the batch. Instead, use a teaspoon of solid vegetable shortening (like Crisco), refined coconut oil, or paramount crystals specifically designed for candy making. Stir it into the warm chocolate until it reaches a fluid, easily dippable consistency.
Creative Variations
Once you master the basic pastel technique, the world is your oyster. You can easily adapt this recipe for different flavor profiles and aesthetics. Instead of white chocolate, you can use a base of high-quality milk or dark chocolate for a classic flavor, then use the colored pastel white chocolate solely for the decorative drizzles.
You can also experiment with different toppings. While the white sugar pearls provide a delicate, elegant crunch, you could roll the freshly dipped berries in toasted coconut flakes, finely chopped pistachios or almonds, crushed graham crackers, or even freeze-dried fruit dust for an extra pop of flavor and texture. For an adult twist, you can even infuse the strawberries by soaking them in a bit of champagne or prosecco before drying and dipping them—just ensure they are patted meticulously dry before they hit the chocolate.
Serving Suggestions and Occasions
Presentation is everything when it comes to gourmet treats. To replicate the gorgeous, high-end look of bakery strawberries, place each fully set strawberry into a small, white fluted paper cup (like a mini cupcake liner). Arrange them neatly in a windowed bakery box. This not only looks spectacular but prevents the strawberries from rolling into each other and smudging the delicate drizzles.
These pastel chocolate covered strawberries are best enjoyed on the day they are made. Because strawberries are highly perishable and prone to releasing moisture, storing them can be tricky. If you must store them, place them in an airtight container lined with paper towels to absorb any condensation, and keep them in the refrigerator for no more than 24 to 48 hours. Bring them out about 15 minutes before serving so they can lose their chill and the chocolate can reach its maximum flavor potential. Serve them alongside a chilled glass of sparkling wine, at a festive brunch, or as the centerpiece dessert that will leave your guests utterly enchanted.
Pastel Chocolate Covered Strawberries
Ingredients
Equipment
Method
- Wash strawberries thoroughly and dry them completely with paper towels. Let them sit at room temperature to ensure absolutely no moisture remains.
- Line a large baking sheet with parchment paper or a silicone baking mat.
- Divide the white candy melts into four microwave-safe bowls. Microwave one bowl at a time at 50% power in 30-second intervals, stirring in between, until smooth.
- Add a tiny drop of oil-based food coloring to each bowl to create peach, green, yellow, and purple chocolate. Stir well.
- Holding a strawberry by the green stem, dip it into the colored chocolate. Swirl to coat, let excess drip off, and place on the parchment paper.
- While the chocolate is still wet, sprinkle some of the strawberries with white sugar pearls.
- Place remaining melted chocolate into small piping bags and pipe decorative zig-zag drizzles over the other strawberries.
- Allow the strawberries to set completely at room temperature for 15-20 minutes before placing them in paper liners and serving.