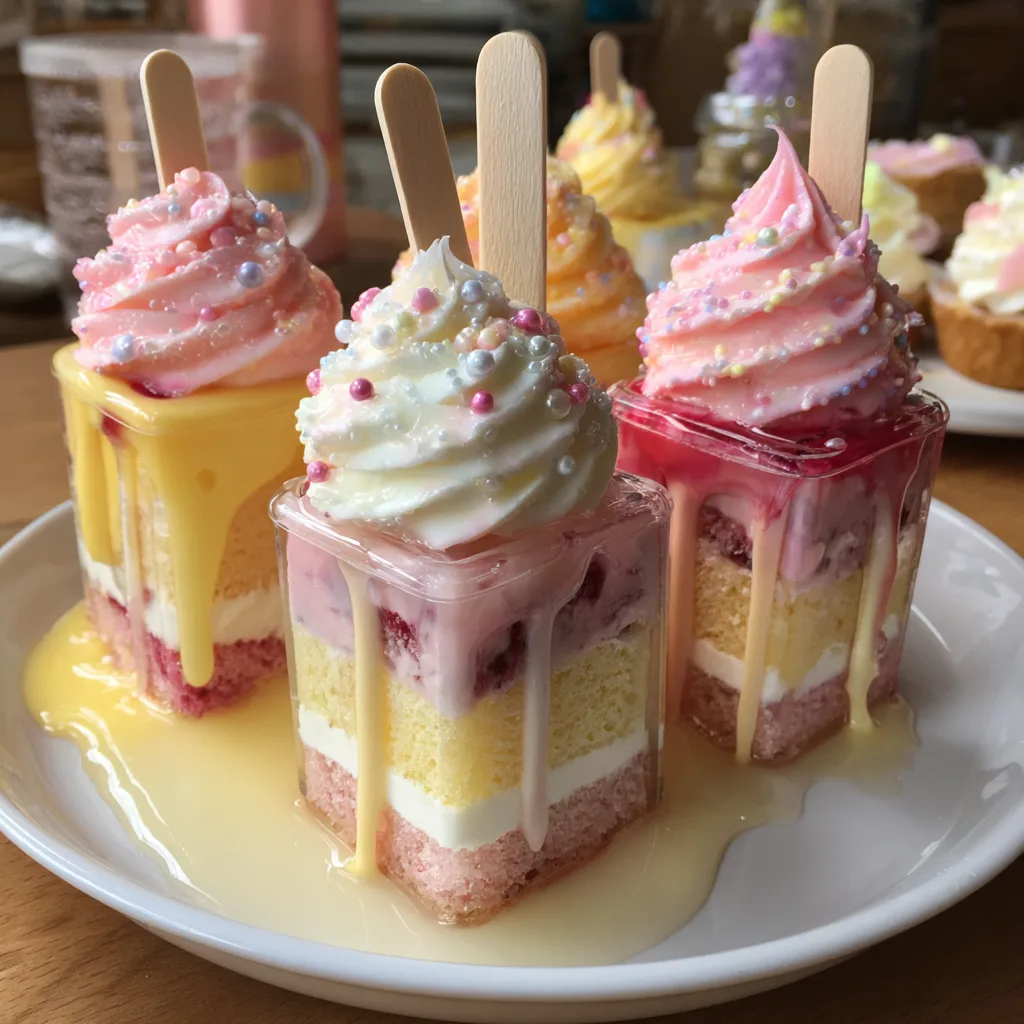
Neapolitan Cake Push Pops
Neapolitan Party Cake Push Pops: The Ultimate Crowd-Pleasing Dessert
There is a special kind of magic that happens when classic childhood favorites are reimagined for the modern age, and few things capture that joyful spirit better than cake push pops. Taking the whimsical concept of those brightly colored, frozen ice cream pops and turning them into a portable, pre-portioned cake sensation, these push pops have become a genuine sensation at parties, events, and even casual get-togethers. In this article, we are thrilled to bring you the complete, detailed guide to creating your very own breathtakingly beautiful and undeniably delicious Neapolitan Party Cake Push Pops—a dessert that is not just a treat for the taste buds, but a true feast for the eyes and the spirit of aloha.
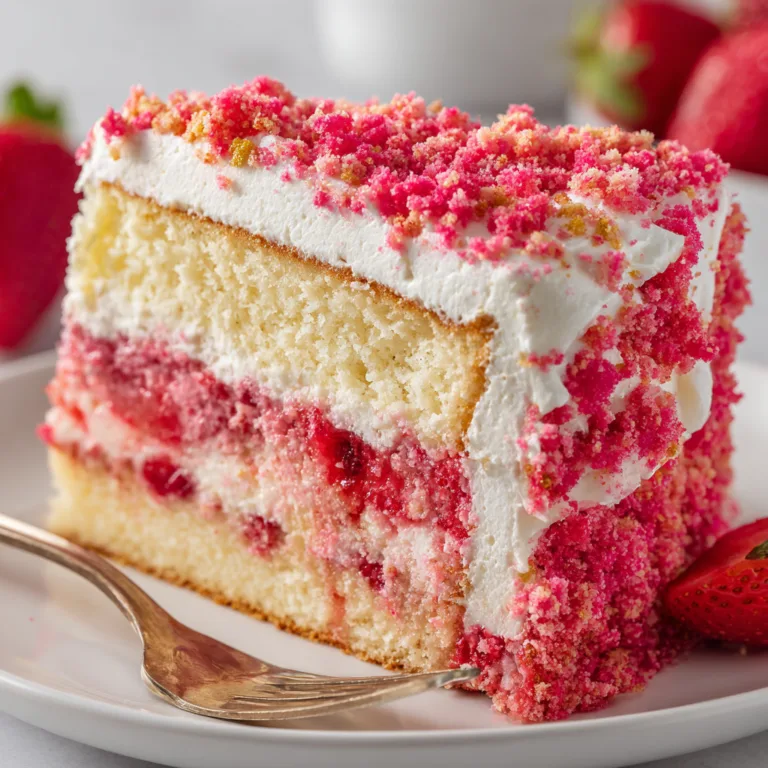
Imagine the delightful combination of a dense, moist vanilla bean sponge and a vibrant, naturally flavored strawberry cake, interleaved with alternating layers of velvety vanilla and bright, fruity strawberry cream cheese frosting. Beneath a simple, elegant star-tip frosting swirl, each push pop is a work of edible art, perfectly captured with its glossy, glistening surfaces in our featured image. Whether you are planning a themed backyard luau, a kid’s birthday bash, a sophisticated bridal shower, or just want to treat your family to a spectacular dessert over the weekend, this recipe is designed to deliver maximum joy with every single push. Let’s delve into everything you need to know to bring this beachside dream directly to your kitchen, unlocking the secrets of professionally styled cake decorating for the home baker.
Why You’ll Love This Specific Flavor Combination
The success of any great recipe lies in the perfect balance of its flavors, and this Neapolitan Party Cake Push Pop offers a truly exceptional dynamic. While you can certainly use a standard vanilla and strawberry box mix, adapting the flavor profile with real, high-quality ingredients elevates the entire experience. The foundation of the dish, the vanilla cake, offers a deep, floral sweetness and a dense, moist crumb, providing the necessary structural integrity to hold up across multiple layers without crumbling. This isn’t just a simple vanilla sponge; it’s a canvas for the other complex flavors to shine.
By using real, finely mashed strawberries in the cake batter and concentrated, naturally reduced strawberry puree in the frosting, we introduce a bright, refreshing tartness that cuts through the rich cream cheese and dense cake. We enhance this with a splash of fresh lemon juice, which prevents the peaches from turning brown and ensures your fruit looks just as stunning an hour after making it as it did the moment it was tossed. The raw honey in the glaze adds a viscous, floral sweetness that encourages the fruit to release its natural juices—a process known as maceration—creating a built-in, intensely flavored syrup at the bottom of the bowl. It is rare to find a dish that feels this decadent while being this actively beneficial to your overall health and well-being.

Creative Customization and Flavor Twists
One of the most wonderful aspects of any layered cake recipe, particularly one as flexible as push pops, is the inherent ability to tailor it to your exact preferences or party theme. While the classic Neapolitan profile is stellar, you can easily adapt the recipe to create a wide variety of textural effects and flavor dynamic. Consider some of these other fantastic tropical options:
- Guava and Raspberry: Replace the strawberry reduction in the frosting and cake with a vibrant guava nectar reduction. Pair with a tart raspberry compote between the cake and frosting layers for a breathtaking and unexpected tropical twist that echoes the sharp acidity of passionfruit.
- Coconut and Passionfruit: Use a moist coconut pound cake as your base. Create a tangy passionfruit curd, similar to what you would make for a key lime pie, and use it as a filling layer between the cake and a light, coconut cream frosting. The result is an intensely tropical, nutty, and luxurious dessert.
- Banana and Rum: A dense banana cake, infused with a hint of dark rum, pairs magnificently with a classic cream cheese frosting and a rich dark chocolate ganache drip. It acts as a perfect, comforting, and boozy tropical treat.
- Mango and Macadamia: Combine a moist mango sponge cake with a smooth mango and white chocolate ganache, sprinkled with toasted macadamia nuts for a dynamic, nutty texture that perfectly captures the complex flavors of the beach.
Mastering the Maceration Process for the Perfect Juiciness
The secret to why this fruit salad tastes so incredibly “juicy” is a simple culinary technique called maceration. Maceration is the process of softening or breaking into pieces using a liquid, but in the context of fruit, it refers to the process of drawing out the natural juices by adding sugar or acid. For this cake push pop, we are using the colors of the sunset as inspiration for the interior flavor dynamic. The cake itself is a dense, moist coconut pineapple sponge, infused with real shredded coconut and crushed pineapple, creating a textural profile that is both complex and incredibly juicy. This cake is sturdy enough to hold its shape across multiple tiers, but tender enough to be delightful.
By drizzling the cake pieces with a glossy, fruit-infused simple syrup, made from equal parts water and sugar and boiled with a handful of crushed fresh fruit, we draw out even more of those natural sugars through osmosis. The clear vanilla glaze applied at the end further contributes to this process, encouraging the fruit and cake to release their natural juices. Maceration isn’t just about juiciness; it’s a way to concentrate the natural flavors, ensuring that every single bite is completely coated in that irresistible, intensely flavored syrup, making your final dessert truly and unmistakably a celebration of the season.
The Structural Mastery of a Sturdy Cake Base
One of the single most common causes of cake decorating related anxiety is the fear that your layered creation will simply squash or collapse under its own weight. This is particularly relevant for push pops, which require neat, defined layers that maintain their structure even after being pushed up multiple times. To prevent this, you must start with a sturdy and dense cake base, like our coconut pineapple sponge, which provides the perfect sturdy foundation for our layered structure. We create this architectural marvel by using real shredded coconut and crushed pineapple, which not only adds incredible flavor and texture, but also provides internal support. By utilizing a ruffled piping technique, the frosting mimics the gentle, rhythmic lapping of ocean waves or the layered clouds painted by the setting sun, making your cake not just a dessert, but a true exploration of architectural scale and color.
Regarding the frosting, the vanilla bean cream cheese frosting is stable and delicious, but it can get soft quickly in a warm environment. If you are planning a themed party in a warm, humid environment, or if your kitchen is hot, consider switching to a Swiss Meringue Buttercream, which is much more stable and handles heat and humidity significantly better. This technique, easier to master than it looks, results in a perfectly pristine, crack-free surface that is as durable as it is beautiful. These small adjustments ensure your cake push pops are not just visually stunning but also physically safe, guaranteeing your show-stopping creation remains intact and picture-perfect throughout your entire celebration.
The Art of Selecting the Perfect Tropical Fruits
Because this recipe relies on raw, uncooked ingredients, the quality of your fruit will dictate the entire success of the salad. You cannot hide a mealy, unripe, or flavorless peach behind layers of pastry or heavy cooking techniques. Therefore, knowing how to select the perfect peach is a crucial skill. Peaches are incredibly rich in vitamins A and C, essential for maintaining healthy skin and a robust immune system. They also provide a good amount of dietary fiber, especially if you leave the nutrient-dense skins on, which is highly recommended for this recipe. When selecting peaches, prioritize aroma. If you cannot find peaches with a heavy peach aroma, look for background color. You want a background color that is a warm, creamy yellow or golden orange, not green. Finally, feel the texture. A perfectly ripe peach will yield slightly to gentle pressure around the shoulder of the fruit. However, for a fruit salad, you want to avoid peaches that are overly soft or bruised, as they will quickly turn to mush when tossed. By selecting peaches at their peak and handling them with aloha, you ensure your final dish is as vibrant and flavorful as a true tropical sunset.
Ingredients
- – 2 and 1/2 cups all-purpose flour
- – 1 tablespoon baking powder
- – 1/2 teaspoon fine sea salt
- – 1 cup unsalted butter, softened to room temperature
- – 1 and 3/4 cups granulated sugar
- – 4 large eggs, at room temperature
- – 1 teaspoon clear vanilla extract
- – 1/2 teaspoon pure almond extract (optional)
- – 1 cup full-fat buttermilk, at room temperature
- – Gel food coloring: bright pink and cream/off-white
- – Pink pearl sprinkles
- – Push pop containers with stands
For the Strawberry Puree:
- – 2 cups fresh strawberries, hulled and mashed
- – 1 tablespoon granulated sugar
- – 1 teaspoon fresh lemon juice
For the Strawberry Cream Cheese Frosting:
- – 1/2 cup strawberry puree reduction
- – 8 oz full-fat cream cheese, softened
- – 1/2 cup unsalted butter, softened
- – 4 cups powdered sugar
- – 1 teaspoon clear vanilla extract
- – Gel food coloring: bright pink
For the Vanilla Bean Cream Cheese Frosting:
- – 8 oz full-fat cream cheese, softened
- – 1/2 cup unsalted butter, softened
- – 4 cups powdered sugar
- – 1 tablespoon vanilla bean paste or pure vanilla extract
- – Pinch of salt
- – Gel food coloring: cream/off-white
Step-by-Step Instructions
- Make the Strawberry Reduction: In a small saucepan, combine the 2 cups of mashed fresh strawberries, 1 tablespoon of granulated sugar, and fresh lemon juice. Bring the mixture to a gentle simmer over medium heat, stirring until the sugar has completely dissolved. Transfer to a blender and puree until smooth. Return the puree to the saucepan and simmer on low heat for another 10-15 minutes, stirring frequently, until the mixture is thick and reduced to exactly 1/2 cup. Transfer to a bowl and let it cool completely in the refrigerator before using. This is a crucial step that concentrates the strawberry flavor without making the frosting runny.
- Prepare the Cake: Preheat your oven to 350°F (175°C). Lightly grease two 8-inch round cake pans and two 6-inch round cake pans. Line the bottoms with parchment paper and dust the sides with flour. In a large bowl, whisk together the flour, baking powder, and fine sea salt until well combined. In a separate bowl, cream together the softened unsalted butter and granulated sugar. Beat in the eggs, one at a time, followed by the clear vanilla extract and pure almond extract. Gradually add the wet ingredients to the dry, mixing on low speed just until combined. Fold in the toasty shredded coconut and well-drained crushed pineapple. Divide the batter evenly among the prepared pans and bake for 30-35 minutes. Allow the cakes to cool in the pans for 10 minutes before turning them out onto wire racks to cool completely. Once cool, wrap each cake tightly in plastic wrap and chill in the refrigerator for at least 4 hours or overnight. Work with chilled cakes to prevent crumbling.
- Prepare the Frostings: In separate bowls, make the Strawberry and Vanilla Bean Cream Cheese Frostings. Beat the softened cream cheese and butter until smooth. For the Vanilla Bean Frosting, add the powdered sugar, one cup at a time, followed by the vanilla bean paste and a pinch of salt. Tint with a drop of cream/off-white gel coloring. For the Strawberry Frosting, add the powdered sugar, followed by the cooled strawberry puree reduction and clear vanilla extract. Tint with a drop of bright pink gel food coloring. Mix until each frosting is light, fluffy, and holds its shape. Do not overmix. Cover tightly with plastic wrap to prevent a skin from forming.
- Mastering the Layering Process: Level the chilled cake layers using a serrated knife and cut each layer horizontally into multiple thin, 1/2-inch to 3/4-inch slices. Using the push pop container itself as a guide, cut out precise cake circles from each slice. Start at the very base of the bottom tier and apply a thick row of continuous ruffles using the deep hot pink buttercream. Transition color every few rows to achieve your sunset gradient, finishing with cream on the top tier. Apply the ruffles in overlapping rows to create a dynamic, layered pattern that is highly forgiving and often hides small mistakes. Fill a piping bag fitted with a large petal tip and pipe continuous horizontal rows of ruffles around each cake. This technique, easier to master than it looks, yields spectacular results that has to be seen to be believed.
- Crafting the Edible Decorations: While the cake is chilling, tint your remaining fondant or gum paste to the exact shades: brown, orange, and yellow. Use molding chocolate for the tree trunks for added stability, texturing them with a small knife to create the bark pattern. Cut intricate leaf shapes from orange fondant and allow them to dry over curved surfaces to give them natural wave and dimension. Roll out thin strands of yellow fondant and weave them together to create the detailed, woven hammock net. Add delicate, white plumeria or hibiscus-style flowers to soften the look and add a botanical touch of realism. Once dry, these elements become firm, structural pieces that are easy to place and guarantee a professional finish. These elements can be made days or even weeks in advance.
- Final Assembly and the Frosting Swirl: Once your cake has chilled for at least 30 minutes, remove the push pops from the refrigerator. Fill the top of each push pop with a beautiful star-tip frosting swirl, matching the frosting flavor to the layered pattern inside. For the Type 2 push pops with white/cream swirls, sprinkle generously with the pink pearl sprinkles just before serving. For the Type 1 push pops with pink swirls, leave plain for an elegant finish. Add the pre-made fondant palm trees, hammock, and flowers to the top tier, pressing gently to secure. Allow the finished cake to rest at cool room temperature for 10 minutes before slicing to ensure neat, perfect slices that highlight the complex flavors and textures of the beach. Brush a generous layer of clear vanilla glaze over the entire surface and let it pool and create mirror pools at the base border for that unmistakable ultra-glossy finish. Serve with a shiny spoon and enjoy the fruits of your incredible achievement.
Tips for neat layering and piping
Creating a large, tiered cake is a test of structural integrity, but by following a few simple tips, you can ensure your masterpiece is safe to serve. First, always work with chilled cakes. Chilling makes the crumb denser and more sturdy, making it easier to stack and frost without crumbling or shifting. Second, use the right tools. A petal tip is absolutely essential for creating those delicate ruffles, and a cake turntable will save you from contorting your wrists. Third, apply consistent, even pressure to the piping bag. This technique, while simpler than it looks, results in a perfectly pristine, crack-free surface. Working slowly and steadily is much more important than working quickly. When tinting your buttercream, go for smooth, clean transitions of color rather than jarring, abrupt changes. This requires careful blending and constant testing. Don’t worry about minor imperfections; the complex layered effect of the ruffles is highly forgiving and often hides small mistakes. Finally, take your time with the edible decorations. Hand-crafting these elements adds a touch of professional-level aloha that makes your final creation truly memorable.
To ensure neat layering, level each cake layer perfectly and work with chilled cake rounds. Apply a thin, even layer of frosting between each cake slice to prevent sliding, and work with a clean piping tip after every color change to maintain a sharp, clean pattern. Regarding the frosting, the vanilla bean cream cheese frosting is stable and delicious, but it can get soft quickly. Consider using a stable Swiss Meringue Buttercream, which handles heat and humidity significantly better, for a structurally sound and visually stunning final creation. For clean piping, dip your tip in hot water and wipe it clean between colors, ensuring the ruffles are always smooth and flawless. With a little aloha and the right techniques, you can successfully bring this beachside dream directly into your kitchen.
Perfect for Any Occasion
The **Tropical Sunset Ombré Ruffle Cake** is not just a dessert; it is an accomplishment, a tower of pure achievement that is perfect for any occasion that calls for a true centerpiece. Imagine this spectacular cake as the showstopper at your next backyard luau party, its vibrant colors reflecting the summer sky and its tropical flavors capturing the spirit of the islands. It is a triumphant, undeniably beautiful dessert that becomes the immediate focal point of any birthday bash, its intricate layers a celebration in themselves. Consider it as a sophisticated and elegant addition to a beachside bridal shower, where its delicate ruffles and hand-crafted flowers can match the event’s overall aesthetic. Even a casual family weekend get-together can be elevated to a memorable culinary event by serving this unique and impressive dessert. Pair the cake with a refreshing tropical fruit punch or a classic Mai Tai, and watch as it creates a shared edible memory that is as vibrant and joyful as aloha itself. This is not just a cake, but a celebration of natural beauty, a shared moment of delight, and the perfect, crowd-pleasing dessert that brings the beach directly to your celebration.
Storage and Reheating Advice
A layered cake of this magnitude requires careful planning and proper storage to maintain its beautiful appearance and incredible flavor. This cake is undeniable a labor of love, and you can break the process up across several days. The coconut pineapple cake layers can be baked, leveled, and frozen up to a month in advance. Simply thaw them in the refrigerator overnight before stacking. The passionfruit curd can be made up to a week in advance and stored in an airtight container in the refrigerator. The Italian Meringue Buttercream can be made 3 days in advance and stored in the refrigerator; just let it come to room temperature and re-whip it until smooth and glossy before using. Finally, the fondant decorations can be made up to a month in advance; store them in a cool, dry place away from direct sunlight, which can cause the colors to fade. Fully decorated, this cake will sit beautifully at cool room temperature for up to 24 hours. Because it contains highly perishable tropical fruit and dairy, it is not recommended to keep it longer than that.
When storing the cake, always cover it tightly with plastic wrap to prevent a skin from forming on the frosting and to keep it from drying out. Place it in an airtight container in the refrigerator to prevent it from absorbing any unwanted odors. To serve leftovers, the microwave is not recommended as it will make the fruit salad soggy. Reheating tend to turn the shrimp rubbery, so avoid it completely. Re-create the maceration dynamic by blending day-old fruit salad into a magnificent morning smoothie, ensuring none of this delicious summer bounty goes to waste. These practical, easy-to-follow storage and make-ahead tips ensure your show-stopping creation remains intact and picture-perfect throughout your entire celebration.
Conclusion: The Taste of Pure Achievement
The **Tropical Sunset Ombré Ruffle Cake** is much more than a recipe; it is an achievement, a tower of pure, edible achievement that celebrates the very essence of nature’s finest sweet offerings. From the dense, moist coconut pineapple sponge to the vibrant, dripping passionfruit curd filling and the spectacularly complex ruffled buttercream, every element is designed to perfectly complement the others. Embracing the maceration process concentrations the natural sugars of the tropical fruit, while mastering the structural engineering of dowels and multiple chilling periods guarantees a perfect, crack-free surface. Hand-crafting the edible palm trees and hammock decorations allows you to successfully bring this beachside dream directly into your kitchen, creating an undeniable, show-stopping centerpiece that becomes the immediately focal point of any celebration. So Head to your local market, grab the heaviest, most fragrant passionfruit you can find, and get ready to enjoy one of the most incredible, undeniably beautiful comfort food dishes you will ever create in your own kitchen.
Neapolitan Party Cake Push Pops
Ingredients
Equipment
Method
- Prepare Strawberry Puree: Mash 2 cups fresh strawberries with 1 tbsp sugar and 1 tsp lemon juice. Reduce in a saucepan until thick (about 1/2 cup). Puree until smooth and cool completely.
- Prepare Cake: Preheat oven to 350°F (175°C). Grease and flour two 8-inch and two 6-inch pans.
- Whisk dry ingredients: flour, baking powder, and salt. Cream butter and sugar, then add eggs one at a time, followed by extracts.
- Alternate adding buttermilk and the dry ingredients, beginning and ending with the dry ingredients. Mix until combined, then bake for 30-35 minutes.
- Let cakes cool in pans for 10 minutes, then transfer to a wire rack. Chill at least 4 hours.
- Prepare Frostings: Beat softened cream cheese and butter until smooth. Divide in half. To one half, add 4 cups powdered sugar, vanilla bean paste, and a pinch of salt. Tint with cream coloring.
- To the other half, add 4 cups powdered sugar, clear vanilla, and the cooled strawberry puree. Tint with bright pink coloring.
- Level chilled cakes. Use the push pop container to cut out neat cake circles.
- Assemble Push Pops: Start layering cake circles with frostings according to the pattern variations in the image (pink/white cake with white frosting, or white cake with pink frosting).
- Finish with star-tip frosting swirls and garnishes (pearl sprinkles) on top.