Mini Strawberry Glazed Tarts
Bakery-Style Mini Strawberry Glazed Tarts: A Bite of Sunshine
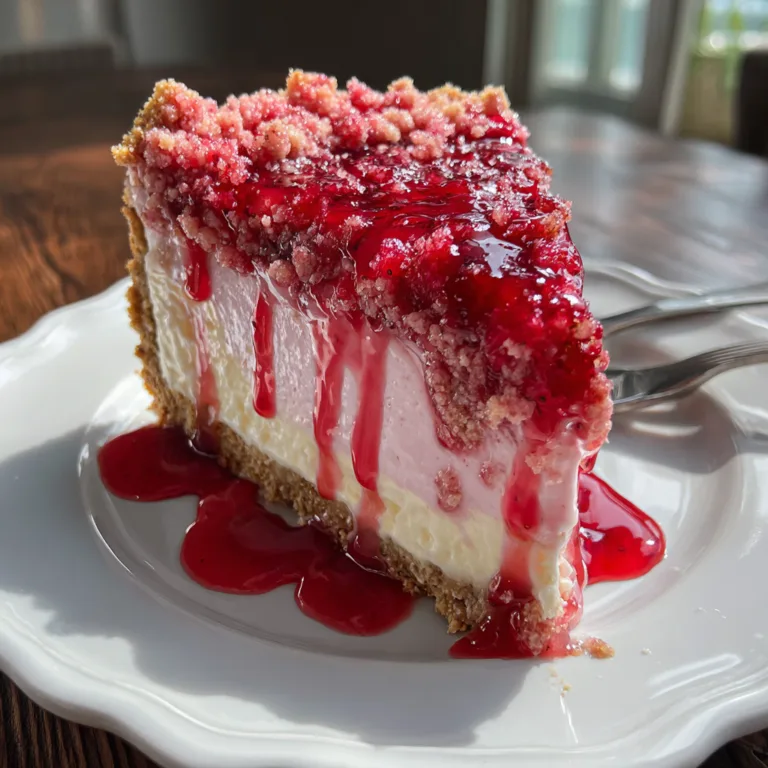
There is something undeniably captivating about the display case of a high-end patisserie. Rows upon rows of glistening, jewel-like fruit tarts sit perfectly arranged, looking almost too beautiful to eat. Among them, the strawberry tart is the undisputed queen. Today, we are bringing that bakery magic into your home kitchen with these Mini Strawberry Glazed Tarts. These aren’t just desserts; they are bite-sized masterpieces that combine the crunch of a buttery shortbread crust, the richness of a velvety cream cheese filling, and the fresh, sweet burst of glazed strawberries.
Whether you are hosting a bridal shower, a summer garden party, or simply want to impress your family with a dessert that looks professionally made, this recipe is your secret weapon. The best part? Despite their sophisticated appearance, they are surprisingly approachable for the home baker. We are going to break down the intimidating world of French pastry into simple, manageable steps that guarantee success.
The Anatomy of the Perfect Tartlet
To understand why this recipe works, we need to deconstruct the three essential layers that make up a classic fruit tart. Each component plays a specific role in texture and flavor balance.
- The Shell (Pâte Sablée): Unlike a flaky American pie crust, a tart shell should be more cookie-like. We use a Pâte Sablée, or “sandy dough,” which is rich in butter and sugar. It provides a sturdy, crisp vessel that doesn’t get soggy easily and offers a satisfying “snap” when you bite into it.
- The Cream Filling: Traditionally, fruit tarts use Pastry Cream (Crème Pâtissière), which is an egg-based custard. However, for these mini versions, we are using a Cream Cheese Mousse. It is lighter, fluffier, and more stable at room temperature. The slight tang of the cream cheese cuts through the sweetness of the glaze and the richness of the pastry.
- The Fruit & Glaze: The crown jewel. We use fresh, ripe strawberries, but the secret is the glaze (or nappage). This isn’t just for looks; the glaze seals the fruit, keeping it fresh and preventing it from drying out, while adding an extra layer of sweetness.

Mastering the Crust: The “Sanding” Method
The crust is often the most intimidating part for new bakers, but this recipe uses the “sanding” method (sablage). Instead of worrying about keeping big chunks of butter for flakes (like in biscuits), we want to coat the flour in fat completely. This inhibits gluten development, ensuring your tart shells are tender and crumbly rather than tough and chewy.
Pro Tip: Do not skip the chilling times. The dough must be cold when it hits the oven. If the butter is too warm, the sides of your tart shells will slump down during baking, leaving you with a flat cookie instead of a cup. If you are in a rush, pop the unbaked shells in the freezer for 15 minutes before baking.
Ingredients
This recipe requires precision, so we have broken it down into the three structural components.
The Pâte Sablée (Tart Shells)
- All-Purpose Flour (1 ½ cups): The structural base.
- Powdered Sugar (½ cup): We use powdered instead of granulated because it dissolves instantly into the dough, creating a smoother, finer texture.
- Salt (¼ tsp): Essential to balance the sweetness.
- Unsalted Butter (9 tbsp): Cold and cubed. This is a butter-forward recipe, so use a high-quality brand if possible.
- Egg Yolk (1 large): Adds richness and helps bind the dough without adding too much moisture (which activates gluten).
- Heavy Cream or Ice Water (1 tbsp): Just enough to bring the dough together.
The Cream Cheese Filling
- Cream Cheese (8 oz): Full fat, brick style. It must be softened to room temperature to avoid lumps.
- Heavy Whipping Cream (½ cup): Cold. This gets whipped into the cheese to create an airy, mousse-like texture.
- Powdered Sugar (½ cup): Sweetens the filling without adding graininess.
- Vanilla Bean Paste or Extract (1 tsp): Vanilla bean paste adds those beautiful black specks that scream “gourmet.”
- Lemon Zest (1 tsp, optional): A hint of citrus brightens the heavy cream.
The Topping & Glaze
- Fresh Strawberries (1 lb): Look for small to medium berries that are uniform in size. Huge strawberries are hard to fit on mini tarts.
- Apricot Jam or Strawberry Jelly (½ cup): This is the base of your professional glaze.
- Water (1 tbsp): To thin the jam.
Instructions
Phase 1: The Crust
1. Mix Dry Ingredients: In a food processor (or large bowl), pulse together the flour, powdered sugar, and salt.
2. Cut in the Butter: Add the cold, cubed butter. Pulse until the mixture looks like coarse sand or breadcrumbs. If doing this by hand, use a pastry cutter or your fingertips to rub the butter into the flour.
3. Bind the Dough: Add the egg yolk and vanilla. Pulse again. If the dough hasn’t come together, add the tablespoon of cream/water. Stop mixing as soon as the dough starts to clump. Do not overmix.
4. Chill: Turn the dough out, gather it into a disc, wrap in plastic, and refrigerate for at least 30 minutes.
5. Shape: Preheat oven to 375°F (190°C). Roll out the dough on a lightly floured surface to about 1/8 inch thickness. Cut out circles slightly larger than your tart pans (a muffin tin works too if you don’t have tart molds). Press the dough gently into the molds, trimming the excess.
6. Blind Bake: Prick the bottoms with a fork. Bake for 12-15 minutes until golden brown. Let them cool completely in the pans before removing. They must be cool, or the filling will melt.
Phase 2: The Filling
7. Whip the Base: In a medium bowl, beat the softened cream cheese and powdered sugar until completely smooth and creamy. Scrape the sides of the bowl to ensure no lumps remain.
8. Aerate: Pour in the cold heavy cream and vanilla. Switch to a whisk attachment (or hand mixer) and beat on medium-high speed. The mixture will thicken and turn into a sturdy, pipeable mousse. Be careful not to overbeat, or it can turn into butter.
9. Fill: Transfer the mixture to a piping bag (or a Ziploc bag with the corner snipped). Pipe a generous swirl into each cooled tart shell.
Phase 3: Assembly and Glaze
10. Prep the Fruit: Wash and thoroughly dry the strawberries. If they are wet, the glaze won’t stick. Hull them (remove the green leafy top) or keep it on for a rustic look, depending on your preference. You can leave them whole or slice them.
11. Arrange: Press the strawberries gently into the cream filling. For mini tarts, one whole berry or a fan of slices looks best.
12. Make the Glaze: In a small microwave-safe bowl, mix the apricot jam and water. Microwave for 20-30 seconds until bubbling. Pass it through a fine-mesh sieve to remove any fruit chunks, leaving you with a clear, golden syrup.
13. The Shine: While the glaze is warm (not boiling hot), use a pastry brush to gently dab it over the strawberries. This gives them that signature “wet” bakery shine.
14. Chill and Serve: Refrigerate the tarts for at least 30 minutes to set the filling and glaze. Serve cold.
Chef’s Tips for Professional Results
- Waterproof Your Shells: If you plan to make these a day in advance, you can brush a thin layer of melted white chocolate inside the baked tart shells. Let it harden before adding the cream. This acts as a moisture barrier so the crust stays crunchy for days.
- The “Shinier” Glaze: If you don’t have apricot jam, you can use clear piping gel or dissolve 1 teaspoon of unflavored gelatin in apple juice. However, apricot jam contributes a subtle acidity that balances the dessert perfectly.
- Uniformity is Key: When buying strawberries, open the container and look at the bottom. You want berries that are all roughly the same size so your platter looks cohesive.
- Room Temp Cheese: We cannot stress this enough—if your cream cheese is cold, you will have lumpy filling. There is no fixing lumps once the heavy cream is added.
Variations to Explore
Once you master the base, the possibilities are endless.
The “Chocolate Lover”
Add 2 tablespoons of cocoa powder to the crust dough. For the filling, fold in melted ganache or Nutella into the cream cheese mixture. Top with raspberries instead of strawberries.
The “Tropical”
Swap the vanilla extract for coconut extract in the filling. Top with diced mango, kiwi, and pineapple. Use a lime zest garnish.
The “Lemon Bliss”
Spread a thin layer of lemon curd at the bottom of the tart shell before piping in the vanilla cream. The hidden pocket of tart lemon is a delightful surprise.

Serving Suggestions
These tartlets are versatile enough for brunch or a midnight snack.
- Beverage Pairing: A glass of Champagne or Prosecco is the classic match. The bubbles cut through the rich cream. For a non-alcoholic option, an Earl Grey tea with lemon pairs beautifully with the berry notes.
- Presentation: Serve on a tiered cake stand for high tea vibes, or on a long rectangular wooden board for a rustic farmhouse look. Dust the edges of the platter (not the tarts) with powdered sugar right before serving.
A Note on Seasonality
While you can buy strawberries year-round, this recipe shines brightest in late spring and early summer. When strawberries are in peak season, they are red all the way through and naturally sweet. If you are making this in winter with less flavorful berries, toss the sliced berries in a teaspoon of sugar and lemon juice 10 minutes before assembling to wake up the flavors.
Enjoy the process of creating these little gems. There is a immense satisfaction in brushing that final coat of glaze and seeing your kitchen creation transform into something that looks like it belongs in a Parisian window display.
Bakery-Style Mini Strawberry Glazed Tarts
Ingredients
Equipment
Method
- Combine flour, powdered sugar, and salt in a processor. Pulse in cold butter until mixture resembles crumbs.
- Add egg yolk and cream. Pulse until dough clumps. Form into a disc, wrap, and chill for 30 minutes.
- Preheat oven to 375°F. Roll dough and press into mini tart pans. Prick bottoms with a fork.
- Bake for 12-15 minutes until golden. Cool completely in pans.
- Beat softened cream cheese and powdered sugar until smooth. Add cold heavy cream and vanilla; whip until fluffy and stiff.
- Pipe filling into cooled tart shells.
- Top with strawberries. Microwave apricot jam and water, strain, and brush over fruit for a glossy finish.
- Refrigerate for 30 minutes before serving.