Lego Rice Krispie Treats
The Ultimate Lego Rice Krispie Treats Recipe
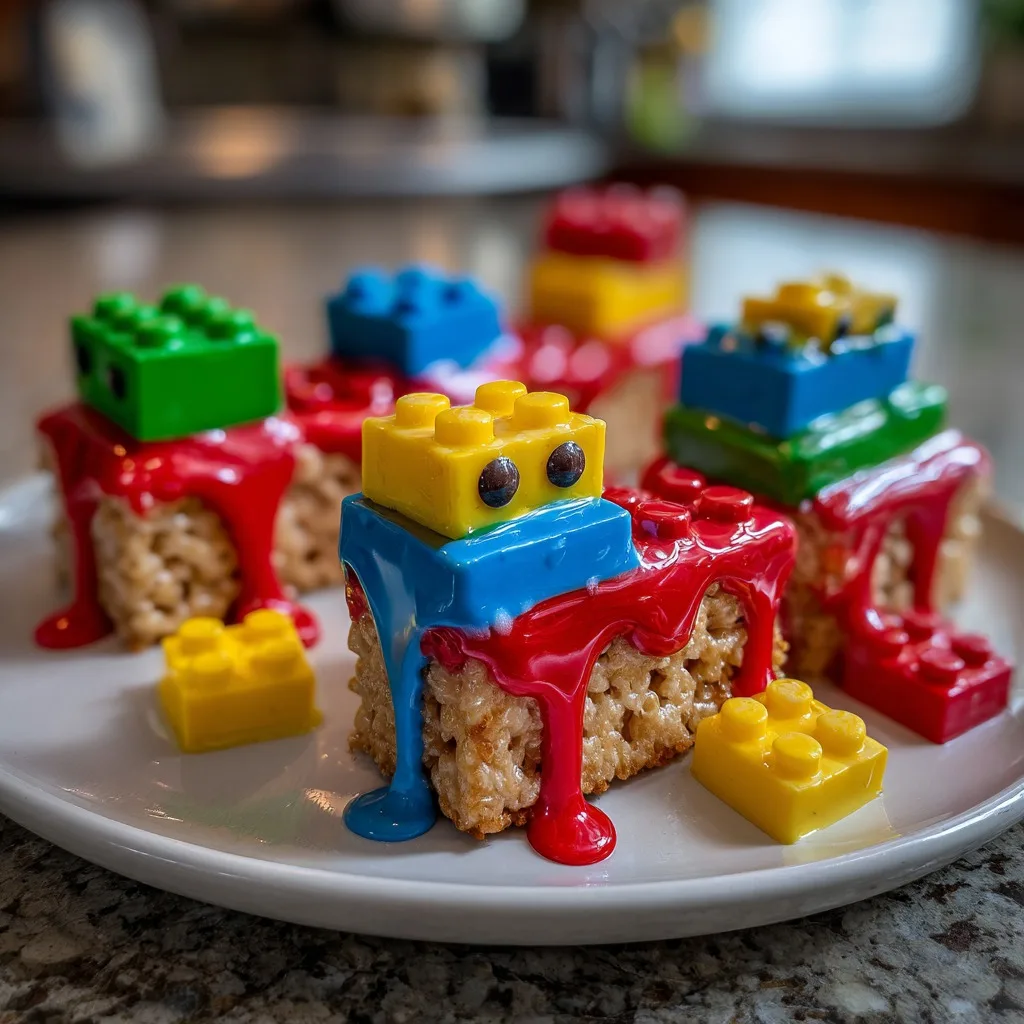
When it comes to planning a birthday party, a school event, or simply a fun weekend activity with the family, finding a dessert that is both visually striking and universally beloved can be a challenge. Enter the ultimate solution: Lego Rice Krispie Treats. These brilliantly colored, perfectly sweet, and satisfyingly crunchy treats take the classic, nostalgic marshmallow cereal bar and transform it into a vibrant masterpiece. Modeled after the iconic building blocks that have captured the imaginations of generations, these treats are guaranteed to be the absolute star of any dessert table. Best of all, they require zero baking, minimal ingredients, and offer a fantastic opportunity to get little helpers involved in the kitchen.
There is something inherently magical about food that looks like toys. It sparks joy and nostalgia in adults while providing an irresistible, playful element for children. The combination of a chewy, buttery, marshmallow-packed Rice Krispie base topped with a smooth, sweet candy coating and the iconic crunch of chocolate candies is a sensory delight. In this comprehensive guide, we are going to walk you through everything you need to know to create these adorable building block treats. From achieving the softest cereal base to mastering the art of melting candy coating without seizing, you will be a master builder of these edible bricks in no time.
Why You Will Fall in Love with This Fun Dessert
The beauty of the Lego Rice Krispie Treat lies in its brilliant simplicity paired with maximum visual impact. Standard Rice Krispie treats are a staple for a reason—they are incredibly easy to whip up, require only a handful of pantry staples, and are generally allergy-friendly for many common school restrictions (when double-checking specific ingredient labels). However, serving plain squares can sometimes feel a bit uninspired for a highly themed party.
By simply adding a layer of brightly colored candy melts and a few carefully placed chocolate candies, you instantly elevate a basic snack into a premium, custom-themed dessert. Furthermore, the texture contrast is phenomenal. The soft, gooey chewiness of the freshly made marshmallow cereal base pairs beautifully with the slight snap of the hardened candy melt topping, finished with the candy shell crunch of the chocolate M&Ms on top. It is a handheld, no-mess treat that guests can easily grab while mingling or playing, making it the quintessential party food.

The Magic of Building Block Themed Parties
Building block themes remain one of the most popular party concepts for children across the globe. The bright primary colors—bold reds, vibrant blues, sunny yellows, and crisp greens—create a festive and energetic atmosphere effortlessly. When you incorporate these edible building blocks into your party spread, they serve double duty as both nourishment and decor.
Imagine a dessert table featuring a towering cake in the center, flanked by platters of these Lego Rice Krispie Treats carefully stacked to look like actual brick constructions. You can arrange them by color, build small edible walls, or place them in clear acrylic containers for a modern, sleek presentation. The thematic cohesion these treats provide is unmatched, and they save you from having to order expensive, custom fondant work from a bakery. You have the power to create professional-looking, theme-accurate treats right in your own kitchen.
Understanding the Essential Ingredients
While the ingredient list for this recipe is short, the quality and type of ingredients you select will dramatically impact the final result. Here is a detailed breakdown of what you need and why.
For the Classic Rice Krispie Base
The foundation of your building block must be structurally sound yet delightfully chewy to eat.
- – Crispy Rice Cereal: The star of the show. Ensure your cereal is fresh. Stale cereal will result in tough, unappetizing treats. Brand name Rice Krispies or high-quality generic equivalents work perfectly.
- – Miniature Marshmallows: Mini marshmallows melt much faster and more evenly than the jumbo variety. Freshness is key here as well; older marshmallows lose their moisture and will create a hard, rock-like treat instead of a gooey one. Always buy a fresh bag for this recipe.
- – Unsalted Butter: Butter provides the rich flavor and helps keep the marshmallows soft. We prefer unsalted so we can control the sodium, but salted butter can be used to add a pleasant sweet-and-salty dynamic.
- – Vanilla Extract: A splash of pure vanilla extract elevates the flavor profile from just “sweet” to something much more complex and bakery-worthy.
- – A Pinch of Salt: Never underestimate the power of salt in a dessert. It balances the extreme sweetness of the marshmallows and candy coating.
For the Colorful Brick Topping
This is where the magic happens and the blocks come to life.
- – Candy Melts: Also known as candy wafers or melting chocolate. You will need bags of primary colors: Red, Blue, Green, and Yellow. Candy melts are formulated to melt smoothly and set up hard at room temperature, making them far superior to standard white chocolate chips and food coloring (which can easily seize).
- – M&M Candies (or similar chocolate candies): You will need to sort these by color to match your candy melts. These act as the “studs” or “pegs” on top of the Lego brick. Buy the standard size, not the mini or peanut ones, for the best visual proportion.
- – Coconut Oil or Shortening (Optional): If your candy melts are a bit thick or older, a tiny teaspoon of coconut oil can help thin them out to a perfectly smooth, glazy consistency.
Step-by-Step Instructions
Creating these treats involves a simple three-phase process: making the base, shaping the bricks, and applying the colorful decorations. Follow these steps for flawless execution.
Phase 1: Making the Perfect Cereal Base
- Preparation: Begin by generously greasing a 9×13 inch baking dish with butter or non-stick cooking spray. Alternatively, line the pan with parchment paper, leaving an overhang on the sides for easy removal later.
- Melt the Butter: In a large, heavy-bottomed pot or Dutch oven, melt the unsalted butter over medium-low heat. Do not rush this step; you want to melt it gently without browning it (unless you are specifically going for a browned-butter flavor profile).
- Melt the Marshmallows: Once the butter is completely melted, add the entire bag of fresh miniature marshmallows. Stir continuously with a silicone spatula. Keep the heat on low. The secret to soft treats is melting the marshmallows gently. As soon as they are about 90% melted, remove the pot from the heat. The residual heat will melt the rest.
- Flavor the Mixture: Stir in the vanilla extract and the pinch of salt until well combined and smooth.
- Add the Cereal: Pour the crispy rice cereal into the marshmallow mixture. Gently fold the mixture together using your spatula until every single piece of cereal is evenly coated with the sticky marshmallow goodness.
- Press into the Pan: Transfer the mixture into your prepared baking dish. Here is the most important tip: do not pack the cereal down tightly. Use a piece of wax paper or buttered fingers to very gently press the mixture into an even layer. Pressing too hard compresses the cereal and results in dense, hard squares. Let the pan sit at room temperature for about 30 to 45 minutes to set.
Phase 2: Cutting and Prepping the Bricks
- Remove from Pan: Once the base has cooled and set, use the parchment paper overhang to lift the entire block of Rice Krispies out of the pan and onto a large cutting board.
- Measure and Cut: To make them look like authentic building blocks, you want distinct rectangles. Using a sharp chef’s knife, trim off the rounded edges of the entire block to create perfectly straight sides (chef’s treat!). Then, cut the remaining block into uniform rectangles, approximately 2 inches wide by 3 inches long. This size perfectly accommodates the six M&M “studs” needed for a standard brick look.
Phase 3: Decorating the Building Blocks
- Prepare Your Workspace: Lay out a large sheet of wax paper or parchment paper on your counter. Sort your M&Ms into bowls by color (red, blue, green, yellow).
- Melt the Candy Coating: Work with one color at a time. Place about 1 cup of candy melts into a microwave-safe bowl. Microwave at 50% power for 30 seconds. Stir well. Repeat in 15-second intervals, stirring vigorously after each, until the candy is completely melted and smooth. If it seems too thick, stir in 1/2 teaspoon of coconut oil or vegetable shortening until smooth.
- Frost the Bricks: Dip the top surface of a Rice Krispie rectangle directly into the melted candy coating, or use an offset spatula to spread a generous, even layer of the colored coating over the top. Make sure it goes right to the edges for a clean look. Place the frosted treat onto the wax paper.
- Add the Studs: While the candy coating is still wet and melted, immediately place six M&Ms of the corresponding color onto the top, arranging them in two rows of three. Ensure the “M” logo is facing down so you just see the smooth candy shell.
- Repeat and Set: Repeat the melting and decorating process for all remaining colors and cereal rectangles. Allow the finished treats to sit at room temperature for about 20 to 30 minutes until the candy coating is completely hardened and set.
Expert Tips for Perfect Treats Every Time
Making Rice Krispie treats is generally foolproof, but these professional tips will elevate your results from good to exceptional.
The Freshness Rule: We cannot stress this enough: use a brand new, unopened bag of marshmallows. Marshmallows that have been sitting in your pantry for months have dried out. They will melt into a stiff paste rather than a fluffy cloud, ruining the texture of your treats.
Avoid the Refrigerator: Do not put your treats in the refrigerator to speed up the setting process. The cold air will draw moisture out of the treats, making them hard and crunchy in a bad way. Always let them set at room temperature.
Troubleshooting Candy Melts: Candy melts are notoriously sensitive to water. Even a single drop of water in your bowl or on your spatula will cause the entire batch of candy melts to seize up and turn into a crumbly, unworkable mess. Ensure all equipment is bone dry. Additionally, overheating causes seizing. Low and slow in the microwave is the golden rule.
Exciting Variations to Try
Once you master the basic Lego Rice Krispie Treat, you can adapt the recipe to suit different tastes and themes.
- – Browned Butter Base: For a more sophisticated flavor profile that adults will rave about, brown the butter before adding the marshmallows. The nutty, caramelized flavor of browned butter pairs incredibly well with the sweetness of the candy coating.
- – Fruity Cereal Blocks: Substitute half or all of the Rice Krispies with a fruity puffed cereal (like Fruity Pebbles) for an explosion of flavor and an even more colorful interior when bitten into.
- – Pastel Blocks: If you are throwing a pastel-themed party or a baby shower, use pastel candy melts and pastel-colored chocolate candies to create a softer, delicate aesthetic.
- – Chocolate Base: Use Cocoa Krispies and a handful of mini chocolate chips folded into the marshmallow mixture for the chocolate lovers in your life.
Serving Suggestions and Display Ideas
Presentation is key when dealing with highly themed food. As mentioned earlier, stacking the treats like actual building blocks on a platter is a fantastic visual. You can also place each treat inside a colorful cupcake liner to keep sticky fingers clean and make them easy to grab.
For an interactive dessert station, consider placing the plain, cut Rice Krispie rectangles on a platter alongside bowls of warm, melted candy coating and dishes sorted with colored M&Ms. Let the older children (with adult supervision) “paint” and build their own custom Lego blocks. It acts as both an activity and a party favor.
Storage and Make-Ahead Guidelines
These treats are incredibly convenient because they can easily be made ahead of time. Store the fully decorated and set Lego Rice Krispie Treats in an airtight container at room temperature. Use sheets of wax paper between the layers to prevent the bottoms from sticking to the tops of the treats below them. They will stay soft and fresh for up to 3 days.
If you need to make them further in advance, you can freeze them. Wrap each individual treat tightly in plastic wrap, then place them all in a large zip-top freezer bag. They can be frozen for up to 6 weeks. To thaw, simply take them out of the freezer and let them sit at room temperature for an hour before serving.
Frequently Asked Questions (FAQ)
Can I use food coloring to dye white chocolate chips instead of buying candy melts?
It is highly recommended to use pre-colored candy melts. Standard liquid food coloring is water-based and will immediately cause melted white chocolate to seize and clump. If you must color your own white chocolate, you must use specialized oil-based candy colors.
Why are my Rice Krispie treats so hard?
The three main culprits for hard treats are: using stale marshmallows, cooking the marshmallow/butter mixture over heat that is too high, or packing the cereal mixture into the pan too tightly. Gentle heat and gentle pressing are the secrets to soft treats.
Can I use large marshmallows instead of mini?
Yes, you can substitute large marshmallows, but they take significantly longer to melt. You will need to chop them up or stir very patiently over low heat to ensure they melt without burning or overheating.
Conclusion
Lego Rice Krispie Treats are the ultimate combination of edible art and delicious comfort food. They bring an undeniable element of fun to any gathering and are surprisingly simple to execute with precision. By following the tips regarding fresh ingredients, gentle marshmallow melting, and careful candy coating application, you will create a stunning batch of edible building blocks that look just as amazing as they taste. Prepare to amaze your guests, delight the children, and bring a little bit of playful magic into your kitchen.
Lego Rice Krispie Treats
Ingredients
Equipment
Method
- Grease a 9×13 inch baking pan or line it with parchment paper.
- In a large pot, melt the butter over medium-low heat. Add the fresh marshmallows and stir continuously until completely melted and smooth. Remove from heat immediately.
- Stir in the vanilla extract and a pinch of salt.
- Add the crispy rice cereal and fold gently until all the cereal is evenly coated with the marshmallow mixture.
- Transfer the mixture to the prepared baking pan. Using a buttered spatula or wax paper, gently press the mixture into an even layer. Do not pack it down tightly. Let set at room temperature for 30 minutes.
- Remove the set cereal block from the pan. Trim the edges to make them straight, then cut the block into uniform 2×3 inch rectangles.
- Melt one color of candy melts in a microwave-safe bowl at 50% power in 30-second increments, stirring until smooth. Add a tiny bit of coconut oil if the mixture is too thick.
- Spread an even layer of the melted candy coating over the top of a Rice Krispie rectangle.
- Immediately place 6 M&M candies of the matching color onto the wet coating in two rows of three, with the ‘M’ facing down.
- Repeat with the remaining colors and treats. Let sit at room temperature for 20 minutes until the candy coating is fully hardened.