Kiwi Grape Fruit Turtles
Create Adorable Kiwi & Grape Fruit Turtles: The Ultimate Guide to Kid-Friendly Fruit Plating
Getting kids to eat fruit can be an ongoing battle for many parents. We dream of our little ones happily munching on nature’s candy, but often, they gravitate towards processed snacks with flashy packaging. If you’re tired of making fruit-filled promises that go unfulfilled, it’s time to bring a bit of creative magic to the snack table. Enter the Adorable Kiwi & Grape Fruit Turtles, a delightful fusion of simple ingredients and charming food art that turns healthy eating into a playful adventure. These tiny, edible creatures are more than just a snack; they are a visual feast that proves getting kids excited about fruit is possible, and surprisingly easy.
This recipe transforms ripe, green kiwi and plump green grapes into whimsical turtles that look almost too cute to eat. No complex culinary skills are required—just a steady hand, a sharp knife, and a few minutes of your time. Imagine the pure joy on your children’s faces when they discover these edible companions waiting for them at playdates, school lunches, or as an afternoon surprise. They are perfect for themed parties, preschool celebrations, or simply making a mundane afternoon feel special. Let’s explore the simple steps to creating your own fleet of fruitful turtles and delve into the fascinating world of cute food plating for kids.
Why You Will Love This Creative Fruit Recipe
There are countless reasons to add these Kiwi & Grape Fruit Turtles to your regular snack rotation. Firstly, they are incredibly simple to make, making them an ideal last-minute snack solution for busy parents. Secondly, the visual appeal is unmatched. Kids are naturally drawn to cute and playful food designs, making these turtles irresistible. Thirdly, they are made with just a few wholesome, natural ingredients, ensuring your little ones are getting essential vitamins and fiber without any added sugars or preservatives. Fourthly, they can be made ahead of time and easily transported, making them a practical choice for on-the-go snacking. Fifthly, the customizability is endless, allowing you to tailor the turtles to your children’s preferences and get creative with different fruits. Finally, making these turtles is a fun activity that you can even involve your kids in, fostering their creativity and a positive relationship with healthy food. So grab your fruit and get ready to create some healthy edible fun!
The Art of Cute Food Plating: How Creative Design Encourages Healthy Eating
Cute food art is not just about aesthetic appeal; it’s a powerful tool for encouraging children to try new foods and make healthier choices. When we present food in a fun, playful, and visually appealing manner, we tap into a child’s natural curiosity and sense of adventure. It moves food from being just sustenance to being a form of entertainment. This creative approach to plating can break down barriers and reduce food resistance. Instead of viewing fruit as something they *should* eat, kids see it as something they *want* to eat. This positive reinforcement creates a more enjoyable mealtime experience for everyone involved and can foster a long-term appreciation for fresh produce. The key is simplicity and recognizability. When a child can easily identify a familiar and pleasing shape, they are more likely to engage with the food. These turtles are the perfect example, transforming familiar fruits into a universally beloved animal in a few easy steps. By focusing on simple, recognizable, and appealing designs, you can transform ordinary healthy foods into extraordinary culinary creations that kids will love.
Pro Tips for Success in Making Fruit Turtles
To ensure your fruit turtles turn out perfectly and look their absolute best, keep these expert tips in mind. Firstly, select ripe but still firm kiwi for the shells. Soft kiwi can be difficult to slice evenly and might not hold the turtle shape well. Secondly, choose large, firm, and seedless green grapes for the bodies and limbs. Firmer grapes are easier to cut and arrange, and large ones will create a more proportional turtle. Thirdly, invest in a very sharp paring knife. This is crucial for making clean, precise cuts in both the kiwi and grapes without crushing the fruit. Fourthly, get creative with the ‘eyes’! While black icing gel works well, you can also use small melted chocolate dots, edible markers, or even tiny pieces of dark fruit for a more natural look. Experiment to find your preferred method. Fifthly, work in batches. Breading and arranging each turtle takes time, so focus on creating a few at once for efficiency. Finally, use a dark-colored plate for plating. The vibrant green of the kiwi and grapes will pop against a dark background, making your fruit turtles truly stand out. With these simple tips, you’ll be well on your way to creating stunningly cute and delicious fruit turtles that your kids will adore.
Ingredients:
- 2-3 ripe kiwi fruit
- 1 pound large green seedless grapes
- Black icing gel or melted chocolate (for eyes)
Step-by-Step Instructions:
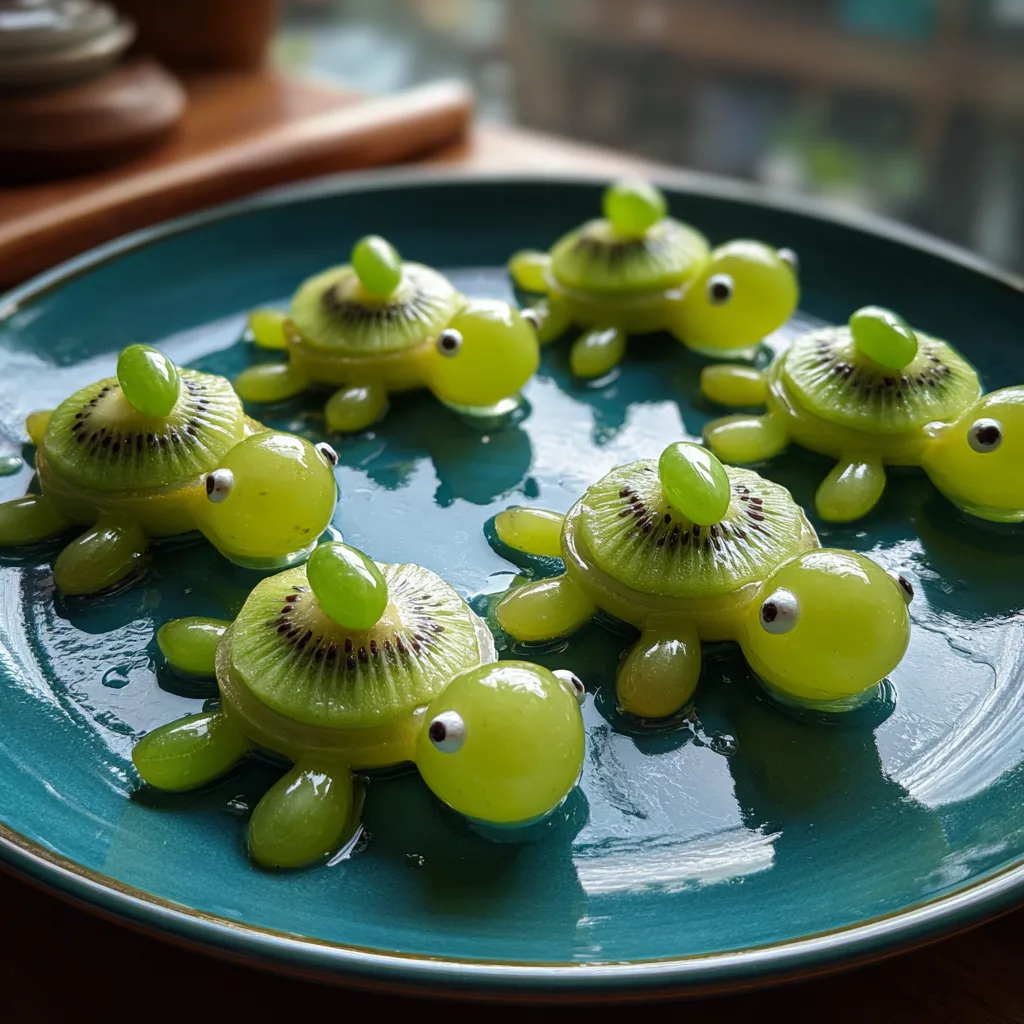
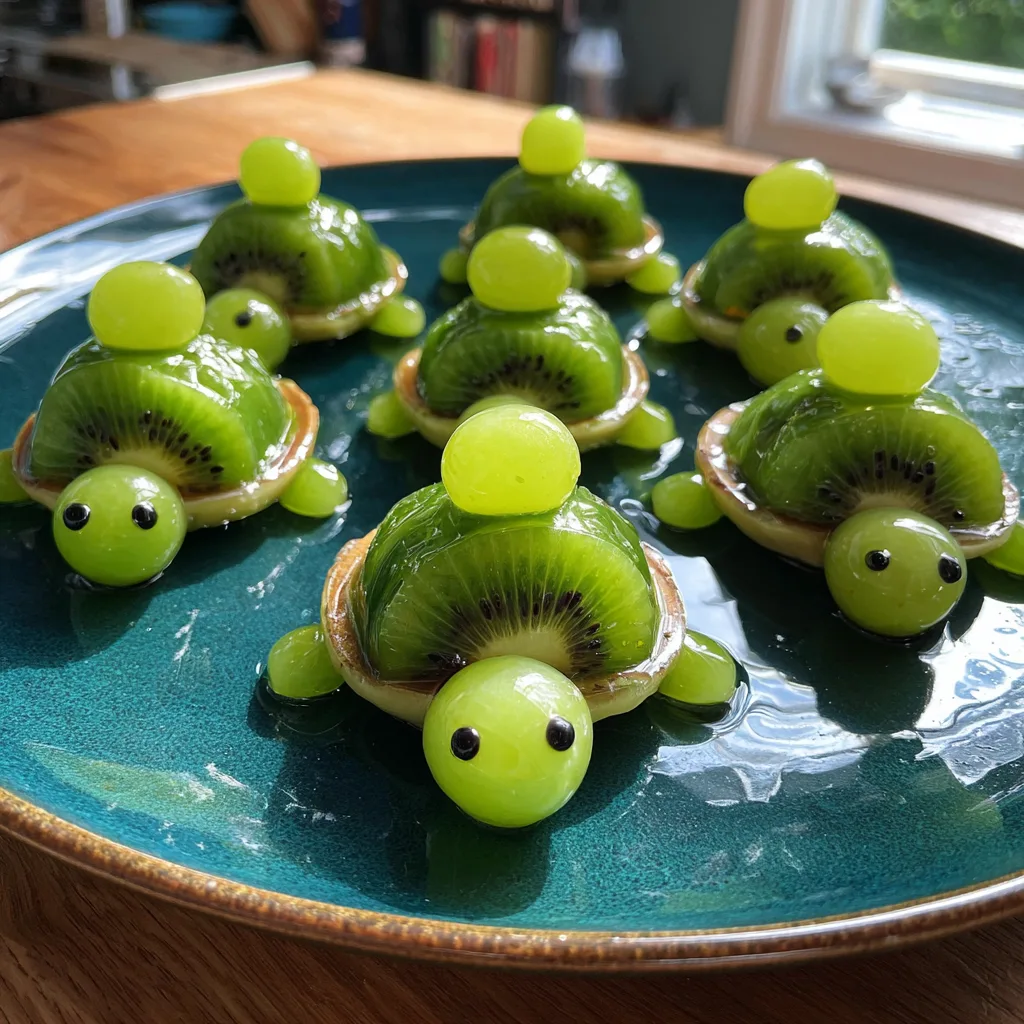
- Begin by preparing the kiwi shells. Use a sharp knife to carefully peel the kiwi fruit, removing the fuzzy skin while keeping the flesh intact. Slice the peeled kiwi horizontally into 1/4-inch thick rounds. Each kiwi should produce 3-4 perfect shells. Place the kiwi slices on a cutting board.
- Next, prepare the grapes for the heads and limbs. Keep a few large grapes whole to serve as heads. For the limbs and tail, carefully slice the remaining large grapes in half lengthwise. You will need four grape halves for each turtle (two for the front legs, two for the back legs) and an additional grape half to serve as the small tail.
- Assemble the turtles. Place one kiwi slice flat on your serving plate to create the turtle’s shell. Positioning a whole grape at the top of the shell will create the head. Carefully arrange four grape halves, two at the front and two at the back of the shell, with the cut sides down, to form the four legs. Place a final grape half at the bottom of the shell for the tail.
- Add the finishing touch: the eyes. Using the black icing gel or melted chocolate in a small piping bag, carefully pipe two small dots onto the front of each whole grape to create a pair of eyes. This simple step adds instant character and brings your fruit turtles to life.
- Serve immediately. These fruit turtles are best enjoyed fresh, but they can be carefully covered and refrigerated for up to 24 hours. Enjoy creating and serving these adorable, healthy snacks that are sure to delight kids and adults alike!
Creative Variations for More Fruitful Fun
While the classic kiwi and grape combination is undeniably charming, you can easily customize this recipe to explore a variety of delicious and visually distinct variations. For a colorful twist, experiment with different colors of grapes, such as red or black grapes, for the heads and limbs. This creates a more diverse fleet of fruit turtles and can expose your children to different grape varieties. For the ‘eyes’, instead of icing gel, try using small melted chocolate dots, edible markers, or even tiny pieces of dark dried fruit like raisins or currants. These natural alternatives offer a different look and a hint of sweetness. For an extra layer of visual interest, you could add small flower sprinkles to the turtle shells to mimic patterned shell details. This adds a unique touch that kids will love. To make a larger-scale fruit plating, create a whole pond scene by scattering numerous fruit turtles on a larger platter with other ‘pond’ elements made from fruit, such as blueberry ‘pebbles’ and strawberry ‘lily pads’. By thinking outside the box and experimenting with different fruits and details, you can create a truly unique and memorable fruit plating experience that is both healthy and fun.
Serving Suggestions for Fruit Turtles
The versatility of these fruit turtles extends far beyond just an afternoon snack, making them a fantastic addition to various occasions. Firstly, they make for an unforgettable and healthy kid’s party food. Imagine a large platter of these turtles as the centerpiece of a nature-themed birthday celebration or a casual pool party. Secondly, they are a practical and fun choice for school lunches. Pack a few turtles in a small, well-sealed container for a surprise treat that your child will look forward to. Thirdly, they are perfect for playdates. Serve them to a group of children for a interactive snack time that encourages social engagement and healthy eating. Finally, they can be served as a special breakfast or brunch dish. Arrange a few turtles on a pancake or waffle ‘island’ for a playful and wholesome start to the day. No matter the occasion, these Kiwi & Grape Fruit Turtles are a charming and delicious way to bring some creative fruit plating into your children’s lives. We hope these serving suggestions inspire you to incorporate these adorable turtles into your family’s meals and celebrations in new and exciting ways!
Nutritional Benefits from Every Turtle
Beyond their charming appearance, these Kiwi & Grape Fruit Turtles pack a impressive nutritional punch, ensuring your kids are getting wholesome, natural ingredients with every single bite. Kiwi is a nutritional powerhouse, renowned for its extremely high vitamin C content, which supports a healthy immune system and collagen production. It is also an excellent source of dietary fiber, promoting healthy digestion, and contains essential vitamins and minerals like vitamin K, vitamin E, and potassium. Green grapes are another healthy choice, offering a host of beneficial nutrients. They are rich in antioxidants, including resveratrol, which are associated with various health benefits. Grapes also provide essential vitamins like vitamin C and vitamin K and are a good source of natural energy in the form of simple sugars. Together, kiwi and grapes provide a synergistic blend of nutrients that support overall health and well-being. By choosing these fruit turtles over processed snacks, you’re not just giving your kids a treat that they’ll love; you’re providing them with a wholesome, nutritious option that you can feel good about serving. Enjoy the peace of mind that comes from offering your children a truly healthy and delightful snack with every fleet of fruitful turtles you create.
The Evolution of Cute Food: A Brief Culinary Context
The concept of creating cute and playful food designs is not a recent phenomenon; it has a long and interesting history that spans across cultures and continents. One of the most famous examples of cute food is the Japanese tradition of Baka, or character-themed lunchboxes, which originated in the early 20th century. These meticulously arranged lunchboxes often feature popular cartoon characters and animals made from rice, vegetables, and other ingredients, demonstrating the enduring appeal of visual storytelling in food. In Western cultures, the practice of creating cute food art, sometimes called “food plating for kids” or “edible crafts,” has gained popularity in recent decades, driven by a growing awareness of the importance of making healthy food appealing to children. These creations are often shared and celebrated on social media platforms, inspiring a whole new generation of home cooks to get creative with their plating. The rise of food art can be seen as a reflection of our evolving relationship with food, moving beyond simple sustenance to being a means of creative expression and social connection. Ultimately, cute food is a testament to the fact that we can infuse joy, creativity, and visual delight into our everyday meals, making healthy eating a more enjoyable and engaging experience for everyone.
Frequently Asked Questions
Q: My kiwi slices are too soft to hold their shape. What can I do?
A: Make sure to select kiwi that are still slightly firm to the touch. Avoid overly soft kiwi. If your slices are still too soft, you can try chilling the peeled kiwi in the freezer for about 10-15 minutes before slicing to make them easier to handle.
Q: My child doesn’t like kiwi. Can I use a different fruit for the shells?
A: Absolutely! You can get creative with different fruits for the shell. Try using thin apple slices (peeled or unpeeled), small watermelon wedges, or even a thick slice of banana (brush with lemon juice to prevent browning). Experiment with different fruits to find your child’s favorites!
Q: Can I make these fruit turtles ahead of time?
A: Yes, you can assemble the turtles and add the eyes ahead of time. Place them on a platter and cover them tightly with plastic wrap before refrigerating. They can be stored for up to 24 hours, but they are best served as fresh as possible for optimal flavor and texture.
Conclusion: Making Healthy Eating Fun and Fabulous
Creating these Kiwi & Grape Fruit Turtles is a simple yet impactful way to bring a touch of playful creativity and visual delight to your children’s snack time. It demonstrates that healthy eating doesn’t have to be a battle; with a bit of imagination and a few wholesome ingredients, you can transform ordinary fruit into an edible adventure that kids will love. By embracing the power of cute food art, you’re not just providing a nutritious snack; you’re fostering a positive relationship with fresh produce and creating mealtimes that are both healthy and fun. So the next time you’re faced with the challenge of getting your little ones to eat their fruit, remember the magic of these adorable turtles. Let them inspire you to get creative with your plating and turn healthy food into a source of playful joy. Enjoy the process of creating and serving these delightful turtles, and savor the happy faces of your children as they discover the delicious and fabulous world of fruitful fun!
Adorable Kiwi & Grape Fruit Turtles
Ingredients
Equipment
Method
- Slice peeled kiwi into 1/4-inch thick rounds for shells. Place one slice on the serving plate.
- Position one whole grape at the top of the kiwi slice for the head.
- Cut grape halves for legs and tail. Arrange four halves (two front, two back) for limbs and one half at the bottom for the tail.
- Carefully pipe two small dots onto each whole grape head using black icing gel or melted chocolate to create eyes.
- Repeat steps 1-4 for all remaining fruit, carefully arranging the completed turtles. Serve immediately or refrigerate for up to 24 hours.