Homemade Orange Candy
Classic Homemade Orange Candy: A Burst of Sunshine in Every Bite
There is something incredibly nostalgic about the taste of orange candy. For many of us, it brings back memories of visiting grandparents, holiday gift tins, or the simple joy of a sweet citrus treat on a warm afternoon. However, the store-bought versions often pale in comparison to the real thing. Mass-produced gummies can be overly waxy, packed with artificial flavors, and lacking that zesty punch of real fruit. That is why this Classic Homemade Orange Candy recipe is a game-changer. It combines the vibrant, tangy flavor of fresh oranges with a texture that walks the perfect line between a soft gummy and a firm jelly (reminiscent of high-end French Pâte de Fruit).
Making candy at home might sound intimidating, invoking fears of thermometers and sugar burns, but this recipe is surprisingly accessible. It relies on the natural setting power of gelatin (or pectin, if you prefer) and the brightness of fresh citrus juice. The result is a translucent, glowing, jewel-like treat that looks beautiful and tastes even better. Whether you coat them in sparkling sugar for a crunchy exterior or leave them smooth and glossy, these orange slices are pure happiness on a plate.
Why This Recipe is Worth the Effort
First and foremost, the flavor intensity is unmatched. Because we are using real fruit juice and zest, the candy bursts with authentic citrus notes that artificial flavorings just can’t replicate. It’s sweet, tart, and aromatic all at once.
Secondly, you have complete control over the ingredients. You can adjust the sugar levels, skip the corn syrup found in commercial brands, and ensure there are no unpronounceable preservatives. It is a fantastic option for parents looking for a cleaner alternative to fruit snacks for their kids.
Finally, these candies make for stunning gifts. Wrapped in clear cellophane or packed into a mason jar, they look like artisanal confectioneries bought from a boutique shop. They are perfect for Christmas, Easter, or just as a thoughtful “thinking of you” gift.
Ingredients Checklist
To achieve that perfect translucent look and firm yet chewy texture, you need precise measurements of the following ingredients:
The Candy Base
- Freshly Squeezed Orange Juice: 1 ½ cups (approx. 4-5 large oranges). Do not use concentrate; the natural pectin and acidity in fresh juice are vital for the flavor profile.
- Granulated Sugar: 2 cups. This provides the structure and sweetness.
- Unflavored Gelatin Powder: 4 tablespoons (approx. 4 packets). This is the setting agent that gives the candy its chew.
- Water: ½ cup (cold). Used to bloom the gelatin.
- Lemon Juice: 2 tablespoons. The acidity helps balance the sweetness and activates the setting properties.
- Orange Zest: 1 tablespoon, finely grated. This adds the essential aromatic oils.
- Corn Syrup or Honey: 2 tablespoons (optional). This helps prevent sugar crystallization, ensuring a smooth texture.
The Coating
- Granulated Sugar or Sanding Sugar: ½ cup. For rolling the finished candies to prevent sticking and add crunch.
- Citric Acid: 1 teaspoon (optional). Mix this with the coating sugar if you want a “sour patch” style kick.

Step-by-Step Instructions
Patience is key here. While the active cooking time is short, the setting time is crucial for the perfect texture.
1. Prepare the Mold
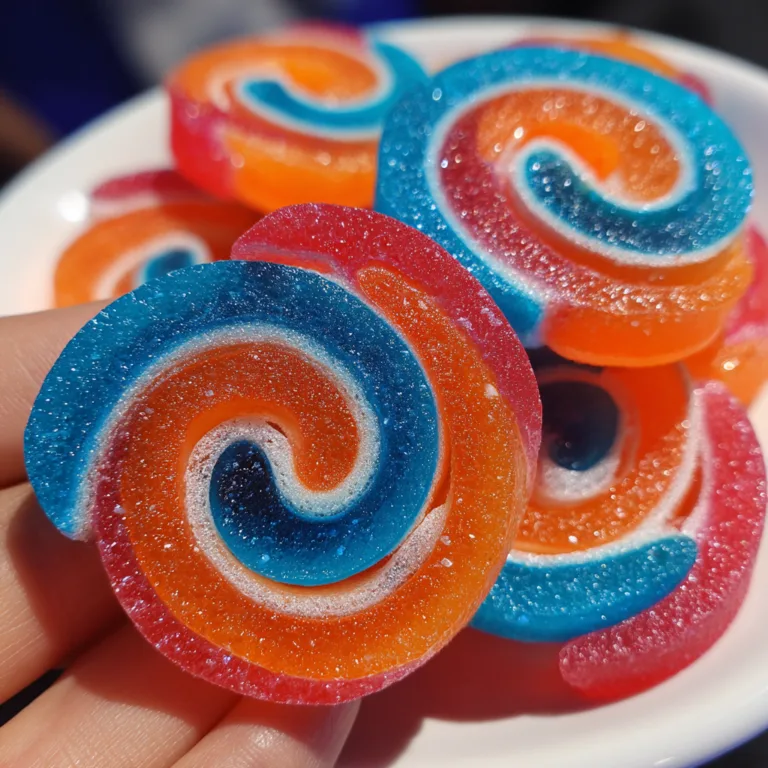
Lightly grease an 8×8 inch square glass baking dish or silicone molds shaped like orange slices (as seen in the photos) with non-stick spray. If using a baking dish, line it with parchment paper leaving an overhang on the sides for easy removal.
2. Bloom the Gelatin
In a small bowl, pour the ½ cup of cold water. Sprinkle the gelatin powder evenly over the surface. Do not dump it in a pile, or the center won’t hydrate. Let it sit for 5-10 minutes until it becomes a firm, rubbery puck. This process is called “blooming.”
3. Simmer the Juice
In a medium saucepan over medium heat, combine the fresh orange juice, lemon juice, orange zest, and granulated sugar. Stir constantly until the sugar has completely dissolved. Bring the mixture to a gentle simmer. If you want a clear candy, you can strain the juice before this step to remove pulp, but keeping the pulp adds a rustic, homemade feel.
4. Combine and Thicken
Once the juice mixture is hot (but not boiling vigorously), add the bloomed gelatin puck and the corn syrup/honey. Whisk gently but thoroughly until the gelatin has completely dissolved. Important: Do not let the mixture boil rapidly once the gelatin is added, as high heat can weaken the gelatin’s setting power. Simmer on low for another 2-3 minutes to slightly reduce and thicken.
5. Pour and Set
Pour the mixture into your prepared mold or baking dish. Tap the dish firmly against the counter a few times to pop any air bubbles trapped in the liquid. Allow it to cool to room temperature, then transfer to the refrigerator. chill for at least 4 to 6 hours, or ideally overnight. The candy needs to be completely firm to the touch.
6. Cut and Coat
Once fully set, lift the candy block out using the parchment paper (or pop out of silicone molds). If you used a square pan, use a sharp knife or cookie cutters to cut into squares or orange slice shapes.
Pro Tip: If the knife sticks, run it under hot water and wipe dry between cuts.
7. The Sugar Toss
Place the extra sugar in a shallow bowl. Toss each candy piece in the sugar until fully coated. This not only adds texture but also prevents the candies from sticking to each other. Place the sugared candies on a wire rack to dry out slightly for an hour before storing.
Tips for Success
Strain for Clarity: If you want your candies to look like polished glass (as shown in some parts of the image), strain your orange juice through a cheesecloth or fine-mesh sieve before cooking. This removes the pulp and results in a crystal-clear jelly.
The “Weeping” Issue: Homemade jellies can sometimes “weep” or release moisture, making the sugar coating wet and sticky. To prevent this, let the cut candies air dry on a wire rack for 24 hours before rolling them in sugar. This creates a slightly dried skin that holds the sugar better.
Use Silicone Molds: For the realistic orange slice shape seen in the photos, Amazon or specialty baking stores sell “citrus slice” silicone molds. These pop out perfectly and require no cutting.
Flavor Boost: If your oranges aren’t very flavorful, you can add ½ teaspoon of orange extract or a drop of orange food grade essential oil to the mixture before pouring.
Variations to Try
Lemon-Lime Drops: Swap the orange juice for a mix of lemon and lime juice. You may need to increase the sugar slightly to balance the higher acidity.
Spicy Orange: Add a pinch of cayenne pepper or chili flakes to the simmering juice. The heat pairs surprisingly well with the sweet citrus, similar to Mexican candy.
Adult Version: Swap ¼ cup of the water for Grand Marnier or Cointreau liqueur. Add it at the very end of the cooking process so the alcohol flavor remains.
Vegan Option: If you cannot use gelatin, you can use Agar Agar powder. Use approximately 2-3 teaspoons of Agar powder for this amount of liquid. Note that Agar sets much harder and has a texture more similar to firm jelly (“yokan”) than chewy gummy bears.
Serving and Gifting Ideas
These candies are beautiful enough to be a centerpiece. Arrange them on a tiered platter for a brunch or tea party. They look like glowing gems when catching the light.
For holiday gifting, pack them in small clear bags tied with orange and green ribbons. Include a handwritten tag with the “consume by” date. They are also excellent toppers for cupcakes or citrus-flavored cakes, acting as an edible garnish that tastes as good as it looks.
Storage Instructions
Room Temperature: Store the coated candies in an airtight container at room temperature for up to 1 week. If it is very humid where you live, they may become sticky faster.
Refrigerator: You can store them in the fridge for up to 3 weeks. However, the sugar coating might melt slightly due to the condensation when you take them out. If storing in the fridge, it is best to store them plain and coat them in sugar right before serving.
Freezing: Freezing is not recommended for gelatin-based candies as it alters the texture, making them rubbery or causing them to break down upon thawing.

Frequently Asked Questions
Why didn’t my candy set?
This usually happens for two reasons: either the gelatin wasn’t bloomed properly (hydrated in cold water first), or the mixture was boiled too vigorously after adding the gelatin, which breaks down the protein bonds. Also, ensure you measured the liquid accurately; too much juice makes for a soft set.
Can I use store-bought orange juice?
Technically, yes, but avoid “low acid” varieties. However, the flavor will lack the brightness of fresh fruit. If using store-bought, try to find a high-quality “not from concentrate” brand.
How do I get the two-tone color look?
To get the look of a rind vs. the flesh, you would need to make two batches: one opaque (mix a little condensed milk or white food coloring into a small portion of the jelly) for the “rind” and pour that into the mold first or last. It is a more advanced technique but looks spectacular.
Conclusion
Making Classic Homemade Orange Candy is a delightful kitchen project that rewards you with a treat far superior to anything you can buy in a bag. The process of transforming simple fruit juice into beautiful, glistening jewels of candy feels almost like magic. Whether you are looking for a project to do with the kids, a unique handmade gift, or just a sweet treat to brighten your day, this recipe delivers sunshine in every bite. So grab a bag of oranges and get squeezing—your tastebuds will thank you!
Classic Homemade Orange Candy
Ingredients
Equipment
Method
- Prepare an 8×8 inch pan by lining with parchment paper and lightly greasing, or grease silicone molds.
- Pour cold water into a small bowl and sprinkle gelatin powder over it. Let stand for 5-10 minutes to bloom.
- In a saucepan, combine orange juice, lemon juice, 2 cups sugar, and zest. Heat over medium, stirring until sugar dissolves.
- Add the bloomed gelatin mass and corn syrup to the hot liquid. Whisk until fully dissolved. Do not boil vigorously.
- Simmer on low for 2-3 minutes to thicken slightly. Pour mixture into prepared molds/pan.
- Refrigerate for at least 4-6 hours until firm and set.
- Remove from mold. If using a pan, cut into squares or shapes with a wet knife.
- Toss sticky candies in the remaining 1/2 cup sugar to coat. Let dry on a wire rack for 1 hour before storing.