Fruity Pebbles Tacos
Fruity Pebbles Cheesecake Tacos: A Rainbow Explosion of Flavor
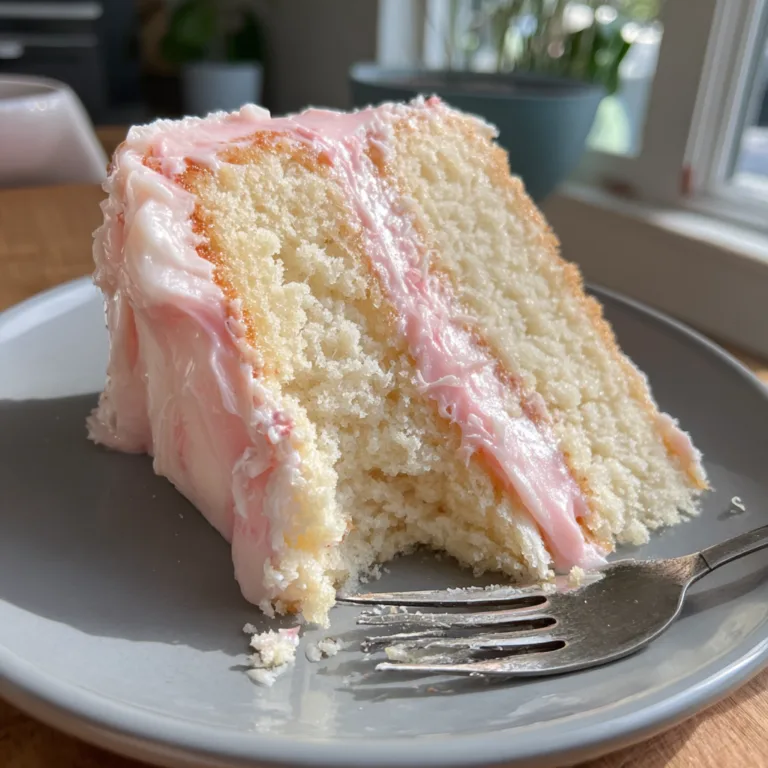
If you are looking for a dessert that screams “fun,” looks absolutely stunning, and tastes like pure childhood nostalgia, look no further than these Fruity Pebbles Cheesecake Tacos. This is not your average taco night recipe. We are taking the classic concept of a cereal treat, molding it into a crunchy, sweet shell, and stuffing it with a velvety, no-bake cheesecake filling that is to die for.
Imagine the chewy, marshmallow-infused crunch of your favorite breakfast cereal, bent into the perfect handheld vessel. Inside, cool, tangy, and sweet cream cheese filling creates the perfect contrast to the sugary shell. Topped with extra sprinkles and cereal bits, these tacos are a textural masterpiece—crispy, gooey, creamy, and fluffy all in one bite.
In this comprehensive guide, we will walk you through exactly how to mold your taco shells so they hold their shape without breaking, how to whip up a cheesecake filling that is stable enough to pipe, and tips for customizing these colorful treats for holidays or birthday parties. Get your mixing bowls ready, because this is one recipe the whole family will want to help make!
Why This Recipe Works
It is rare to find a dessert that is as visually impressive as it is easy to make, but these cheesecake tacos fit the bill perfectly.
- No-Bake Magic: Aside from melting the butter and marshmallows (which takes 5 minutes on the stove or microwave), there is no oven time required. This keeps your kitchen cool and makes for a quick turnaround.
- Textural Contrast: The “shell” is essentially a flattened Rice Krispie treat made with Fruity Pebbles. It offers a dense, chewy crunch. The filling is airy and smooth. Together, they create a satisfying mouthfeel.
- Highly Customizable: While we love the rainbow look of Fruity Pebbles, you can use Cocoa Pebbles for a chocolate version, or even Cinnamon Toast Crunch for a churro-inspired taco.
- Perfect for Parties: These are handheld, mess-free (if eaten quickly!), and look incredible on a dessert platter. They are guaranteed conversation starters.

Ingredients Overview
The beauty of this recipe lies in its simplicity. You likely have most of these ingredients in your pantry already.
For the Cereal Taco Shells
- Fruity Pebbles Cereal: 4 cups. The star of the show. Provides the color, the crunch, and that distinct fruity flavor.
- Mini Marshmallows: 10 oz bag. Use fresh marshmallows for the best melt and stretch. Stale marshmallows will result in hard shells.
- Unsalted Butter: 3 tbsp. This adds richness and helps melt the marshmallows down into a smooth glue.
- Vanilla Extract: 1/2 tsp. Optional, but adds a nice aroma to the shell.
For the Cheesecake Filling
- Cream Cheese: 8 oz (1 block), softened. Full fat works best for structure. Ensure it is at room temperature to avoid lumps.
- Powdered Sugar: 1 cup. Also known as confectioners’ sugar. It dissolves instantly into the cream cheese for a gritty-free texture.
- Heavy Whipping Cream: 1 cup. Cold. This will be whipped to create volume and lightness in the filling.
- Vanilla Extract: 1 tsp. Essential for that classic cheesecake flavor.
- Lemon Juice: 1 tsp (optional). A tiny splash of acid cuts the sweetness and highlights the tang of the cream cheese.
Toppings
- Extra Cereal: For garnishing the top.
- Rainbow Sprinkles/Nonpareils: To add even more color and crunch.
Step-by-Step Instructions
Timing is everything with the shells. Make sure you have your workspace prepped before you melt the marshmallows.
1. Prep Your Molds
You need a way to curve the shells while they cool. You can use a dedicated taco rack, or simply flip a muffin tin upside down and use the spaces between the cups. Alternatively, lay a rolling pin or bottles on a towel and drape the circles over them. Spray your hands and a spatula with non-stick cooking spray.
2. Make the Marshmallow Mixture
In a large pot over low heat, melt the butter. Add the marshmallows and stir constantly until completely melted and smooth. Remove from heat and stir in the vanilla extract.
3. Form the Shells
Immediately pour the Fruity Pebbles into the pot and fold gently until every piece is coated in the marshmallow mixture.
Working quickly while the mixture is warm, scoop about 1/2 cup of the mixture onto a piece of parchment paper. Grease your hands and press the mixture flat into a 4-5 inch circle.
Lift the parchment paper (or just the cereal circle) and drape it over your chosen mold to create a “U” shape. Repeat with remaining mixture. Let them set at room temperature for 20-30 minutes until firm.
4. Whip the Cream
While shells are setting, make the filling. In a medium bowl, whip the cold heavy cream until stiff peaks form. Set aside.
5. Create the Cheesecake Base
In a separate large bowl, beat the softened cream cheese, powdered sugar, vanilla, and lemon juice until smooth and creamy. Do not overbeat, or the mixture can become runny.
6. Fold and Pipe
Gently fold the whipped cream into the cream cheese mixture using a spatula. Keep the mixture light and airy.
Transfer the filling to a piping bag fitted with a large star tip (like a Wilton 1M). This gives those beautiful ridges seen in the photo.
7. Assemble
Once the taco shells are firm and hold their shape, remove them from the molds. Pipe a generous swirl of cheesecake filling into each shell.
Immediately sprinkle with extra Fruity Pebbles and rainbow sprinkles. Serve immediately or chill for 30 minutes.
Tips for Perfect Shapes
Grease is Your Friend: Marshmallow mixture is incredibly sticky. Coat your hands, your spatula, and your parchment paper with a light layer of butter or cooking spray. This makes pressing the circles much easier.
Work While Warm: Once the marshmallow cools, it hardens and becomes impossible to mold. If the mixture gets too stiff in the pot, put it back on low heat for 30 seconds to loosen it up.
Thickness Matters: Don’t press the shells too thin, or they might crack when you pick them up. Don’t leave them too thick, or they will be hard to eat. Aim for about 1/4 to 1/2 inch thickness.
Chill for Stability: If you are serving these on a hot day, chill the finished tacos in the fridge for 20 minutes. The cold firms up the marshmallow shell and the cheesecake filling, making them easier to handle.
Variations to Try
Chocolate Lovers
Swap Fruity Pebbles for Cocoa Pebbles. Add 2 tablespoons of cocoa powder to the cheesecake filling for a double-chocolate taco. Top with chocolate shavings.
Strawberry Shortcake
Use Rice Krispies for the shell. Fold chopped fresh strawberries into the cheesecake filling (or put them on top). Drizzle with strawberry syrup.
S’mores Tacos
Use Golden Grahams cereal for the shell. Fill with a chocolate mousse or chocolate cheesecake filling. Top with mini toasted marshmallows and chocolate sauce.

Storage Instructions
Making Ahead: You can make the shells up to 2 days in advance. Store them in an airtight container at room temperature with parchment paper between them to prevent sticking. Make the filling the day of serving.
Leftovers: Once filled, these tacos are best eaten within 2-4 hours. If you store filled tacos in the fridge, the cereal shell will eventually absorb moisture from the cheesecake and lose its crunch, becoming chewy (though still delicious!). Store in a single layer in an airtight container in the refrigerator for up to 2 days.
Fun Fact
Did you know Fruity Pebbles is one of the oldest cereal brands based on a TV show character? Based on The Flintstones, it has been a breakfast staple since the early 1970s. Using it in desserts brings a retro pop-culture vibe to your table that spans generations!
These Fruity Pebbles Cheesecake Tacos are pure joy on a plate. The vibrant colors make people smile before they even take a bite, and the flavor combination keeps them coming back for more. Enjoy the crunch!
Fruity Pebbles Cheesecake Tacos
Ingredients
Equipment
Method
- Prepare a workspace with parchment paper and grease a muffin tin (upside down) or taco rack to use as molds.
- In a large pot, melt butter over low heat. Add marshmallows and stir until completely melted.
- Remove from heat, stir in vanilla, then immediately fold in Fruity Pebbles until coated.
- With greased hands, press scoops of mixture into 4-5 inch circles on parchment paper.
- Drape circles over your molds to form a taco shape. Let set for 20-30 minutes until firm.
- In a bowl, whip heavy cream until stiff peaks form. Set aside.
- In a large bowl, beat cream cheese, powdered sugar, vanilla, and lemon juice until smooth.
- Gently fold the whipped cream into the cream cheese mixture.
- Transfer filling to a piping bag with a star tip. Pipe into the set taco shells.
- Top with sprinkles and extra cereal. Serve immediately.