Easter Egg Oreo Balls
Easter Egg Oreo Balls: The Ultimate No-Bake Spring Treat
When the vibrant colors of spring begin to bloom and the holiday season approaches, there is nothing quite as delightful as preparing a batch of homemade, beautifully decorated sweets. Among the vast array of seasonal desserts, Easter Egg Oreo Balls stand out as a definitive crowd-pleaser. These bite-sized morsels of joy combine the rich, deeply satisfying crunch of classic chocolate sandwich cookies with the smooth, tangy richness of cream cheese, all enveloped in a perfectly sweet, crisp shell of pastel-colored candy melts. Whether you are hosting a large family gathering, attending a festive potluck, or simply looking for a fun and engaging kitchen activity to share with loved ones, this recipe delivers both spectacular visual appeal and undeniable flavor.
The beauty of this recipe lies in its remarkable simplicity. Unlike complex pastries that require exact measurements, precise oven temperatures, and hours of active labor, these no-bake truffles are incredibly forgiving and accessible to bakers of all skill levels. With just a handful of straightforward ingredients and a bit of chilling time, you can transform everyday pantry staples into an elegant, bakery-worthy confection. In this comprehensive guide, we will walk you through every single step, expert tip, and creative variation you need to master the art of making the perfect Easter Egg Oreo Balls.
Why You Will Fall in Love with These Easter Egg Oreo Balls
There are countless reasons why these delightful treats have become a viral sensation and a holiday staple in households around the world. First and foremost is the unmatched flavor profile. The interior of the truffle is essentially a dense, fudgy, cookies-and-cream cheesecake bite. The slight acidity and creaminess of the cream cheese perfectly balance the intense cocoa flavor and sweetness of the cookies. When this soft, decadent center is paired with the snap of the outer candy coating, it creates a textural contrast that is simply addictive.
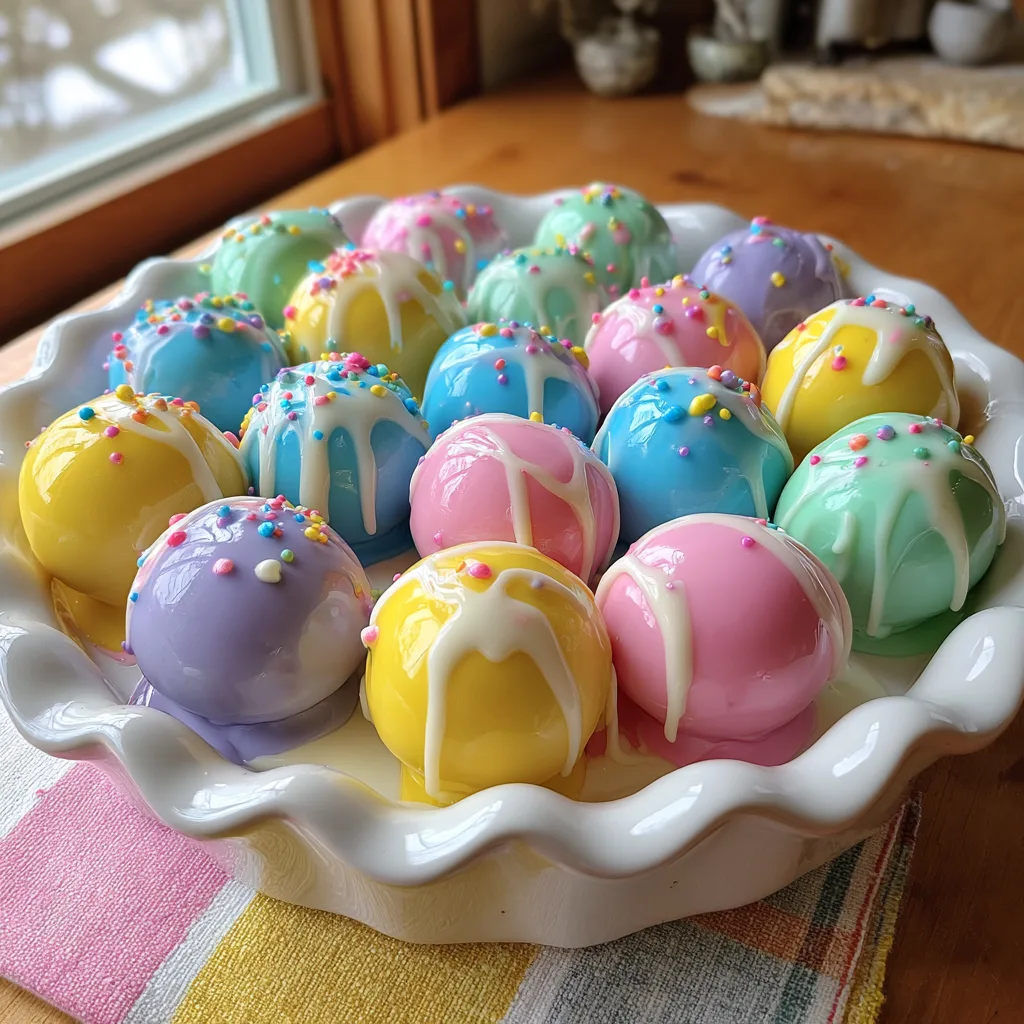
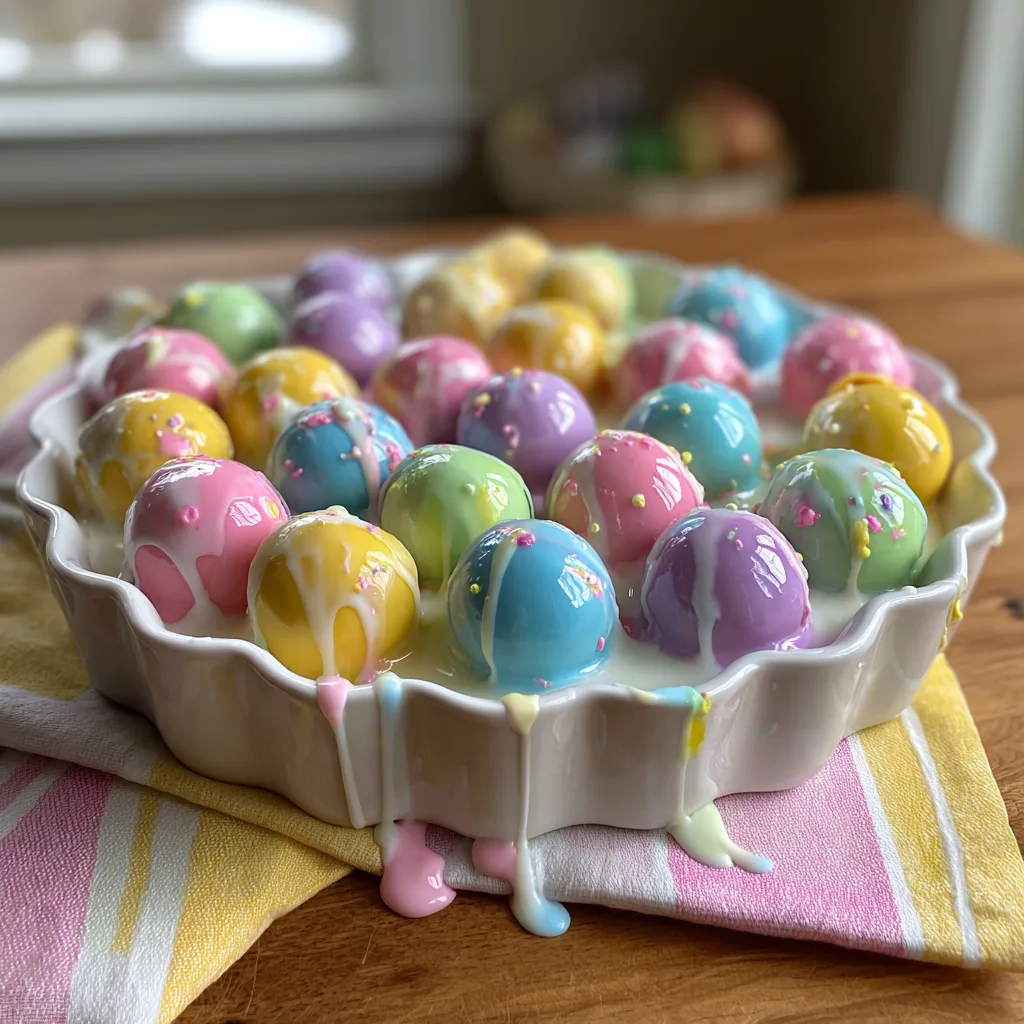
Furthermore, the visual potential of Easter Egg Oreo Balls is limitless. By utilizing an assortment of pastel candy melts—think soft lavenders, baby blues, mint greens, pale yellows, and gentle pinks—you can create a platter that essentially doubles as a festive table centerpiece. The addition of contrasting drizzles and a shower of vibrant spring-themed sprinkles elevates them from simple homemade candies to professional-looking confections. They are entirely customizable to fit any color scheme or party theme you might be planning.
Another significant advantage is their make-ahead nature. During busy holiday preparations, oven space and time are precious commodities. Because these treats require absolutely no baking and actually benefit from being made in advance and stored in the refrigerator, they significantly reduce day-of-event stress. You can prepare them days ahead of time, ensuring you have a spectacular dessert ready to serve the moment your guests arrive.
Ingredients You Need
To create these stunning and delicious spring treats, you will need to gather a few simple ingredients. High-quality components will yield the best tasting and most visually appealing results.
- – 1 standard package (14.3 oz) of classic chocolate sandwich cookies (like Oreos), including the filling
- – 1 block (8 oz) of full-fat cream cheese, softened to room temperature
- – 24 oz of candy melts in assorted pastel spring colors (pink, yellow, light blue, lavender, light green)
- – 4 oz of white chocolate chips or bright white candy melts (for the decorative drizzle)
- – 1 to 2 tablespoons of coconut oil or vegetable shortening (optional, to thin the candy melts for smoother dipping)
- – Assorted rainbow nonpareils or spring-themed sprinkles for decoration
Step-by-Step Instructions
Follow these detailed instructions to achieve perfectly round, beautifully coated Easter Egg Oreo Balls every single time. Patience during the chilling steps is the secret to flawless dipping.
- Prepare the Cookie Crumbs: Place the entire package of chocolate sandwich cookies (do not remove the cream filling) into the bowl of a large food processor. Pulse the cookies on high speed until they are reduced to very fine, uniform crumbs. If you do not have a food processor, you can place the cookies in a heavy-duty zip-top bag and crush them thoroughly with a rolling pin until no large chunks remain.
- Mix the Truffle Dough: Transfer the fine cookie crumbs to a large mixing bowl. Add the softened block of cream cheese. Using a hand mixer on medium speed, or a sturdy wooden spoon, blend the cream cheese and cookie crumbs together until completely combined. The mixture should form a dense, dark, slightly sticky dough that holds together well when squeezed.
- Shape the Balls: Line a large baking sheet with parchment paper or a silicone baking mat. Using a small cookie scoop or a measuring spoon, scoop out roughly 1 tablespoon of the dough. Roll the dough firmly between the palms of your hands to form a smooth, tight sphere. Place the formed ball onto the prepared baking sheet. Repeat this process until all the dough has been used. You should get approximately 36 to 40 balls.
- The First Chill: Place the baking sheet of rolled balls into the freezer for at least 30 minutes, or into the refrigerator for 1 to 2 hours. The balls must be very firm and cold before dipping, otherwise, they will fall apart in the warm candy coating and leave unappealing crumbs in your dipping bowl.
- Melt the Candy Coating: Place each color of your pastel candy melts into separate, deep, microwave-safe bowls. Working with one color at a time, microwave the melts at 50% power for 30 seconds. Stir well. Continue to microwave in 15-second intervals, stirring vigorously after each, until the candy is completely melted, smooth, and glossy. If the melted candy seems too thick, stir in a half-teaspoon of coconut oil or shortening until you reach a thin, easily dippable consistency.
- Dip the Truffles: Remove a few chilled balls from the freezer at a time (keep the rest cold). Drop one ball into the melted coating. Use a fork to gently roll the ball until completely covered. Lift the ball out with the fork, tapping the handle of the fork gently against the side of the bowl to allow all excess coating to drip off. Carefully slide the coated ball back onto the parchment-lined baking sheet using a toothpick to help ease it off the fork. Repeat with the remaining balls and colors.
- Decorate: Once the base coating has fully hardened (this only takes a few minutes), melt the white chocolate or white candy melts in a small bowl or piping bag. Drizzle the white chocolate rapidly back and forth over the tops of the coated balls to create thin, elegant lines. Immediately top with your colorful spring sprinkles before the drizzle sets.
- Final Set: Allow the decorated Easter Egg Oreo Balls to set completely at room temperature or in the refrigerator until the coating is firm to the touch before serving or storing.
Expert Tips for Perfect Oreo Truffles
Creating picture-perfect truffles requires a bit of technique. Here are professional tips to ensure your Easter Egg Oreo Balls look as incredible as they taste.
Temperature Control is Crucial: The most common mistake when making Oreo balls is attempting to dip them while they are too warm. If the centers are soft, they will begin to melt into the hot candy coating, causing your dipping bowl to become a muddy, crumb-filled mess. Always ensure your rolled balls are rock solid before dipping. If you notice them softening while you are working, pause and place them back in the freezer for ten minutes.
Achieving a Smooth Coating: Candy melts can sometimes be stubbornly thick, especially certain brands or colors. For a professional, thin, and snappy shell, you must thin out the melted candy. The addition of a small amount of refined coconut oil or vegetable shortening works miracles. Never use water or water-based food coloring to thin candy melts, as this will cause the chocolate to seize and become an unusable, grainy paste.
The Fork Tapping Method: When removing the truffle from the melted candy, do not scrape the bottom of the fork against the bowl. Instead, hold the fork flat over the bowl and gently tap the handle of the fork with your other hand. The vibration will cause the excess chocolate to sheet off the truffle smoothly, leaving a thin, even coat without a massive “foot” of pooled chocolate at the base once it sets on the parchment paper.
Creative Variations and Customizations
While the classic chocolate cookie and cream cheese combination is legendary, this basic formula serves as an incredible canvas for culinary creativity. You can easily alter the flavor profile to suit different tastes and occasions.
Flavor Infusions: You can dramatically change the taste of your truffles by incorporating extracts into the dough. A half-teaspoon of pure peppermint extract, almond extract, or orange extract mixed in with the cream cheese adds a wonderful, unexpected twist. Alternatively, you can use flavored sandwich cookies—such as golden vanilla cookies, mint chocolate cookies, or even peanut butter filled cookies—in place of the classic chocolate ones.
Alternative Coatings: While pastel candy melts provide the quintessential Easter egg look, you are not limited to them. High-quality dark chocolate, creamy milk chocolate, or pure white chocolate couverture all make exceptional coatings. If you are a fan of sweet and salty combinations, try dipping the balls in milk chocolate and finishing them with a light sprinkle of flaky sea salt instead of sugar sprinkles.
Hidden Surprises: For an extra element of fun, try stuffing the center of each truffle. When rolling the dough, flatten it slightly, place a mini marshmallow, a chocolate chip, or a small hazelnut in the center, and then roll the dough tightly around it. This creates a delightful textural surprise when your guests take a bite.
How to Serve and Store Your Easter Treats
Because these truffles contain fresh, unbaked cream cheese, proper storage is essential for both food safety and maintaining optimal texture.
Easter Egg Oreo Balls must be stored in the refrigerator. Place them in a single layer in a rigid airtight container. If you need to stack them, separate the layers with a sheet of wax paper or parchment paper to prevent them from sticking together or scuffing their shiny coatings. They will remain fresh and delicious in the refrigerator for up to 3 weeks, making them the ultimate make-ahead holiday dessert.
If you wish to store them for longer, they freeze exceptionally well. Place the set and decorated truffles in a freezer-safe container. They can be frozen for up to 2 months. When you are ready to enjoy them, simply transfer the container to the refrigerator overnight to thaw gently. Do not thaw them at room temperature, as rapid temperature changes can cause the candy shell to crack or develop condensation (sweat), ruining their pristine appearance.
When it comes time to serve, arrange them beautifully on a platter. They are best served slightly chilled, straight from the refrigerator, as the contrast between the crisp, cold chocolate shell and the dense, fudgy center is most pronounced at this temperature.
Fun Facts About Oreo Truffles and Easter Desserts
The concept of mixing crushed cookies with cream cheese to create a truffle-like center originated in the early 2000s and quickly spread across early food blogs and community recipe sharing sites. It was a revelation in home baking, proving that you didn’t need a tempering thermometer or expensive couverture chocolate to make a highly addictive, gift-worthy confection.
In the context of Easter, eggs have been a symbol of rebirth and the arrival of spring for centuries. Transforming these popular cookie balls into brightly colored “eggs” is a modern, playful nod to these ancient traditions. The vibrant pastel colors mimic the dyed eggs that children hunt for in the grass, bringing that same sense of joy and discovery to the dessert table.
Frequently Asked Questions
Can I make these dairy-free or vegan? Yes, absolutely. You can substitute the standard cream cheese with a high-quality plant-based cream cheese alternative. Classic Oreos are already incidentally vegan, but always double-check the label. For the coating, you will need to source vegan white chocolate or specific dairy-free candy melts, which are becoming increasingly available in specialty baking stores.
Why did my candy coating crack after it set? Cracking is usually caused by an extreme temperature differential. If your cookie balls were frozen solid and your melted candy was exceptionally hot, the candy shell shrinks rapidly as it cools on the freezing cold center, causing it to fracture. To prevent this, ensure your candy melts are warm and fluid, but not boiling hot, and you can let the frozen balls sit at room temperature for just a few minutes before dipping to take the harsh edge off the cold.
My mixture is too dry and crumbling, what do I do? This usually happens if the cookies weren’t crushed finely enough, or if your cream cheese wasn’t completely softened. If the mixture won’t hold together when squeezed, you can add an additional tablespoon or two of softened cream cheese and mix again until the desired consistency is reached.
Easter Egg Oreo Balls
Ingredients
Equipment
Method
- Crush the entire package of sandwich cookies in a food processor until they are fine crumbs.
- In a large bowl, mix the cookie crumbs and softened cream cheese together until completely combined and a dough forms.
- Scoop out 1 tablespoon portions of dough and roll into smooth balls. Place on a parchment-lined baking sheet.
- Chill the rolled balls in the freezer for 30 minutes, or until very firm.
- Melt the pastel candy melts in separate bowls in the microwave on 50% power in 30-second intervals until smooth. Add a little coconut oil if the mixture is too thick.
- Dip the chilled balls into the melted candy, tapping off the excess, and place back on the parchment paper.
- Melt the white chocolate and drizzle over the top of the coated balls. Immediately top with sprinkles.
- Allow the truffles to set completely until the shell is hard. Store in an airtight container in the refrigerator.