Decadent Flourless Chocolate Cake
🍫 The Ultimate Decadent Flourless Dark Chocolate Torte 🤤
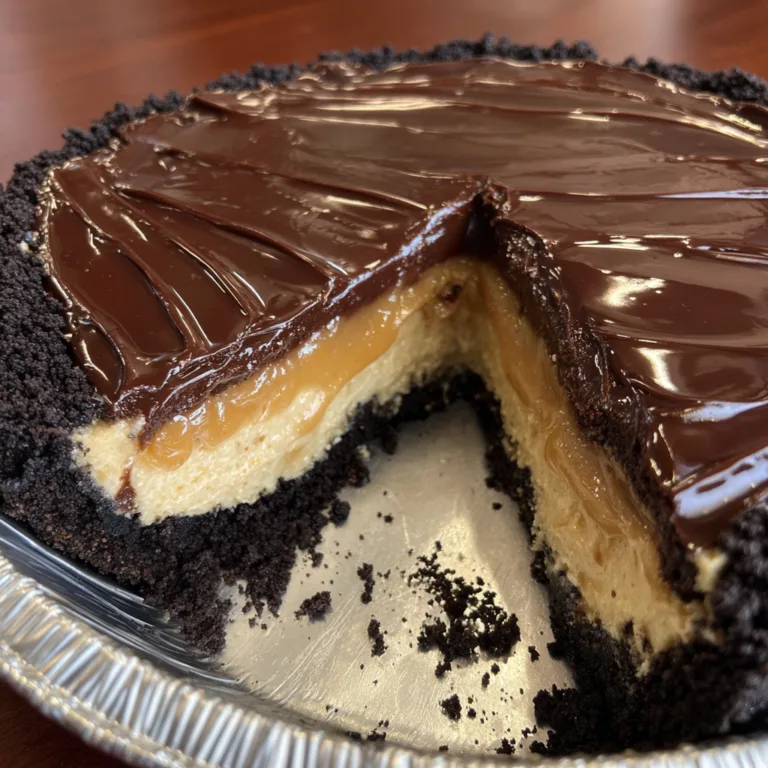
There are moments in life that call for a simple, light dessert, and then there are moments that demand absolute, unadulterated indulgence. When you look at the image of this dense, incredibly fudgy slice of cake covered in a cascading waterfall of glossy ganache, you know exactly which kind of moment we are talking about. This is not your average, airy birthday cake. This is the Ultimate Decadent Flourless Dark Chocolate Torte. It is a masterpiece of texture and flavor, a dessert designed specifically for the true, uncompromising chocolate aficionado.
If you have ever been intimidated by baking elegant, restaurant-quality desserts at home, prepare to have your mind changed. The magic of a flourless chocolate cake lies in its beautiful simplicity. By removing the flour, we eliminate the risk of a dry, crumbly texture, resulting in a dessert that is a glorious cross between a baked chocolate truffle, a dense fudge brownie, and a classic French torte. Furthermore, it is naturally gluten-free, making it a spectacular centerpiece that everyone at your dinner table can enjoy. Today, we are going to dive deep into the alchemy of chocolate, butter, and eggs, and guide you through creating this awe-inspiring, ganache-drenched masterpiece right in your own kitchen.
✨ The Allure of the Flourless Chocolate Cake: A Brief History
To truly appreciate this dessert, we must understand where it comes from. The flourless chocolate cake is a beloved fixture in European pastry traditions, most notably tracing its roots back to the Italian island of Capri. Legend has it that the “Torta Caprese” was born out of a happy accident in the 1920s when a chef preparing a cake for a visiting mobster completely forgot to add the flour. The result was a surprisingly delightful, moist, and incredibly dense cake that became an instant classic.
Over the decades, French and American chefs refined the concept, moving away from the almond meal often used in the Italian version and relying solely on the structural integrity of whipped eggs and high-quality chocolate. This evolution gave birth to the modern flourless chocolate torte we know today—a dessert that unapologetically showcases the raw, complex flavor profile of the cocoa bean without the interference of wheat. It is pure, concentrated joy on a plate.
🍫 The Science of Chocolate: Why Quality is Non-Negotiable
When a recipe has fewer than six ingredients, there is nowhere to hide. The quality of your ingredients will dictate the final outcome of your cake. In a flourless chocolate torte, chocolate is not just a flavoring; it is the entire foundation, structure, and soul of the dessert.
For this recipe, you must step away from the standard chocolate chips found in the baking aisle. Chocolate chips contain stabilizers and less cocoa butter, designed to help them hold their shape in the oven. For a silky, melt-in-your-mouth torte, you need high-quality baking bars or couverture chocolate. You want to look for a cocoa percentage between 60% and 70%. If you go lower, the cake will be overly sweet and lack depth. If you go much higher (like 85%), the cake can become too bitter and chalky, as there isn’t enough sugar and fat to balance the intense cocoa solids. A 65% dark chocolate hits the perfect sweet spot—rich, complex, slightly fruity, and intensely satisfying.

🛠️ Essential Equipment for a Flawless Torte
Before we begin melting and mixing, let’s ensure your kitchen is prepped. Baking a flourless torte is largely about temperature control and gentle mixing.
First, you will need an 8-inch or 9-inch springform pan. Because this cake is so delicate and fudgy, trying to invert it out of a standard cake pan will likely result in a broken cake. A springform pan allows you to gently release the sides without disturbing the beautiful edges. You will also need a double boiler (or a heatproof bowl set over a saucepan of simmering water) to melt your chocolate gently. Direct heat is the enemy of chocolate and can cause it to seize or burn. Finally, a stand mixer or a good hand mixer is crucial for whipping the eggs to the perfect volume, providing the only “lift” this dense cake will get.
🛒 Ingredients: The Building Blocks of Decadence
Gather these premium ingredients to begin your chocolate journey. Make sure your eggs and butter are at room temperature before you start!
For the Flourless Chocolate Cake:
- – 10 ounces (280g) high-quality dark chocolate (60-70% cacao), finely chopped
- – 1 cup (2 sticks / 226g) unsalted butter, cubed
- – 1 cup (200g) granulated sugar
- – 6 large eggs, room temperature
- – 1 teaspoon pure vanilla extract
- – ½ teaspoon espresso powder (optional, but enhances chocolate flavor)
- – ¼ teaspoon fine sea salt
- – ½ cup (50g) unsweetened Dutch-process cocoa powder, sifted
For the Glossy Ganache Glaze:
- – 4 ounces (113g) semi-sweet or dark chocolate, finely chopped
- – ½ cup (120ml) heavy whipping cream
- – 1 tablespoon unsalted butter, softened (for extra shine)
🔢 Instructions: Crafting Your Chocolate Masterpiece
Patience and gentle folding are the keys to success here. Follow these steps to create the ultimate texture.
Ultimate Flourless Dark Chocolate Torte
Ingredients
Equipment
Method
- Preheat oven to 375°F (190°C). Grease an 8 or 9-inch springform pan, line the bottom with parchment, and dust with cocoa powder.
- Melt the 10oz dark chocolate and cubed butter in a double boiler over simmering water until smooth. Stir in espresso powder and let cool slightly.
- In a stand mixer, whip the eggs, sugar, vanilla, and salt on medium-high for 5-8 minutes until pale, thick, and doubled in volume.
- Using a spatula, gently fold the slightly cooled chocolate mixture into the whipped eggs until just combined.
- Sift the cocoa powder over the batter and gently fold until no dry streaks remain.
- Pour batter into the prepared pan. Bake for 25-35 minutes until the edges are set but the center has a slight jiggle. Cool in pan for 15 minutes before releasing.
- For the ganache, place chopped chocolate in a bowl. Heat heavy cream just until simmering, then pour over chocolate. Let sit for 3 minutes, then whisk until smooth. Whisk in the softened butter.
- Let ganache thicken for 5-10 minutes, then pour over the completely cooled cake, allowing it to drip beautifully down the sides.
Notes
- Prepare the Pan and Oven: Preheat your oven to 375°F (190°C). Generously grease an 8-inch or 9-inch springform pan with butter. Line the bottom with a circle of parchment paper, and grease the paper as well. Dust the inside of the pan lightly with cocoa powder, tapping out the excess.
- Melt the Chocolate and Butter: Create a double boiler by setting a large heatproof glass or metal bowl over a saucepan filled with 2 inches of barely simmering water. Ensure the bottom of the bowl does not touch the water. Add the chopped 10 ounces of dark chocolate and the cubed butter to the bowl. Stir occasionally until completely melted, glossy, and smooth. Remove from heat and stir in the espresso powder. Let it cool slightly for about 5-10 minutes.
- Whip the Eggs: In the bowl of a stand mixer fitted with the whisk attachment (or using a hand mixer), combine the 6 large eggs, granulated sugar, vanilla extract, and sea salt. Whip on medium-high speed for about 5 to 8 minutes. The mixture should become pale, thick, and significantly double or triple in volume. This step incorporates the necessary air to lighten the dense chocolate.
- Combine Mixtures: Gently pour the slightly cooled melted chocolate and butter mixture into the whipped eggs. Using a large rubber spatula, very gently fold the mixtures together. Use a scooping motion, bringing the spatula down the side of the bowl and up through the center, turning the bowl as you go. Do not overmix; you want to keep as much air in the eggs as possible.
- Fold in the Cocoa: Sift the Dutch-process cocoa powder over the chocolate and egg mixture. Continue to gently fold until the cocoa powder is completely incorporated and no dry streaks remain.
- Bake the Torte: Pour the batter into the prepared springform pan and smooth the top gently with your spatula. Bake in the preheated oven for 25 to 35 minutes. The cake is done when the edges are set and slightly puffed, but the center still has a slight jiggle to it. It will continue to set as it cools. Do not overbake, or you will lose the fudgy texture!
- Cool Completely: Remove the cake from the oven and place it on a wire rack. Let it cool in the pan for 15 minutes. Then, carefully run a thin knife around the edge of the cake to loosen it, and release the sides of the springform pan. Allow the cake to cool completely on the base before transferring to a serving plate.
- Prepare the Ganache: Place the 4 ounces of finely chopped chocolate in a heatproof bowl. In a small saucepan, heat the heavy cream just until it begins to simmer gently around the edges (do not let it boil). Pour the hot cream over the chopped chocolate. Let it sit undisturbed for 3 to 4 minutes to melt the chocolate. Then, starting from the center, gently whisk the mixture in small circles until it comes together into a dark, smooth emulsion. Whisk in the softened butter until melted and glossy.
- Glaze the Cake: Let the ganache cool for about 5-10 minutes so it thickens slightly. Pour the ganache directly into the center of the completely cooled cake. Use an offset spatula or the back of a spoon to gently push the ganache outward, allowing it to dramatically cascade and drip over the edges of the cake and onto the serving plate.
🌡️ The Secret to the Perfect Ganache Drip
The image showcases a spectacular ganache drip—thick enough to look substantial, yet fluid enough to cascade beautifully. Achieving this requires understanding the ratio of chocolate to cream and controlling the temperature.
A standard glaze is usually a 1:1 ratio (equal parts chocolate and cream by weight). By adding a tablespoon of butter at the end, we give the ganache a luxurious, mirror-like shine that stays glossy even after it sets. The most crucial factor, however, is patience. If you pour the ganache immediately after making it, it will be too hot and thin; it will run straight off the cake and pool entirely on the plate, leaving a transparent layer on top. You must let the ganache sit at room temperature for 5 to 10 minutes until it cools and thickens to the consistency of warm honey. Pour it slowly, and let gravity do the beautiful work for you.
🍷 Pairing Suggestions: Elevating the Experience
Because this flourless dark chocolate torte is intensely rich and boldly flavored, it requires pairings that can either complement its depth or provide a refreshing contrast to cleanse the palate.
For a contrasting pairing, serve your slice with a generous dollop of unsweetened or very lightly sweetened freshly whipped cream. The dairy fat cuts through the intensity of the dark chocolate beautifully. Fresh tart berries, such as raspberries or blackberries, are also a classic accompaniment; their bright acidity wakes up the palate between heavy, fudgy bites.
If you prefer a complementary pairing, beverages are your best friend. A robust, dark roast coffee or a shot of espresso mirrors the bitter notes of the cocoa perfectly. For the wine connoisseurs, skip the dry reds (which will taste metallic next to the chocolate) and opt for a fortified wine like a Ruby Port or a Banyuls. The sweetness and dark fruit notes of the port will harmonize magnificently with the dense chocolate.
🧊 Storage and Serving Secrets
This cake is a marvel of make-ahead baking. In fact, many bakers argue that a flourless chocolate cake tastes even better on the second day, as the flavors have time to meld and deepen.
Once the ganache has fully set, you can cover the cake loosely with a cake dome and store it at room temperature for up to 3 days. If your kitchen is very warm, you can store it in the refrigerator for up to a week. However, this is crucial: never serve this cake cold. Cold temperatures solidify the cocoa butter, turning a fudgy, melt-in-your-mouth torte into a hard, dense brick. If refrigerated, you must let the slices sit at room temperature for at least an hour before serving to restore their luxurious, soft texture.
🎉 Conclusion: A Slice of Pure Joy
Baking the Ultimate Decadent Flourless Dark Chocolate Torte is an act of culinary devotion. It is a testament to the power of high-quality ingredients and careful, loving technique. The result is a dessert that looks like it belongs in the window of a Parisian patisserie, yet it was crafted with your own hands.
From the delicate crackle of the top crust to the intensely fudgy center, and the silky, dramatic cascade of the chocolate ganache drip, every element of this cake is designed to thrill the senses. Whether you are baking for a special anniversary, a holiday gathering, or simply to satisfy a deep, persistent chocolate craving, this recipe will never let you down. So embrace the chocolate, respect the process, and prepare to serve a slice of absolute perfection. Enjoy every single bite!