Croque-monsieur
The Ultimate Tasty Grilled Cheese Chaffle Recipe
Welcome to the ultimate guide to making the most mouth-watering, perfectly crispy, and ridiculously gooey Tasty Grilled Cheese Chaffle you will ever experience. If you have been on a low-carb, keto, or gluten-free journey, you likely already know the struggle of giving up bread. Bread is the ultimate comfort food vehicle, especially when it comes to the classic grilled cheese sandwich. But what if we told you that you do not have to compromise on taste, texture, or that satisfying crunch? Enter the chaffle: the revolutionary cheese and egg waffle that has taken the low-carb community by storm. In this comprehensive recipe guide, we are going to dive deep into the world of chaffles, exploring exactly how to craft the perfect grilled cheese sandwich using this ingenious bread substitute.
What Exactly is a Chaffle?
If you are new to the ketogenic diet or just exploring low-carb alternatives, the word “chaffle” might sound a bit unusual. A chaffle is a brilliant portmanteau of “cheese” and “waffle.” In its most basic, foundational form, a chaffle is made from just two simple ingredients: shredded cheese and eggs. When mixed together and poured into a standard waffle maker or a mini waffle iron, these two humble ingredients magically transform into a crispy, airy, and surprisingly bread-like structure. The cheese crisps up on the hot cast iron or non-stick grates, creating a sturdy exterior, while the egg acts as a binding agent, fluffing up the interior. The result is a perfect, low-carbohydrate canvas for all your favorite sandwich fillings, burgers, and, of course, the classic grilled cheese.
Why You Will Absolutely Love This Keto Grilled Cheese Chaffle
There are countless reasons why this Tasty Grilled Cheese Chaffle will quickly become a staple in your weekly meal rotation. First and foremost is the incredible texture. Traditional keto breads made from almond flour or coconut flour can often be dense, crumbly, or overly heavy. They sometimes carry a noticeable nutty flavor that distracts from the savory fillings. The chaffle, on the other hand, provides a genuinely satisfying crunch that mimics perfectly toasted sourdough or white bread.
Secondly, the flavor profile is exceptional. Because the “bread” itself is made of cheese, you are essentially creating an inside-out and outside-in grilled cheese experience. The savory, slightly salty notes of the chaffle perfectly complement the rich, gooey melted cheese in the center. Furthermore, this recipe is incredibly fast and accessible. You do not need yeast, you do not need to wait for dough to rise, and you do not need complicated baking techniques. From start to finish, you can have a piping hot, comforting grilled cheese sandwich ready in under 15 minutes. It is the perfect solution for busy weeknight dinners, quick weekend lunches, or even a decadent late-night snack.
The Science of the Perfect Melt: Choosing Your Cheeses
A grilled cheese is only as good as the cheese you use. For this specific recipe, we are dealing with two different cheese applications: the cheese used in the chaffle batter, and the cheese used for the filling of the sandwich.
For the chaffle batter itself, finely shredded mozzarella is universally recognized as the gold standard. Mozzarella is a mild, neutral-tasting cheese that melts smoothly and crisps up beautifully without overpowering the palate. It allows the chaffle to act as a true bread substitute rather than a dense block of flavor. You can use mild cheddar for the batter, but it will result in a slightly greasier and distinctly sharper-tasting “bread.”
For the filling, the world is your oyster, but the classics are classic for a reason. To achieve that picture-perfect, Instagram-worthy cheese pull seen in our photos, you need cheeses with high moisture content and excellent melting capabilities. A combination of medium to sharp yellow cheddar and a creamy white cheese like provolone, Monterey Jack, or even more mozzarella is ideal. The cheddar brings the sharp, tangy, comforting flavor we all associate with childhood grilled cheese sandwiches, while the white cheese provides the superior stretch and gooey texture. When these melt together between the hot, crispy chaffle layers, the result is pure culinary bliss.
Essential Equipment for Chaffle Success
You don’t need a professional kitchen to make this recipe, but having the right tools makes the process seamless. The star of the show is, without a doubt, the waffle maker. Most chaffle enthusiasts swear by the mini waffle maker (often referred to by the popular brand name Dash). These miniature irons produce the perfect 4-inch round waffle, which is the exact size of a standard hamburger bun or a perfectly portioned sandwich half. If you only have a large Belgian waffle maker, that works too! You will simply pour the batter into the center of the iron and either eat a massive grilled cheese or cut the large waffle into quarters to form your sandwich halves. Aside from the waffle maker, you will need a small mixing bowl, a fork or whisk to beat the egg, a spatula for carefully removing the hot chaffles, and a standard frying pan or skillet to grill the final sandwich.
Ingredients
- – 1 large egg
- – 1/2 cup finely shredded mozzarella cheese (for the chaffle batter)
- – 1 tablespoon almond flour (optional, but highly recommended for a more bread-like texture)
- – 1/4 teaspoon garlic powder (optional, for flavor)
- – 1 tablespoon butter, room temperature
- – 2 slices sharp cheddar cheese
- – 1 slice provolone or Monterey Jack cheese
Instructions
- Preheat your mini waffle maker. If your waffle maker has temperature controls, set it to medium-high. Let it heat up completely. A properly preheated iron is the secret to a crispy, non-soggy chaffle.
- In a small mixing bowl, crack the large egg and beat it well with a fork until the yolk and white are fully combined and slightly frothy.
- Add the finely shredded mozzarella cheese, the optional almond flour, and the optional garlic powder to the beaten egg. Stir the mixture until all the ingredients are fully incorporated. The batter will be thick and chunky; this is exactly how it should look.
- Once the waffle maker is hot, carefully pour half of the cheese and egg batter onto the center of the lower grid. Close the lid gently.
- Cook the first chaffle for 3 to 4 minutes. Do not open the lid too early, or the chaffle may tear. You will know it is ready when the steam stops billowing out from the sides of the iron and the exterior is a deep, golden brown.
- Carefully remove the finished chaffle using a silicone spatula and place it on a wire cooling rack. This is a crucial step! Letting the chaffle rest on a wire rack allows air to circulate, preventing the bottom from getting soggy and ensuring maximum crispiness.
- Repeat steps 4 and 5 with the remaining half of the batter to create your second chaffle. Place it on the wire rack to cool slightly.
- Now it is time to assemble the sandwich. Take the room-temperature butter and spread a thin, even layer on one side of each chaffle. These buttered sides will face outward, just like making a traditional grilled cheese.
- Place one chaffle, butter-side down, on a clean cutting board or plate. Layer your slices of sharp cheddar and provolone cheese evenly on top of the chaffle. Top with the second chaffle, butter-side up.
- Heat a non-stick skillet or frying pan over medium-low heat. We use a lower heat here to ensure the cheese inside melts completely before the outside of the chaffles burn.
- Carefully transfer the assembled sandwich to the preheated skillet. Cook for 2 to 3 minutes, or until the bottom chaffle is deeply toasted and the cheese inside begins to soften.
- Using a wide spatula, gently flip the sandwich. Cook for an additional 2 to 3 minutes on the other side. If the cheese needs a little more help melting, you can place a lid over the skillet for the last minute of cooking to trap the steam.
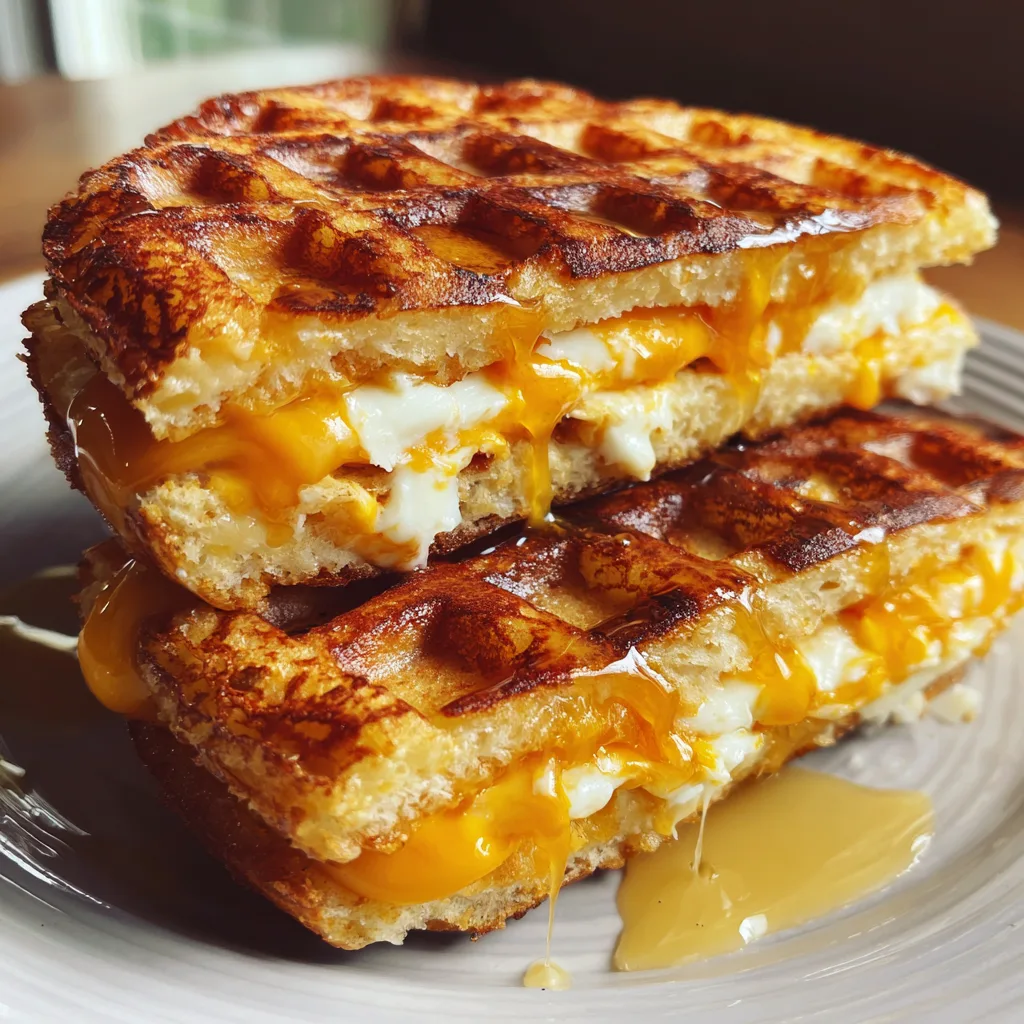
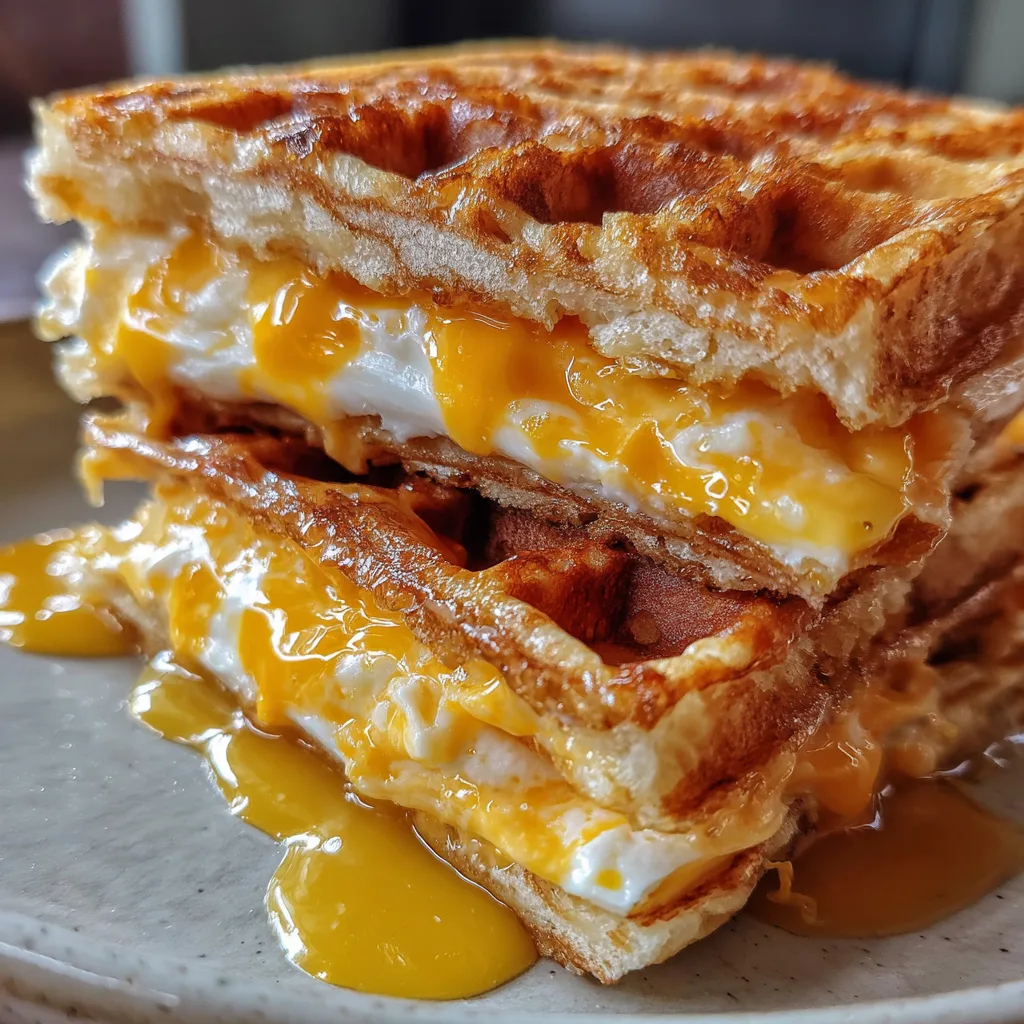
- Remove the perfectly golden, gooey grilled cheese chaffle from the skillet. Let it rest for just one minute before slicing diagonally to reveal the beautiful melted cheese cross-section. Serve immediately and enjoy!
Pro Tips for the Ultimate Chaffle Experience
Mastering the chaffle is easy, but a few pro tips can elevate your keto grilled cheese from good to phenomenal. First, always use freshly grated cheese for your filling if possible. Pre-shredded cheeses in bags are coated with anti-caking agents like potato starch or cellulose. While these keep the cheese from clumping in the bag, they also prevent the cheese from melting smoothly, resulting in a grainy texture. Grating your own block of cheddar or provolone will guarantee that glossy, liquid-glass melt seen in the best food photography.
Second, do not skip the wire rack resting step for the chaffles. When a hot chaffle comes out of the iron and sits directly on a flat plate, the steam gets trapped underneath, turning your perfectly crispy bread substitute into a soggy, limp mess. Just 60 seconds on a wire cooling rack makes a world of difference in the structural integrity of your sandwich.
Fun Variations and Delicious Add-Ins
Once you have mastered the basic Tasty Grilled Cheese Chaffle, the possibilities for customization are truly endless. Think of this recipe as a blank canvas for all your favorite flavor profiles. Here are a few incredible variations to try:
The Bacon Jalapeño Popper Chaffle: Add a tablespoon of diced, pickled jalapeños to the chaffle batter. For the filling, use a combination of cream cheese and sharp cheddar, and add two slices of crispy, thick-cut bacon. It is a spicy, creamy, crunchy delight.
The Italian Caprese Chaffle: Use Italian seasoning in your chaffle batter instead of garlic powder. For the filling, use thick slices of fresh mozzarella, fresh basil leaves, and a thin slice of ripe tomato. Drizzle a tiny bit of balsamic glaze inside before grilling.
The Ultimate Breakfast Chaffle: Turn this into a morning masterpiece by frying an egg over-easy and placing it inside the grilled cheese along with a sausage patty. The runny yolk mixing with the melted cheese is an unforgettable combination.
Storage, Freezing, and Reheating Instructions
One of the best things about chaffles is that they are fantastic for meal prep. You can easily make a large batch of the “bread” chaffles on a Sunday to use for sandwiches throughout the week. If you are storing just the chaffles (not the assembled grilled cheese), let them cool completely on a wire rack. Once cool, place them in an airtight container or a ziplock bag in the refrigerator for up to 5 days. You can place a small piece of parchment paper between them to prevent sticking.
Chaffles also freeze incredibly well. To freeze, flash-freeze the cooled chaffles in a single layer on a baking sheet for 30 minutes, then transfer them to a freezer-safe bag. They will keep in the freezer for up to 3 months. When you are ready to use them, there is no need to thaw! You can pop the frozen chaffles directly into a toaster (just like a frozen waffle) to heat them up and crisp them back to perfection before assembling your grilled cheese and frying it in the skillet.
We do not recommend storing or freezing a fully assembled, cooked grilled cheese sandwich, as reheating it will likely result in a soggy texture. Always store the chaffle “bread” separately and cook the sandwich fresh for the best experience.
Frequently Asked Questions
Does a chaffle taste strongly of eggs? This is a common concern! Because the ratio of cheese is high, and the cheese crisps up so well, the egg flavor is highly masked. If you are very sensitive to the taste of eggs, you can use only egg whites instead of a whole egg, which will result in an even more neutral-tasting bread substitute.
Can I make this dairy-free? A traditional chaffle relies heavily on cheese for its structure. While there are vegan cheeses available on the market that melt, they do not always crisp up in a waffle iron the way dairy cheese does. You can experiment with dairy-free shreds, but the texture and structural integrity may vary significantly from the original recipe.
Why did my chaffle stick to the waffle maker? A perfectly preheated waffle maker is key. Additionally, the cheese itself has enough fat that you usually do not need cooking spray, but if your waffle iron is older or prone to sticking, a very light mist of avocado oil spray before pouring the batter can ensure a clean release.
Enjoying a comforting, warm, and exceptionally cheesy sandwich does not have to be a thing of the past just because you are watching your carbohydrate intake. With this Tasty Grilled Cheese Chaffle recipe, you can indulge in the ultimate comfort food experience while staying perfectly aligned with your health goals. Happy grilling!
Tasty Grilled Cheese Chaffle
Ingredients
Equipment
Method
- Preheat your mini waffle maker. In a small bowl, beat the egg.
- Add 1/2 cup of mozzarella, almond flour, baking powder, and garlic powder to the egg. Mix well.
- Sprinkle a little plain mozzarella directly onto the hot waffle iron. Pour half the batter over it, close, and cook for 3-4 minutes until crispy and golden.
- Remove the first chaffle and let it cool on a wire rack. Repeat the process with the remaining batter to make the second chaffle.
- Place the cheddar and provolone slices between the two cooled chaffles to assemble your sandwich.
- Melt butter in a skillet over medium-low heat. Place the sandwich in the pan and grill slowly for 2-3 minutes per side until the inside cheese is completely melted and gooey.
- Remove from heat, cut in half, and serve immediately.